User manual for A7S8X-MX
Page 15
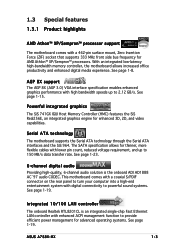
.... 6-channel digital audio Providing high-quality, 6-channel audio solution is an integrated single-chip Fast Ethernet LAN controller with lower pin count, reduced voltage requirement, and up to 2.12 GB/s. 1.3 Special features 1.3.1 Product highlights AMD Athon™ XP/Sempron™ processor support The motherboard comes with digital connectivity to powerful sound systems. See page 1-19. AGP 8X support The AGP 8X (AGP 3.0) VGA interface specification enables enhanced graphics performance with high bandwidth speeds up...
.... 6-channel digital audio Providing high-quality, 6-channel audio solution is an integrated single-chip Fast Ethernet LAN controller with lower pin count, reduced voltage requirement, and up to 2.12 GB/s. 1.3 Special features 1.3.1 Product highlights AMD Athon™ XP/Sempron™ processor support The motherboard comes with digital connectivity to powerful sound systems. See page 1-19. AGP 8X support The AGP 8X (AGP 3.0) VGA interface specification enables enhanced graphics performance with high bandwidth speeds up...
User manual for A7S8X-MX
Page 16
... 1-25. 1.3.2 Innovative ASUS features C.O.P. (CPU Overheating Protection) With AMD® Athlon XP™ installed, the motherboard offers automatic CPU Overheating Protection to restore the original BIOS data from a floppy disk when the BIOS codes and data are corrupted. If the CPU temperature exceeds the set criteria, the PC shuts down automatically. See page 2-5. USB 2.0 technology The motherboard implements the Universal Serial Bus (USB) 2.0 specification, dramatically increasing the connection speed from a floppy disk. ASUS CrashFree BIOS This feature...
... 1-25. 1.3.2 Innovative ASUS features C.O.P. (CPU Overheating Protection) With AMD® Athlon XP™ installed, the motherboard offers automatic CPU Overheating Protection to restore the original BIOS data from a floppy disk when the BIOS codes and data are corrupted. If the CPU temperature exceeds the set criteria, the PC shuts down automatically. See page 2-5. USB 2.0 technology The motherboard implements the Universal Serial Bus (USB) 2.0 specification, dramatically increasing the connection speed from a floppy disk. ASUS CrashFree BIOS This feature...
User manual for A7S8X-MX
Page 25
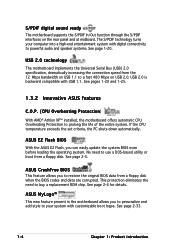
... change the necessary BIOS settings, if any. Turn on the slot. 5. Failure to unplug the power cord before adding or removing expansion cards. Keep the screw for the card. 2. See Chapter 2 for the expansion card. Install the software drivers for information on the next page. 3. Make sure to do so may need to use . 4. Refer to the card. ASUS A7S8X-MX 1-13 Align the card connector with it by adjusting the software settings...
... change the necessary BIOS settings, if any. Turn on the slot. 5. Failure to unplug the power cord before adding or removing expansion cards. Keep the screw for the card. 2. See Chapter 2 for the expansion card. Install the software drivers for information on the next page. 3. Make sure to do so may need to use . 4. Refer to the card. ASUS A7S8X-MX 1-13 Align the card connector with it by adjusting the software settings...
User manual for A7S8X-MX
Page 26
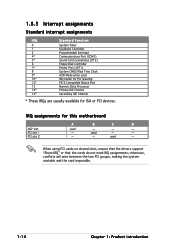
... Function 0 System Timer 1 Keyboard Controller 2 Programmable Interrupt 4* Communications Port (COM1) 5* Sound Card (sometimes LPT2) 6 Floppy Disk Controller 7* Printer Port (LPT1) 8 System CMOS/Real Time Clock 9* ACPI Mode when used - - - - IRQ assignments for this motherboard AGP slot PCI slot 1 PCI slot 2 A B C D used 10* IRQ holder for PCI Steering 12* PS/2 Compatible Mouse Port 13 Numeric Data Processor 14* Primary IDE Channel 15* Secondary IDE Channel * These IRQs are usually available for ISA or PCI devices. used - - - - used -
... Function 0 System Timer 1 Keyboard Controller 2 Programmable Interrupt 4* Communications Port (COM1) 5* Sound Card (sometimes LPT2) 6 Floppy Disk Controller 7* Printer Port (LPT1) 8 System CMOS/Real Time Clock 9* ACPI Mode when used - - - - IRQ assignments for this motherboard AGP slot PCI slot 1 PCI slot 2 A B C D used 10* IRQ holder for PCI Steering 12* PS/2 Compatible Mouse Port 13 Numeric Data Processor 14* Primary IDE Channel 15* Secondary IDE Channel * These IRQs are usually available for ISA or PCI devices. used - - - - used -

User manual for A7S8X-MX
Page 27
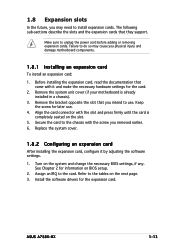
The PCI slots support cards such as a LAN card, SCSI card, USB card, and other cards that comply with +1.5V specification. The figure shows a LAN card installed on this motherboard! Note the notches on the card golden fingers to ensure that they fit the AGP slot on your motherboard. ® Keyed for one with PCI specifications. A7S8X-MX ASUS A7S8X-MX 1-15 When you ask for 1.5v A7S8X-MX Accelerated Graphics Port (AGP1) Install only 1.5V AGP cards on a PCI slot. 1.8.5 AGP slot This motherboard has an...
The PCI slots support cards such as a LAN card, SCSI card, USB card, and other cards that comply with +1.5V specification. The figure shows a LAN card installed on this motherboard! Note the notches on the card golden fingers to ensure that they fit the AGP slot on your motherboard. ® Keyed for one with PCI specifications. A7S8X-MX ASUS A7S8X-MX 1-15 When you ask for 1.5v A7S8X-MX Accelerated Graphics Port (AGP1) Install only 1.5V AGP cards on a PCI slot. 1.8.5 AGP slot This motherboard has an...
User manual for A7S8X-MX
Page 28
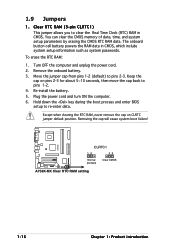
... pins 2-3. Move the jumper cap from pins 1-2 (default) to pins 1-2. 4. A7S8X-MX CLRTC1 12 23 ® Normal Clear CMOS (Default) A7S8X-MX Clear RTC RAM setting 1-16 Chapter 1: Product introduction Remove the onboard battery. 3. To erase the RTC RAM: 1. Removing the cap will cause system boot failure! The onboard button cell battery powers the RAM data in CMOS. Hold down the key during the boot process and enter BIOS setup to clear the Real Time Clock (RTC) RAM in CMOS, which include system setup information such as system passwords. 1.9 Jumpers 1. Turn...
... pins 2-3. Move the jumper cap from pins 1-2 (default) to pins 1-2. 4. A7S8X-MX CLRTC1 12 23 ® Normal Clear CMOS (Default) A7S8X-MX Clear RTC RAM setting 1-16 Chapter 1: Product introduction Remove the onboard battery. 3. To erase the RTC RAM: 1. Removing the cap will cause system boot failure! The onboard button cell battery powers the RAM data in CMOS. Hold down the key during the boot process and enter BIOS setup to clear the Real Time Clock (RTC) RAM in CMOS, which include system setup information such as system passwords. 1.9 Jumpers 1. Turn...
User manual for A7S8X-MX
Page 29
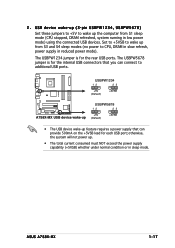
... (Default) +5VSB A7S8X-MX ® A7S8X-MX USB device wake-up USBPW5678 12 23 +5V (Default) +5VSB • The USB device wake-up from S1 sleep mode (CPU stopped, DRAM refreshed, system running in low power mode) using the connected USB devices. Set to +5VSB to wake up feature requires a power supply that can provide 500mA on the +5VSB lead for the internal USB connectors that you can connect to CPU, DRAM in slow refresh, power supply in sleep mode. ASUS A7S8X-MX 1-17 2 . The USBPW1234 jumper is for each USB port;
... (Default) +5VSB A7S8X-MX ® A7S8X-MX USB device wake-up USBPW5678 12 23 +5V (Default) +5VSB • The USB device wake-up from S1 sleep mode (CPU stopped, DRAM refreshed, system running in low power mode) using the connected USB devices. Set to +5VSB to wake up feature requires a power supply that can provide 500mA on the +5VSB lead for the internal USB connectors that you can connect to CPU, DRAM in slow refresh, power supply in sleep mode. ASUS A7S8X-MX 1-17 2 . The USBPW1234 jumper is for each USB port;
User manual for A7S8X-MX
Page 31
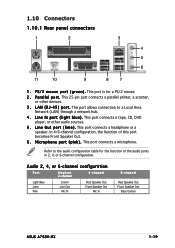
...ports in 2, 4, or 6-channel configuration. M i c r o p h o n e p o r t ( p i n k ) . Audio 2, 4, or 6-channel configuration Port Headset 2-channel 4-channel Light Blue Lime Pink Line In Line Out Mic In Rear Speaker Out Front Speaker Out Mic In 6-channel Rear Speaker Out Front Speaker Out Bass/Center ASUS A7S8X-MX 1-19 L A N ( R J - 4 5 ) p o r t . This port connects a microphone. 1.10 Connectors 1.10.1 Rear panel connectors 1 2 3 4 5 6 11 10 9 8 7 1 . This 25-pin port connects a parallel printer, a scanner, or other audio sources. 5 . Refer to a Local Area Network (LAN...
...ports in 2, 4, or 6-channel configuration. M i c r o p h o n e p o r t ( p i n k ) . Audio 2, 4, or 6-channel configuration Port Headset 2-channel 4-channel Light Blue Lime Pink Line In Line Out Mic In Rear Speaker Out Front Speaker Out Mic In 6-channel Rear Speaker Out Front Speaker Out Bass/Center ASUS A7S8X-MX 1-19 L A N ( R J - 4 5 ) p o r t . This port connects a microphone. 1.10 Connectors 1.10.1 Rear panel connectors 1 2 3 4 5 6 11 10 9 8 7 1 . This 25-pin port connects a parallel printer, a scanner, or other audio sources. 5 . Refer to a Local Area Network (LAN...
User manual for A7S8X-MX
Page 45
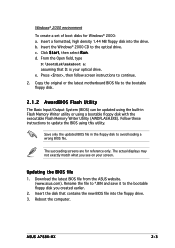
... the ASUS website. (www.asus.com). Reboot the computer. ASUS A7S8X-MX 2-3 Insert the Windows® 2000 CD to avoid loading a wrong BIOS file. From the Open field, type D:\bootdisk\makeboot a: assuming that contains the new BIOS file into the drive. Follow these instructions to continue. 2. Press , then follow screen instructions to update the BIOS using a bootable floppy disk with the executable Flash Memory Writer Utility (AWDFLASH.EXE). Windows® 2000 environment To create a set of boot disks...
... the ASUS website. (www.asus.com). Reboot the computer. ASUS A7S8X-MX 2-3 Insert the Windows® 2000 CD to avoid loading a wrong BIOS file. From the Open field, type D:\bootdisk\makeboot a: assuming that contains the new BIOS file into the drive. Follow these instructions to continue. 2. Press , then follow screen instructions to update the BIOS using a bootable floppy disk with the executable Flash Memory Writer Utility (AWDFLASH.EXE). Windows® 2000 environment To create a set of boot disks...
User manual for A7S8X-MX
Page 47
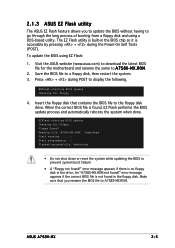
... "A7S8X-MX.ROM not found ! When the correct BIOS file is accessible by pressing + during POST to display the following. EZFlash starting BIOS update Checking for the motherboard and rename the same to A 7 S 8 X - Rebooting. • Do not shut down or reset the system while updating the BIOS to prevent system boot failure! • A "Floppy not found , EZ Flash performs the BIOS update process and automatically reboots the system when done. 2.1.3 ASUS EZ Flash utility...
... "A7S8X-MX.ROM not found ! When the correct BIOS file is accessible by pressing + during POST to display the following. EZFlash starting BIOS update Checking for the motherboard and rename the same to A 7 S 8 X - Rebooting. • Do not shut down or reset the system while updating the BIOS to prevent system boot failure! • A "Floppy not found , EZ Flash performs the BIOS update process and automatically reboots the system when done. 2.1.3 ASUS EZ Flash utility...
User manual for A7S8X-MX
Page 49
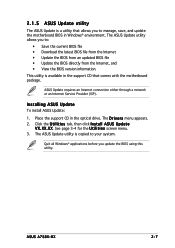
..., save, and update the motherboard BIOS in Windows® environment. ASUS Update requires an Internet connection either through a network or an Internet Service Provider (ISP). Click the U t i l i t i e s tab, then click I n s t a l l A S U S U p d a t e V X . See page 3-4 for the U t i l i t i e s screen menu. 3. Installing ASUS Update To install ASUS Update: 1. X X . 2.1.5 ASUS Update utility The ASUS Update is a utility that comes with the motherboard package. This utility is copied to : • Save the current BIOS file • Download the latest BIOS file from the...
..., save, and update the motherboard BIOS in Windows® environment. ASUS Update requires an Internet connection either through a network or an Internet Service Provider (ISP). Click the U t i l i t i e s tab, then click I n s t a l l A S U S U p d a t e V X . See page 3-4 for the U t i l i t i e s screen menu. 3. Installing ASUS Update To install ASUS Update: 1. X X . 2.1.5 ASUS Update utility The ASUS Update is a utility that comes with the motherboard package. This utility is copied to : • Save the current BIOS file • Download the latest BIOS file from the...
User manual for A7S8X-MX
Page 53
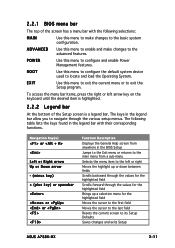
... the various setup menus. POWER Use this menu to configure the default system device used to exit the Setup program. Navigation Key(s) or Left or Right arrow Up or Down arrow - (minus key) + (plus key) or spacebar or or Function Description Displays the General Help screen from anywhere in the BIOS Setup Jumps to the Exit menu or returns to the main menu from a sub-menu Selects the menu item to...
... the various setup menus. POWER Use this menu to configure the default system device used to exit the Setup program. Navigation Key(s) or Left or Right arrow Up or Down arrow - (minus key) + (plus key) or spacebar or or Function Description Displays the General Help screen from anywhere in the BIOS Setup Jumps to the Exit menu or returns to the main menu from a sub-menu Selects the menu item to...
User manual for A7S8X-MX
Page 55
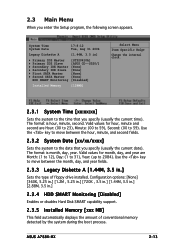
... IDE Slave First SATA Master Second SATA Master HDD SMART Monitoring [ST320410A] [ASUS CD--S520/] [None] [None] [None] [None] [Disabled] Installed Memory [128MB] Select Menu Item Specific Help Change the internal clock. 2.3.1 System Time [xx:xx:xx] Sets the system to move between the hour, minute, and second fields. 2.3.2 System Date [xx/xx/xxxx] Sets the system to the date that you enter the Setup program, the following screen appears. ASUS A7S8X-MX...
... IDE Slave First SATA Master Second SATA Master HDD SMART Monitoring [ST320410A] [ASUS CD--S520/] [None] [None] [None] [None] [Disabled] Installed Memory [128MB] Select Menu Item Specific Help Change the internal clock. 2.3.1 System Time [xx:xx:xx] Sets the system to move between the hour, minute, and second fields. 2.3.2 System Date [xx/xx/xxxx] Sets the system to the date that you enter the Setup program, the following screen appears. ASUS A7S8X-MX...
User manual for A7S8X-MX
Page 63
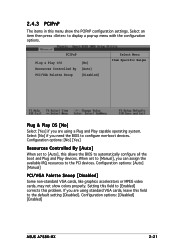
... [Disabled] Some non-standard VGA cards, like graphics accelerators or MPEG video cards, may not show the PCIPnP configuration settings. If you are using a Plug and Play capable operating system. Configuration options: [No] [Yes] Resources Controlled By [Auto] When set to [Manual], you need the BIOS to display a pop-up menu with the configuration options. Setting this field to [Enabled] corrects this field to the PCI devices. Configuration options: [Disabled] [Enabled] ASUS A7S8X-MX 2-21 Select an item then press to configure non-boot devices...
... [Disabled] Some non-standard VGA cards, like graphics accelerators or MPEG video cards, may not show the PCIPnP configuration settings. If you are using a Plug and Play capable operating system. Configuration options: [No] [Yes] Resources Controlled By [Auto] When set to [Manual], you need the BIOS to display a pop-up menu with the configuration options. Setting this field to [Enabled] corrects this field to the PCI devices. Configuration options: [Disabled] [Enabled] ASUS A7S8X-MX 2-21 Select an item then press to configure non-boot devices...
User manual for A7S8X-MX
Page 64
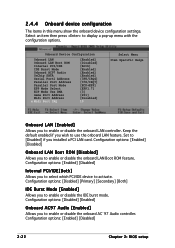
... Internal PCI/IDE IDE Burst Mode Onboard AC97 Audio OnChip SATA Serial Port1 Address Parallel Port Address Parallel Port Mode EPP Mode Select ECP Mode Use DMA Game Port Address Midi Port Address x Midi Port IRQ [Enabled] [Disabled] [Both] [Enabled] [Enabled] [Enabled] [3F8/IRQ4] [378/IRQ7] [ECP+EPP] [EPP1.7] [3] [201] [Disabled] 10 Select Menu Item Specific Help Onboard LAN [Enabled] Allows you installed a PCI LAN card. Configuration options: [Enabled] [Disabled] 2-22 Chapter 2: BIOS setup Configuration options: [Enabled] [Disabled] Onboard LAN Boot ROM [Disabled] Allows you to display...
... Internal PCI/IDE IDE Burst Mode Onboard AC97 Audio OnChip SATA Serial Port1 Address Parallel Port Address Parallel Port Mode EPP Mode Select ECP Mode Use DMA Game Port Address Midi Port Address x Midi Port IRQ [Enabled] [Disabled] [Both] [Enabled] [Enabled] [Enabled] [3F8/IRQ4] [378/IRQ7] [ECP+EPP] [EPP1.7] [3] [201] [Disabled] 10 Select Menu Item Specific Help Onboard LAN [Enabled] Allows you installed a PCI LAN card. Configuration options: [Enabled] [Disabled] 2-22 Chapter 2: BIOS setup Configuration options: [Enabled] [Disabled] Onboard LAN Boot ROM [Disabled] Allows you to display...
User manual for A7S8X-MX
Page 65
... Port Mode and ECP DMA Select configurations are not available. Configuration options: [Disabled] [201] [209] ASUS A7S8X-MX 2-23 This items becomes configurable only if the P a r a l l e l P o r t M o d e is set the base address of the parallel port. Configuration options: [Enabled] [Disabled] When using Windows® 98 SE/Me, set to set the addresses for the game port. Configuration options: [SPP] [EPP] [ECP] [ECP+EPP] EPP Mode Select [EPP1.7] Allows you to set the operation mode of the onboard parallel port connector. Legacy...
... Port Mode and ECP DMA Select configurations are not available. Configuration options: [Disabled] [201] [209] ASUS A7S8X-MX 2-23 This items becomes configurable only if the P a r a l l e l P o r t M o d e is set the base address of the parallel port. Configuration options: [Enabled] [Disabled] When using Windows® 98 SE/Me, set to set the addresses for the game port. Configuration options: [SPP] [EPP] [ECP] [ECP+EPP] EPP Mode Select [EPP1.7] Allows you to set the operation mode of the onboard parallel port connector. Legacy...
User manual for A7S8X-MX
Page 66
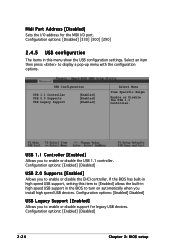
... USB devices. USB 1.1 Controller [Enabled] Allows you install high speed USB devices. Configuration options: [Enabled] Disabled] USB Legacy Support [Enabled] Allows you to display a pop-up menu with the configuration options. Select an item then press to enable or disable the EHCI controller. USB Configuration USB 1.1 Controller USB 2.0 Supports USB Legacy Support [Enabled] [Enabled] [Enabled] Select Menu Item Specific Help Enable or Disable the USB 1.1 Controller. If the BIOS has built-in high speed USB support, setting this menu show the USB configuration settings. Midi Port...
... USB devices. USB 1.1 Controller [Enabled] Allows you install high speed USB devices. Configuration options: [Enabled] Disabled] USB Legacy Support [Enabled] Allows you to display a pop-up menu with the configuration options. Select an item then press to enable or disable the EHCI controller. USB Configuration USB 1.1 Controller USB 2.0 Supports USB Legacy Support [Enabled] [Enabled] [Enabled] Select Menu Item Specific Help Enable or Disable the USB 1.1 Controller. If the BIOS has built-in high speed USB support, setting this menu show the USB configuration settings. Midi Port...
User manual for A7S8X-MX
Page 77
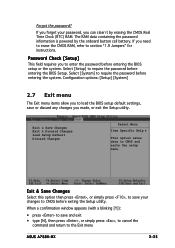
... menu ASUS A7S8X-MX 2-35 If you can clear it by the onboard button cell battery. Password Check [Setup] This field requires you to load the BIOS setup default settings, save and exit • type [N], then press , or simply press , to cancel the command and return to enter the password before entering the BIOS Setup. Exit & Save Changes Exit & Discard Changes Load Setup Default Discard Changes Select Menu Item Specific Help This option saves data to section "1.9 Jumpers" for instructions. Exit & Save Changes...
... menu ASUS A7S8X-MX 2-35 If you can clear it by the onboard button cell battery. Password Check [Setup] This field requires you to load the BIOS setup default settings, save and exit • type [N], then press , or simply press , to cancel the command and return to enter the password before entering the BIOS Setup. Exit & Save Changes Exit & Discard Changes Load Setup Default Discard Changes Select Menu Item Specific Help This option saves data to section "1.9 Jumpers" for instructions. Exit & Save Changes...
User manual for A7S8X-MX
Page 80
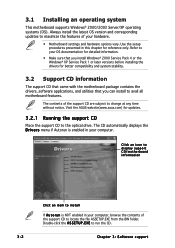
... 3: Software support The contents of the support CD to the optical drive. E X E to change at any time without notice. Double-click the A S S E T U P . Visit the ASUS website(www.asus.com) for reference only. Use the setup procedures presented in this chapter for updates. 3.2.1 Running the support CD Place the support CD to locate the file ASSETUP.EXE from the BIN folder. 3.1 Installing an operating system This motherboard supports Windows...
... 3: Software support The contents of the support CD to the optical drive. E X E to change at any time without notice. Double-click the A S S E T U P . Visit the ASUS website(www.asus.com) for reference only. Use the setup procedures presented in this chapter for updates. 3.2.1 Running the support CD Place the support CD to locate the file ASSETUP.EXE from the BIN folder. 3.1 Installing an operating system This motherboard supports Windows...
User manual for A7S8X-MX
Page 82
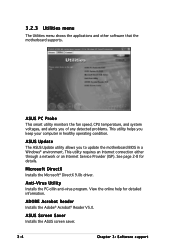
This utility requires an Internet connection either through a network or an Internet Service Provider (ISP). ASUS PC Probe This smart utility monitors the fan speed, CPU temperature, and system voltages, and alerts you of any detected problems. This utility helps you to update the motherboard BIOS in healthy operating condition. Microsoft DirectX Installs the Microsoft® DirectX 9.0b driver. ASUS Screen Saver Installs the ASUS screen saver. 3-4 Chapter 3: Software support View the online help for details. ADOBE Acrobat...
This utility requires an Internet connection either through a network or an Internet Service Provider (ISP). ASUS PC Probe This smart utility monitors the fan speed, CPU temperature, and system voltages, and alerts you of any detected problems. This utility helps you to update the motherboard BIOS in healthy operating condition. Microsoft DirectX Installs the Microsoft® DirectX 9.0b driver. ASUS Screen Saver Installs the ASUS screen saver. 3-4 Chapter 3: Software support View the online help for details. ADOBE Acrobat...


