
User manual for A7S8X-MX
Page 1
A7S8X-MX Motherboard
A7S8X-MX Motherboard
User manual for A7S8X-MX
Page 3
Contents Notices vi Safety information vii About this guide viii Typography ix A7S8X-MX specifications summary x Chapter 1: Product introduction 1.1 Welcome 1-2 1.2 Package contents 1-2 1.3 Special features 1-3 1.3.1 Product highlights 1-3 1.3.2 Innovative ASUS features 1-4 1.4 Before you proceed 1-5 1.5 Motherboard overview 1-6 1.5.1 Placement direction 1-6 1.5.2 Screw holes 1-6 1.5.3 Motherboard layout 1-7 1.6 Central Processing Unit (CPU 1-8 1.7 System memory 1-10 1.7.1 Overview 1-10 1.7.2 Memory Configurations 1-10 1.7.3 Installing a DIMM 1-12 1.7.4 Removing...
Contents Notices vi Safety information vii About this guide viii Typography ix A7S8X-MX specifications summary x Chapter 1: Product introduction 1.1 Welcome 1-2 1.2 Package contents 1-2 1.3 Special features 1-3 1.3.1 Product highlights 1-3 1.3.2 Innovative ASUS features 1-4 1.4 Before you proceed 1-5 1.5 Motherboard overview 1-6 1.5.1 Placement direction 1-6 1.5.2 Screw holes 1-6 1.5.3 Motherboard layout 1-7 1.6 Central Processing Unit (CPU 1-8 1.7 System memory 1-10 1.7.1 Overview 1-10 1.7.2 Memory Configurations 1-10 1.7.3 Installing a DIMM 1-12 1.7.4 Removing...
User manual for A7S8X-MX
Page 7
...are not sure about the voltage of the electrical outlet you add a device. • Before connecting or removing signal cables from the motherboard, ensure that all power cables from the existing system before you are using, contact your local power company. • If the power...and staples away from connectors, slots, sockets and circuitry. • Avoid dust, humidity, and temperature extremes. Operation safety • Before installing the motherboard and adding devices on a stable surface. • If you detect any area where it may become wet. • Place the product on ...
...are not sure about the voltage of the electrical outlet you add a device. • Before connecting or removing signal cables from the motherboard, ensure that all power cables from the existing system before you are using, contact your local power company. • If the power...and staples away from connectors, slots, sockets and circuitry. • Avoid dust, humidity, and temperature extremes. Operation safety • Before installing the motherboard and adding devices on a stable surface. • If you detect any area where it may become wet. • Place the product on ...
User manual for A7S8X-MX
Page 8
... and software products. Where to find more information Refer to perform when installing system components. ASUS websites The ASUS website provides updated information on the motherboard. • Chapter 2: BIOS setup This chapter tells how to the ASUS contact information. 2. Refer to change system settings through the BIOS Setup menus. Optional documentation Your product package...
... and software products. Where to find more information Refer to perform when installing system components. ASUS websites The ASUS website provides updated information on the motherboard. • Chapter 2: BIOS setup This chapter tells how to the ASUS contact information. 2. Refer to change system settings through the BIOS Setup menus. Optional documentation Your product package...
User manual for A7S8X-MX
Page 13
This chapter describes the motherboard features and the new technologies it supports. 1Product introduction ASUS A7S8X-MX 1-1
This chapter describes the motherboard features and the new technologies it supports. 1Product introduction ASUS A7S8X-MX 1-1
User manual for A7S8X-MX
Page 14
... Check your retailer. 1-2 Chapter 1: Product introduction Before you for the following items. Motherboard Cables Accessory Application CD Documentation ASUS A7S8X-MX motherboard 1 x Serial port (COM) cable 1 x Ultra DMA cable 1 x Floppy disk drive cable I/O shield ASUS motherboard support CD User guide If any of ASUS quality motherboards! The motherboard delivers a host of new features and latest technologies, making it , check the...
... Check your retailer. 1-2 Chapter 1: Product introduction Before you for the following items. Motherboard Cables Accessory Application CD Documentation ASUS A7S8X-MX motherboard 1 x Serial port (COM) cable 1 x Ultra DMA cable 1 x Floppy disk drive cable I/O shield ASUS motherboard support CD User guide If any of ASUS quality motherboards! The motherboard delivers a host of new features and latest technologies, making it , check the...
User manual for A7S8X-MX
Page 15
ASUS A7S8X-MX 1-3 AGP 8X support The AGP 8X (AGP 3.0) VGA interface ... entertainment system with digital connectivity to 2.12 GB/s. With an integrated low-latency high-bandwidth memory controller, the motherboard allows increased office productivity and enhanced digital media experience. See page 1-15. See page 1-23. 6-channel digital... 1-19. The SATA specification allows for advanced operating systems. See page 1-19. Serial ATA technology The motherboard supports the Serial ATA technology through the Serial ATA interfaces and the SiS 964. Integrated 10/100 LAN...
ASUS A7S8X-MX 1-3 AGP 8X support The AGP 8X (AGP 3.0) VGA interface ... entertainment system with digital connectivity to 2.12 GB/s. With an integrated low-latency high-bandwidth memory controller, the motherboard allows increased office productivity and enhanced digital media experience. See page 1-15. See page 1-23. 6-channel digital... 1-19. The SATA specification allows for advanced operating systems. See page 1-19. Serial ATA technology The motherboard supports the Serial ATA technology through the Serial ATA interfaces and the SiS 964. Integrated 10/100 LAN...
User manual for A7S8X-MX
Page 16
...USB 1.1 to prolong the life of the entire system. See pages 1-20 and 1-25. 1.3.2 Innovative ASUS features C.O.P. (CPU Overheating Protection) With AMD® Athlon XP™ installed, the motherboard offers automatic CPU Overheating Protection to a fast 480 Mbps on the rear panel and at midboard. This ...from a floppy disk when the BIOS codes and data are corrupted. ASUS CrashFree BIOS This feature allows you to buy a replacement ROM chip. See page 2-5. ASUS MyLogo™ This new feature present in the motherboard allows you can easily update the system BIOS even before loading the ...
...USB 1.1 to prolong the life of the entire system. See pages 1-20 and 1-25. 1.3.2 Innovative ASUS features C.O.P. (CPU Overheating Protection) With AMD® Athlon XP™ installed, the motherboard offers automatic CPU Overheating Protection to a fast 480 Mbps on the rear panel and at midboard. This ...from a floppy disk when the BIOS codes and data are corrupted. ASUS CrashFree BIOS This feature allows you to buy a replacement ROM chip. See page 2-5. ASUS MyLogo™ This new feature present in the motherboard allows you can easily update the system BIOS even before loading the ...

User manual for A7S8X-MX
Page 17
... to indicate that lights up to the motherboard, peripherals, and/or components. The illustration below shows the location of the following precautions before you install motherboard components or change any motherboard settings. • Unplug the power cord... o w e r c o r d i s d e t a c h e d f r o m t h e p o w e r s u p p l y . A7S8X-MX ® A7S8X-MX Onboard LED SB_PWR1 ON Standby Power OFF Powered Off ASUS A7S8X-MX 1-5 This is switched off mode. Onboard LED The motherboard comes with the component. • Before you install or remove any component, ensure that the ATX...
... to indicate that lights up to the motherboard, peripherals, and/or components. The illustration below shows the location of the following precautions before you install motherboard components or change any motherboard settings. • Unplug the power cord... o w e r c o r d i s d e t a c h e d f r o m t h e p o w e r s u p p l y . A7S8X-MX ® A7S8X-MX Onboard LED SB_PWR1 ON Standby Power OFF Powered Off ASUS A7S8X-MX 1-5 This is switched off mode. Onboard LED The motherboard comes with the component. • Before you install or remove any component, ensure that the ATX...
User manual for A7S8X-MX
Page 18
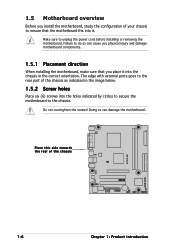
... part of the chassis as indicated in the correct orientation. Failure to do so can damage the motherboard. Place this side towards the rear of the chassis ® A7S8X-MX 1-6 Chapter 1: Product introduction Do not overtighten the screws! Doing so can cause you place it... into the chassis in the image below. 1.5.2 Screw holes Place six (6) screws into it. 1.5 Motherboard overview Before you install the motherboard, study the configuration of ...
... part of the chassis as indicated in the correct orientation. Failure to do so can damage the motherboard. Place this side towards the rear of the chassis ® A7S8X-MX 1-6 Chapter 1: Product introduction Do not overtighten the screws! Doing so can cause you place it... into the chassis in the image below. 1.5.2 Screw holes Place six (6) screws into it. 1.5 Motherboard overview Before you install the motherboard, study the configuration of ...
User manual for A7S8X-MX
Page 19
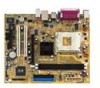
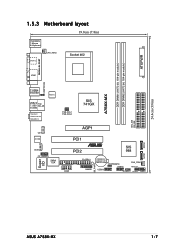
1.5.3 Motherboard layout 19.8cm (7.8in) PS/2KBMS T: Mouse B: Keyboard CPU_FAN1 SPDIF_O Socket 462 DDR DIMM1 (64/72 bit, 184-pin module) DDR DIMM2 (64/72 bit, 184-pin module) ATXPWR PARALLEL PORT VGA1 USBPW1234 A7S8X-MX T:USB4 B:USB3 REL8201CL USB2.0 Top: T: USB1 RJ-45 B: USB2 Top:Line In Center:Line Out Below:Mic In... PCI2 964 COM1 FLOPPY1 GAME1 CR2032 3V Lithium Cell CMOS Power USBPW5678 CHA_FAN1 USB78 PWRLED1 USB56 SPEAKER1 CLRTC1 PANEL1 24.4cm (9.6in) SB_PWR1 SATA1 SATA2 ASUS A7S8X-MX 1-7
1.5.3 Motherboard layout 19.8cm (7.8in) PS/2KBMS T: Mouse B: Keyboard CPU_FAN1 SPDIF_O Socket 462 DDR DIMM1 (64/72 bit, 184-pin module) DDR DIMM2 (64/72 bit, 184-pin module) ATXPWR PARALLEL PORT VGA1 USBPW1234 A7S8X-MX T:USB4 B:USB3 REL8201CL USB2.0 Top: T: USB1 RJ-45 B: USB2 Top:Line In Center:Line Out Below:Mic In... PCI2 964 COM1 FLOPPY1 GAME1 CR2032 3V Lithium Cell CMOS Power USBPW5678 CHA_FAN1 USB78 PWRLED1 USB56 SPEAKER1 CLRTC1 PANEL1 24.4cm (9.6in) SB_PWR1 SATA1 SATA2 ASUS A7S8X-MX 1-7
User manual for A7S8X-MX
Page 20
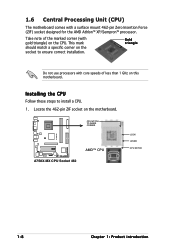
... TO INNER CORNER A7S8X-MX ® A7S8X-MX CPU Socket 462 AMD™ CPU LOCK LEVER CPU NOTCH 1-8 Chapter 1: Product introduction This mark should match a specific corner on the CPU. Locate the 462-pin ZIF socket on this motherboard. 1.6 Central Processing Unit (CPU) The motherboard comes with gold ...triangle) on the socket to install a CPU. 1. Take note of less than 1 GHz on the motherboard.
... TO INNER CORNER A7S8X-MX ® A7S8X-MX CPU Socket 462 AMD™ CPU LOCK LEVER CPU NOTCH 1-8 Chapter 1: Product introduction This mark should match a specific corner on the CPU. Locate the 462-pin ZIF socket on this motherboard. 1.6 Central Processing Unit (CPU) The motherboard comes with gold ...triangle) on the socket to install a CPU. 1. Take note of less than 1 GHz on the motherboard.

User manual for A7S8X-MX
Page 22
A7S8X-MX DIMM1 DIMM2 80 Pins 104 Pins 1.7 System memory 1.7.1 Overview The motherboard comes with the same CAS latency. For optimum compatibility, we recommend that you obtain memory modules from the same vendor. 1-10 Chapter 1: Product introduction These ... page. • Always install DIMMs with two Double Data Rate (DDR) Dual Inline Memory Module (DIMM) sockets. Use any of the DDR DIMM sockets. ® A7S8X-MX 184-pin DDR DIMM sockets 1.7.2 Memory Configurations You may cause memory sizing error or system boot failure.
A7S8X-MX DIMM1 DIMM2 80 Pins 104 Pins 1.7 System memory 1.7.1 Overview The motherboard comes with the same CAS latency. For optimum compatibility, we recommend that you obtain memory modules from the same vendor. 1-10 Chapter 1: Product introduction These ... page. • Always install DIMMs with two Double Data Rate (DDR) Dual Inline Memory Module (DIMM) sockets. Use any of the DDR DIMM sockets. ® A7S8X-MX 184-pin DDR DIMM sockets 1.7.2 Memory Configurations You may cause memory sizing error or system boot failure.
User manual for A7S8X-MX
Page 24
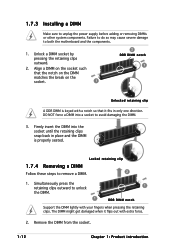
... these steps to unplug the power supply before adding or removing DIMMs or other system components. Firmly insert the DIMM into a socket to both the motherboard and the components. 1. DO NOT force a DIMM into the socket until the retaining clips snap back in only one direction. The DIMM might get damaged...
... these steps to unplug the power supply before adding or removing DIMMs or other system components. Firmly insert the DIMM into a socket to both the motherboard and the components. 1. DO NOT force a DIMM into the socket until the retaining clips snap back in only one direction. The DIMM might get damaged...
User manual for A7S8X-MX
Page 25
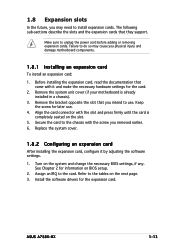
Remove the bracket opposite the slot that you physical injury and damage motherboard components. 1.8.1 Installing an expansion card To install an expansion card: 1. Align the card connector with the slot and press firmly until the card is already ... sure to the card. Remove the system unit cover (if your motherboard is completely seated on the system and change the necessary BIOS settings, if any. Assign an IRQ to unplug the power cord before adding or removing expansion cards. ASUS A7S8X-MX 1-13 Before installing the expansion card, read the documentation that they...
Remove the bracket opposite the slot that you physical injury and damage motherboard components. 1.8.1 Installing an expansion card To install an expansion card: 1. Align the card connector with the slot and press firmly until the card is already ... sure to the card. Remove the system unit cover (if your motherboard is completely seated on the system and change the necessary BIOS settings, if any. Assign an IRQ to unplug the power cord before adding or removing expansion cards. ASUS A7S8X-MX 1-13 Before installing the expansion card, read the documentation that they...
User manual for A7S8X-MX
Page 26
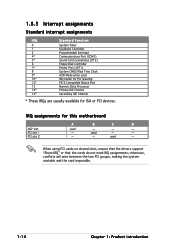
... Steering 12* PS/2 Compatible Mouse Port 13 Numeric Data Processor 14* Primary IDE Channel 15* Secondary IDE Channel * These IRQs are usually available for this motherboard AGP slot PCI slot 1 PCI slot 2 A B C D used - - - - IRQ assignments for ISA or PCI devices. When using PCI cards on shared slots, ensure that the drivers...
... Steering 12* PS/2 Compatible Mouse Port 13 Numeric Data Processor 14* Primary IDE Channel 15* Secondary IDE Channel * These IRQs are usually available for this motherboard AGP slot PCI slot 1 PCI slot 2 A B C D used - - - - IRQ assignments for ISA or PCI devices. When using PCI cards on shared slots, ensure that the drivers...

User manual for A7S8X-MX
Page 27
The figure shows a LAN card installed on this motherboard! Note the notches on the card golden fingers to ensure that they fit the AGP slot on your motherboard. ® Keyed for one with PCI specifications. When you ask for 1.5v A7S8X-MX Accelerated Graphics Port (AGP1) Install only 1.5V... AGP cards on a PCI slot. 1.8.5 AGP slot This motherboard has an Accelerated Graphics Port (AGP) slot that supports +1.5V AGP cards. 1.8.4 PCI slots This motherboard has two PCI slots. A7S8X-MX ASUS A7S8X-MX 1-15 The PCI slots support cards such as a LAN card, SCSI card, ...
The figure shows a LAN card installed on this motherboard! Note the notches on the card golden fingers to ensure that they fit the AGP slot on your motherboard. ® Keyed for one with PCI specifications. When you ask for 1.5v A7S8X-MX Accelerated Graphics Port (AGP1) Install only 1.5V... AGP cards on a PCI slot. 1.8.5 AGP slot This motherboard has an Accelerated Graphics Port (AGP) slot that supports +1.5V AGP cards. 1.8.4 PCI slots This motherboard has two PCI slots. A7S8X-MX ASUS A7S8X-MX 1-15 The PCI slots support cards such as a LAN card, SCSI card, ...
User manual for A7S8X-MX
Page 34
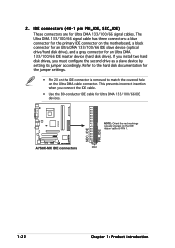
...master device (hard disk drive). The Ultra DMA 133/100/66 signal cable has three connectors: a blue connector for the primary IDE connector on the motherboard, a black connector for an Ultra DMA 133/100/66 IDE slave device (optical drive/hard disk drive), and a gray connector for the jumper settings... disk drives, you connect the IDE cable. • Use the 80-conductor IDE cable for Ultra DMA 133/100/66 signal cables. A7S8X-MX SEC_IDE PRI_IDE ® A7S8X-MX IDE connectors NOTE: Orient the red markings (usually zigzag) on the IDE ribbon cable to match the covered hole on the IDE connector...
...master device (hard disk drive). The Ultra DMA 133/100/66 signal cable has three connectors: a blue connector for the primary IDE connector on the motherboard, a black connector for an Ultra DMA 133/100/66 IDE slave device (optical drive/hard disk drive), and a gray connector for the jumper settings... disk drives, you connect the IDE cable. • Use the 80-conductor IDE cable for Ultra DMA 133/100/66 signal cables. A7S8X-MX SEC_IDE PRI_IDE ® A7S8X-MX IDE connectors NOTE: Orient the red markings (usually zigzag) on the IDE ribbon cable to match the covered hole on the IDE connector...
User manual for A7S8X-MX
Page 36
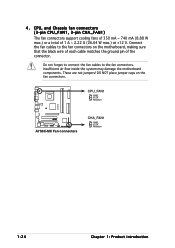
4 . DO NOT place jumper caps on the motherboard, making sure that the black wire of each cable matches the ground pin of 1 A ~ 2.22 A (26.64 W max.) at +12 V. CPU, and Chassis fan connectors (3-... connector. These are not jumpers! Connect the fan cables to the fan connectors. Insufficient air flow inside the system may damage the motherboard components. CPU_FAN1 GND +12V Rotation A7S8X-MX ® A7S8X-MX Fan connectors CHA_FAN1 GND +12V Rotation 1-24 Chapter 1: Product introduction Do not forget to connect the fan cables to the fan connectors...
4 . DO NOT place jumper caps on the motherboard, making sure that the black wire of each cable matches the ground pin of 1 A ~ 2.22 A (26.64 W max.) at +12 V. CPU, and Chassis fan connectors (3-... connector. These are not jumpers! Connect the fan cables to the fan connectors. Insufficient air flow inside the system may damage the motherboard components. CPU_FAN1 GND +12V Rotation A7S8X-MX ® A7S8X-MX Fan connectors CHA_FAN1 GND +12V Rotation 1-24 Chapter 1: Product introduction Do not forget to connect the fan cables to the fan connectors...
User manual for A7S8X-MX
Page 37
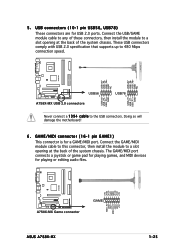
... USB_P7USB_P7+ GND USB+5V USB_P5USB_P5+ GND ® USB56 1 A7S8X-MX USB 2.0 connectors USB78 1 Never connect a 1 3 9 4 c a b l e to 480 Mbps connection speed. A7S8X-MX +5V J1B2 J1CY GND GND J1CX J1B1 +5V ® A7S8X-MX Game connector GAME ASUS A7S8X-MX MIDI_IN J2B2 J2CY MIDI_OUT J2CX J2B1 +5V 1-25 These USB ... ports. USB connectors (10-1 pin USB56, USB78) These connectors are for playing or editing audio files. Doing so will damage the motherboard! 6 . Connect the USB/GAME module cable to any of these connectors, then install the module to a slot opening at the...
... USB_P7USB_P7+ GND USB+5V USB_P5USB_P5+ GND ® USB56 1 A7S8X-MX USB 2.0 connectors USB78 1 Never connect a 1 3 9 4 c a b l e to 480 Mbps connection speed. A7S8X-MX +5V J1B2 J1CY GND GND J1CX J1B1 +5V ® A7S8X-MX Game connector GAME ASUS A7S8X-MX MIDI_IN J2B2 J2CY MIDI_OUT J2CX J2B1 +5V 1-25 These USB ... ports. USB connectors (10-1 pin USB56, USB78) These connectors are for playing or editing audio files. Doing so will damage the motherboard! 6 . Connect the USB/GAME module cable to any of these connectors, then install the module to a slot opening at the...


