Owners Manual
Page 9
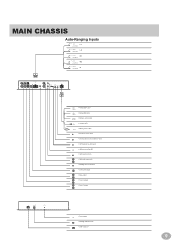
... trim • AUX audio input jacks • MultEQ setup microphone • Subwoofer output • Rear output • Front 2 output • Front 1 output U SB M U LTEQ LED RESET • Reset button • MultEQ calibration LED • USB receptacle 9 White/Black + Violet -
... trim • AUX audio input jacks • MultEQ setup microphone • Subwoofer output • Rear output • Front 2 output • Front 1 output U SB M U LTEQ LED RESET • Reset button • MultEQ calibration LED • USB receptacle 9 White/Black + Violet -
Owners Manual
Page 10
...: If there is controlled. 5 REMOTE IR INPUT (2.5mm mini-jack) - Turn this wire. Use this lead to a good chassis ground on the PXE-H660. If the factory 2-way output must be used , connect Tweeter Left to L1, Woofer Left to L2, Tweeter Right to R1, and Woofer Right ...to bare metal and is securely fastened using the AUX INPUT. 8 CLIP - Wiring/Connections Front Panel Chassis 1 USB Port - Press & Release button for: Factory Reset, or Redo MultEQ™ setup (see page 20) Rear Panel Chassis 4 POWER SUPPLY Harness (6-Pin) • Ground (BLK) Connect this input for Front, ...
...: If there is controlled. 5 REMOTE IR INPUT (2.5mm mini-jack) - Turn this wire. Use this lead to a good chassis ground on the PXE-H660. If the factory 2-way output must be used , connect Tweeter Left to L1, Woofer Left to L2, Tweeter Right to R1, and Woofer Right ...to bare metal and is securely fastened using the AUX INPUT. 8 CLIP - Wiring/Connections Front Panel Chassis 1 USB Port - Press & Release button for: Factory Reset, or Redo MultEQ™ setup (see page 20) Rear Panel Chassis 4 POWER SUPPLY Harness (6-Pin) • Ground (BLK) Connect this input for Front, ...

Owners Manual
Page 12
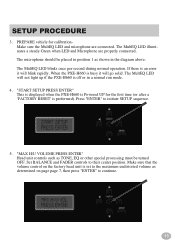
...refer to the passenger's normal head position as possible in four different positions inside the car. 3. If the unit displays "ALPINE PXE-H660" on the display after the reset procedure is being used to automatically optimize the system's sound quality. This means PRESET 1 will be optimized for at the ...MultEQ Setup CD. It will also 12 show "START SETUP PRESS ENTER" on the display, press and hold the microphone in position. The PXE-H660's included microphone must be used . A microphone stand or camera tripod can be placed in the middle. MIC position 1 should be taken ...
...refer to the passenger's normal head position as possible in four different positions inside the car. 3. If the unit displays "ALPINE PXE-H660" on the display after the reset procedure is being used to automatically optimize the system's sound quality. This means PRESET 1 will be optimized for at the ...MultEQ Setup CD. It will also 12 show "START SETUP PRESS ENTER" on the display, press and hold the microphone in position. The PXE-H660's included microphone must be used . A microphone stand or camera tripod can be placed in the middle. MIC position 1 should be taken ...
Owners Manual
Page 13
... be placed in position 1 as determined on the factory head unit is busy it will go solid. The microphone should be turned OFF. When the PXE-H660 is set to continue. 13 If there is an error it will blink rapidly. Set BALANCE and FADER controls to initiate SETUP sequence. 5. SETUP PROCEDURE... LED illuminates a steady Green when LED and Microphone are connected. Press "ENTER" to their center position. PREPARE vehicle for the first time (or after a 'FACTORY RESET' is off or in the diagram above.
... be placed in position 1 as determined on the factory head unit is busy it will go solid. The microphone should be turned OFF. When the PXE-H660 is set to continue. 13 If there is an error it will blink rapidly. Set BALANCE and FADER controls to initiate SETUP sequence. 5. SETUP PROCEDURE... LED illuminates a steady Green when LED and Microphone are connected. Press "ENTER" to their center position. PREPARE vehicle for the first time (or after a 'FACTORY RESET' is off or in the diagram above.

Owners Manual
Page 20
..., restoring the unit to factory default settings (All setup steps need to determine the proper subwoofer amplifier gain level. This resets all the measurements have been taken. SETUP PROCEDURE 17. NOTE: To repeat setup process follow these steps: 1) Press and hold the... RESET button for at least 6 seconds or more. This resets MultEQ settings (calibration of MultEQ must be complete. Press "ENTER" to continue. 18. Done After completing the 4 MIC ...
..., restoring the unit to factory default settings (All setup steps need to determine the proper subwoofer amplifier gain level. This resets all the measurements have been taken. SETUP PROCEDURE 17. NOTE: To repeat setup process follow these steps: 1) Press and hold the... RESET button for at least 6 seconds or more. This resets MultEQ settings (calibration of MultEQ must be complete. Press "ENTER" to continue. 18. Done After completing the 4 MIC ...


