Owners Manual
Page 2
... A PROBLEM APPEARS When problems appear, stop the vehicle in this unit to electrical shorts. Some problems which could hurt you or other people if you or other people. DO NOT OPERATE THE EQUIPMENT OR LOOK AT THE SCREEN WHILE DRIVING Do not change settings while driving. If operation requiring a prolonged view of Safety Warnings in a safe location before starting installation and operation. ARRANGE THE WIRING SO...
... A PROBLEM APPEARS When problems appear, stop the vehicle in this unit to electrical shorts. Some problems which could hurt you or other people if you or other people. DO NOT OPERATE THE EQUIPMENT OR LOOK AT THE SCREEN WHILE DRIVING Do not change settings while driving. If operation requiring a prolonged view of Safety Warnings in a safe location before starting installation and operation. ARRANGE THE WIRING SO...
Owners Manual
Page 3
Fuse Replacement When replacing the fuse(s), the replacement must be exposed to repair the unit yourself. Maintenance If you have your vehicle's voltage regulator checked. Installation Location Make sure the PXE-H660 will not be of the same amperage as shown on . If the fuse(s) blows more than once, carefully check all electrical connections for servicing... before turning your Alpine dealer or the nearest Alpine Service Station for shorted circuitry. ! CAUTION This symbol means important instructions. Also have problems, do not attempt to : • Direct sun and...
Fuse Replacement When replacing the fuse(s), the replacement must be exposed to repair the unit yourself. Maintenance If you have your vehicle's voltage regulator checked. Installation Location Make sure the PXE-H660 will not be of the same amperage as shown on . If the fuse(s) blows more than once, carefully check all electrical connections for servicing... before turning your Alpine dealer or the nearest Alpine Service Station for shorted circuitry. ! CAUTION This symbol means important instructions. Also have problems, do not attempt to : • Direct sun and...
Owners Manual
Page 5
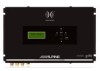
... car's cabin is a versatile processor that reflect and absorb sound. Also, carpeted areas in music reproduction. Using AntEQ™ to Alpine! Leather covered surfaces like the seats and dash also reflect and change certain frequencies. For instance, windows reflect and amplify high frequencies. The automotive cabin is capable of Alpine amplifiers and speakers give significant improvement over your factory hardware. The PXE-H660 utilizes advanced sound tuning of audio...
... car's cabin is a versatile processor that reflect and absorb sound. Also, carpeted areas in music reproduction. Using AntEQ™ to Alpine! Leather covered surfaces like the seats and dash also reflect and change certain frequencies. For instance, windows reflect and amplify high frequencies. The automotive cabin is capable of Alpine amplifiers and speakers give significant improvement over your factory hardware. The PXE-H660 utilizes advanced sound tuning of audio...
Owners Manual
Page 7
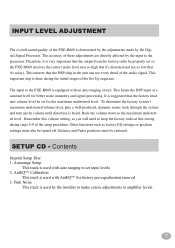
... setup procedure. The input to the PXE-H660 is used by the installer to make coarse adjustments to amplifier levels. 7 Autorange Setup This track is equipped with auto ranging to the processor. Back the volume down to keep the factory radio at a constant level for factory pre-equalization removal 3. AntEQ™ Calibration This track is suggested that the DSP chip in the unit can see every detail of these adjustments are directly...
... setup procedure. The input to the PXE-H660 is used by the installer to make coarse adjustments to amplifier levels. 7 Autorange Setup This track is equipped with auto ranging to the processor. Back the volume down to keep the factory radio at a constant level for factory pre-equalization removal 3. AntEQ™ Calibration This track is suggested that the DSP chip in the unit can see every detail of these adjustments are directly...
Owners Manual
Page 9
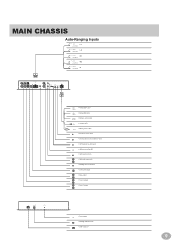
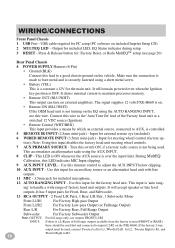
... OUT cable Blue/ White • Remote ON cable White/ • Remote control cable Brown • Ground cable Black Fuse • Battery power cable Yellow (3A) • IR remote sensor input • Steering wheel control interface input • AFT head unit on AUX input • AUX trim level clip LED • AUX input level trim • AUX audio input jacks • MultEQ setup microphone • Subwoofer output • Rear output • Front 2 output • Front 1 output U SB M U LTEQ LED RESET • Reset button • MultEQ calibration LED • USB...
... OUT cable Blue/ White • Remote ON cable White/ • Remote control cable Brown • Ground cable Black Fuse • Battery power cable Yellow (3A) • IR remote sensor input • Steering wheel control interface input • AFT head unit on AUX input • AUX trim level clip LED • AUX input level trim • AUX audio input jacks • MultEQ setup microphone • Subwoofer output • Rear output • Front 2 output • Front 1 output U SB M U LTEQ LED RESET • Reset button • MultEQ calibration LED • USB...
Owners Manual
Page 10
...) Rear Panel Chassis 4 POWER SUPPLY Harness (6-Pin) • Ground (BLK) Connect this lead to maintain processor memory. • Remote OUT (BLU/WHT) This output can turn on included Imprint Setup CD) 2 MULTEQ LED - Turn this input for included microphone. 12 AUTO RANGING INPUT - Use this switch ON, if a factory radio source is not turning on the PXE-H660. tion); Note: Using this LED indicates MIC Input clipping. 9 AUX INPUT LEVEL - Use this wire to the 'Auto Turn On' lead of the Factory head unit or a switched...
...) Rear Panel Chassis 4 POWER SUPPLY Harness (6-Pin) • Ground (BLK) Connect this lead to maintain processor memory. • Remote OUT (BLU/WHT) This output can turn on included Imprint Setup CD) 2 MULTEQ LED - Turn this input for included microphone. 12 AUTO RANGING INPUT - Use this switch ON, if a factory radio source is not turning on the PXE-H660. tion); Note: Using this LED indicates MIC Input clipping. 9 AUX INPUT LEVEL - Use this wire to the 'Auto Turn On' lead of the Factory head unit or a switched...
Owners Manual
Page 11
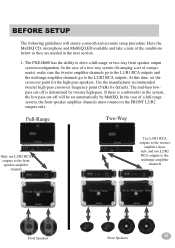
...-way system (bi-amping a set of a full-range system, the front speaker amplifier channels must connect to the L2/R2 RCA outputs. BEFORE SETUP The following guidelines will be set automatically by default). At this time, set the crossover point for the high-pass speakers. If there is determined by tweeter high-pass. Use the manufacturer recommended tweeter high-pass crossover frequency point (5 kHz...
...-way system (bi-amping a set of a full-range system, the front speaker amplifier channels must connect to the L2/R2 RCA outputs. BEFORE SETUP The following guidelines will be set automatically by default). At this time, set the crossover point for the high-pass speakers. If there is determined by tweeter high-pass. Use the manufacturer recommended tweeter high-pass crossover frequency point (5 kHz...

Owners Manual
Page 12
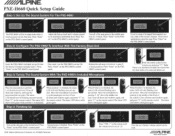
... to reset the PXE-H660 to its factory settings (refer to the driver's normal head position as possible. PRESET 1 settings are derived from MIC position 1 and PRESET 2 settings are derived from MIC position 2. BEFORE SETUP 2. The diagram below shows the four microphone positions inside the car, allowing the unit to the passenger's normal head position as possible. TURN ON Vehicle Ignition Switch 2. If the unit displays "ALPINE PXE-H660" on the display after the reset...
... to reset the PXE-H660 to its factory settings (refer to the driver's normal head position as possible. PRESET 1 settings are derived from MIC position 1 and PRESET 2 settings are derived from MIC position 2. BEFORE SETUP 2. The diagram below shows the four microphone positions inside the car, allowing the unit to the passenger's normal head position as possible. TURN ON Vehicle Ignition Switch 2. If the unit displays "ALPINE PXE-H660" on the display after the reset...
Owners Manual
Page 13
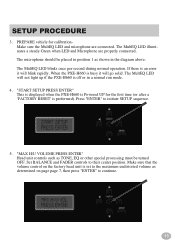
... MultEQ LED illuminates a steady Green when LED and Microphone are connected. "START SETUP PRESS ENTER" This is displayed when the PXE-H660 is set to the maximum undistorted volume as shown in the diagram above. Press "ENTER" to their center position. Make sure that the volume control on the factory head unit is Powered UP for calibrationMake sure the MultEQ LED and microphone are properly...
... MultEQ LED illuminates a steady Green when LED and Microphone are connected. "START SETUP PRESS ENTER" This is displayed when the PXE-H660 is set to the maximum undistorted volume as shown in the diagram above. Press "ENTER" to their center position. Make sure that the volume control on the factory head unit is Powered UP for calibrationMake sure the MultEQ LED and microphone are properly...
Owners Manual
Page 14
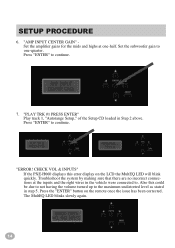
..." Play track 1, "Autorange Setup," of the Setup CD loaded in the vehicle were connected to. Troubleshoot the system by making sure that there are no incorrect connections at one -quarter. SETUP PROCEDURE 6. Also this error display on the remote once the issue has been corrected. CHECK VOL & INPUTS" If the PXE-H660 displays this could be due to not having the volume turned up to one -half. "AMP INPUT...
..." Play track 1, "Autorange Setup," of the Setup CD loaded in the vehicle were connected to. Troubleshoot the system by making sure that there are no incorrect connections at one -quarter. SETUP PROCEDURE 6. Also this error display on the remote once the issue has been corrected. CHECK VOL & INPUTS" If the PXE-H660 displays this could be due to not having the volume turned up to one -half. "AMP INPUT...
Owners Manual
Page 15
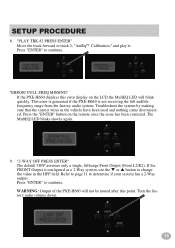
... audible frequency range from the factory audio system. WARNING: Output of the PXE-H660 will not be muted after this error display on the remote once the issue has been corrected. Press "ENTER" to determine if your system has a 2-Way output. Press "ENTER" to track 2, "AntEq™ Calibration," and play it. Troubleshoot the system by making sure that the correct wires in the HPF field. "ERROR! "PLAY...
... audible frequency range from the factory audio system. WARNING: Output of the PXE-H660 will not be muted after this error display on the remote once the issue has been corrected. Press "ENTER" to determine if your system has a 2-Way output. Press "ENTER" to track 2, "AntEq™ Calibration," and play it. Troubleshoot the system by making sure that the correct wires in the HPF field. "ERROR! "PLAY...
Owners Manual
Page 16
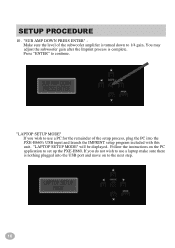
... wish to 1/4 gain. "LAPTOP SETUP MODE" If you do not wish to the next step. 16 You may adjust the subwoofer gain after the Imprint process is nothing plugged into the PXE-H660's USB input and launch the IMPRINT setup program included with this unit. SETUP PROCEDURE 10. "SUB AMP DOWN PRESS ENTER" Make sure the level of the subwoofer amplifier is turned down to use a laptop make sure there is complete.
... wish to 1/4 gain. "LAPTOP SETUP MODE" If you do not wish to the next step. 16 You may adjust the subwoofer gain after the Imprint process is nothing plugged into the PXE-H660's USB input and launch the IMPRINT setup program included with this unit. SETUP PROCEDURE 10. "SUB AMP DOWN PRESS ENTER" Make sure the level of the subwoofer amplifier is turned down to use a laptop make sure there is complete.
Owners Manual
Page 17
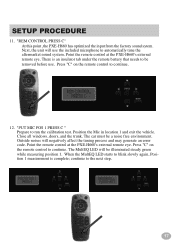
... free environment. Point the remote control at the PXE-H660's external remote eye. "REM CONTROL PRESS C" At this point, the PXE-H660 has optimized the input from the factory sound sytem. Press "C" on the remote control to continue. 12. Outside noises will use . SETUP PROCEDURE 11. When the MultEQ LED starts to blink slowly again, Position 1 measurement is an insulator tab under the remote battery that needs to automatically tune...
... free environment. Point the remote control at the PXE-H660's external remote eye. "REM CONTROL PRESS C" At this point, the PXE-H660 has optimized the input from the factory sound sytem. Press "C" on the remote control to continue. 12. Outside noises will use . SETUP PROCEDURE 11. When the MultEQ LED starts to blink slowly again, Position 1 measurement is an insulator tab under the remote battery that needs to automatically tune...

Owners Manual
Page 20
... all settings, restoring the unit to factory default settings (All setup steps need to be complete. Press "ENTER" to continue. 18. Done After completing the 4 MIC positions, MultEQ setup will be redone after reset). 2) Press and hold RESET button for at least 3 seconds but less than 6 seconds. "SUB AMP UP PRESS ENTER" This is recommended to listen to the system to turn the subwoofer amplifier...
... all settings, restoring the unit to factory default settings (All setup steps need to be complete. Press "ENTER" to continue. 18. Done After completing the 4 MIC positions, MultEQ setup will be redone after reset). 2) Press and hold RESET button for at least 3 seconds but less than 6 seconds. "SUB AMP UP PRESS ENTER" This is recommended to listen to the system to turn the subwoofer amplifier...
Owners Manual
Page 22
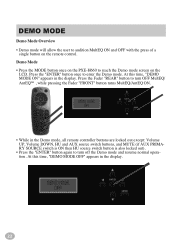
... MODE button once on the PXE-H660 to reach the Demo mode screen on the remote control. Press the "ENTER" button once to turn OFF MultEQ/ AntEQ™ , while pressing the Fader "FRONT" button turns MultEQ/AntEQ ON. • While in the display. 22 Press the Fader "REAR" button to turn off the Demo mode and resume normal operation. At this time, "DEMO MODE ON" appears in the display. DEMO MODE Demo Mode Overview • Demo mode will allow the user...
... MODE button once on the PXE-H660 to reach the Demo mode screen on the remote control. Press the "ENTER" button once to turn OFF MultEQ/ AntEQ™ , while pressing the Fader "FRONT" button turns MultEQ/AntEQ ON. • While in the display. 22 Press the Fader "REAR" button to turn off the Demo mode and resume normal operation. At this time, "DEMO MODE ON" appears in the display. DEMO MODE Demo Mode Overview • Demo mode will allow the user...
Owners Manual
Page 23
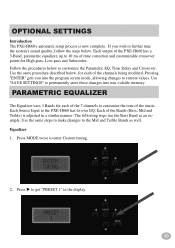
... into non-volatile memory. Use "SAVE SETTINGS" to further tune the system's sound quality, follow the steps below , for each of the music. Pressing "ENTER" gets you wish to permanently store these changes into the program screen mode, allowing changes to the PXE-H660 has its own EQ. The following steps use the Bass Band as well. Each of the channels being modified. Each Source Input to current...
... into non-volatile memory. Use "SAVE SETTINGS" to further tune the system's sound quality, follow the steps below , for each of the music. Pressing "ENTER" gets you wish to permanently store these changes into the program screen mode, allowing changes to the PXE-H660 has its own EQ. The following steps use the Bass Band as well. Each of the channels being modified. Each Source Input to current...
Owners Manual
Page 29
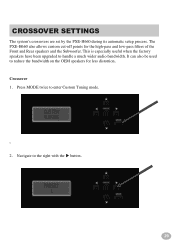
This is especially useful when the factory speakers have been upgraded to the right with the u button. 29 Navigate to handle a much wider audio bandwidth. It can also be used to enter Custom Tuning mode. \\ 2. Press MODE twice to reduce the bandwidth on the OEM speakers for the high-pass and low-pass filters of the Front and Rear speakers and the Subwoofer. The PXE-H660 also allows custom cut-off points for less distortion. Crossover 1. Crossover settings The system's crossovers are set by the PXE-H660 during its automatic setup process.
This is especially useful when the factory speakers have been upgraded to the right with the u button. 29 Navigate to handle a much wider audio bandwidth. It can also be used to enter Custom Tuning mode. \\ 2. Press MODE twice to reduce the bandwidth on the OEM speakers for the high-pass and low-pass filters of the Front and Rear speakers and the Subwoofer. The PXE-H660 also allows custom cut-off points for less distortion. Crossover 1. Crossover settings The system's crossovers are set by the PXE-H660 during its automatic setup process.

Owners Manual
Page 44
... bi-amping the front speakers, FRONT 2 is the set of outputs you use to go the the RCA inputs of the amp for the left signal. Blue/White Remote ON Cable White/Brown Remote Control Cable Blue/White Remote OUT Cable Black Ground Cable Yellow Battery Power Cable 6 CH System with Subwoofer Subwoofer Output Rear Output (L) Rear Output (R) Front 2 Output (L) Front 2 Output (R) Front 1 Output (L) Front 1 Output (R) To factory ampli er turn-on lead or ignition To compatible Alpine AUX source To External Ampli er Remote ON Cable Connect to a metal part...
... bi-amping the front speakers, FRONT 2 is the set of outputs you use to go the the RCA inputs of the amp for the left signal. Blue/White Remote ON Cable White/Brown Remote Control Cable Blue/White Remote OUT Cable Black Ground Cable Yellow Battery Power Cable 6 CH System with Subwoofer Subwoofer Output Rear Output (L) Rear Output (R) Front 2 Output (L) Front 2 Output (R) Front 1 Output (L) Front 1 Output (R) To factory ampli er turn-on lead or ignition To compatible Alpine AUX source To External Ampli er Remote ON Cable Connect to a metal part...
Owners Manual
Page 49
... set -up the sub gain to be removed before use. Reduce the sub amp (s) levels to position area around the car quiet. l1li Place the microphone in position -- The status LED the remote control. Move the microphone to position 4, the middle of the front of America, Inc. r- ~,.""_. , I Press "VOL +" on the PXE-H660's control panel. Press "Enter" on the "Enter" on the remote until the volume level...
... set -up the sub gain to be removed before use. Reduce the sub amp (s) levels to position area around the car quiet. l1li Place the microphone in position -- The status LED the remote control. Move the microphone to position 4, the middle of the front of America, Inc. r- ~,.""_. , I Press "VOL +" on the PXE-H660's control panel. Press "Enter" on the "Enter" on the remote until the volume level...
Owners Manual
Page 54
... aw: E-mail Address: w May we contact you for Product registration Failure to ..www.alpine-usa.com/registration.. CD Player 9. 0 Monitor Controller 10.0 Video Monitor 3. 0 MD Player 11. 0 Navigation 4.0 DVD Player 12.0 Mobile Mayday 5.0 CD Changer 13.0 Video Tape Player 6.0 Amplifier 14. 0 Processor/Equalizer 7.0 Speaker 15.0 Security 8.0 Subwoofer 16.0 Other _ • Model Number: _ • Serial Number: _ • Date of my friends to bUy the newest electronic equipment 3.0 I usually...
... aw: E-mail Address: w May we contact you for Product registration Failure to ..www.alpine-usa.com/registration.. CD Player 9. 0 Monitor Controller 10.0 Video Monitor 3. 0 MD Player 11. 0 Navigation 4.0 DVD Player 12.0 Mobile Mayday 5.0 CD Changer 13.0 Video Tape Player 6.0 Amplifier 14. 0 Processor/Equalizer 7.0 Speaker 15.0 Security 8.0 Subwoofer 16.0 Other _ • Model Number: _ • Serial Number: _ • Date of my friends to bUy the newest electronic equipment 3.0 I usually...


