User Manual
Page 11
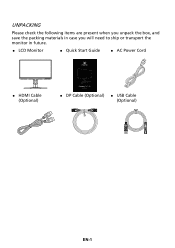
UNPACKING Please check the following items are present when you unpack the box, and save the packing materials in case you will need to ship or transport the monitor in future. LCD Monitor Quick Start Guide AC Power Cord HDMI Cable (Optional) DP Cable (Optional) USB Cable (Optional) EN-1
UNPACKING Please check the following items are present when you unpack the box, and save the packing materials in case you will need to ship or transport the monitor in future. LCD Monitor Quick Start Guide AC Power Cord HDMI Cable (Optional) DP Cable (Optional) USB Cable (Optional) EN-1
User Manual
Page 18
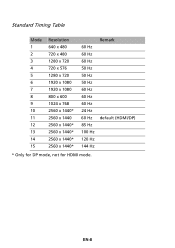
Standard Timing Table Mode 1 2 3 4 5 6 7 8 9 10 11 12 13 14 15 Resolution 640 x 480 720 x 480 1280 x 720 720 x 576 1280 x 720 1920 x 1080 1920 x 1080 800 x 600 1024 x 768 2560 x 1440* 2560 x 1440 2560 x 1440* 2560 x 1440* 2560 x 1440* 2560 x 1440* 60 Hz 60 Hz 60 Hz 50 Hz 50 Hz 50 Hz 60 Hz 60 Hz 60 Hz 24 Hz 60 Hz 85 Hz 100 Hz 120 Hz 144 Hz Remark default (HDMI/DP) * Only for DP mode, not for HDMI mode. EN-8
Standard Timing Table Mode 1 2 3 4 5 6 7 8 9 10 11 12 13 14 15 Resolution 640 x 480 720 x 480 1280 x 720 720 x 576 1280 x 720 1920 x 1080 1920 x 1080 800 x 600 1024 x 768 2560 x 1440* 2560 x 1440 2560 x 1440* 2560 x 1440* 2560 x 1440* 2560 x 1440* 60 Hz 60 Hz 60 Hz 50 Hz 50 Hz 50 Hz 60 Hz 60 Hz 60 Hz 24 Hz 60 Hz 85 Hz 100 Hz 120 Hz 144 Hz Remark default (HDMI/DP) * Only for DP mode, not for HDMI mode. EN-8
User Manual
Page 19
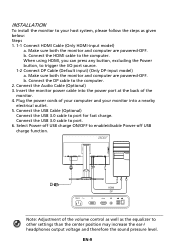
... to the computer. 2. Connect the DP cable to the computer. Select Power-off USB charge function. When using HDMI, you can press any button, excluding the Power button, to enable/disable Power-off USB charge ON/OFF to trigger the I/O port source. 1-2 ...center position may increase the ear-/ headphones output voltage and therefore the sound pressure level. POWER HDMI DP DP HDMI Note: Adjustment of the volume control as well as given below: Steps 1. 1-1 Connect HDMI Cable (Only HDMI-input model) a. INSTALLATION To install the monitor to your monitor into the power port at the...
... to the computer. 2. Connect the DP cable to the computer. Select Power-off USB charge function. When using HDMI, you can press any button, excluding the Power button, to enable/disable Power-off USB charge ON/OFF to trigger the I/O port source. 1-2 ...center position may increase the ear-/ headphones output voltage and therefore the sound pressure level. POWER HDMI DP DP HDMI Note: Adjustment of the volume control as well as given below: Steps 1. 1-1 Connect HDMI Cable (Only HDMI-input model) a. INSTALLATION To install the monitor to your monitor into the power port at the...
User Manual
Page 22
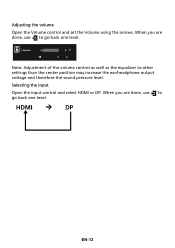
EN-12 Volume 71 Note: Adjustment of the volume control as well as the equalizer to go back one level. Selecting the input Open the input control and select HDMI or DP. When you are done, use to go back one level. Adjusting the volume Open the Volume control and set the Volume using the arrows. When you are done, use to other settings than the center position may increase the ear/headphone output voltage and therefore the sound pressure level.
EN-12 Volume 71 Note: Adjustment of the volume control as well as the equalizer to go back one level. Selecting the input Open the input control and select HDMI or DP. When you are done, use to go back one level. Adjusting the volume Open the Volume control and set the Volume using the arrows. When you are done, use to other settings than the center position may increase the ear/headphone output voltage and therefore the sound pressure level.
User Manual
Page 27
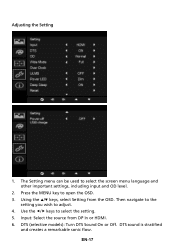
Then navigate to the setting you wish to select the setting. 5. Input: Select the source from the OSD. DTS sound is stratified and creates a remarkable sonic flow. EN-17 Using the / keys, select Setting from DP In or HDMI. 6. Use the / keys to adjust. 4. The Setting menu can be used to open the OSD. 3. Press the MENU key to select the screen menu language and other important settings, including input and OD level. 2. Adjusting the Setting 1. DTS (selective models): Turn DTS Sound On or Off.
Then navigate to the setting you wish to select the setting. 5. Input: Select the source from the OSD. DTS sound is stratified and creates a remarkable sonic flow. EN-17 Using the / keys, select Setting from DP In or HDMI. 6. Use the / keys to adjust. 4. The Setting menu can be used to open the OSD. 3. Press the MENU key to select the screen menu language and other important settings, including input and OD level. 2. Adjusting the Setting 1. DTS (selective models): Turn DTS Sound On or Off.
User Manual
Page 28
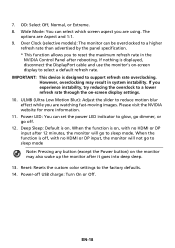
When the function is on, with no HDMI or DP input after rebooting. Reset: Resets the custom color settings to a lower refresh rate through the on -screen display to support refresh rate overclocking. .... * This function allows you experience instability, try reducing the overclock to the factory defaults. 14. The options are using. If nothing is off, with no HDMI or DP input, the monitor will go to sleep mode. ULMB (Ultra Low Motion Blur): Adjust the slider to sleep mode Note: Pressing any button...
When the function is on, with no HDMI or DP input after rebooting. Reset: Resets the custom color settings to a lower refresh rate through the on -screen display to support refresh rate overclocking. .... * This function allows you experience instability, try reducing the overclock to the factory defaults. 14. The options are using. If nothing is off, with no HDMI or DP input, the monitor will go to sleep mode. ULMB (Ultra Low Motion Blur): Adjust the slider to sleep mode Note: Pressing any button...
User Manual
Page 30
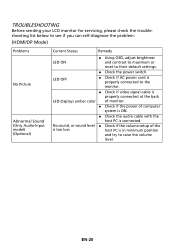
... is connected. TROUBLESHOOTING Before sending your LCD monitor for servicing, please check the troubleshooting list below to see if you can self-diagnose the problem. (HDMI/DP Mode) Problems No Picture Abnormal Sound (Only Audio-Input model) (Optional) Current Status Remedy LED ON Using OSD, adjust brightness and contrast to...
... is connected. TROUBLESHOOTING Before sending your LCD monitor for servicing, please check the troubleshooting list below to see if you can self-diagnose the problem. (HDMI/DP Mode) Problems No Picture Abnormal Sound (Only Audio-Input model) (Optional) Current Status Remedy LED ON Using OSD, adjust brightness and contrast to...


