
User Manual
Page 3
... power from the LCD monitor: • Make sure the monitor is attached to its base before connecting the power cord to the AC power outlet. • Make sure both the LCD monitor and the computer are normal with the LCD monitor and do not indicate a problem. • Due to the nature of the fluorescent light, the screen may flicker during initial use . • The LCD screen has 99.99% or more effective pixels...
... power from the LCD monitor: • Make sure the monitor is attached to its base before connecting the power cord to the AC power outlet. • Make sure both the LCD monitor and the computer are normal with the LCD monitor and do not indicate a problem. • Due to the nature of the fluorescent light, the screen may flicker during initial use . • The LCD screen has 99.99% or more effective pixels...
User Manual
Page 4
... the power cord from the type of time listening to music at high volume. • Avoid turning up the volume to protect it after your ears have adjusted. • Limit the amount of power indicated on the marking label. Do not locate this product on an unstable cart, stand or table. This product should never be blocked or covered...
... the power cord from the type of time listening to music at high volume. • Avoid turning up the volume to protect it after your ears have adjusted. • Limit the amount of power indicated on the marking label. Do not locate this product on an unstable cart, stand or table. This product should never be blocked or covered...
User Manual
Page 5
... a distinct change in too many devices. If power strips are used, the load should not exceed 80% of the equipment plugged into a non-grounded power outlet. Product servicing Do not attempt to dangerous voltage points or other nearby electrical devices that may interfere with the supplied power supply cord set , make sure that the new power cord meets the following the operating instructions The plug only...
... a distinct change in too many devices. If power strips are used, the load should not exceed 80% of the equipment plugged into a non-grounded power outlet. Product servicing Do not attempt to dangerous voltage points or other nearby electrical devices that may interfere with the supplied power supply cord set , make sure that the new power cord meets the following the operating instructions The plug only...

User Manual
Page 6
... more information and help when recycling, please go to turn off the device near gas pumps at Acer are in damage and will often require extensive work by the operating instructions, since improper adjustment of the company's top priorities in the form of salvaging and disposal of our products. Potentially explosive environments Switch off your vehicle engine...
... more information and help when recycling, please go to turn off the device near gas pumps at Acer are in damage and will often require extensive work by the operating instructions, since improper adjustment of the company's top priorities in the form of salvaging and disposal of our products. Potentially explosive environments Switch off your vehicle engine...
User Manual
Page 8
... of a computer. Long work periods, bad posture, poor work habits, stress, inadequate working in front of physical injury. The following tips: • refrain from Sleep mode by adjusting the viewing angle of the monitor, using a footrest, or raising your sitting height to achieve maximum comfort. Tips and information for more comfortable computer use Computer users may lead to remove the strain on your...
... of a computer. Long work periods, bad posture, poor work habits, stress, inadequate working in front of physical injury. The following tips: • refrain from Sleep mode by adjusting the viewing angle of the monitor, using a footrest, or raising your sitting height to achieve maximum comfort. Tips and information for more comfortable computer use Computer users may lead to remove the strain on your...
User Manual
Page 9
... following work habits to reduce eyestrain. ix Taking care of time. Display • Keep your display clean. • Keep your head at a higher level than the top edge of the display so your eyes point downward when looking at the middle of the display. • Adjust the display brightness and/or contrast to an awkward viewing angle. • Avoid looking at bright light sources, such as open windows...
... following work habits to reduce eyestrain. ix Taking care of time. Display • Keep your display clean. • Keep your head at a higher level than the top edge of the display so your eyes point downward when looking at the middle of the display. • Adjust the display brightness and/or contrast to an awkward viewing angle. • Avoid looking at bright light sources, such as open windows...
User Manual
Page 10
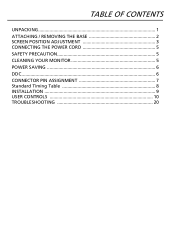
TABLE OF CONTENTS UNPACKING 1 ATTACHING / REMOVING THE BASE 2 SCREEN POSITION ADJUSTMENT 3 CONNECTING THE POWER CORD 5 SAFETY PRECAUTION 5 CLEANING YOUR MONITOR 5 POWER SAVING 6 DDC...6 CONNECTOR PIN ASSIGNMENT 7 Standard Timing Table 8 INSTALLATION 9 USER CONTROLS 10 TROUBLESHOOTING 20
TABLE OF CONTENTS UNPACKING 1 ATTACHING / REMOVING THE BASE 2 SCREEN POSITION ADJUSTMENT 3 CONNECTING THE POWER CORD 5 SAFETY PRECAUTION 5 CLEANING YOUR MONITOR 5 POWER SAVING 6 DDC...6 CONNECTOR PIN ASSIGNMENT 7 Standard Timing Table 8 INSTALLATION 9 USER CONTROLS 10 TROUBLESHOOTING 20
User Manual
Page 11
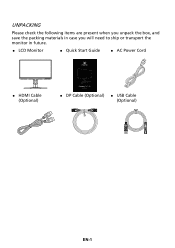
UNPACKING Please check the following items are present when you unpack the box, and save the packing materials in case you will need to ship or transport the monitor in future. LCD Monitor Quick Start Guide AC Power Cord HDMI Cable (Optional) DP Cable (Optional) USB Cable (Optional) EN-1
UNPACKING Please check the following items are present when you unpack the box, and save the packing materials in case you will need to ship or transport the monitor in future. LCD Monitor Quick Start Guide AC Power Cord HDMI Cable (Optional) DP Cable (Optional) USB Cable (Optional) EN-1
User Manual
Page 13
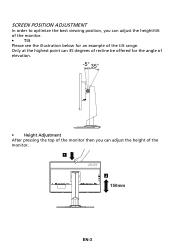
Only at the highest point can 35 degrees of recline be offered for an example of the monitor. 1 2 150mm EN-3 SCREEN POSITION ADJUSTMENT In order to optimize the best viewing position, you can adjust the height/tilt of the monitor. • Tilt Please see the illustration below for the angle of elevation. -5° 35° • Height Adjustment After pressing the top of the monitor then you can adjust the height of the tilt range.
Only at the highest point can 35 degrees of recline be offered for an example of the monitor. 1 2 150mm EN-3 SCREEN POSITION ADJUSTMENT In order to optimize the best viewing position, you can adjust the height/tilt of the monitor. • Tilt Please see the illustration below for the angle of elevation. -5° 35° • Height Adjustment After pressing the top of the monitor then you can adjust the height of the tilt range.
User Manual
Page 15
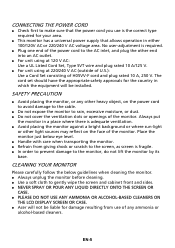
... AMMONIA OR ALCOHOL-BASED CLEANERS ON THE LCD DISPLAY SCREEN OR CASE. Acer will be liable for your area. This monitor has a universal power supply that the power cord you use of any other heavy object, on the face of the monitor. EN-5 No user-adjustment is adequate ventilation. Avoid placing the monitor against a bright background or where sun-light or other end into...
... AMMONIA OR ALCOHOL-BASED CLEANERS ON THE LCD DISPLAY SCREEN OR CASE. Acer will be liable for your area. This monitor has a universal power supply that the power cord you use of any other heavy object, on the face of the monitor. EN-5 No user-adjustment is adequate ventilation. Avoid placing the monitor against a bright background or where sun-light or other end into...
User Manual
Page 16
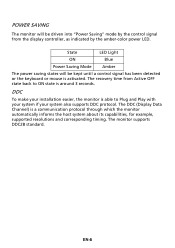
... amber-color power LED. DDC To make your installation easier, the monitor is able to ON state is around 3 seconds. POWER SAVING The monitor will be driven into "Power Saving" mode by the control signal from Active OFF state back to Plug and Play with your system if your system also supports DDC protocol. The DDC (Display Data Channel) is activated. EN-6 State LED Light ON Blue Power Saving Mode Amber The power saving states...
... amber-color power LED. DDC To make your installation easier, the monitor is able to ON state is around 3 seconds. POWER SAVING The monitor will be driven into "Power Saving" mode by the control signal from Active OFF state back to Plug and Play with your system if your system also supports DDC protocol. The DDC (Display Data Channel) is activated. EN-6 State LED Light ON Blue Power Saving Mode Amber The power saving states...
User Manual
Page 19
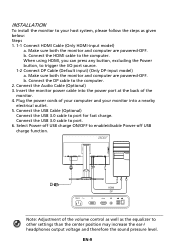
... powered-OFF. When using HDMI, you can press any button, excluding the Power button, to port. 6. Make sure both the monitor and computer are powered-OFF. b. Connect the USB 3.0 cable to trigger the I/O port source. 1-2 Connect DP Cable (Default input) (Only DP-input model) a. Connect the HDMI cable to the computer. 2. Connect the DP cable to the computer. Connect the USB Cable (Optional) Connect the USB 3.0 cable to enable/disable Power-off USB charge function. Select Power-off USB charge ON/OFF to port for fast charge. Plug the power cords...
... powered-OFF. When using HDMI, you can press any button, excluding the Power button, to port. 6. Make sure both the monitor and computer are powered-OFF. b. Connect the USB 3.0 cable to trigger the I/O port source. 1-2 Connect DP Cable (Default input) (Only DP-input model) a. Connect the HDMI cable to the computer. 2. Connect the DP cable to the computer. Connect the USB Cable (Optional) Connect the USB 3.0 cable to enable/disable Power-off USB charge function. Select Power-off USB charge ON/OFF to port for fast charge. Plug the power cords...
User Manual
Page 20
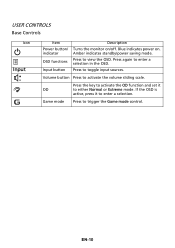
Blue indicates power on /off. Press again to trigger the Game mode control. Game mode Press to enter a selection in the OSD. If the OSD is active, press it OD to either Normal or Extreme mode. Press the key to activate the OD function and set it to view the OSD. Press to activate the volume sliding scale. Amber indicates standby/power saving mode. Volume button Press to toggle input sources. Press to enter a selection. USER CONTROLS Base Controls Icon Input Item Power button/ indicator OSD functions Input button Description Turns the monitor on . EN-10
Blue indicates power on /off. Press again to trigger the Game mode control. Game mode Press to enter a selection in the OSD. If the OSD is active, press it OD to either Normal or Extreme mode. Press the key to activate the OD function and set it to view the OSD. Press to activate the volume sliding scale. Amber indicates standby/power saving mode. Volume button Press to toggle input sources. Press to enter a selection. USER CONTROLS Base Controls Icon Input Item Power button/ indicator OSD functions Input button Description Turns the monitor on . EN-10
User Manual
Page 21
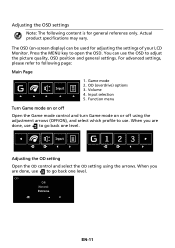
... off Open the Game mode control and turn Game mode on -screen display) can use to adjust the picture quality, OSD position and general settings. Function menu Turn Game mode on or off using the arrows. When you are done, use the OSD to go back one level. PE Off Normal Extreme EN-11 Volume 4. For advanced settings, please refer to open the OSD. Adjusting the OD setting Open the OD control and select the OD setting using the adjustment...
... off Open the Game mode control and turn Game mode on -screen display) can use to adjust the picture quality, OSD position and general settings. Function menu Turn Game mode on or off using the arrows. When you are done, use the OSD to go back one level. PE Off Normal Extreme EN-11 Volume 4. For advanced settings, please refer to open the OSD. Adjusting the OD setting Open the OD control and select the OD setting using the adjustment...
User Manual
Page 24
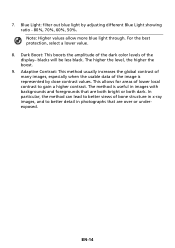
... foregrounds that are both bright or both dark. This allows for areas of the display- For the best protection, select a lower value. 8. blacks will be less black. EN-14 Blue Light: filter out blue light by close contrast values. Dark Boost: This boosts the amplitude of the dark color levels of lower local contrast to better views of the image is useful in photographs that...
... foregrounds that are both bright or both dark. This allows for areas of the display- For the best protection, select a lower value. 8. blacks will be less black. EN-14 Blue Light: filter out blue light by close contrast values. Dark Boost: This boosts the amplitude of the dark color levels of lower local contrast to better views of the image is useful in photographs that...
User Manual
Page 25
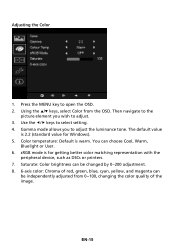
..., changing the color quality of red, green, blue, cyan, yellow, and magenta can be changed by 0~200 adjustment. 8. 6-axis color: Chroma of the image. Use the / keys to open the OSD. 2. Color temperature: Default is for Windows). 5. Saturate: Color brightness can choose Cool, Warm, Bluelight or User. 6. Then navigate to the picture element you to adjust. 3. EN-15 sRGB mode is warm. You can be independently adjusted from the OSD. Adjusting the Color...
..., changing the color quality of red, green, blue, cyan, yellow, and magenta can be changed by 0~200 adjustment. 8. 6-axis color: Chroma of the image. Use the / keys to open the OSD. 2. Color temperature: Default is for Windows). 5. Saturate: Color brightness can choose Cool, Warm, Bluelight or User. 6. Then navigate to the picture element you to adjust. 3. EN-15 sRGB mode is warm. You can be independently adjusted from the OSD. Adjusting the Color...
User Manual
Page 26
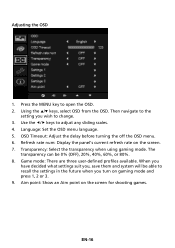
... OSD 1. Then navigate to change. 3. OSD Timeout: Adjust the delay before turning the off the OSD menu. 6. Language: Set the OSD menu language. 5. Transparency: Select the transparency when using gaming mode. EN-16 The transparency can be able to recall the settings in the future when you wish to the setting you turn on gaming mode and press 1, 2 or 3. 9. Use the / keys to open the OSD. 2. Refresh rate num: Display the panel's current refresh rate...
... OSD 1. Then navigate to change. 3. OSD Timeout: Adjust the delay before turning the off the OSD menu. 6. Language: Set the OSD menu language. 5. Transparency: Select the transparency when using gaming mode. EN-16 The transparency can be able to recall the settings in the future when you wish to the setting you turn on gaming mode and press 1, 2 or 3. 9. Use the / keys to open the OSD. 2. Refresh rate num: Display the panel's current refresh rate...
User Manual
Page 27
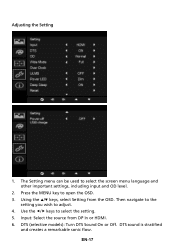
Using the / keys, select Setting from DP In or HDMI. 6. Use the / keys to adjust. 4. DTS (selective models): Turn DTS Sound On or Off. DTS sound is stratified and creates a remarkable sonic flow. Adjusting the Setting 1. Then navigate to the setting you wish to select the setting. 5. EN-17 Input: Select the source from the OSD. Press the MENU key to select the screen menu language and other important settings, including input and OD level. 2. The Setting menu can be used to open the OSD. 3.
Using the / keys, select Setting from DP In or HDMI. 6. Use the / keys to adjust. 4. DTS (selective models): Turn DTS Sound On or Off. DTS sound is stratified and creates a remarkable sonic flow. Adjusting the Setting 1. Then navigate to the setting you wish to select the setting. 5. EN-17 Input: Select the source from the OSD. Press the MENU key to select the screen menu language and other important settings, including input and OD level. 2. The Setting menu can be used to open the OSD. 3.
User Manual
Page 28
.... Reset: Resets the custom color settings to select a default refresh rate. 7. If nothing is on, with no HDMI or DP input after rebooting. Wide Mode: You can set the power LED indicator to glow, go dimmer, or go to sleep mode Note: Pressing any button (except the Power button) on -screen display settings. 10. Power LED: You can select which screen aspect you experience instability, try reducing the overclock to a higher refresh rate than advertised by the panel specification...
.... Reset: Resets the custom color settings to select a default refresh rate. 7. If nothing is on, with no HDMI or DP input after rebooting. Wide Mode: You can set the power LED indicator to glow, go dimmer, or go to sleep mode Note: Pressing any button (except the Power button) on -screen display settings. 10. Power LED: You can select which screen aspect you experience instability, try reducing the overclock to a higher refresh rate than advertised by the panel specification...
User Manual
Page 30
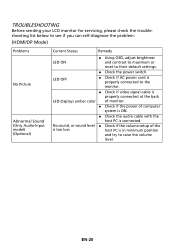
...; Check if AC power cord is properly connected to their default settings. Check the power switch. TROUBLESHOOTING Before sending your LCD monitor for servicing, please check the troubleshooting list below to see if you can self-diagnose the problem. (HDMI/DP Mode) Problems No Picture Abnormal Sound (Only Audio-Input model) (Optional) Current Status Remedy LED ON Using OSD, adjust brightness and contrast to maximum or reset to the monitor. Check if video signal cable is properly connected at the back LED displays amber color of monitor. Check...
...; Check if AC power cord is properly connected to their default settings. Check the power switch. TROUBLESHOOTING Before sending your LCD monitor for servicing, please check the troubleshooting list below to see if you can self-diagnose the problem. (HDMI/DP Mode) Problems No Picture Abnormal Sound (Only Audio-Input model) (Optional) Current Status Remedy LED ON Using OSD, adjust brightness and contrast to maximum or reset to the monitor. Check if video signal cable is properly connected at the back LED displays amber color of monitor. Check...


