Acer P186H Support Question
Acer P186H Support Question
Find answers below for this question about Acer P186H.Need a Acer P186H manual? We have 2 online manuals for this item!
Question posted by chrisferna93 on October 15th, 2011
Does P186h Has Dvi? Is It Possible To Connect My Ps3 To The Monitor (hdmi-dvi)?
I want to connect my ps3 to my monitor but i only see a vga input. Is there any way i can connect ps3 to vga? My monitor is a p186h
Current Answers
Answer #1: Posted by pchelper on October 27th, 2011 9:23 PM
pchelper

Member since:
October 20th, 2011 Points: 206,890

Member since:
October 20th, 2011 Points: 206,890
The PS3 is very picky about what monitors it will work with. In particular, monitors that are not HDCP-compliant will NOT work with the PS3 most of the time.
And, not all DVI-equipped monitors are HDCP-compliant.
So before you devote your time and money buying that DVI-to-HDMI cable, you might want to check if your monitor is HDCP-compliant first.
And, not all DVI-equipped monitors are HDCP-compliant.
So before you devote your time and money buying that DVI-to-HDMI cable, you might want to check if your monitor is HDCP-compliant first.
Related Acer P186H Manual Pages
Quick Start Guide - Page 1

...monitor in the monitor's power port and the electrical outlet. Connecting Your Monitor to the computer.
1-2
Connect digital Cable (Only Dual-Input Model)
a.
If your monitor near an easily accessible electrical outlet. • Place the monitor...
Connect one end of the 24-pin DVI cable to rest on but be
blocked or covered. Connect power cord
Connect the power cord to the monitor,...
Quick Start Guide - Page 2

...the Federal Communications Commission, to operate this LCD monitor is in a residential installation. If this equipment...health and the environment. Notice: Shielded cables
All connections to radio or television reception, which the receiver
...may cause undesired operation.
Notice: Peripheral devices
Only peripherals (input/output devices, terminals, printers, etc.) certified to comply...
User Manual - Page 1

TABLE OF CONTENTS
Special notes on LCD monitors 1 Information for your safety and comfort 2 Unpacking 5 Attaching/Removing the base 6 Screen position adjustment 6 Connecting the power cord 7 Safety precaution 7 Cleaning your monitor 7 Power saving 8 DDC 8 Connector Pin Assignment 9 Standard Timing Table 11 Installation 12 User controls 13 Troubleshooting 19
User Manual - Page 2

... following symptoms are normal with LCD monitor and do not indicate a problem. In this case, the screen is displayed for hours. Turn off the Power Switch for hours. It may include blemishes ...
User Manual - Page 3

... in a built-in a fire or electric shock. If the
product falls, it under sporting, exercising, or any kind into this product through cabinet
slots as possible.
Warnings
•
Do not use it could
result in installation
unless proper ventilation is easily accessible and located as close to protect it from lithium...
User Manual - Page 4

..., indicating a need for service
•
the product does not operate normally after following symptoms may complain of eyestrain and headaches after long hours of the monitor, using a footrest,
or raising your sitting height to qualified service person- Long
work periods, bad posture, poor work by adjusting the viewing angle of working...
User Manual - Page 5

... couch or bed. We do some stretching exercises.
•
Breathe fresh air as often as possible.
•
Exercise regularly and maintain a healthy body.
For more than the top edge of ... and mouse properly and within comfort
able reach
•
if you view your monitor more information and help in such a way that the side faces the window or any light
source
• minimizing room...
User Manual - Page 6

UNPACKING
Please check the following items are present when you unpack the box, and save the packing materials in case you will need to ship or transport the monitor in future.
• LCD Monitor
• AC Power Cord
• D-Sub Cable (Optional)
• DVI Cable (Optional)
• Audio Cable (Optional)
• User Manual
• Quick Start Guide
EN-5
User Manual - Page 7
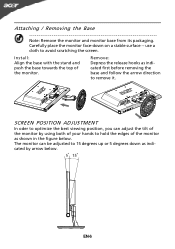
...oder to optimize the best viewing position, you can be adjusted to hold the edges of the monitor. EN-6 Carefully place the monitor face-down as indicated by using both of your hands to 15 degrees up or 5 degrees... with the stand and push the base towards the top of the monitor as indicated first before removing the base and follow the arrow direction to avoid scratching the screen.
The...
User Manual - Page 8

... the ventilation slots or openings of the monitor. CLEANING YOUR MONITOR
Please carefully follow the below eye level. • Handle with care when transporting the monitor. • Refrain from giving shock or... of U.S.): Use a Cord Set consisting of H05VV-F cord and plug rated 10 A, 250 V. CONNECTING THE POWER CORD
• Check first to make sure that allows operation in either 100/120V AC...
User Manual - Page 9

... is around 3 seconds. The DDC (Display Data Channel) is a communication protocol through which the monitor automatically informs the host system about its capabilities, for example, supported resolutions and corresponding timing.
The monitor supports DDC2B standard. Power saving
The monitor will be driven into Power Saving" mode by the control signal from Active OFF...
User Manual - Page 10

DESCRIPTION Red
Green Blue Monitor Ground DDC-return R-Ground G-Ground B-Ground
PIN NO. 9. 10. 11. 12. 13. 14. 15. DESCRIPTION +5V
Logic Ground Monitor Ground DDC-Serial Data
H-Sync V-Sync DDC-Serial Clock
EN-9
CONNECTOR PIN ASSIGNMENT
15-Pin Color Display Signal Cable
PIN NO. 1. 2. 3. 4. 5. 6. 7. 8.
User Manual - Page 13

... below: Steps 1. 1-1 Connect Video Cable
a. Connect the VGA video cable to the computer's port. 2. Power-ON Monitor and Computer Power-ON the monitor first, then power-ON the computer. Connect one end of the 24-pin DVI cable to the back of the monitor and connect the other end to the computer. 1-2 Connect digital Cable (Only Dual-Input Model) a. EN-12...
User Manual - Page 14

... shortcut menu. MENU OSD functions Press this button to activate the OSD menu. VGA or DVI If either VGA or DVI input is used to your monitor. (a) VGA input (b) DVI input As you cycle through the sources you quickly select the most commonly accessed settings. It may be connected to set the HPos, VPos, Clock and Focus. Using the Shortcut Menu...
User Manual - Page 16

EN-15 For advanced settings, please refer to following content is for adjusting the settings of your LCD Monitor. The OSD can be used for general reference only. You can be used to adjust the current Brightness, Contrast,
Colour Temp, Auto Config and other ...
User Manual - Page 19

EN-18
Then the
basic information of LCD monitor will show up the OSD. 2 Using the / keys, select Information from the OSD. Product information
1 Press the MENU key to bring up for current input.
User Manual - Page 20

...can self-diagnose the problem.
(VGA Mode)
Problems
Current Status Remedy
LED ON
· Using OSD, adjust brightness and contrast to maximum or reset to the monitor. No Picture
· Check ... compliance which may be causing the input signal frequency mismatch. LED displays amber color
· Check if video signal cable is properly connected at the back of monitor.
· Check if the power...
User Manual - Page 21

... sound, or sound level is too low
· Check the audio cable with the host PC is connected.
· Check if the volume setup of computer system is in minimum position and try to raise ...amber color
· Check if video signal cable is properly connected at the back of monitor.
· Check if the power of the host PC is ON. (DVI Mode)
Problems Current Status Remedy
LED ON
· Using ...
User Manual - Page 22

[email protected]
And, Acer Europe SA Via Cantonale, Centro Galleria 2 6928 Manno Switzerland
Hereby declare that: Product: Trade Name: Model Number:
SKU Number:
LCD Monitor Acer P186Hxxxxxx;P196HQxxxxxx("x" = 0~9, a ~ z, or A ~ Z)
P186Hxxxxxx;P196HQxxxxxx("x" = 0~9, a ~ z, or A ~ Z)
Is compliant with the essential requirements and other relevant provisions of the following EC directives, and that...
User Manual - Page 23
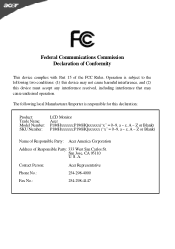
...15 of Responsible Party: 333 West San Carlos St. The following two conditions: (1) this device may not cause harmful interference, and (2) this declaration:
Product:
LCD Monitor
Trade Name: Acer
Model Number: P186Hxxxxxx;P196HQxxxxxx("x" = 0~9, a ~ z, A ~ Z or Blank)
SKU Number: P186Hxxxxxx;P196HQxxxxxx ("x" = 0~9, a ~ z, A ~ Z or Blank)
Name of Responsible Party: Acer America Corporation...
Similar Questions

Hdmi Connection Issues
I owned this monitor for more than 6 years, and start to realize the problem is quite significant. 1...
I owned this monitor for more than 6 years, and start to realize the problem is quite significant. 1...
(Posted by ombulin48 8 years ago)

Pedastal Base Stand For P186h
My Monitor Was Shipped With What I Beleive Was The Wrong Stand Or Missing Other Parts Needed To Use ...
My Monitor Was Shipped With What I Beleive Was The Wrong Stand Or Missing Other Parts Needed To Use ...
(Posted by DWWSCC 11 years ago)


When I Plug My Monitor In, The Screen Is Dark. I Can Barely See Anything.
(Posted by stevep0713 12 years ago)