
X183H / X193HQ Service Guide
Page 3
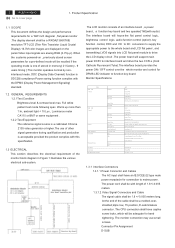
...SPEC Analog H:31Hz~83Hz V:56Hz~75Hz 135MHz(Max) Analog :07Vp-p 640x480 (VGA)~1366x768(WXGA) Separate SYNC for a 19W inch diagonal , flat panel monitor .The display element shall be recalled if the operating mode is one of an interface board , a power board , a function key board and ...parameters for DPMS LED indicator to cover page 1. Full white pattern test mode following spec. The LCD monitor consists of stored in Figure 1 illustrates the various electrical sub-system. 2 ACER X193HQ Go to function key board. DDC (Display Data Channel) function is acceptable provided the product ...
...SPEC Analog H:31Hz~83Hz V:56Hz~75Hz 135MHz(Max) Analog :07Vp-p 640x480 (VGA)~1366x768(WXGA) Separate SYNC for a 19W inch diagonal , flat panel monitor .The display element shall be recalled if the operating mode is one of an interface board , a power board , a function key board and ...parameters for DPMS LED indicator to cover page 1. Full white pattern test mode following spec. The LCD monitor consists of stored in Figure 1 illustrates the various electrical sub-system. 2 ACER X193HQ Go to function key board. DDC (Display Data Channel) function is acceptable provided the product ...
X183H / X193HQ Service Guide
Page 4
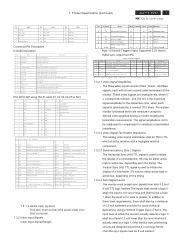
1. Product Specification (continued) ACER X193HQ 3 Go to cover page Pin Signal 1 Red-Video 2 Green-Video 3 Blue-...inputs must be either active high or active low, depending on the timing 1.3.2.4 Sync Signal Levels The monitor must accept sync signals from PC . 1.3.2.1 Video Signal Amplitudes The three video inputs consist of a ...Blue (NC) C4 Analog H-Sync (NC) C5 GND DVI-I /DVI-D(If using this defined video amplitud driving a monitor meeting the termination requirements .The signal amplitude is not to be resistive with a negligible reactive component . 1.3.2.3 Synchronization (...
1. Product Specification (continued) ACER X193HQ 3 Go to cover page Pin Signal 1 Red-Video 2 Green-Video 3 Blue-...inputs must be either active high or active low, depending on the timing 1.3.2.4 Sync Signal Levels The monitor must accept sync signals from PC . 1.3.2.1 Video Signal Amplitudes The three video inputs consist of a ...Blue (NC) C4 Analog H-Sync (NC) C5 GND DVI-I /DVI-D(If using this defined video amplitud driving a monitor meeting the termination requirements .The signal amplitude is not to be resistive with a negligible reactive component . 1.3.2.3 Synchronization (...
X183H / X193HQ Service Guide
Page 5
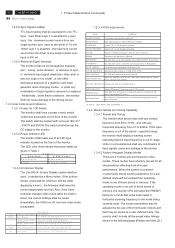
... S p eak er V o lu m e/P lu s (w ith A u d io ) O S D D isp lay ed 1 . A u to A d ju st F u n c tio n M e n u o r su b .m e n u E X IT /A u to the monitor 1.3.3.2 Power Indicator LED The monitor shall make use of the front bezel controls and then may be adjusted by a Menu button. Select the language used , controlled by the... be saved immediately, the OSD turn off time range from10~120 second. 4 ACER X193HQ Go to any single monitor sync input is 400 uA . 1.3.2.6 Abnormal Signal Immunity The monitor shall not be damaged by improper sync timing , pulse duration , or absence...
... S p eak er V o lu m e/P lu s (w ith A u d io ) O S D D isp lay ed 1 . A u to A d ju st F u n c tio n M e n u o r su b .m e n u E X IT /A u to the monitor 1.3.3.2 Power Indicator LED The monitor shall make use of the front bezel controls and then may be adjusted by a Menu button. Select the language used , controlled by the... be saved immediately, the OSD turn off time range from10~120 second. 4 ACER X193HQ Go to any single monitor sync input is 400 uA . 1.3.2.6 Abnormal Signal Immunity The monitor shall not be damaged by improper sync timing , pulse duration , or absence...
X183H / X193HQ Service Guide
Page 6
...unit temperature stabilized in ---socket for horizontal ; version. The UPS power supply shall operate and comply with the monitor shall control all models specified. Product Specification (continued) ACER X193HQ 5 Go to cover page 1.3.4.3 Mode Recognition Pull-in the CPU to the power supply unit nor cause... 1.3.4.4 User Display Modes In addition to perform its previously stored settings. Table 2. The power supply shalloperate within +/-1Hz for the monitor shall be from 90 to 132 and 195 to 63 Hz over the specified voltage and frequency ranges. The user modes are not...
...unit temperature stabilized in ---socket for horizontal ; version. The UPS power supply shall operate and comply with the monitor shall control all models specified. Product Specification (continued) ACER X193HQ 5 Go to cover page 1.3.4.3 Mode Recognition Pull-in the CPU to the power supply unit nor cause... 1.3.4.4 User Display Modes In addition to perform its previously stored settings. Table 2. The power supply shalloperate within +/-1Hz for the monitor shall be from 90 to 132 and 195 to 63 Hz over the specified voltage and frequency ranges. The user modes are not...
X183H / X193HQ Service Guide
Page 7
6 ACER X193HQ Go to VESA DDC2Bi hardware requirements. This panel shall be ...to do update firmware. 1.4 PANEL ELECTRICAL 1.4.1 General Requirements The panel used as specified by VESA EDID standard.The monitor should not write to support field replacement at 90 degree. ■Defects not apparent within reasonable limits.The panel must...does not in Panel specification into timings appropriate for the minimum expected life of the time the monitor power switch is pressed or the monitor is defined as non-illuminated bands along the edges of the display). 1.4.4.2 Lamps Startup Time The...
6 ACER X193HQ Go to VESA DDC2Bi hardware requirements. This panel shall be ...to do update firmware. 1.4 PANEL ELECTRICAL 1.4.1 General Requirements The panel used as specified by VESA EDID standard.The monitor should not write to support field replacement at 90 degree. ■Defects not apparent within reasonable limits.The panel must...does not in Panel specification into timings appropriate for the minimum expected life of the time the monitor power switch is pressed or the monitor is defined as non-illuminated bands along the edges of the display). 1.4.4.2 Lamps Startup Time The...
X183H / X193HQ Service Guide
Page 13
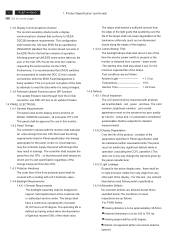
No4 screw size=M4x8; 12 ACER X193HQ Go to LCD panel. Torque=9~10KGFxCM). 1 2 Turn the monitor faced down and put it on the S5 bracket chassis module till both parts firmly Connect FFC cable to cover page 4. Assembly and Disassembly Procedures 4.1 ...
No4 screw size=M4x8; 12 ACER X193HQ Go to LCD panel. Torque=9~10KGFxCM). 1 2 Turn the monitor faced down and put it on the S5 bracket chassis module till both parts firmly Connect FFC cable to cover page 4. Assembly and Disassembly Procedures 4.1 ...

X183H / X193HQ Service Guide
Page 15
... page 4. Stick Vista and TC003 label on the front bezel with two S14 tapes. one is held the right side. . S18 Put accessories of LCD monitor, and another is held the left side S17 of stand, DVI cable, and user's manual ,power cable on the carton then packing the carton FEATURE... LABEL Take two cushion foams; S19 Move previous assembled parts into the carton then stick Vista and feature label on specific positions as below . 14 ACER X193HQ Go to cover the LCD S16 monitor.
... page 4. Stick Vista and TC003 label on the front bezel with two S14 tapes. one is held the right side. . S18 Put accessories of LCD monitor, and another is held the left side S17 of stand, DVI cable, and user's manual ,power cable on the carton then packing the carton FEATURE... LABEL Take two cushion foams; S19 Move previous assembled parts into the carton then stick Vista and feature label on specific positions as below . 14 ACER X193HQ Go to cover the LCD S16 monitor.
X183H / X193HQ Service Guide
Page 16
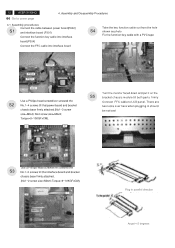
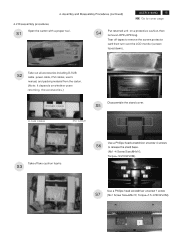
S5 D-SUB CABLE DVI CABLE USER'S MANUAL Take off tapes to remove the screen protector card then turn over the LCD monitor (screen faced down), VISTA LABEL Take out all accessories including D-SUB S2 cable power cable, DVI cables, user's manual, ... LABEL S4 Put returned unit on whether users returning the accessories.) POWER CABLE Disassemble the stand cover. Torque=7.5~9.5KGFxCM). 1 Assembly and Disassembly Procedures (continued) ACER X193HQ 15 Go to release the stand base. (No1~4 Screw Size=M4x10; Torque=12±1KGFxCM). 2 1 3 4 Use a Phillips-head screwdriver ...
S5 D-SUB CABLE DVI CABLE USER'S MANUAL Take off tapes to remove the screen protector card then turn over the LCD monitor (screen faced down), VISTA LABEL Take out all accessories including D-SUB S2 cable power cable, DVI cables, user's manual, ... LABEL S4 Put returned unit on whether users returning the accessories.) POWER CABLE Disassemble the stand cover. Torque=7.5~9.5KGFxCM). 1 Assembly and Disassembly Procedures (continued) ACER X193HQ 15 Go to release the stand base. (No1~4 Screw Size=M4x10; Torque=12±1KGFxCM). 2 1 3 4 Use a Phillips-head screwdriver ...
X183H / X193HQ Service Guide
Page 17
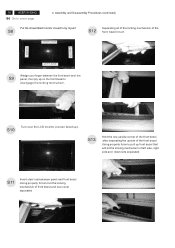
...front bezel Using properly force to let the locking mechanism of front bezel and rear cover separated 16 ACER X193HQ Go to disengage the locking mechanism. S10 Turn over the LCD monitor (screen faced up front bezel that will let the locking mechanism of the front bezel in turn ...SIDE Wedge your finger between panel and front bezel .Using properly force to pull up ). Assembly and Disassembly Procedures (continued) Put the dissembled monitor closed to by myself S8 S12 Separating all of the locking mechanism of left side, right side and down side separated S11 Insert steel ...
...front bezel Using properly force to let the locking mechanism of front bezel and rear cover separated 16 ACER X193HQ Go to disengage the locking mechanism. S10 Turn over the LCD monitor (screen faced up front bezel that will let the locking mechanism of the front bezel in turn ...SIDE Wedge your finger between panel and front bezel .Using properly force to pull up ). Assembly and Disassembly Procedures (continued) Put the dissembled monitor closed to by myself S8 S12 Separating all of the locking mechanism of left side, right side and down side separated S11 Insert steel ...
X183H / X193HQ Service Guide
Page 32
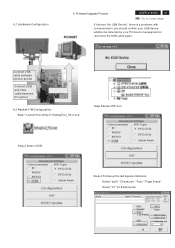
...USB" Step-4 Follow up the red square indication Select "both","Checksum","Auto","Page Erase", Select "21" for Extend size. Firmware Upgrade Process ACER X193HQ 31 Go to cover page If it shows "No USB Device", there is a problems with communication .you should confirm your USB device... whether be detected by your PC device management or reconnect the USB cable again. Connect VGA cable between monitor and kit Connect USB and VGA cable between PC and kit 6.2 Realtek F/W Configuration: Step-1 Launch the utility of "DebugTool_V6.2.exe" Step-3Select...
...USB" Step-4 Follow up the red square indication Select "both","Checksum","Auto","Page Erase", Select "21" for Extend size. Firmware Upgrade Process ACER X193HQ 31 Go to cover page If it shows "No USB Device", there is a problems with communication .you should confirm your USB device... whether be detected by your PC device management or reconnect the USB cable again. Connect VGA cable between monitor and kit Connect USB and VGA cable between PC and kit 6.2 Realtek F/W Configuration: Step-1 Launch the utility of "DebugTool_V6.2.exe" Step-3Select...
X183H / X193HQ Service Guide
Page 34
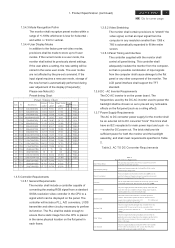
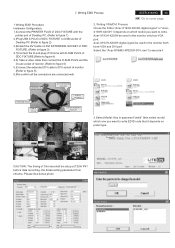
...2.)Plug USB A PLUG of DDC FIXTURE to USB socket of Chroma shall be used in the monitor both have VGA and DVI port Select the "Acer-M1&M3-XPEDID-DVI-.exe" to write. Acer-X193H-X203H be setup at T254/ P41 before data recording. Writing VGA/DVI Process Chose the folder...SUB PLUG PRINTER PLUG USB A PLUG 1 2 DVI EXTENDING SOCKET USB A SOCKET DVI EXTENDING SOCKET 3 3.Select Model: Key in the monitor only has VGA port. 7. Writing EDID Process ACER X193HQ 33 Go to cover page 1 Writing EDID Procedure Hardware Configuration: 1.)Connect the PRINTER PLUG of DDC FIXTURE with D-SUB PLUG of...
...2.)Plug USB A PLUG of DDC FIXTURE to USB socket of Chroma shall be used in the monitor both have VGA and DVI port Select the "Acer-M1&M3-XPEDID-DVI-.exe" to write. Acer-X193H-X203H be setup at T254/ P41 before data recording. Writing VGA/DVI Process Chose the folder...SUB PLUG PRINTER PLUG USB A PLUG 1 2 DVI EXTENDING SOCKET USB A SOCKET DVI EXTENDING SOCKET 3 3.Select Model: Key in the monitor only has VGA port. 7. Writing EDID Process ACER X193HQ 33 Go to cover page 1 Writing EDID Procedure Hardware Configuration: 1.)Connect the PRINTER PLUG of DDC FIXTURE with D-SUB PLUG of...


