
User Manual
Page 1
Acer Projector X1185/X1185N/X1285/X1285N/ S1285/P1185/P1285/P1385W/ X1385WH/H6518BD Series User's Guide
Acer Projector X1185/X1185N/X1285/X1285N/ S1285/P1185/P1285/P1385W/ X1385WH/H6518BD Series User's Guide
User Manual
Page 2
...date and place of purchase information in new editions of Acer Incorporated. "HDMITM, the HDMI logo and High-Definition Multimedia Interface are used herein for a particular purpose. All correspondence concerning your projector. Other companies' product names or trademarks are trademarks ...recording or otherwise, without obligation to their respective companies. Copyright © 2015. Acer Projector Model number Serial number Date of purchase Place of purchase Acer and the Acer logo are recorded on the label affixed to the contents hereof and specifically disclaims ...
...date and place of purchase information in new editions of Acer Incorporated. "HDMITM, the HDMI logo and High-Definition Multimedia Interface are used herein for a particular purpose. All correspondence concerning your projector. Other companies' product names or trademarks are trademarks ...recording or otherwise, without obligation to their respective companies. Copyright © 2015. Acer Projector Model number Serial number Date of purchase Place of purchase Acer and the Acer logo are recorded on the label affixed to the contents hereof and specifically disclaims ...
User Manual
Page 3
... to ensure reliable operation of the product and to unplug the power cord from the wall outlet before removing the power supply unit from the projector. • If the system has multiple sources of any kind into the product.
... to ensure reliable operation of the product and to unplug the power cord from the wall outlet before removing the power supply unit from the projector. • If the system has multiple sources of any kind into the product.
User Manual
Page 5
... to qualified service personnel when: • the power cord or plug is damaged, cut or frayed • liquid was spilled into the projector's lens when the lamp is poorly ventilated or confined. Do not operate if smoke, strange noise or odor comes out of your reseller for... normal condition. For safety reasons, do not use non-compliant parts when adding or changing components. Consult your projector. Keep them out of the reach of air around the projector are necessary. • Locations where temperatures may become excessively high, such as opening or removing covers may contain...
... to qualified service personnel when: • the power cord or plug is damaged, cut or frayed • liquid was spilled into the projector's lens when the lamp is poorly ventilated or confined. Do not operate if smoke, strange noise or odor comes out of your reseller for... normal condition. For safety reasons, do not use non-compliant parts when adding or changing components. Consult your projector. Keep them out of the reach of air around the projector are necessary. • Locations where temperatures may become excessively high, such as opening or removing covers may contain...
User Manual
Page 6
...This product is on the remote control. • Do not operate lamps beyond the rated lamp life. It may hurt your local dealer or Acer service center when you . • Do not stand the projector on end vertically. In this case, unplug immediately and contact your local dealer or... Acer service center for inspection. • Do not face the projector lens to change the lamp. • The product will detect the life of displaying inverted images...
...This product is on the remote control. • Do not operate lamps beyond the rated lamp life. It may hurt your local dealer or Acer service center when you . • Do not stand the projector on end vertically. In this case, unplug immediately and contact your local dealer or... Acer service center for inspection. • Do not face the projector lens to change the lamp. • The product will detect the life of displaying inverted images...
User Manual
Page 7
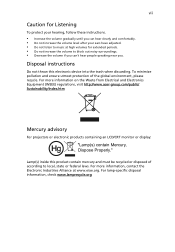
... increase the volume to local, state or federal laws. For more information on the Waste from Electrical and Electronics Equipment (WEEE) regulations, visit http://www.acer-group.com/public/ Sustainability/index.htm Mercury advisory For projectors or electronic products containing an LCD/CRT monitor or display: "Lamp(s) contain Mercury, Dispose Properly."
... increase the volume to local, state or federal laws. For more information on the Waste from Electrical and Electronics Equipment (WEEE) regulations, visit http://www.acer-group.com/public/ Sustainability/index.htm Mercury advisory For projectors or electronic products containing an LCD/CRT monitor or display: "Lamp(s) contain Mercury, Dispose Properly."
User Manual
Page 8
... center. If this may make a loud popping sound. Please contact your local dealer or Acer service center for changing the lamp, when lamp warning message displays. • When switching the projector off the product before disconnecting power. • Turn on until the lamp module has been ...cloth moistened with mild detergent to clean the display housing. • Disconnect the power plug from AC outlet if the product is on the projector provided for ventilation. • Use abrasive cleaners, waxes or solvents to clean the unit. • Use under the following conditions: &#...
... center. If this may make a loud popping sound. Please contact your local dealer or Acer service center for changing the lamp, when lamp warning message displays. • When switching the projector off the product before disconnecting power. • Turn on until the lamp module has been ...cloth moistened with mild detergent to clean the display housing. • Disconnect the power plug from AC outlet if the product is on the projector provided for ventilation. • Use abrasive cleaners, waxes or solvents to clean the unit. • Use under the following conditions: &#...
User Manual
Page 9
... First viii Usage Notes viii Precautions viii Introduction 1 Product Features 1 Package Overview 2 Projector Overview 3 Projector Outlook 3 Control Panel 4 Remote Control Layout 5 MHL Feature Introduction 7 Getting Started 8 Connecting the Projector 8 Turning the Projector On/Off 13 Turning On the Projector 13 Turning Off the Projector 14 Adjusting the Projected Image 15 Adjusting the Height of the Projected...
... First viii Usage Notes viii Precautions viii Introduction 1 Product Features 1 Package Overview 2 Projector Overview 3 Projector Outlook 3 Control Panel 4 Remote Control Layout 5 MHL Feature Introduction 7 Getting Started 8 Connecting the Projector 8 Turning the Projector On/Off 13 Turning On the Projector 13 Turning Off the Projector 14 Adjusting the Projected Image 15 Adjusting the Height of the Projected...
User Manual
Page 11
... life. - English 1 Introduction Product Features This product is a single-chip DLP® projector, including the following outstanding features: • DLP® technology • X1185/X1185N/P1185: Native 800 x 600 SVGA resolution, Auto/4:3/16:9 aspect ratio supported X1285/X1285N...can be enhanced. - When projecting darker images the power consumption will also be detected for 5 minutes. • Acer EcoProjection Technology delivers Intelligent power management approach and physical efficiency improvement • Advanced keystone correction delivers optimum presentations • ...
... life. - English 1 Introduction Product Features This product is a single-chip DLP® projector, including the following outstanding features: • DLP® technology • X1185/X1185N/P1185: Native 800 x 600 SVGA resolution, Auto/4:3/16:9 aspect ratio supported X1285/X1285N...can be enhanced. - When projecting darker images the power consumption will also be detected for 5 minutes. • Acer EcoProjection Technology delivers Intelligent power management approach and physical efficiency improvement • Advanced keystone correction delivers optimum presentations • ...
User Manual
Page 12
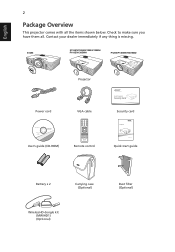
S1285 X1185/X1185N/X1285/X1285N/ P1185/X1385WH P1285/P1385W/H6518BD Projector Power cord VGA cable Security card User's guide (CD-ROM) Remote control Quick start guide Battery x 2 Carrying case (Optional) WirelessHD dongle kit (MWIHD1) (Optional) Dust filter (Optional) Check to make sure you have them all the items shown below. English 2 Package Overview This projector comes with all . Contact your dealer immediately if any thing is missing.
S1285 X1185/X1185N/X1285/X1285N/ P1185/X1385WH P1285/P1385W/H6518BD Projector Power cord VGA cable Security card User's guide (CD-ROM) Remote control Quick start guide Battery x 2 Carrying case (Optional) WirelessHD dongle kit (MWIHD1) (Optional) Dust filter (Optional) Check to make sure you have them all the items shown below. English 2 Package Overview This projector comes with all . Contact your dealer immediately if any thing is missing.
User Manual
Page 13
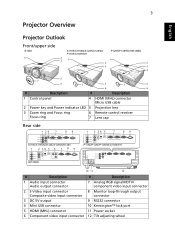
3 Projector Overview English Projector Outlook Front/upper side S1285 1 X1185/X1185N/X1285/X1285N/ P1185/X1385WH P1285/P1385W/H6518BD 2 3 1 1 2 2 3 3 4 5 7 6 7 5 7 5 6 6 # Description # Description 1 Control panel 4 HDMI (MHL) connector Micro USB cable 2 Power key and ...control receiver 7 Lens cap Rear side 1 24 7 89 AUDIO IN -1 AUDIO IN -2 S-VIDEO USB MINI-B VGA IN -2 VGA IN -1 VGA-OUT RS232 AUDIO OUT VIDEO X1185/X1185N/X1285/X1285N/S1285 1 2 34 5 6 7 8 9 AUDIO IN -1 AUDIO IN -2 S-VIDEO DC 5V OUT HDMI / MHL USB MINI-B AUDIO OUT VIDEO H6518BD ...
3 Projector Overview English Projector Outlook Front/upper side S1285 1 X1185/X1185N/X1285/X1285N/ P1185/X1385WH P1285/P1385W/H6518BD 2 3 1 1 2 2 3 3 4 5 7 6 7 5 7 5 6 6 # Description # Description 1 Control panel 4 HDMI (MHL) connector Micro USB cable 2 Power key and ...control receiver 7 Lens cap Rear side 1 24 7 89 AUDIO IN -1 AUDIO IN -2 S-VIDEO USB MINI-B VGA IN -2 VGA IN -1 VGA-OUT RS232 AUDIO OUT VIDEO X1185/X1185N/X1285/X1285N/S1285 1 2 34 5 6 7 8 9 AUDIO IN -1 AUDIO IN -2 S-VIDEO DC 5V OUT HDMI / MHL USB MINI-B AUDIO OUT VIDEO H6518BD ...
User Manual
Page 14
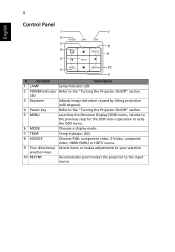
... 3 Keystone Adjusts image distortion caused by tilting projection (±40 degrees). 4 Power key Refer to the "Turning the Projector On/Off" section. 5 MENU Launches the Onscreen Display (OSD) menu, returns to the previous step for the OSD ..., composite video, HDMI (MHL) or HDTV source. 9 Four directional Selects items or makes adjustments to your selection selection keys 10 RESYNC Automatically synchronizes the projector to the "Turning the Projector On/Off" section. 4 English Control Panel 1 7 2 3 8 4 9 5 6 10 3 # Function Description 1 LAMP Lamp Indicator LED. 2...
... 3 Keystone Adjusts image distortion caused by tilting projection (±40 degrees). 4 Power key Refer to the "Turning the Projector On/Off" section. 5 MENU Launches the Onscreen Display (OSD) menu, returns to the previous step for the OSD ..., composite video, HDMI (MHL) or HDTV source. 9 Four directional Selects items or makes adjustments to your selection selection keys 10 RESYNC Automatically synchronizes the projector to the "Turning the Projector On/Off" section. 4 English Control Panel 1 7 2 3 8 4 9 5 6 10 3 # Function Description 1 LAMP Lamp Indicator LED. 2...
User Manual
Page 15
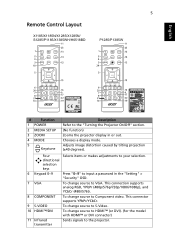
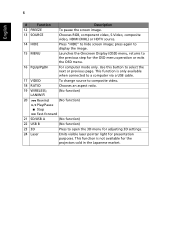
...to HDMI™ (or DVI). (for the model with HDMI™ or DVI connector) 11 Infrared transmitter Sends signals to the projector. Chooses a display mode. Four directional selection keys Selects items or makes adjustments to your selection. 6 Keypad 0~9 Press "0~9" to input... or out. English 5 Remote Control Layout X1185/X1185N/X1285/X1285N/ S1285/P1185/X1385WH/H6518BD P1285/P1385W # Function 1 POWER 2 MEDIA SETUP 3 ZOOM 4 MODE 5 Keystone Description Refer to the "Turning the Projector On/Off" section. (No function) Zooms the projector display in the "Setting" > "Security"...
...to HDMI™ (or DVI). (for the model with HDMI™ or DVI connector) 11 Infrared transmitter Sends signals to the projector. Chooses a display mode. Four directional selection keys Selects items or makes adjustments to your selection. 6 Keypad 0~9 Press "0~9" to input... or out. English 5 Remote Control Layout X1185/X1185N/X1285/X1285N/ S1285/P1185/X1385WH/H6518BD P1285/P1385W # Function 1 POWER 2 MEDIA SETUP 3 ZOOM 4 MODE 5 Keystone Description Refer to the "Turning the Projector On/Off" section. (No function) Zooms the projector display in the "Setting" > "Security"...
User Manual
Page 16
... connected to a computer via a USB cable. 17 VIDEO To change source to the previous step for presentation purposes. This function is not available for the projectors sold in the Japanese market. press again to display the image. 15 MENU Launches the Onscreen Display (OSD) menu, returns to composite video. 18 RATIO...
... connected to a computer via a USB cable. 17 VIDEO To change source to the previous step for presentation purposes. This function is not available for the projectors sold in the Japanese market. press again to display the image. 15 MENU Launches the Onscreen Display (OSD) menu, returns to composite video. 18 RATIO...
User Manual
Page 17
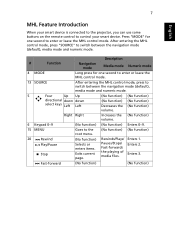
...) Rewinds/Plays/ Pauses/Stops/ Fast-forwards the playing of media files. Enters 2. Enters 3. 7 English MHL Feature Introduction When your smart device is connected to the projector, you can use some buttons on the remote control to enter or leave the MHL control mode. Press "MODE" for one second to control your...
...) Rewinds/Plays/ Pauses/Stops/ Fast-forwards the playing of media files. Enters 2. Enters 3. 7 English MHL Feature Introduction When your smart device is connected to the projector, you can use some buttons on the remote control to enter or leave the MHL control mode. Press "MODE" for one second to control your...
User Manual
Page 18
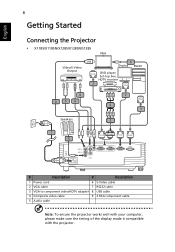
English 8 Getting Started Connecting the Projector • X1185/X1185N/X1285/X1285N/S1285 VGA Video/S-Video Output Display DVD player, Set-top box, HDTV receiver RS232 Speakers RB G 9 RB G 3 HDTV adapter AUDIO IN -1 AUDIO ... cable 2 VGA cable 7 RS232 cable 3 VGA to component video/HDTV adapter 8 USB cable 4 Composite video cable 9 3 RCA component cable 5 Audio cable Note: To ensure the projector works well with your computer, please make sure the timing of the display mode is compatible with the...
English 8 Getting Started Connecting the Projector • X1185/X1185N/X1285/X1285N/S1285 VGA Video/S-Video Output Display DVD player, Set-top box, HDTV receiver RS232 Speakers RB G 9 RB G 3 HDTV adapter AUDIO IN -1 AUDIO ... cable 2 VGA cable 7 RS232 cable 3 VGA to component video/HDTV adapter 8 USB cable 4 Composite video cable 9 3 RCA component cable 5 Audio cable Note: To ensure the projector works well with your computer, please make sure the timing of the display mode is compatible with the...

User Manual
Page 20
English 10 Note: To ensure the projector works well with your computer, please make sure the timing of the display mode is compatible with the projector. Note: Some smart devices require a converter (supplied by the smart device maker) to enable the MHL function. Note: Compatible HDMI/MHL dongles: WirelessHD (MWIHD1), MWA3, Android (MWND1), ChromecastTM.
English 10 Note: To ensure the projector works well with your computer, please make sure the timing of the display mode is compatible with the projector. Note: Some smart devices require a converter (supplied by the smart device maker) to enable the MHL function. Note: Compatible HDMI/MHL dongles: WirelessHD (MWIHD1), MWA3, Android (MWND1), ChromecastTM.

User Manual
Page 22
Note: Some smart devices require a converter (supplied by the smart device maker) to enable the MHL function. Note: Compatible HDMI/MHL dongles: WirelessHD (MWIHD1), MWA3, Android (MWND1), ChromecastTM. English 12 Note: To ensure the projector works well with your computer, please make sure the timing of the display mode is compatible with the projector.
Note: Some smart devices require a converter (supplied by the smart device maker) to enable the MHL function. Note: Compatible HDMI/MHL dongles: WirelessHD (MWIHD1), MWA3, Android (MWND1), ChromecastTM. English 12 Note: To ensure the projector works well with your computer, please make sure the timing of the display mode is compatible with the projector.
User Manual
Page 23
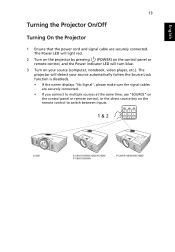
... turn blue. 3 Turn on the remote control to switch between inputs. 1 & 2 S1285 X1185/X1185N/X1285/X1285N/ P1185/X1385WH P1285/P1385W/H6518BD English 13 Turning the Projector On/Off Turning On the Projector 1 Ensure that the power cord and signal cable are securely connected. • If you connect to ...or the direct source key on your source (computer, notebook, video player, etc.). The Power LED will light red. 2 Turn on the projector by pressing (POWER) on the control panel or remote control, and the Power indicator LED will detect your source automatically (when the Source Lock ...
... turn blue. 3 Turn on the remote control to switch between inputs. 1 & 2 S1285 X1185/X1185N/X1285/X1285N/ P1185/X1385WH P1285/P1385W/H6518BD English 13 Turning the Projector On/Off Turning On the Projector 1 Ensure that the power cord and signal cable are securely connected. • If you connect to ...or the direct source key on your source (computer, notebook, video player, etc.). The Power LED will light red. 2 Turn on the projector by pressing (POWER) on the control panel or remote control, and the Power indicator LED will detect your source automatically (when the Source Lock ...
User Manual
Page 24
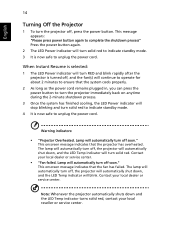
... and turn solid red to indicate standby mode. 4 It is now safe to unplug the power cord. Warning indicators: • "Projector Overheated. This onscreen message indicates that the fan has failed. Contact your local dealer or service center. The lamp will automatically turn off... dealer or service center. • "Fan failed. The lamp will automatically turn off soon." Lamp will automatically turn off , the projector will automatically shut down and the LED Temp indicator turns solid red, contact your local reseller or service center. Lamp will automatically turn off...
... and turn solid red to indicate standby mode. 4 It is now safe to unplug the power cord. Warning indicators: • "Projector Overheated. This onscreen message indicates that the fan has failed. Contact your local dealer or service center. The lamp will automatically turn off... dealer or service center. • "Fan failed. The lamp will automatically turn off soon." Lamp will automatically turn off , the projector will automatically shut down and the LED Temp indicator turns solid red, contact your local reseller or service center. Lamp will automatically turn off...


