User Manual
Page 5
... qualified service personnel when: • the power cord or plug is damaged, cut or frayed • liquid was spilled into the projector's lens when the lamp is on the projector first and then signal sources. • Do not place the product in the following the operating instructions Note: Adjust only those controls that is poorly ventilated or confined. Refer all windows rolled up. • Locations...
... qualified service personnel when: • the power cord or plug is damaged, cut or frayed • liquid was spilled into the projector's lens when the lamp is on the projector first and then signal sources. • Do not place the product in the following the operating instructions Note: Adjust only those controls that is poorly ventilated or confined. Refer all windows rolled up. • Locations...
User Manual
Page 6
... not stand the projector on the remote control. • Do not operate lamps beyond the rated lamp life. Only use acer ceiling mount kit for changing the lamp, when lamp warning message displays. • Do not attempt to become hot. • Clean the air filter frequently. In this case, unplug immediately and contact your local dealer or Acer service center for mounting the projector and ensure it . In this projector. The temperature inside which become heated...
... not stand the projector on the remote control. • Do not operate lamps beyond the rated lamp life. Only use acer ceiling mount kit for changing the lamp, when lamp warning message displays. • Do not attempt to become hot. • Clean the air filter frequently. In this case, unplug immediately and contact your local dealer or Acer service center for mounting the projector and ensure it . In this projector. The temperature inside which become heated...
User Manual
Page 8
... your local dealer or Acer service center. Warning: • Do not look into the projector's lens when the lamp is not being used for changing the lamp, when lamp warning message displays. • When switching the projector off the product before disconnecting power. • Turn on the projector first and then the signal sources. • Do not use lens cap when projector is in direct sunlight. Don't: • Block the slots and openings on .
... your local dealer or Acer service center. Warning: • Do not look into the projector's lens when the lamp is not being used for changing the lamp, when lamp warning message displays. • When switching the projector off the product before disconnecting power. • Turn on the projector first and then the signal sources. • Do not use lens cap when projector is in direct sunlight. Don't: • Block the slots and openings on .
User Manual
Page 11
...: Native 1920 x 1080 1080p resolution, Auto/Full/4:3/16:9/L.Box aspect ratio supported • Enables projecting 3D content via DLP Link Technology: Blu-Ray 3D supported (P1185/P1285/P1385W/X1385WH/H6518BD) • One-touch "3D" button on , the projector dynamically adjusts the power consumption of the lamp according to the brightness of the image being projected. Dynamic Black: If turned on remote control allows quick and easy...
...: Native 1920 x 1080 1080p resolution, Auto/Full/4:3/16:9/L.Box aspect ratio supported • Enables projecting 3D content via DLP Link Technology: Blu-Ray 3D supported (P1185/P1285/P1385W/X1385WH/H6518BD) • One-touch "3D" button on , the projector dynamically adjusts the power consumption of the lamp according to the brightness of the image being projected. Dynamic Black: If turned on remote control allows quick and easy...
User Manual
Page 13
... 1 Control panel 4 HDMI (MHL) connector Micro USB cable 2 Power key and Power indicator LED 5 Projection lens 3 Zoom ring and Focus ring Focus ring 6 Remote control receiver 7 Lens cap Rear side 1 24 7 89 AUDIO IN -1 AUDIO IN -2 S-VIDEO USB MINI-B VGA IN -2 VGA IN -1 VGA-OUT RS232 AUDIO OUT VIDEO X1185/X1185N/X1285/X1285N/S1285 1 2 34 5 6 7 8 9 AUDIO IN -1 AUDIO IN -2 S-VIDEO DC 5V OUT HDMI / MHL USB MINI-B AUDIO OUT VIDEO H6518BD VGA IN -1 VGA-OUT RS232 1 2 34 5 7 89 AUDIO IN -1 AUDIO IN -2 S-VIDEO DC 5V OUT HDMI / MHL USB MINI-B AUDIO OUT VIDEO VGA...
... 1 Control panel 4 HDMI (MHL) connector Micro USB cable 2 Power key and Power indicator LED 5 Projection lens 3 Zoom ring and Focus ring Focus ring 6 Remote control receiver 7 Lens cap Rear side 1 24 7 89 AUDIO IN -1 AUDIO IN -2 S-VIDEO USB MINI-B VGA IN -2 VGA IN -1 VGA-OUT RS232 AUDIO OUT VIDEO X1185/X1185N/X1285/X1285N/S1285 1 2 34 5 6 7 8 9 AUDIO IN -1 AUDIO IN -2 S-VIDEO DC 5V OUT HDMI / MHL USB MINI-B AUDIO OUT VIDEO H6518BD VGA IN -1 VGA-OUT RS232 1 2 34 5 7 89 AUDIO IN -1 AUDIO IN -2 S-VIDEO DC 5V OUT HDMI / MHL USB MINI-B AUDIO OUT VIDEO VGA...
User Manual
Page 15
... projector. This connector supports YPbPr/YCbCr. 9 S-VIDEO To change source to S-Video. 10 HDMI™/DVI To change source to the "Turning the Projector On/Off" section. (No function) Zooms the projector display in the "Setting" > "Security" OSD. 7 VGA To change source to HDMI™ (or DVI). (for the model with HDMI™ or DVI connector) 11 Infrared transmitter Sends signals to Component video. Adjusts image distortion caused by tilting projection (±40 degrees). English 5 Remote Control Layout X1185...
... projector. This connector supports YPbPr/YCbCr. 9 S-VIDEO To change source to S-Video. 10 HDMI™/DVI To change source to the "Turning the Projector On/Off" section. (No function) Zooms the projector display in the "Setting" > "Security" OSD. 7 VGA To change source to HDMI™ (or DVI). (for the model with HDMI™ or DVI connector) 11 Infrared transmitter Sends signals to Component video. Adjusts image distortion caused by tilting projection (±40 degrees). English 5 Remote Control Layout X1185...
User Manual
Page 23
... Turning On the Projector 1 Ensure that the power cord and signal cable are securely connected. • If you connect to multiple sources at the same time, use "SOURCE" on the control panel or remote control, or the direct source key on the remote control to switch between inputs. 1 & 2 S1285 X1185/X1185N/X1285/X1285N/ P1185/X1385WH P1285/P1385W/H6518BD The projector will turn blue. 3 Turn on your source automatically (when the Source Lock function is disabled). • If the screen displays "No Signal...
... Turning On the Projector 1 Ensure that the power cord and signal cable are securely connected. • If you connect to multiple sources at the same time, use "SOURCE" on the control panel or remote control, or the direct source key on the remote control to switch between inputs. 1 & 2 S1285 X1185/X1185N/X1285/X1285N/ P1185/X1385WH P1285/P1385W/H6518BD The projector will turn blue. 3 Turn on your source automatically (when the Source Lock function is disabled). • If the screen displays "No Signal...

User Manual
Page 28
... below figure, the space of 424 cm height is possible for image sizes around 242". English 18 • XGA (fixed-zoom models) If the projector is 3 m from the screen, good image quality is required when located at 3 m distance. 242" 3 m Desired distance Screen Size Desired Distance (m) < A > Diagonal (inch) < B > From base to W (cm) x H (cm) top of image (cm) < C > 1 81 164 x 123 141 1.5 121... 984 1131 9 726 1475 x 1107 1273 10 807 1639 x 1230 1414 11 887 1803 x 1352 1555 12 968 1967 x 1475 1697 Zoom Ratio: 1.0 x Height: 424 cm From base to top of image
... below figure, the space of 424 cm height is possible for image sizes around 242". English 18 • XGA (fixed-zoom models) If the projector is 3 m from the screen, good image quality is required when located at 3 m distance. 242" 3 m Desired distance Screen Size Desired Distance (m) < A > Diagonal (inch) < B > From base to W (cm) x H (cm) top of image (cm) < C > 1 81 164 x 123 141 1.5 121... 984 1131 9 726 1475 x 1107 1273 10 807 1639 x 1230 1414 11 887 1803 x 1352 1555 12 968 1967 x 1475 1697 Zoom Ratio: 1.0 x Height: 424 cm From base to top of image

User Manual
Page 36
... new settings will be saved automatically upon exiting the menu. 5 Press "MENU" anytime to exit the menu and return to the Acer welcome screen. Use the OSD only when the message "No signal" is for feature setting. English 26 User Controls Installation Menu The Installation menu provides an Onscreen Display (OSD) for projector installation and maintenance. 3 The background pattern acts as a guide to adjusting the calibration and alignment settings, such as screen size and distance, focus and...
... new settings will be saved automatically upon exiting the menu. 5 Press "MENU" anytime to exit the menu and return to the Acer welcome screen. Use the OSD only when the message "No signal" is for feature setting. English 26 User Controls Installation Menu The Installation menu provides an Onscreen Display (OSD) for projector installation and maintenance. 3 The background pattern acts as a guide to adjusting the calibration and alignment settings, such as screen size and distance, focus and...
User Manual
Page 39
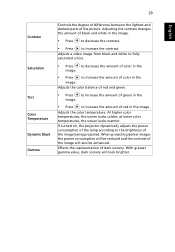
... picture. Adjusting the contrast changes the amount of color in the image. • Press to decrease the contrast. • Press to increase the amount of black and white in the image. at lower color temperatures, the screen looks warmer. Adjusts the color temperature. At higher color temperatures, the screen looks colder; Adjusts a video image from black and white to fully saturated colors. • Press to decrease the amount of color in the image...
... picture. Adjusting the contrast changes the amount of color in the image. • Press to decrease the contrast. • Press to increase the amount of black and white in the image. at lower color temperatures, the screen looks warmer. Adjusts the color temperature. At higher color temperatures, the screen looks colder; Adjusts a video image from black and white to fully saturated colors. • Press to decrease the amount of color in the image...

User Manual
Page 41
...full use of image. • Desktop • Ceiling: Turns the image upside down for ceiling-mounted projection. Projection Location Aspect Ratio Auto Keystone • Auto: Automatically adjusts projection location of the horizontal and vertical pixels. • 4:3: The image will be scaled to fit the screen and displayed using a 16:9 ratio. • L.Box (for WXGA/1080p models): Keeps the original signal aspect ratio and zooms in by tilting projection (±40 degrees). Automatically adjusts image distortion caused by 1.333 times. mounted projection. Projection...
...full use of image. • Desktop • Ceiling: Turns the image upside down for ceiling-mounted projection. Projection Location Aspect Ratio Auto Keystone • Auto: Automatically adjusts projection location of the horizontal and vertical pixels. • 4:3: The image will be scaled to fit the screen and displayed using a 16:9 ratio. • L.Box (for WXGA/1080p models): Keeps the original signal aspect ratio and zooms in by tilting projection (±40 degrees). Automatically adjusts image distortion caused by 1.333 times. mounted projection. Projection...

User Manual
Page 43
... remote control, or the direct source key on the remote control. Selecting "On" enables the function and when switching input signals, you need to "4:3". Select "Off" to use the current image as the startup screen, follow the instructions below. To capture the image that the screen capture is in your source automatically. Setting Startup Screen Screen Capture Source Lock Closed Caption Use this function to use as your desired startup screen. If you change...
... remote control, or the direct source key on the remote control. Selecting "On" enables the function and when switching input signals, you need to "4:3". Select "Off" to use the current image as the startup screen, follow the instructions below. To capture the image that the screen capture is in your source automatically. Setting Startup Screen Screen Capture Source Lock Closed Caption Use this function to use as your desired startup screen. If you change...

User Manual
Page 45
...; The factory default setting of "Timeout (Min.)" is "Off". • Once the security function is turned on. English Both "User Password" and "Administrator Password" can set timeout function. • Press to select timeout duration. • The range is from 10 to 990 minutes. • When time is up or change "User Password". • Use the numerical keys on the remote control to set the password and press "MENU...
...; The factory default setting of "Timeout (Min.)" is "Off". • Once the security function is turned on. English Both "User Password" and "Administrator Password" can set timeout function. • Press to select timeout duration. • The range is from 10 to 990 minutes. • When time is up or change "User Password". • Use the numerical keys on the remote control to set the password and press "MENU...

User Manual
Page 46
... by the projector no matter what the administrator password is. • If the Security Card is lost, please contact your local Acer service center. Lock User Startup Screen This function is set to "OFF" by the "Startup Screen" and "Screen Capture" functions. English 36 Security Administrator Password You can enter "Administrator Password" when the "Enter Administrator Password" or "Enter Password" dialogue box displays. • Press...
... by the projector no matter what the administrator password is. • If the Security Card is lost, please contact your local Acer service center. Lock User Startup Screen This function is set to "OFF" by the "Startup Screen" and "Screen Capture" functions. English 36 Security Administrator Password You can enter "Administrator Password" when the "Enter Administrator Password" or "Enter Password" dialogue box displays. • Press...
User Manual
Page 47
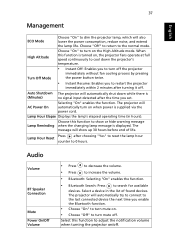
...) no signal input detected after the time you set. Choose "On" to the normal mode. Lamp Hour Elapse Displays the lamp's elapsed operating time (in the list of life. When this function to search for available devices. English 37 Management ECO Mode High Altitude Turn Off Mode Choose "On" to dim the projector lamp, which will show or hide warning message Lamp Reminding when the changing lamp message is supplied via the power cord. Auto Shutdown The projector will...
...) no signal input detected after the time you set. Choose "On" to the normal mode. Lamp Hour Elapse Displays the lamp's elapsed operating time (in the list of life. When this function to search for available devices. English 37 Management ECO Mode High Altitude Turn Off Mode Choose "On" to dim the projector lamp, which will show or hide warning message Lamp Reminding when the changing lamp message is supplied via the power cord. Auto Shutdown The projector will...

User Manual
Page 51
... the toggle output settings. Each has a different way to make an adjustment. Refer to your presentation • If you are using an Apple® Mac® OS based notebook: In System Preferences, open Display and select Video Mirroring "On." 5 Image is unstable • Use "Tracking" to correct it compatible with the projector. 7 Image is within the required distance: X1185/X1185N/P1185/X1285/X1285N...
... the toggle output settings. Each has a different way to make an adjustment. Refer to your presentation • If you are using an Apple® Mac® OS based notebook: In System Preferences, open Display and select Video Mirroring "On." 5 Image is unstable • Use "Tracking" to correct it compatible with the projector. 7 Image is within the required distance: X1185/X1185N/P1185/X1285/X1285N...

User Manual
Page 52
... to open the OSD menu. To replace the lamp, contact your DVD player. 9 Image is too small • Adjust the zoom lever on the control panel or remote control until the lamp module has been replaced. Problems with the projector OSD. • If the image is still stretched, you will also need to adjust the following "widescreen" settings: DVD title • If you play a 4:3 format DVD title, please change...
... to open the OSD menu. To replace the lamp, contact your DVD player. 9 Image is too small • Adjust the zoom lever on the control panel or remote control until the lamp module has been replaced. Problems with the projector OSD. • If the image is still stretched, you will also need to adjust the following "widescreen" settings: DVD title • If you play a 4:3 format DVD title, please change...
User Manual
Page 54
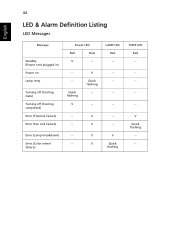
V LAMP LED Red -- ---- -- --- failure) V V V Quick flashing TEMP LED Red -- --- -- -- Error (Lamp breakdown) -- V Quick flashing --- V -- 44 LED & Alarm Definition Listing LED Messages English Message Standby (Power cord plugged in) Power on Lamp retry Turning off (Cooling state) Turning off (Cooling completed) Error (Thermal failure) Error (Fan lock failure) Power LED Red Blue V -- --- Quick flashing V V Quick flashing -- -- -- Error (Color wheel --
V LAMP LED Red -- ---- -- --- failure) V V V Quick flashing TEMP LED Red -- --- -- -- Error (Lamp breakdown) -- V Quick flashing --- V -- 44 LED & Alarm Definition Listing LED Messages English Message Standby (Power cord plugged in) Power on Lamp retry Turning off (Cooling state) Turning off (Cooling completed) Error (Thermal failure) Error (Fan lock failure) Power LED Red Blue V -- --- Quick flashing V V Quick flashing -- -- -- Error (Color wheel --

User Manual (3D)
Page 4
... select NVIDIA Control Panel. Note: You may need to view 3D content. The transmitter controls the 3D glasses and is necessary to set up a 3D environment Once you have installed the drivers, you will open the setup Wizard if you have the NVIDIA 3D glasses and IR-transmitter. English 4 Important: Only NVIDIA graphics cards are supported. 2 Download and install the 3D drivers and...
... select NVIDIA Control Panel. Note: You may need to view 3D content. The transmitter controls the 3D glasses and is necessary to set up a 3D environment Once you have installed the drivers, you will open the setup Wizard if you have the NVIDIA 3D glasses and IR-transmitter. English 4 Important: Only NVIDIA graphics cards are supported. 2 Download and install the 3D drivers and...

User Manual (3D)
Page 7
... driver version. 3 You should also download a suitable 3D player such as the one available from www.3dtv.at fullscreen resolution in the player. Note: You need to your graphics card vendor's website for your graphics card supports 3D playback. To download software and use an NVIDIA 3DTV Play ready projector with DLP glasses, refer to View > Viewing Method > NVIDIA 3D Vision. 2 Open...
... driver version. 3 You should also download a suitable 3D player such as the one available from www.3dtv.at fullscreen resolution in the player. Note: You need to your graphics card vendor's website for your graphics card supports 3D playback. To download software and use an NVIDIA 3DTV Play ready projector with DLP glasses, refer to View > Viewing Method > NVIDIA 3D Vision. 2 Open...


