
User Manual
Page 13
...comes with excellent color performance • Better Lumens brightness and contrast ratio • Versatile display modes (Standard, Video, Bright, Picture, Game, Blackboard, User 1, User 2) for optimum performance in any situation • NTSC / PAL /... SECAM compatible and HDTV (720p, 1080i) supported • Acer EcoProjeciton Technology delivers Intelligent power management approach and physical efficiency improvement. • The eCaring button reveals Acer Empowering functions (eView, eTimer, ePower) for easy adjustment of... This product is a single-chip DLP® projector.
...comes with excellent color performance • Better Lumens brightness and contrast ratio • Versatile display modes (Standard, Video, Bright, Picture, Game, Blackboard, User 1, User 2) for optimum performance in any situation • NTSC / PAL /... SECAM compatible and HDTV (720p, 1080i) supported • Acer EcoProjeciton Technology delivers Intelligent power management approach and physical efficiency improvement. • The eCaring button reveals Acer Empowering functions (eView, eTimer, ePower) for easy adjustment of... This product is a single-chip DLP® projector.

User Manual
Page 14
Contact your unit is missing. Projector with all the items shown below. Check to make sure your dealer immediately if any thing is complete. English 2 Package Overview This projector comes with lens cap Power cord VGA cable Composite video cable Battery User's guide Remote control Security card Acer Projector Quick Start Guide Quick start guide Carrying case (X1160Z/ZC/PZ/PZC, X1260/Z/ZC/P/PZ/PZC/K/KC)
Contact your unit is missing. Projector with all the items shown below. Check to make sure your dealer immediately if any thing is complete. English 2 Package Overview This projector comes with lens cap Power cord VGA cable Composite video cable Battery User's guide Remote control Security card Acer Projector Quick Start Guide Quick start guide Carrying case (X1160Z/ZC/PZ/PZC, X1260/Z/ZC/P/PZ/PZC/K/KC)
User Manual
Page 15
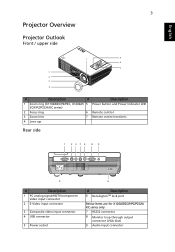
... 3 Projector Overview Projector Outlook Front / upper side 5 1 6 7 7 2 3 4 # Description # Description 1 Zoom ring (X1160Z/ZC/PZ/PZC, X1260/Z/ 5 Power button and Power Indicator LED ZC/P/PZ/PZC/K/KC series) 2 Focus ring 6 Remote control 3 Zoom lens 7 Remote control receivers 4 Lens cap Rear side 1 237 4 8 9 5 # Description 1 PC analog signal/HDTV/component video input connector 2 S-Video input connector 3 Composite video...
... 3 Projector Overview Projector Outlook Front / upper side 5 1 6 7 7 2 3 4 # Description # Description 1 Zoom ring (X1160Z/ZC/PZ/PZC, X1260/Z/ 5 Power button and Power Indicator LED ZC/P/PZ/PZC/K/KC series) 2 Focus ring 6 Remote control 3 Zoom lens 7 Remote control receivers 4 Lens cap Rear side 1 237 4 8 9 5 # Description 1 PC analog signal/HDTV/component video input connector 2 S-Video input connector 3 Composite video...

User Manual
Page 16
...Four directional Use up, down, left, right buttons to select items or make select keys adjustments to your selection. 6 ZOOM Zooms the projector display in or out. 7 ASPECT RATIO To choose the desired aspect ratio (Auto/4:3/16:9). 8 KeyPad 0~9 Press "0~9" to input a password... in the "Sécurité". 9 KEYSTONE Adjusts the image to compensate for distortion caused by tilting the projector (± 40 degrees). 10 RESYNC 11 SOURCE Automatically synchronizes the projector to the projector. Press "SOURCE" to choose RGB, Component, S-Video, Composite and HDTV sources.
...Four directional Use up, down, left, right buttons to select items or make select keys adjustments to your selection. 6 ZOOM Zooms the projector display in or out. 7 ASPECT RATIO To choose the desired aspect ratio (Auto/4:3/16:9). 8 KeyPad 0~9 Press "0~9" to input a password... in the "Sécurité". 9 KEYSTONE Adjusts the image to compensate for distortion caused by tilting the projector (± 40 degrees). 10 RESYNC 11 SOURCE Automatically synchronizes the projector to the projector. Press "SOURCE" to choose RGB, Component, S-Video, Composite and HDTV sources.
User Manual
Page 17
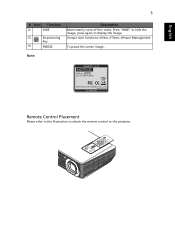
English 5 # Icon Function 12 HIDE 13 Empowering key 14 FREEZE Description Momentarily turns off the video. To pause the screen image. Unique Acer functions: eView, eTimer, ePower Management. Note: Remote Control Placement Please refer to the illustration to attach the remote control to display the image. Press "HIDE" to hide the image, press again to the projector.
English 5 # Icon Function 12 HIDE 13 Empowering key 14 FREEZE Description Momentarily turns off the video. To pause the screen image. Unique Acer functions: eView, eTimer, ePower Management. Note: Remote Control Placement Please refer to the illustration to attach the remote control to display the image. Press "HIDE" to hide the image, press again to the projector.
User Manual
Page 18
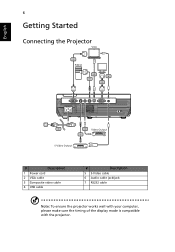
English RW USB 6 Getting Started Connecting the Projector VGA 2 RS232 RS232 4 7 D-Sub 6 2 D-Sub D-Sub USB Y D-Sub Y 1 3 Video Output 5 S-Video Output # Description 1 Power cord 2 VGA cable 3 Composite video cable 4 USB cable # Description 5 S-Video cable 6 Audio cable jack/jack 7 RS232 cable Note: To ensure the projector works well with your computer, please make sure the timing of the display mode is compatible with the projector.
English RW USB 6 Getting Started Connecting the Projector VGA 2 RS232 RS232 4 7 D-Sub 6 2 D-Sub D-Sub USB Y D-Sub Y 1 3 Video Output 5 S-Video Output # Description 1 Power cord 2 VGA cable 3 Composite video cable 4 USB cable # Description 5 S-Video cable 6 Audio cable jack/jack 7 RS232 cable Note: To ensure the projector works well with your computer, please make sure the timing of the display mode is compatible with the projector.
User Manual
Page 19
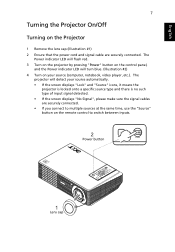
...time, use the "Source" button on your source automatically. • If the screen displays "Lock" and "Source" icons, it means the projector is locked onto a specific source type and there is no such type of input signal detected. • If the screen displays "No Signal",... "Power" button on the control panel, and the Power indicator LED will detect your source (computer, notebook, video player ,etc.). English 7 Turning the Projector On/Off Turning on the Projector 1 Remove the lens cap.(Illustration #1) 2 Ensure that the power cord and signal cable are securely connected. •...
...time, use the "Source" button on your source automatically. • If the screen displays "Lock" and "Source" icons, it means the projector is locked onto a specific source type and there is no such type of input signal detected. • If the screen displays "No Signal",... "Power" button on the control panel, and the Power indicator LED will detect your source (computer, notebook, video player ,etc.). English 7 Turning the Projector On/Off Turning on the Projector 1 Remove the lens cap.(Illustration #1) 2 Ensure that the power cord and signal cable are securely connected. •...
User Manual
Page 30
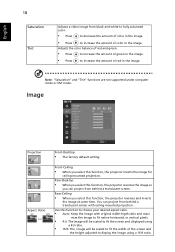
..." and "Tint" functions are not supported under computer mode or DVI mode. Rear-Ceiling • When you select this function, the projector reverses and inverts the image at same time. Rear-Desktop • When you can project from behind a translucent screen. Image Projection Aspect...: Keep the image with ceiling mounted projection. Use this function, the projector reverses the image so you select this function to display the image using a 16:9 ratio. English 18 Saturation Tint Adjusts a video image from black and white to fully saturated color. • Press to...
..." and "Tint" functions are not supported under computer mode or DVI mode. Rear-Ceiling • When you select this function, the projector reverses and inverts the image at same time. Rear-Desktop • When you can project from behind a translucent screen. Image Projection Aspect...: Keep the image with ceiling mounted projection. Use this function, the projector reverses the image so you select this function to display the image using a 16:9 ratio. English 18 Saturation Tint Adjusts a video image from black and white to fully saturated color. • Press to...
User Manual
Page 31
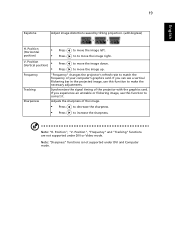
...to correct it. Synchronizes the signal timing of your computer's graphics card. Note: "Sharpness" functions is not supported under DVI or Video mode. If you experience an unstable or flickering image, use this function to move the image down. Position", "Frequency" and "Tracking... not supported under DVI and Computer mode. Frequency Tracking Sharpeness "Frequency" changes the projector's refresh rate to move the image up. Note: "H. V. to to match the frequency of the projector with the graphics card. Adjusts the sharpness of the image. • Press to...
...to correct it. Synchronizes the signal timing of your computer's graphics card. Note: "Sharpness" functions is not supported under DVI or Video mode. If you experience an unstable or flickering image, use this function to move the image down. Position", "Frequency" and "Tracking... not supported under DVI and Computer mode. Frequency Tracking Sharpeness "Frequency" changes the projector's refresh rate to move the image up. Note: "H. V. to to match the frequency of the projector with the graphics card. Adjusts the sharpness of the image. • Press to...
User Manual
Page 37
...], NEC [Fn]+[F3], Toshiba [Fn]+[F5 ] • If you experience difficulty changing resolutions or your monitor freezes, restart all equipment including the projector. 4 The screen of the • If you are using a Microsoft® Windows® based notebook computer is not displaying your notebook: Some...an Apple® Mac® OS based notebook: In System Preferences, open Display and select Video Mirroring "On". 5 Image is unstable • Adjust the "Tracking" to correct it compatible with the projector. 7 Image is out of focus • Make sure the lens cap is removed. •...
...], NEC [Fn]+[F3], Toshiba [Fn]+[F5 ] • If you experience difficulty changing resolutions or your monitor freezes, restart all equipment including the projector. 4 The screen of the • If you are using a Microsoft® Windows® based notebook computer is not displaying your notebook: Some...an Apple® Mac® OS based notebook: In System Preferences, open Display and select Video Mirroring "On". 5 Image is unstable • Adjust the "Tracking" to correct it compatible with the projector. 7 Image is out of focus • Make sure the lens cap is removed. •...


