User Manual
Page 13
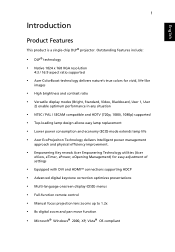
...include: • DLP® technology • Native 1024 x 768 XGA resolution 4:3 / 16:9 aspect ratio supported • Acer ColorBoost technology delivers nature's true colors for vivid, life-like images • High brightness and contrast ratio &#...management approach and physical efficiency improvement. • Empowering Key reveals Acer Empowering Technology utilities (Acer eView, eTimer, ePower, eOpening Management) for easy adjustment of settings • Equipped with DVI and HDMITM connections supporting HDCP • Advanced digital keystone correction optimizes presentations • ...
...include: • DLP® technology • Native 1024 x 768 XGA resolution 4:3 / 16:9 aspect ratio supported • Acer ColorBoost technology delivers nature's true colors for vivid, life-like images • High brightness and contrast ratio &#...management approach and physical efficiency improvement. • Empowering Key reveals Acer Empowering Technology utilities (Acer eView, eTimer, ePower, eOpening Management) for easy adjustment of settings • Equipped with DVI and HDMITM connections supporting HDCP • Advanced digital keystone correction optimizes presentations • ...
User Manual
Page 17
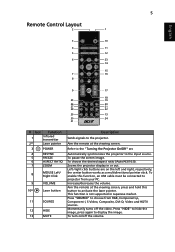
... the left and right, respectively; Left-/right-click buttons are on /off the video. Zooms the projector display in Japanese market. This function is not supported in or out. Refer to the "Turning the Projector On/Off" sec Automatically synchronizes the projector to choose from your PC.
... the left and right, respectively; Left-/right-click buttons are on /off the video. Zooms the projector display in Japanese market. This function is not supported in or out. Refer to the "Turning the Projector On/Off" sec Automatically synchronizes the projector to choose from your PC.
User Manual
Page 18
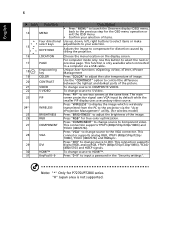
... secondary video source. 24(*) WIRELESS Press "WIRELESS" to display the image which is not supported. Use this button to DVI. This function is only available when connected to a computer via the "Acer eProjection Management" utility. (for wireless model) 25 BRIGHTNESS Press "BRIGHTNESS" to adjust the ... (480i/576i) and RGBsync. 29 DVI Press "DVI" to change source to select the next or previous page. Note: "*" Only for P7270i/P7280i series. English 6 # Icon Function Description 14 MENU • Press "MENU" to launch the Onscreen display (OSD) menu, back to the previous...
... secondary video source. 24(*) WIRELESS Press "WIRELESS" to display the image which is not supported. Use this button to DVI. This function is only available when connected to a computer via the "Acer eProjection Management" utility. (for wireless model) 25 BRIGHTNESS Press "BRIGHTNESS" to adjust the ... (480i/576i) and RGBsync. 29 DVI Press "DVI" to change source to select the next or previous page. Note: "*" Only for P7270i/P7280i series. English 6 # Icon Function Description 14 MENU • Press "MENU" to launch the Onscreen display (OSD) menu, back to the previous...
User Manual
Page 21
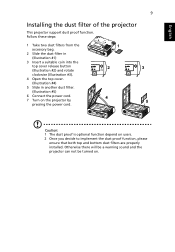
English 9 Installing the dust filter of the projector This projector support dust proof function. Caution: 1 The dust proof is optional function depend on the projector by pressing the power cord. Follow these steps: 1 Take two dust ...
English 9 Installing the dust filter of the projector This projector support dust proof function. Caution: 1 The dust proof is optional function depend on the projector by pressing the power cord. Follow these steps: 1 Take two dust ...
User Manual
Page 34
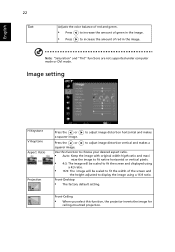
... the amount of green in the image. • Press to adjust image distortion vertical and makes a squarer image. Note: "Saturation" and "Tint" functions are not supported under computer mode or DVI mode. Image setting H Keystone V Keystone Aspect Ratio Projection Press the or a squarer image. to adjust image distortion horizontal and makes...
... the amount of green in the image. • Press to adjust image distortion vertical and makes a squarer image. Note: "Saturation" and "Tint" functions are not supported under computer mode or DVI mode. Image setting H Keystone V Keystone Aspect Ratio Projection Press the or a squarer image. to adjust image distortion horizontal and makes...

User Manual
Page 35
...on the display screen. • Press to move the image left. • Press to to correct it. Note: "Sharpness" functions is not supported under DVI or Video mode. Frequency Tracking Sharpeness "Frequency" changes the projector's refresh rate to increase the sharpness. If you can project from behind... to move the image right. Synchronizes the signal timing of your computer's graphics card. Position", "Frequency" and "Tracking" functions are not supported under DVI and Computer mode. If you can project from behind a translucent screen with the graphics card.
...on the display screen. • Press to move the image left. • Press to to correct it. Note: "Sharpness" functions is not supported under DVI or Video mode. Frequency Tracking Sharpeness "Frequency" changes the projector's refresh rate to increase the sharpness. If you can project from behind... to move the image right. Synchronizes the signal timing of your computer's graphics card. Position", "Frequency" and "Tracking" functions are not supported under DVI and Computer mode. If you can project from behind a translucent screen with the graphics card.

User Manual
Page 49
... and allows - For heat dissipation Note: It is recommended that you keep a reasonable space between the bracket and the projector to allow for extra support, if deemed necessary. 4 Attach the ceiling bracket to the ceiling mount bracket. Use two washers for proper heat distribution. English 37 3 Use the appropriate number ...
... and allows - For heat dissipation Note: It is recommended that you keep a reasonable space between the bracket and the projector to allow for extra support, if deemed necessary. 4 Attach the ceiling bracket to the ceiling mount bracket. Use two washers for proper heat distribution. English 37 3 Use the appropriate number ...

User Manual
Page 52
... • VGA input x2 • Composite video x1 • 3 RCA Component video x 1 • S-Video x1 • VGA output x1 • DVI-D x1: with HDCP support • HDMI x1 • 3.5 mm audio jack input x2 • 3.5 mm audio jack output x1 • SPDIF RCA jack output x1 • 3.5 mm jack input... x1: for wired IR remote control • RS232 3-pin min dim jack x1 • USB x1: for remote computer control Below items are for P7270i/P7280i series only: • Wireless antenna x1 • RJ45 Lan input x 1 • 3.5 mm jack output x1 for wireless audio output • AC power cord x1...
... • VGA input x2 • Composite video x1 • 3 RCA Component video x 1 • S-Video x1 • VGA output x1 • DVI-D x1: with HDCP support • HDMI x1 • 3.5 mm audio jack input x2 • 3.5 mm audio jack output x1 • SPDIF RCA jack output x1 • 3.5 mm jack input... x1: for wired IR remote control • RS232 3-pin min dim jack x1 • USB x1: for remote computer control Below items are for P7270i/P7280i series only: • Wireless antenna x1 • RJ45 Lan input x 1 • 3.5 mm jack output x1 for wireless audio output • AC power cord x1...


