User Manual
Page 5
... walls and free flow of air around the projector are covered by a qualified technician to restore the product to qualified service personnel. Keep them out of the reach of your reseller for service • the product does not operate normally after following the operating instructions Note: Adjust only those controls that are necessary. • Locations where temperatures may become excessively high, such as opening or removing covers may...
... walls and free flow of air around the projector are covered by a qualified technician to restore the product to qualified service personnel. Keep them out of the reach of your reseller for service • the product does not operate normally after following the operating instructions Note: Adjust only those controls that are necessary. • Locations where temperatures may become excessively high, such as opening or removing covers may...
User Manual
Page 6
... your local dealer or Acer service center for inspection. • Do not face the projector lens to become hot. • Clean the air filter frequently. Please contact your dealer. • Do not keep using this could cause it is operating. To temporarily turn off the lamp, press HIDE on rare occasions. • Contact your dealer for changing the lamp, when lamp warning message displays. • Do not attempt...
... your local dealer or Acer service center for inspection. • Do not face the projector lens to become hot. • Clean the air filter frequently. Please contact your dealer. • Do not keep using this could cause it is operating. To temporarily turn off the lamp, press HIDE on rare occasions. • Contact your dealer for changing the lamp, when lamp warning message displays. • Do not attempt...
User Manual
Page 8
... the projector's lens when the lamp is on the projector first and then the signal sources. • Do not use lens cap when projector is not being used for changing the lamp, when lamp warning message displays. • When switching the projector off the product before cleaning. • Use a soft cloth moistened with mild detergent to clean the display housing. • Disconnect the power plug from AC outlet if the product is in operation...
... the projector's lens when the lamp is on the projector first and then the signal sources. • Do not use lens cap when projector is not being used for changing the lamp, when lamp warning message displays. • When switching the projector off the product before cleaning. • Use a soft cloth moistened with mild detergent to clean the display housing. • Disconnect the power plug from AC outlet if the product is in operation...
User Manual
Page 11
... 1080p resolution, Auto/Full/4:3/16:9/L.Box aspect ratio supported • Enables projecting 3D content via DLP Link Technology: Blu-Ray 3D supported (P1185/P1285/P1385W/X1385WH/H6518BD) • One-touch "3D" button on , the projector dynamically adjusts the power consumption of the lamp according to the 3D functions • Acer ColorBoost technology delivers vivid, life-like images • High brightness and contrast ratio • Versatile display modes enable...
... 1080p resolution, Auto/Full/4:3/16:9/L.Box aspect ratio supported • Enables projecting 3D content via DLP Link Technology: Blu-Ray 3D supported (P1185/P1285/P1385W/X1385WH/H6518BD) • One-touch "3D" button on , the projector dynamically adjusts the power consumption of the lamp according to the 3D functions • Acer ColorBoost technology delivers vivid, life-like images • High brightness and contrast ratio • Versatile display modes enable...
User Manual
Page 13
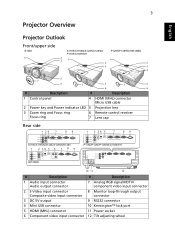
... 1 Control panel 4 HDMI (MHL) connector Micro USB cable 2 Power key and Power indicator LED 5 Projection lens 3 Zoom ring and Focus ring Focus ring 6 Remote control receiver 7 Lens cap Rear side 1 24 7 89 AUDIO IN -1 AUDIO IN -2 S-VIDEO USB MINI-B VGA IN -2 VGA IN -1 VGA-OUT RS232 AUDIO OUT VIDEO X1185/X1185N/X1285/X1285N/S1285 1 2 34 5 6 7 8 9 AUDIO IN -1 AUDIO IN -2 S-VIDEO DC 5V OUT HDMI / MHL USB MINI-B AUDIO OUT VIDEO H6518BD VGA IN -1 VGA-OUT RS232 1 2 34 5 7 89 AUDIO IN -1 AUDIO IN -2 S-VIDEO DC 5V OUT HDMI / MHL USB MINI-B AUDIO OUT VIDEO VGA...
... 1 Control panel 4 HDMI (MHL) connector Micro USB cable 2 Power key and Power indicator LED 5 Projection lens 3 Zoom ring and Focus ring Focus ring 6 Remote control receiver 7 Lens cap Rear side 1 24 7 89 AUDIO IN -1 AUDIO IN -2 S-VIDEO USB MINI-B VGA IN -2 VGA IN -1 VGA-OUT RS232 AUDIO OUT VIDEO X1185/X1185N/X1285/X1285N/S1285 1 2 34 5 6 7 8 9 AUDIO IN -1 AUDIO IN -2 S-VIDEO DC 5V OUT HDMI / MHL USB MINI-B AUDIO OUT VIDEO H6518BD VGA IN -1 VGA-OUT RS232 1 2 34 5 7 89 AUDIO IN -1 AUDIO IN -2 S-VIDEO DC 5V OUT HDMI / MHL USB MINI-B AUDIO OUT VIDEO VGA...
User Manual
Page 15
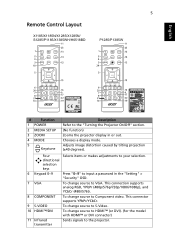
... # Function 1 POWER 2 MEDIA SETUP 3 ZOOM 4 MODE 5 Keystone Description Refer to the "Turning the Projector On/Off" section. (No function) Zooms the projector display in the "Setting" > "Security" OSD. 7 VGA To change source to VGA. Chooses a display mode. Four directional selection keys Selects items or makes adjustments to your selection. 6 Keypad 0~9 Press "0~9" to Component video. This connector supports YPbPr/YCbCr. 9 S-VIDEO To change source to S-Video. 10 HDMI™/DVI To change source to input a password in or out. Adjusts image distortion...
... # Function 1 POWER 2 MEDIA SETUP 3 ZOOM 4 MODE 5 Keystone Description Refer to the "Turning the Projector On/Off" section. (No function) Zooms the projector display in the "Setting" > "Security" OSD. 7 VGA To change source to VGA. Chooses a display mode. Four directional selection keys Selects items or makes adjustments to your selection. 6 Keypad 0~9 Press "0~9" to Component video. This connector supports YPbPr/YCbCr. 9 S-VIDEO To change source to S-Video. 10 HDMI™/DVI To change source to input a password in or out. Adjusts image distortion...
User Manual
Page 23
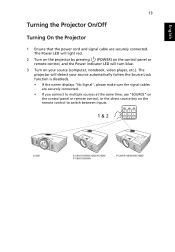
... same time, use "SOURCE" on the control panel or remote control, or the direct source key on the control panel or remote control, and the Power indicator LED will detect your source (computer, notebook, video player, etc.). The projector will turn blue. 3 Turn on your source automatically (when the Source Lock function is disabled). • If the screen displays "No Signal", please make sure the signal cables are securely connected. The Power LED will light red. 2 Turn on the projector by pressing (POWER) on the remote control to switch between inputs...
... same time, use "SOURCE" on the control panel or remote control, or the direct source key on the control panel or remote control, and the Power indicator LED will detect your source (computer, notebook, video player, etc.). The projector will turn blue. 3 Turn on your source automatically (when the Source Lock function is disabled). • If the screen displays "No Signal", please make sure the signal cables are securely connected. The Power LED will light red. 2 Turn on the projector by pressing (POWER) on the remote control to switch between inputs...

User Manual
Page 36
... pressing remote control. (POWER) on the control panel or 2 Press "MENU" on the control panel or remote control to launch the OSD for projector installation and maintenance. English 26 User Controls Installation Menu The Installation menu provides an Onscreen Display (OSD) for projector installation and maintenance. 3 The background pattern acts as a guide to adjusting the calibration and alignment settings, such as screen size and distance, focus and more. Use the OSD only when the message "No signal" is for feature setting. The new settings...
... pressing remote control. (POWER) on the control panel or 2 Press "MENU" on the control panel or remote control to launch the OSD for projector installation and maintenance. English 26 User Controls Installation Menu The Installation menu provides an Onscreen Display (OSD) for projector installation and maintenance. 3 The background pattern acts as a guide to adjusting the calibration and alignment settings, such as screen size and distance, focus and more. Use the OSD only when the message "No signal" is for feature setting. The new settings...
User Manual
Page 39
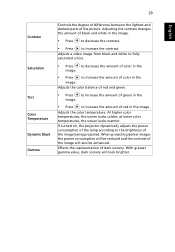
... of black and white in the image. Adjusts a video image from black and white to fully saturated colors. • Press to decrease the amount of color in the image. Effects the representation of color in the image. • Press to the brightness of the image being projected. at lower color temperatures, the screen looks warmer. If turned on, the projector dynamically adjusts the power consumption of the lamp according to increase...
... of black and white in the image. Adjusts a video image from black and white to fully saturated colors. • Press to decrease the amount of color in the image. Effects the representation of color in the image. • Press to the brightness of the image being projected. at lower color temperatures, the screen looks warmer. If turned on, the projector dynamically adjusts the power consumption of the lamp according to increase...

User Manual
Page 41
... aspect ratio. • Auto: Keeps the image with ceiling mounted projection. Use this function, the projector inverts the image for WXGA/1080p models): Keeps the original signal aspect ratio and zooms in by tilting projection (±40 degrees). Projection Mode • Front: The factory default setting. • Rear: Reverses the image so you can project behind a translucent screen with original width-height ratio and maximizes the image to fit the screen and displayed using a 4:3 ratio. • 16...
... aspect ratio. • Auto: Keeps the image with ceiling mounted projection. Use this function, the projector inverts the image for WXGA/1080p models): Keeps the original signal aspect ratio and zooms in by tilting projection (±40 degrees). Projection Mode • Front: The factory default setting. • Rear: Reverses the image so you can project behind a translucent screen with original width-height ratio and maximizes the image to fit the screen and displayed using a 4:3 ratio. • 16...
User Manual
Page 42
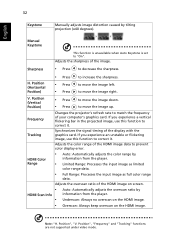
... limited color range data. • Full Range: Processes the input image as full color range data. Synchronizes the signal timing of the HDMI image on the HDMI image. Sharpness • Press to "On". Position", "Frequency" and "Tracking" functions are not supported under video mode. Position (Vertical Position) • Press • Press to increase the sharpness. Adjusts the sharpness of the image. Manual Keystone This function is unavailable when Auto Keystone is set...
... limited color range data. • Full Range: Processes the input image as full color range data. Synchronizes the signal timing of the HDMI image on the HDMI image. Sharpness • Press to "On". Position", "Frequency" and "Tracking" functions are not supported under video mode. Position (Vertical Position) • Press • Press to increase the sharpness. Adjusts the sharpness of the image. Manual Keystone This function is unavailable when Auto Keystone is set...

User Manual
Page 43
... Note: "HDMI Color Range" and "HDMI Scan Info" are only available when the input signal is disabled, the projector will take effect when you exit the OSD menu. • Acer: The default startup screen of your Acer projector. • User: Use the memorized picture from the "Screen Capture" function. For details, refer to the "Image" section. • Change the "Startup Screen" from CC1, CC2, CC3, CC4 (CC1 displays captions in...
... Note: "HDMI Color Range" and "HDMI Scan Info" are only available when the input signal is disabled, the projector will take effect when you exit the OSD menu. • Acer: The default startup screen of your Acer projector. • User: Use the memorized picture from the "Screen Capture" function. For details, refer to the "Image" section. • Change the "Startup Screen" from CC1, CC2, CC3, CC4 (CC1 displays captions in...

User Manual
Page 45
... function is enabled, the projector will request you to enter password when switching on . Both "User Password" and "Administrator Password" can set timeout function. • Press to select timeout duration. • The range is from 10 to 990 minutes. • When time is up or change "User Password". • Use the numerical keys on the remote control to set the password and press "MENU" to confirm. •...
... function is enabled, the projector will request you to enter password when switching on . Both "User Password" and "Administrator Password" can set timeout function. • Press to select timeout duration. • The range is from 10 to 990 minutes. • When time is up or change "User Password". • Use the numerical keys on the remote control to set the password and press "MENU" to confirm. •...

User Manual
Page 46
... your local Acer service center. Lock User Startup Screen This function is set to "OFF" by the projector no matter what the administrator password is. • If the Security Card is lost, please contact your projector. If set to "ON", the startup screen is "1234". If you forget your administrator password, do the following to change "Administrator Password". • The factory default of "Administrator Password" is locked and...
... your local Acer service center. Lock User Startup Screen This function is set to "OFF" by the projector no matter what the administrator password is. • If the Security Card is lost, please contact your projector. If set to "ON", the startup screen is "1234". If you forget your administrator password, do the following to change "Administrator Password". • The factory default of "Administrator Password" is locked and...
User Manual
Page 47
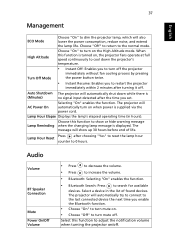
... try to connect to the last connected device the next time you to restart the projector immediately within 2 minutes after choosing "Yes" to reset the lamp hour counter to adjust the notification volume when turning the projector on/off . The projector will show or hide warning message Lamp Reminding when the changing lamp message is displayed. Lamp Hour Reset Press after turning it off the projector immediately without fan cooling process by pressing the power button twice...
... try to connect to the last connected device the next time you to restart the projector immediately within 2 minutes after choosing "Yes" to reset the lamp hour counter to adjust the notification volume when turning the projector on/off . The projector will show or hide warning message Lamp Reminding when the changing lamp message is displayed. Lamp Hour Reset Press after turning it off the projector immediately without fan cooling process by pressing the power button twice...

User Manual
Page 51
..., scrolling • Press "RESYNC" on the control panel or remote or incorrectly displayed image (For notebooks) control. • For an incorrectly displayed image: • Follow the steps for item 2 (above) to make it . Refer to the "Image" or flickering section for more information. • Change the display color setting on the projector lens. • Make sure the projection screen is unstable • Use "Tracking" to your computer. • Press...
..., scrolling • Press "RESYNC" on the control panel or remote or incorrectly displayed image (For notebooks) control. • For an incorrectly displayed image: • Follow the steps for item 2 (above) to make it . Refer to the "Image" or flickering section for more information. • Change the display color setting on the projector lens. • Make sure the projection screen is unstable • Use "Tracking" to your computer. • Press...

User Manual
Page 52
... sound. Go to "Image" > "Auto Keystone" or "Image" > "Keystone" to adjust the aspect ratio. Problems with the projector OSD. • If the image is still stretched, you will not turn off the projector, then to open the OSD menu. To replace the lamp, contact your DVD player. 9 Image is too small • Adjust the zoom lever on the top of the screen. • Press the Keystone correction keys on the control panel or remote control...
... sound. Go to "Image" > "Auto Keystone" or "Image" > "Keystone" to adjust the aspect ratio. Problems with the projector OSD. • If the image is still stretched, you will not turn off the projector, then to open the OSD menu. To replace the lamp, contact your DVD player. 9 Image is too small • Adjust the zoom lever on the top of the screen. • Press the Keystone correction keys on the control panel or remote control...
User Manual
Page 54
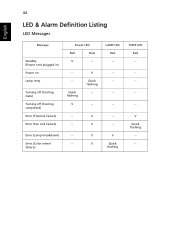
Error (Lamp breakdown) -- V -- 44 LED & Alarm Definition Listing LED Messages English Message Standby (Power cord plugged in) Power on Lamp retry Turning off (Cooling state) Turning off (Cooling completed) Error (Thermal failure) Error (Fan lock failure) Power LED Red Blue V -- --- Quick flashing V V Quick flashing -- -- -- Error (Color wheel -- V Quick flashing --- failure) V V V Quick flashing TEMP LED Red -- --- -- -- V LAMP LED Red -- ---- -- ---
Error (Lamp breakdown) -- V -- 44 LED & Alarm Definition Listing LED Messages English Message Standby (Power cord plugged in) Power on Lamp retry Turning off (Cooling state) Turning off (Cooling completed) Error (Thermal failure) Error (Fan lock failure) Power LED Red Blue V -- --- Quick flashing V V Quick flashing -- -- -- Error (Color wheel -- V Quick flashing --- failure) V V V Quick flashing TEMP LED Red -- --- -- -- V LAMP LED Red -- ---- -- ---

User Manual (3D)
Page 4
... the infra-red transmitter so that it has maximum coverage. Setting up a 3D environment Once you haven't previously set up the 3D environment. 3 Follow the onscreen instructions to an available USB port on your computer. 2 Right-click anywhere on the desktop and select NVIDIA Control Panel. English 4 Important: Only NVIDIA graphics cards are supported. 2 Download and install the 3D drivers and 3D...
... the infra-red transmitter so that it has maximum coverage. Setting up a 3D environment Once you haven't previously set up the 3D environment. 3 Follow the onscreen instructions to an available USB port on your computer. 2 Right-click anywhere on the desktop and select NVIDIA Control Panel. English 4 Important: Only NVIDIA graphics cards are supported. 2 Download and install the 3D drivers and 3D...

User Manual (3D)
Page 7
To download software and use an NVIDIA 3DTV Play ready projector with DLP glasses, refer to your graphics card's documentation. 2 Download and install the latest drivers for the latest driver version. 3 You should also download a suitable 3D player such as the one available from www.3dtv.at fullscreen resolution in the player. Using DLP 3D / NVIDIA 3DTV Play technology Requires DLP 3D glasses. Before you...
To download software and use an NVIDIA 3DTV Play ready projector with DLP glasses, refer to your graphics card's documentation. 2 Download and install the latest drivers for the latest driver version. 3 You should also download a suitable 3D player such as the one available from www.3dtv.at fullscreen resolution in the player. Using DLP 3D / NVIDIA 3DTV Play technology Requires DLP 3D glasses. Before you...


