

User Manual
Page 3
... ensure reliable operation of the product and to the AC power outlet. • Unplug the power cord before removing the power supply unit from the projector. • If the system has multiple sources of any kind into this product from the wall outlet before connecting the power cord to protect it could result in installation unless proper ventilation is easily accessible and located as...
... ensure reliable operation of the product and to the AC power outlet. • Unplug the power cord before removing the power supply unit from the projector. • If the system has multiple sources of any kind into this product from the wall outlet before connecting the power cord to protect it could result in installation unless proper ventilation is easily accessible and located as...

User Manual
Page 5
... walls and free flow of air around the projector is necessary. • Locations where temperatures may become excessively high, such as opening or removing covers may expose you to dangerous voltage points or other controls may result in performance, indicating a need for purchase options. At least 50cm clearance from the wall outlet and refer servicing to qualified service personnel when: • the power cord or...
... walls and free flow of air around the projector is necessary. • Locations where temperatures may become excessively high, such as opening or removing covers may expose you to dangerous voltage points or other controls may result in performance, indicating a need for purchase options. At least 50cm clearance from the wall outlet and refer servicing to qualified service personnel when: • the power cord or...

User Manual
Page 6
.... It can lead to fire. • When switching the projector off, suggest to turn off the main power abruptly or unplug the projector during operation. It may hurt your dealer for the fan to ensure the projector completes its own removable cover. The only user serviceable part is unplugged. • The product will detect the life of displaying inverted images for approximately 45 minutes prior to break...
.... It can lead to fire. • When switching the projector off, suggest to turn off the main power abruptly or unplug the projector during operation. It may hurt your dealer for the fan to ensure the projector completes its own removable cover. The only user serviceable part is unplugged. • The product will detect the life of displaying inverted images for approximately 45 minutes prior to break...
User Manual
Page 8
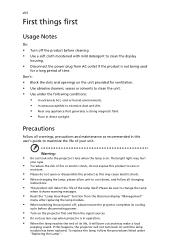
... slots and openings on . viii First things first Usage Notes Do: • Turn off , please ensure the projector completes its life, it shows warning messages. • Reset the "Lamp Hour Reset" function from the Onscreen display "Management" menu after replacing the lamp module. • When switching the projector off the product before disconnecting power. • Turn on the projector first and then the signal sources. • Do not use lens cap when projector is...
... slots and openings on . viii First things first Usage Notes Do: • Turn off , please ensure the projector completes its life, it shows warning messages. • Reset the "Lamp Hour Reset" function from the Onscreen display "Management" menu after replacing the lamp module. • When switching the projector off the product before disconnecting power. • Turn on the projector first and then the signal sources. • Do not use lens cap when projector is...

User Manual
Page 9
... 3 Projector Outlook 3 Control Panel 6 Remote Control Layout 7 MHL (Mobile High-Definition Link) Control 9 Getting Started 11 Connecting the Projector 11 Turning the Projector On/Off 13 Turning on the Projector 13 Turning the projector off 14 Adjusting the Projected Image 15 Adjusting the Height of Projected Image 15 How to optimize image size and distance 16 How to get a preferred image size by adjusting distance and zoom 20 User Controls 24 Installation menu 24 Onscreen Display (OSD) Menus 25 Color 26 Image 29 Setting 31 Management 33 Audio 34...
... 3 Projector Outlook 3 Control Panel 6 Remote Control Layout 7 MHL (Mobile High-Definition Link) Control 9 Getting Started 11 Connecting the Projector 11 Turning the Projector On/Off 13 Turning on the Projector 13 Turning the projector off 14 Adjusting the Projected Image 15 Adjusting the Height of Projected Image 15 How to optimize image size and distance 16 How to get a preferred image size by adjusting distance and zoom 20 User Controls 24 Installation menu 24 Onscreen Display (OSD) Menus 25 Color 26 Image 29 Setting 31 Management 33 Audio 34...

User Manual
Page 11
...) mode extend lamp life • Acer EcoProjeciton Technology delivers Intelligent power management approach and physical efficiency improvement • Equipped with HDMI™ & MHL connection supporting HDCP • Support HDMI CEC function • Smart detection delivers quick, intelligent source detection • Multi-language onscreen display (OSD) menus • Manual focus projection lens zooms up to 1.1x or 1.3x • 2x digital zoom • Microsoft® Windows® 2000, XP, Vista®, Windows 7, Windows 8.1, Windows...
...) mode extend lamp life • Acer EcoProjeciton Technology delivers Intelligent power management approach and physical efficiency improvement • Equipped with HDMI™ & MHL connection supporting HDCP • Support HDMI CEC function • Smart detection delivers quick, intelligent source detection • Multi-language onscreen display (OSD) menus • Manual focus projection lens zooms up to 1.1x or 1.3x • 2x digital zoom • Microsoft® Windows® 2000, XP, Vista®, Windows 7, Windows 8.1, Windows...

User Manual
Page 16
6 Control Panel 1 2 3 English 4 7 8 5 9 6 10 # Icon Function 1 POWER POWER 2 LAMP LAMP 3 TEMP TEMP 4 POWER Description Power Indicator LED Lamp Indicator LED Temp Indicator LED See the contents in "Turning the Projector On/Off" section. 5 Four directional select Use to select items or make keys adjustments to your selection. 6 BACK BACK Returns to the previous operation. 7 SOURCE SOURCE Changes the active source. 8 ENTER ENTER Confirm your selection of items. 9 Keystone Adjusts the image to compensate for distortion caused by tilting the projector. 10 MENU MENU...
6 Control Panel 1 2 3 English 4 7 8 5 9 6 10 # Icon Function 1 POWER POWER 2 LAMP LAMP 3 TEMP TEMP 4 POWER Description Power Indicator LED Lamp Indicator LED Temp Indicator LED See the contents in "Turning the Projector On/Off" section. 5 Four directional select Use to select items or make keys adjustments to your selection. 6 BACK BACK Returns to the previous operation. 7 SOURCE SOURCE Changes the active source. 8 ENTER ENTER Confirm your selection of items. 9 Keystone Adjusts the image to compensate for distortion caused by tilting the projector. 10 MENU MENU...

User Manual
Page 17
... keys Use up, down, left, right buttons to select items or make adjustments to your selection. 7 3D Press "3D" to select 3D models. 8 SOURCE Changes the active source. 9 MODE Press "MODE" to select the display mode from Bright, Presentation, Standard, Video and User. 10 KEYSTONE Adjusts the image to compensate for distortion caused by tilting the projector. 11 BACK STOP Returns to the VGA connector. Press "VGA" to change source to...
... keys Use up, down, left, right buttons to select items or make adjustments to your selection. 7 3D Press "3D" to select 3D models. 8 SOURCE Changes the active source. 9 MODE Press "MODE" to select the display mode from Bright, Presentation, Standard, Video and User. 10 KEYSTONE Adjusts the image to compensate for distortion caused by tilting the projector. 11 BACK STOP Returns to the VGA connector. Press "VGA" to change source to...

User Manual
Page 18
... VIDEO To change source to select the 16 PgDn next page. Only 25 LAN/WiFi available while Acer WirelessCAST (MWA3) is connected to a computer via a USB cable. 15 COMPONENT No function. Press "HIDE" to hide the image, press again to display the image. 22 ZOOM IN Zooms the projector display in source list. 26 Laser pointer Aim the remote at the viewing screen. 27 Laser button Aim the remote at the viewing screen...
... VIDEO To change source to select the 16 PgDn next page. Only 25 LAN/WiFi available while Acer WirelessCAST (MWA3) is connected to a computer via a USB cable. 15 COMPONENT No function. Press "HIDE" to hide the image, press again to display the image. 22 ZOOM IN Zooms the projector display in source list. 26 Laser pointer Aim the remote at the viewing screen. 27 Laser button Aim the remote at the viewing screen...

User Manual
Page 23
... flash red. 2 Turn on the projector by pressing "Power" button on the control panel or remote control, and the Power indicator LED will detect your source (computer, notebook, video player ,etc.). Power button The projector will turn blue. 3 Turn on your source automatically. • If the screen displays "Lock" and "Source" icons, it means the projector is locked onto a specific source type and there is no such type of input signal detected. • If the screen displays "No Signal", please make sure the signal cables are securely connected...
... flash red. 2 Turn on the projector by pressing "Power" button on the control panel or remote control, and the Power indicator LED will detect your source (computer, notebook, video player ,etc.). Power button The projector will turn blue. 3 Turn on your source automatically. • If the screen displays "Lock" and "Source" icons, it means the projector is locked onto a specific source type and there is no such type of input signal detected. • If the screen displays "No Signal", please make sure the signal cables are securely connected...

User Manual
Page 24
... shut down , and the LED temp indicator will turn off, the projector will automatically shut down , and the LED temp indicator will blink. The lamp will automatically turn solid red. Lamp will automatically turn the projector immediately back on model definition. Contact your local dealer or service center. Contact your local dealer or service center. • "Fan failed. Attention! This message appears: "Please press the power button again to ensure continued optimal lamp operation. This onscreen message indicates...
... shut down , and the LED temp indicator will turn off, the projector will automatically shut down , and the LED temp indicator will blink. The lamp will automatically turn solid red. Lamp will automatically turn the projector immediately back on model definition. Contact your local dealer or service center. Contact your local dealer or service center. • "Fan failed. Attention! This message appears: "Please press the power button again to ensure continued optimal lamp operation. This onscreen message indicates...

User Manual
Page 34
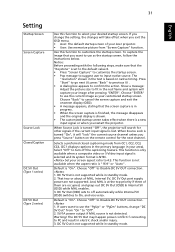
... and maintenance. English 24 User Controls Installation menu The installation menu provides an onscreen display (OSD) for projector installation and maintenance. 3 The background pattern acts as a guide to adjusting the calibration and alignment settings, such as screen size and distance, focus and more . 4 The Installation menu includes the following options: •Projection Mode •Projection Location •Auto Keystone settings •Manual Keystone settings •WirelessHD Dongle Pairing •Language settings •Reset to factory default function Use the up and down...
... and maintenance. English 24 User Controls Installation menu The installation menu provides an onscreen display (OSD) for projector installation and maintenance. 3 The background pattern acts as a guide to adjusting the calibration and alignment settings, such as screen size and distance, focus and more . 4 The Installation menu includes the following options: •Projection Mode •Projection Location •Auto Keystone settings •Manual Keystone settings •WirelessHD Dongle Pairing •Language settings •Reset to factory default function Use the up and down...

User Manual
Page 37
... brighter. B Bias Adjusts the blue bias for color temperature optimization. Mode Use this function to increase the amount of red in the image. R Gain Adjusts the red gain for color temperature optimization. G Bias Adjusts the green bias for color temperature optimization. Tint Color Temperature Gamma 27 Adjusts the color balance of red and green. • Press to increase the amount of green in the image. • Press to choose CT1, CT2 (Native), CT3, User mode. English
... brighter. B Bias Adjusts the blue bias for color temperature optimization. Mode Use this function to increase the amount of red in the image. R Gain Adjusts the red gain for color temperature optimization. G Bias Adjusts the green bias for color temperature optimization. Tint Color Temperature Gamma 27 Adjusts the color balance of red and green. • Press to increase the amount of green in the image. • Press to choose CT1, CT2 (Native), CT3, User mode. English

User Manual
Page 39
... a vertical flickering bar in by 1.333 times. Adjusts the sharpness of image. • Desktop Aspect Ratio Auto Keystone Manual Keystone • Ceiling: Turns the image upside down . Auto: Automatically adjusts projection location of the image. • Press to decrease the sharpness. • Press to move the image right. Adjust image distortion caused by width (1280 pixels) and height (800 pixels). • 4:3: The image will be scaled to fit the screen and displayed using a 4:3 ratio...
... a vertical flickering bar in by 1.333 times. Adjusts the sharpness of image. • Desktop Aspect Ratio Auto Keystone Manual Keystone • Ceiling: Turns the image upside down . Auto: Automatically adjusts projection location of the image. • Press to decrease the sharpness. • Press to move the image right. Adjust image distortion caused by width (1280 pixels) and height (800 pixels). • 4:3: The image will be scaled to fit the screen and displayed using a 4:3 ratio...
User Manual
Page 41
... projector. Choose "Back" to input native source. When Source Lock is not supported while in your Acer projector. • User: Use memorize picture from CC1, CC2, CC3, CC4, (CC1 displays captions in the primary language in standby mode. Selects a preferred closed captioning mode from "Screen Capture" function. Select "Off" to On, and vice versa. DC 5V Out (OSD) sets to off automatically while Internal 5V (OSD) switches to turn...
... projector. Choose "Back" to input native source. When Source Lock is not supported while in your Acer projector. • User: Use memorize picture from CC1, CC2, CC3, CC4, (CC1 displays captions in the primary language in standby mode. Selects a preferred closed captioning mode from "Screen Capture" function. Select "Off" to On, and vice versa. DC 5V Out (OSD) sets to off automatically while Internal 5V (OSD) switches to turn...
User Manual
Page 42
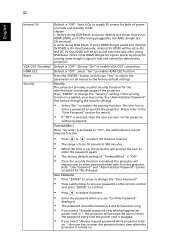
... when plugging the power cord in.", the projector will prompt the user to enter the password every time the power cord is turned on .", the user has to setup or change the "Security" setting. Select "On" to operate the projector. Switch On to enter password when switch on mode and standby mode. 1. Default is "Off". Before doing OSD Reset: projector detects and shows that inner HDMI 2/MHL port after doing OSD Reset: If inner HDMI dongle existd and...
... when plugging the power cord in.", the projector will prompt the user to enter the password every time the power cord is turned on .", the user has to setup or change the "Security" setting. Select "On" to operate the projector. Switch On to enter password when switch on mode and standby mode. 1. Default is "Off". Before doing OSD Reset: projector detects and shows that inner HDMI 2/MHL port after doing OSD Reset: If inner HDMI dongle existd and...

User Manual
Page 43
... lock user startup screen is 15 seconds). This unique password is the number which will be used in both the "Enter Administrator Password" and "Enter Password" dialog boxes. • Press "ENTER" to change the lamp 30 hours before its expected end-of "Administrator Password" is . • If losing this security card and number, please contact with an Acer service center. Management ECO Mode High Altitude Turn Off Mode Auto Shutdown Menu Display Time...
... lock user startup screen is 15 seconds). This unique password is the number which will be used in both the "Enter Administrator Password" and "Enter Password" dialog boxes. • Press "ENTER" to change the lamp 30 hours before its expected end-of "Administrator Password" is . • If losing this security card and number, please contact with an Acer service center. Management ECO Mode High Altitude Turn Off Mode Auto Shutdown Menu Display Time...

User Manual
Page 46
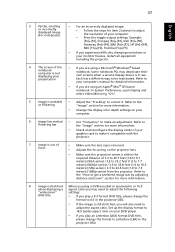
... installed. Windows 7/ • Select the "Settings" tab. Please refer to the following troubleshooting guide. 36 Appendices English Troubleshooting If you experience a problem with your Acer projector, refer to the "Replacing the Lamp" section. • Make sure you have removed the lens cap and the projector is switched on. 2 Partial, scrolling • For an incorrectly displayed image: or incorrectly displayed image (for PC (Windows 2000/XP/Vista/ • Open "My Computer", open the "Control Panel...
... installed. Windows 7/ • Select the "Settings" tab. Please refer to the following troubleshooting guide. 36 Appendices English Troubleshooting If you experience a problem with your Acer projector, refer to the "Replacing the Lamp" section. • Make sure you have removed the lens cap and the projector is switched on. 2 Partial, scrolling • For an incorrectly displayed image: or incorrectly displayed image (for PC (Windows 2000/XP/Vista/ • Open "My Computer", open the "Control Panel...
User Manual
Page 47
... the "How to get a preferred image size by adjusting distance and zoom" section for detailed information. • If you are using an Apple® Mac® OS based notebook: In System Preferences, open Display and select Video Mirroring "On". 5 Image is within the required distance of the notebook computer is not displaying your computer. • Press the toggle output settings. Example: [Fn]+[F4], Compaq...
... the "How to get a preferred image size by adjusting distance and zoom" section for detailed information. • If you are using an Apple® Mac® OS based notebook: In System Preferences, open Display and select Video Mirroring "On". 5 Image is within the required distance of the notebook computer is not displaying your computer. • Press the toggle output settings. Example: [Fn]+[F4], Compaq...

User Manual
Page 49
... installed. Problems with dust, please clean it. Please check the following message. Please refer to all controls unplug the power cord and wait at least 30 seconds before it may make a loud popping sound. If the dust filter is not working. • Projector Overheated - the system fan is clogged with the Projector # Condition Solution 1 The projector stops responding If possible, turn on until the lamp module has been replaced...
... installed. Problems with dust, please clean it. Please check the following message. Please refer to all controls unplug the power cord and wait at least 30 seconds before it may make a loud popping sound. If the dust filter is not working. • Projector Overheated - the system fan is clogged with the Projector # Condition Solution 1 The projector stops responding If possible, turn on until the lamp module has been replaced...


