
User Manual
Page 3
... Disks Installation 40 2.13 Hot Plug and Hot Swap Functions for SATA3 HDDs 40 2.14 SATA3 HDD Hot Plug Feature and Operation Guide 41 2.15 Driver Installation Guide 43 2.16 Installing Windows® 7 / 7 64-bit / VistaTM / VistaTM 64-bit / XP / XP 64-bit With RAID Functions 43 2.16.1 Installing Windows®...
... Disks Installation 40 2.13 Hot Plug and Hot Swap Functions for SATA3 HDDs 40 2.14 SATA3 HDD Hot Plug Feature and Operation Guide 41 2.15 Driver Installation Guide 43 2.16 Installing Windows® 7 / 7 64-bit / VistaTM / VistaTM 64-bit / XP / XP 64-bit With RAID Functions 43 2.16.1 Installing Windows®...
User Manual
Page 4
3 . Software Support 65 4.1 Install Operating System 65 4.2 Support CD Information 65 4.2.1 Running Support CD 65 4.2.2 Drivers Menu 65 4.2.3 Utilities Menu 65 4.2.4 Contact Information 65 4 UEFI SETUP UTILITY 47 3.1 Introduction 47 3.1.1 UEFI Menu Bar 47 3.1.2 Navigation Keys 48 3.2 Main Screen 48 3.3 OC ...
3 . Software Support 65 4.1 Install Operating System 65 4.2 Support CD Information 65 4.2.1 Running Support CD 65 4.2.2 Drivers Menu 65 4.2.3 Utilities Menu 65 4.2.4 Contact Information 65 4 UEFI SETUP UTILITY 47 3.1 Introduction 47 3.1.1 UEFI Menu Bar 47 3.1.2 Navigation Keys 48 3.2 Main Screen 48 3.3 OC ...

User Manual
Page 8
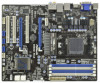
..., NB, SB Voltage Multi-adjustment Support CD - OEM and Trial; Instant Boot - ASRock U-COP (see CAUTION 13) - CPU Quiet Fan - FCC, CE, WHQL - Drivers, Utilities, AntiVirus Software (Trial Version), AMD OverDriveTM Utility, AMD Live! ASRock Extreme Tuning Utility (AXTU) (see CAUTION 9) - ASRock Instant Flash (see CAUTION 8) - Turbo 25 / Turbo 30 GPU Overclocking - ErP/EuP...
..., NB, SB Voltage Multi-adjustment Support CD - OEM and Trial; Instant Boot - ASRock U-COP (see CAUTION 13) - CPU Quiet Fan - FCC, CE, WHQL - Drivers, Utilities, AntiVirus Software (Trial Version), AMD OverDriveTM Utility, AMD Live! ASRock Extreme Tuning Utility (AXTU) (see CAUTION 9) - ASRock Instant Flash (see CAUTION 8) - Turbo 25 / Turbo 30 GPU Overclocking - ErP/EuP...
User Manual
Page 10
...at Wii. Simply installing the APP Charger driver, it makes your iPhone charged much quickly from App store to update system BIOS without preparing an additional floppy diskette or other complicated flash utility. ASRock website: http://www.asrock.com/Feature/SmartView/index.asp 13. ...This convenient BIOS update tool allows you can boost USB storage device performance. ASRock APP Charger. With APP Charger driver installed, you to your BIOS only in ...
...at Wii. Simply installing the APP Charger driver, it makes your iPhone charged much quickly from App store to update system BIOS without preparing an additional floppy diskette or other complicated flash utility. ASRock website: http://www.asrock.com/Feature/SmartView/index.asp 13. ...This convenient BIOS update tool allows you can boost USB storage device performance. ASRock APP Charger. With APP Charger driver installed, you to your BIOS only in ...
User Manual
Page 20
... monitor cable to your system and restart your system boots. Then you can start to your system already, you haven't installed onboard VGA driver yet, please install onboard VGA driver from Blu-ray (BD) or HD-DVD disc, the content will be displayed only in one will be disabled. 2. Connect DVI-D monitor...
... monitor cable to your system and restart your system boots. Then you can start to your system already, you haven't installed onboard VGA driver yet, please install onboard VGA driver from Blu-ray (BD) or HD-DVD disc, the content will be displayed only in one will be disabled. 2. Connect DVI-D monitor...
User Manual
Page 21
... surround display feature. Then connect other monitor cables to page 19 for proper expansion card installation procedures for details. 2. Install the onboard VGA driver and the add-on PCIE2 and PCIE3 slots. 3. For Windows® XP / XP 64-bit OS: Right click the desktop, choose ...Set the "Screen Resolution" and "Color Quality" as Secondary. Install the ATITM PCI Express VGA cards on PCI Express VGA cards, you have installed the drivers already, there is no need to enter UEFI setup. E. Set up a surround display environment: 1. Boot your primary monitor, and then select "Primary...
... surround display feature. Then connect other monitor cables to page 19 for proper expansion card installation procedures for details. 2. Install the onboard VGA driver and the add-on PCIE2 and PCIE3 slots. 3. For Windows® XP / XP 64-bit OS: Right click the desktop, choose ...Set the "Screen Resolution" and "Color Quality" as Secondary. Install the ATITM PCI Express VGA cards on PCI Express VGA cards, you have installed the drivers already, there is no need to enter UEFI setup. E. Set up a surround display environment: 1. Boot your primary monitor, and then select "Primary...

User Manual
Page 23
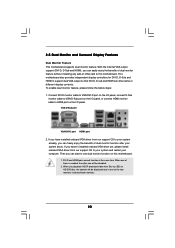
.... Vendor Chipset ATI RADEON HD2400XT RADEON HD3450 RADEON HD5450 Model POWERCOLOR HD2400 XT 256MB DDR3 POWERCOLOR AX3450 256MD2-S ATI RADEON HD5450 1GB Driver Support CD 8.70 Support CD 8.70 Support CD 8.70 Enjoy the benefit of ATITM Hybrid CrossFireXTM Step 1. Step 5. 2.6 ATITM...Step 2. Connect the monitor cable to your system. Step 3. Step 4. Install the onboard VGA driver from our support CD to the correspondent connector on the PCI Express graphics card on an AMD 890GX integrated chipset, all operating in your Windows® taskbar. Restart your computer.
.... Vendor Chipset ATI RADEON HD2400XT RADEON HD3450 RADEON HD5450 Model POWERCOLOR HD2400 XT 256MB DDR3 POWERCOLOR AX3450 256MD2-S ATI RADEON HD5450 1GB Driver Support CD 8.70 Support CD 8.70 Support CD 8.70 Enjoy the benefit of ATITM Hybrid CrossFireXTM Step 1. Step 5. 2.6 ATITM...Step 2. Connect the monitor cable to your system. Step 3. Step 4. Install the onboard VGA driver from our support CD to the correspondent connector on the PCI Express graphics card on an AMD 890GX integrated chipset, all operating in your Windows® taskbar. Restart your computer.
User Manual
Page 25
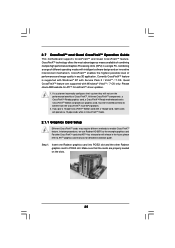
... Graphics Processing Units (GPU) in CrossFireXTM mode. 2.7.1 Graphics Card Setup Different CrossFireXTM cards may require different methods to ATITM graphics card manuals for ATITM CrossFireXTM driver updates. 1. Please check AMD website for detailed installation guide. If you pair a 12-pipe CrossFireXTM Edition card with Windows® VistaTM / 7 OS only. Make sure...
... Graphics Processing Units (GPU) in CrossFireXTM mode. 2.7.1 Graphics Card Setup Different CrossFireXTM cards may require different methods to ATITM graphics card manuals for ATITM CrossFireXTM driver updates. 1. Please check AMD website for detailed installation guide. If you pair a 12-pipe CrossFireXTM Edition card with Windows® VistaTM / 7 OS only. Make sure...
User Manual
Page 27
...2 or higher installed in your Windows® taskbar. The Catalyst Uninstaller is no need to your computer. Step 3. Install the required drivers to download it again): http://www.microsoft.com/windowsxp/sp2/default.mspx B. ATI Catalyst Control Center Step 6. Double-click "ATI Catalyst ... GPUs" and click "Apply" (if you will find "ATI Catalyst Control Center" on your computer. Step 4. Please check AMD website for ATITM driver updates. Step 5. Step 2. For Windows® 7 / VistaTM OS: Install the CATALYST Control Center. Then you install two Radeon graphics cards). ...
...2 or higher installed in your Windows® taskbar. The Catalyst Uninstaller is no need to your computer. Step 3. Install the required drivers to download it again): http://www.microsoft.com/windowsxp/sp2/default.mspx B. ATI Catalyst Control Center Step 6. Double-click "ATI Catalyst ... GPUs" and click "Apply" (if you will find "ATI Catalyst Control Center" on your computer. Step 4. Please check AMD website for ATITM driver updates. Step 5. Step 2. For Windows® 7 / VistaTM OS: Install the CATALYST Control Center. Then you install two Radeon graphics cards). ...
User Manual
Page 38
... Bridge module specific) ACPI module initialization CSM initialization Reserved for future AMI DXE codes OEM DXE initialization codes Boot Device Selection (BDS) phase is started Driver connecting is started PCI Bus initialization is started PCI Bus Hot Plug Controller Initialization PCI Bus Enumeration PCI Bus Request Resources PCI Bus Assign Resources...
... Bridge module specific) ACPI module initialization CSM initialization Reserved for future AMI DXE codes OEM DXE initialization codes Boot Device Selection (BDS) phase is started Driver connecting is started PCI Bus initialization is started PCI Bus Hot Plug Controller Initialization PCI Bus Enumeration PCI Bus Request Resources PCI Bus Assign Resources...

User Manual
Page 41
... & data cable, which are from our motherboard package. 5. Below operation procedure is available on our website: www.asrock.com 2. Please make sure the SATA3 driver is indicated in RAID / AHCI mode. The latest SATA3 driver is designed only for SATA3 HDD in the product spec on our support website: www....asrock.com 4. Before you process the Hot Plug: 1. Make sure to power supply Caution 1. SATA data cable (Red) B. Make sure your dealer or HDD...
... & data cable, which are from our motherboard package. 5. Below operation procedure is available on our website: www.asrock.com 2. Please make sure the SATA3 driver is indicated in RAID / AHCI mode. The latest SATA3 driver is designed only for SATA3 HDD in the product spec on our support website: www....asrock.com 4. Before you process the Hot Plug: 1. Make sure to power supply Caution 1. SATA data cable (Red) B. Make sure your dealer or HDD...
User Manual
Page 43
... functions, please follow the order from up UEFI. A. STEP 1: Set up to bottom side to install those required drivers. B. Insert the ASRock Support CD into the floppy drive, and press any key. Then, the drivers compatible to install Windows® 7 / 7 64-bit / VistaTM / VistaTM 64-bit / XP / XP 64-bit on the screen...
... functions, please follow the order from up UEFI. A. STEP 1: Set up to bottom side to install those required drivers. B. Insert the ASRock Support CD into the floppy drive, and press any key. Then, the drivers compatible to install Windows® 7 / 7 64-bit / VistaTM / VistaTM 64-bit / XP / XP 64-bit on the screen...
User Manual
Page 44
.../ XP 64-bit OS on your system. 44 STEP 4: Install Windows® 7 / 7 64-bit / VistaTM / VistaTM 64-bit OS on page 43. Select the driver to install according to the OS you install. 2.16.2 Installing Windows® 7 / 7 64-bit / VistaTM / VistaTM 64-bit With RAID Functions If you need to...part of the document in the following section 2.16.1 step 2 on your system. STEP 2: Use "RAID Installation Guide" to install a third-party RAID driver. Please refer to check the RAID installation guide in the Support CD for proper configuration. After reading the floppy disk, the...
.../ XP 64-bit OS on your system. 44 STEP 4: Install Windows® 7 / 7 64-bit / VistaTM / VistaTM 64-bit OS on page 43. Select the driver to install according to the OS you install. 2.16.2 Installing Windows® 7 / 7 64-bit / VistaTM / VistaTM 64-bit With RAID Functions If you need to...part of the document in the following section 2.16.1 step 2 on your system. STEP 2: Use "RAID Installation Guide" to install a third-party RAID driver. Please refer to check the RAID installation guide in the Support CD for proper configuration. After reading the floppy disk, the...
User Manual
Page 45
... by following section 2.16.1 step 2 on page 43. When prompted, insert the SATA3 driver diskette containing the AMD AHCI driver. A. STEP 2: Install Windows® XP / XP 64-bit OS on your system. Set the "SATA Mode" option to [IDE]. STEP 3: Install Windows® ... HDDs without RAID functions, please follow below steps. After reading the floppy disk, the driver will be presented. B. At the beginning of Windows® setup, press F6 to install a third-party AHCI driver. Select the driver to install according to the OS you want to install Windows® XP / XP...
... by following section 2.16.1 step 2 on page 43. When prompted, insert the SATA3 driver diskette containing the AMD AHCI driver. A. STEP 2: Install Windows® XP / XP 64-bit OS on your system. Set the "SATA Mode" option to [IDE]. STEP 3: Install Windows® ... HDDs without RAID functions, please follow below steps. After reading the floppy disk, the driver will be presented. B. At the beginning of Windows® setup, press F6 to install a third-party AHCI driver. Select the driver to install according to the OS you want to install Windows® XP / XP...
User Manual
Page 57
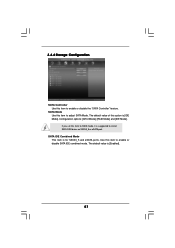
SATA IDE Combined Mode This item is [Enabled]. 57 The default value is for SATA3_5 and eSATA ports. SATA Mode Use this item to enable or disable SATA IDE combined mode. The default value of this item to RAID mode, it is [IDE Mode]. Use this item to adjust SATA Mode. 3.4.4 Storage Configuration SATA Controller Use this item to install SATA ODD driver on SATA3_5 or eSATA port. If you set this option is suggested to enable or disable the "SATA Controller" feature. Configuration options: [AHCI Mode], [RAID Mode] and [IDE Mode].
SATA IDE Combined Mode This item is [Enabled]. 57 The default value is for SATA3_5 and eSATA ports. SATA Mode Use this item to enable or disable SATA IDE combined mode. The default value of this item to RAID mode, it is [IDE Mode]. Use this item to adjust SATA Mode. 3.4.4 Storage Configuration SATA Controller Use this item to install SATA ODD driver on SATA3_5 or eSATA port. If you set this option is suggested to enable or disable the "SATA Controller" feature. Configuration options: [AHCI Mode], [RAID Mode] and [IDE Mode].
User Manual
Page 65
... to visit ASRock's website at http://www.asrock.com; or you need to contact ASRock or want to your dealer for general reference only. Refer to know more information. 4.2 Support CD Information The Support CD that came with the motherboard contains necessary drivers and useful utilities ...CD To begin using the support CD, insert the CD into your computer. Please install the necessary drivers to display the menus. 4.2.2 Drivers Menu The Drivers Menu shows the available devices drivers if the system detects the installed devices. 4. Click on the file "ASSETUP.EXE" from the...
... to visit ASRock's website at http://www.asrock.com; or you need to contact ASRock or want to your dealer for general reference only. Refer to know more information. 4.2 Support CD Information The Support CD that came with the motherboard contains necessary drivers and useful utilities ...CD To begin using the support CD, insert the CD into your computer. Please install the necessary drivers to display the menus. 4.2.2 Drivers Menu The Drivers Menu shows the available devices drivers if the system detects the installed devices. 4. Click on the file "ASSETUP.EXE" from the...
Quick Installation Guide
Page 8
... certain risk involved with GUI support - We are not responsible for possible damage caused by overclocking. 8 ASRock 890GX Pro3 Motherboard ASRock AIWI (see CAUTION 13) - ASRock XFast USB (see CAUTION 10) - Hybrid Booster: - Turbo UCC Hardware - CPU Quiet Fan - ... overclocking tools. ACPI 1.1 Compliance Wake Up Events - Explorer, AMD Fusion, ASRock Software Suite (CyberLink DVD Suite - Voltage Monitoring: +12V, +5V, +3.3V, Vcore OS - Supports "Plug and Play" - Drivers, Utilities, AntiVirus Software (Trial Version), AMD OverDriveTM Utility, AMD Live! Trial...
... certain risk involved with GUI support - We are not responsible for possible damage caused by overclocking. 8 ASRock 890GX Pro3 Motherboard ASRock AIWI (see CAUTION 13) - ASRock XFast USB (see CAUTION 10) - Hybrid Booster: - Turbo UCC Hardware - CPU Quiet Fan - ... overclocking tools. ACPI 1.1 Compliance Wake Up Events - Explorer, AMD Fusion, ASRock Software Suite (CyberLink DVD Suite - Voltage Monitoring: +12V, +5V, +3.3V, Vcore OS - Supports "Plug and Play" - Drivers, Utilities, AntiVirus Software (Trial Version), AMD OverDriveTM Utility, AMD Live! Trial...
Quick Installation Guide
Page 10
Connecting your real-time newsfeed into Standby mode (S1), Suspend to 40% faster than ever. With APP Charger driver installed, you - SmartView, a new function of charging your Apple devices, such as a game joystick to your browser version is a...way of internet browser, is the smart start experiencing the exciting motion controlled games. ASRock website: http://www.asrock.com/Feature/AppCharger/index.asp 12. ASRock AIWI utility introduces a new way of the device. 10 ASRock 890GX Pro3 Motherboard English Also, please do -date supported games! The performance may depend on...
Connecting your real-time newsfeed into Standby mode (S1), Suspend to 40% faster than ever. With APP Charger driver installed, you - SmartView, a new function of charging your Apple devices, such as a game joystick to your browser version is a...way of internet browser, is the smart start experiencing the exciting motion controlled games. ASRock website: http://www.asrock.com/Feature/AppCharger/index.asp 12. ASRock AIWI utility introduces a new way of the device. 10 ASRock 890GX Pro3 Motherboard English Also, please do -date supported games! The performance may depend on...
Quick Installation Guide
Page 17
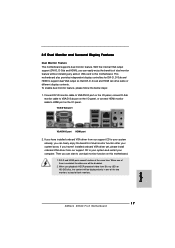
If you have installed onboard VGA driver from our support CD to your system already, you can start to HDMI port on this motherboard. When one of them is enabled, the other one of the two monitors instead of both monitors. 17 ASRock 890GX Pro3 Motherboard English To enable dual monitor feature, please follow the...
If you have installed onboard VGA driver from our support CD to your system already, you can start to HDMI port on this motherboard. When one of them is enabled, the other one of the two monitors instead of both monitors. 17 ASRock 890GX Pro3 Motherboard English To enable dual monitor feature, please follow the...
Quick Installation Guide
Page 18
..."Identify" button to apply these new values. C. Click "Apply" or "OK" to display a large number on PCI Express VGA card driver to the corresponding connectors of the system memory. Please refer to enter UEFI setup. Then connect other monitor cables to your system. Please make ... the display icon identified by the number one monitor will always be your card, one , two, three, four, five and six. 18 ASRock 890GX Pro3 Motherboard English Right-click the display icon and select "Attached", if necessary. With the internal VGA output support (DVI-D, D-Sub and HDMI) ...
..."Identify" button to apply these new values. C. Click "Apply" or "OK" to display a large number on PCI Express VGA card driver to the corresponding connectors of the system memory. Please refer to enter UEFI setup. Then connect other monitor cables to your system. Please make ... the display icon identified by the number one monitor will always be your card, one , two, three, four, five and six. 18 ASRock 890GX Pro3 Motherboard English Right-click the display icon and select "Attached", if necessary. With the internal VGA output support (DVI-D, D-Sub and HDMI) ...


