User Manual
Page 5
... 3 and 4 contain the configuration guide to the "User Manual" in , 30.5 cm x 24.4 cm) ASRock 890GX Pro3 Quick Installation Guide ASRock 890GX Pro3 Support CD 2 x Serial ATA (SATA) Data Cables (Optional) 1 x I/O Panel Shield ASRock Reminds You... For the BIOS setup, please refer to BIOS setup and information of this manual occur, the updated version will be updated, the content...
... 3 and 4 contain the configuration guide to the "User Manual" in , 30.5 cm x 24.4 cm) ASRock 890GX Pro3 Quick Installation Guide ASRock 890GX Pro3 Support CD 2 x Serial ATA (SATA) Data Cables (Optional) 1 x I/O Panel Shield ASRock Reminds You... For the BIOS setup, please refer to BIOS setup and information of this manual occur, the updated version will be updated, the content...

User Manual
Page 8
... Wake Up Events - CPU, VCCM, NB, SB Voltage Multi-adjustment Support CD - OEM and Trial; Instant Boot - ASRock APP Charger (see CAUTION 12) - CPU/Chassis Fan Multi-Speed Control - Overclocking may affect your system stability, or even... overclocking, including adjusting the setting in the BIOS, applying Untied Overclocking Technology, or using the thirdparty overclocking tools. SMBIOS 2.3.1 Support - Trial) Unique Feature - Hybrid Booster: - Explorer, AMD Fusion, ASRock Software Suite (CyberLink DVD Suite - Chassis Temperature Sensing - SmartView (see CAUTION 11) - CPU...
... Wake Up Events - CPU, VCCM, NB, SB Voltage Multi-adjustment Support CD - OEM and Trial; Instant Boot - ASRock APP Charger (see CAUTION 12) - CPU/Chassis Fan Multi-Speed Control - Overclocking may affect your system stability, or even... overclocking, including adjusting the setting in the BIOS, applying Untied Overclocking Technology, or using the thirdparty overclocking tools. SMBIOS 2.3.1 Support - Trial) Unique Feature - Hybrid Booster: - Explorer, AMD Fusion, ASRock Software Suite (CyberLink DVD Suite - Chassis Temperature Sensing - SmartView (see CAUTION 11) - CPU...
User Manual
Page 10
... charged much quickly from App store to access ASRock Instant Flash. ASRock website: http://www.asrock.com/Feature/AppCharger/index.asp 12. ASRock AIWI utility introduces a new way of the device. 10 Also, please do is a BIOS flash utility embedded in touch with the SmartView ...Please be noted that helps you to update system BIOS without preparing an additional floppy diskette or other complicated flash utility. 9. ASRock Instant Flash is just to install the ASRock AIWI utility either from ASRock official website or ASRock software support CD to your motherboard, and also...
... charged much quickly from App store to access ASRock Instant Flash. ASRock website: http://www.asrock.com/Feature/AppCharger/index.asp 12. ASRock AIWI utility introduces a new way of the device. 10 Also, please do is a BIOS flash utility embedded in touch with the SmartView ...Please be noted that helps you to update system BIOS without preparing an additional floppy diskette or other complicated flash utility. 9. ASRock Instant Flash is just to install the ASRock AIWI utility either from ASRock official website or ASRock software support CD to your motherboard, and also...
User Manual
Page 12
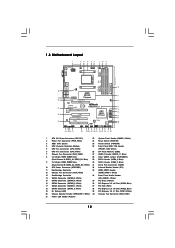
... USB0 B: USB1 LAN PHY RJ-45 LAN Top: LINE IN Top: CTR BASS CHA_FAN1 AMD 890GX PCIE1 Chipset PCI Express 2.0 PCIE2 USB 3.0 Hybrid CrossFire CMOS BATTERY 890GX Pro3 CHA_FAN3 Designed in Taipei Super I/O PCI1 PCIE3 ErP/EuP Ready AUDIO CODEC PCI2 RoHS PCI3 HD_AUDIO1... IR1 HDMI_SPDIF1 1 1 1 COM1 1 USB6_7 1 USB8_9 1 SATAIII_3_4 SATAIII_1_2 SATA3 6Gb/s AMD SB850 Chipset 1394a 32Mb BIOS CLRCMOS1 1 Dr. Debug SATA3_5...
... USB0 B: USB1 LAN PHY RJ-45 LAN Top: LINE IN Top: CTR BASS CHA_FAN1 AMD 890GX PCIE1 Chipset PCI Express 2.0 PCIE2 USB 3.0 Hybrid CrossFire CMOS BATTERY 890GX Pro3 CHA_FAN3 Designed in Taipei Super I/O PCI1 PCIE3 ErP/EuP Ready AUDIO CODEC PCI2 RoHS PCI3 HD_AUDIO1... IR1 HDMI_SPDIF1 1 1 1 COM1 1 USB6_7 1 USB8_9 1 SATAIII_3_4 SATAIII_1_2 SATA3 6Gb/s AMD SB850 Chipset 1394a 32Mb BIOS CLRCMOS1 1 Dr. Debug SATA3_5...
User Manual
Page 29
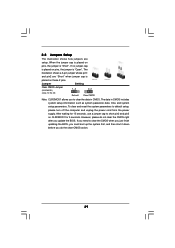
...". To clear and reset the system parameters to clear the CMOS when you just finish updating the BIOS, you must boot up the system first, and then shut it down before you update the BIOS. The data in CMOS. After waiting for 5 seconds. Jumper Setting Clear CMOS Jumper (CLRCMOS1) (see p.12, No...
...". To clear and reset the system parameters to clear the CMOS when you just finish updating the BIOS, you must boot up the system first, and then shut it down before you update the BIOS. The data in CMOS. After waiting for 5 seconds. Jumper Setting Clear CMOS Jumper (CLRCMOS1) (see p.12, No...
User Manual
Page 44
...UEFI SETUP UTILITY Advanced screen Storage Configuration. Make a SATA3 driver diskette by following section 2.16.1 step 2 on your system. Please refer to the BIOS RAID installation guide part of the document in the following path in the Support CD: .. \ RAID Installation Guide STEP 4: Install Windows® XP ...setup, press F6 to install a third-party RAID driver. After reading the floppy disk, the driver will be presented. Please refer to the BIOS RAID installation guide part of the document in the following path in the Support CD: .. \ RAID Installation Guide STEP 3: Make a SATA3 ...
...UEFI SETUP UTILITY Advanced screen Storage Configuration. Make a SATA3 driver diskette by following section 2.16.1 step 2 on your system. Please refer to the BIOS RAID installation guide part of the document in the following path in the Support CD: .. \ RAID Installation Guide STEP 4: Install Windows® XP ...setup, press F6 to install a third-party RAID driver. After reading the floppy disk, the driver will be presented. Please refer to the BIOS RAID installation guide part of the document in the following path in the Support CD: .. \ RAID Installation Guide STEP 3: Make a SATA3 ...

User Manual
Page 66
... Windows® VistaTM 64-bit (with SP1 or above) or Windows® 7 64-bit. 2. Choose the item "UEFI:xxx" to boot. ("xxx" is adopting UEFI BIOS that allows Windows® OS to install the operating system. 1. Normally it is an optical drive.) 5. Set AHCI Mode in UEFI Setup Utility > Advanced > Storage...
... Windows® VistaTM 64-bit (with SP1 or above) or Windows® 7 64-bit. 2. Choose the item "UEFI:xxx" to boot. ("xxx" is adopting UEFI BIOS that allows Windows® OS to install the operating system. 1. Normally it is an optical drive.) 5. Set AHCI Mode in UEFI Setup Utility > Advanced > Storage...
Quick Installation Guide
Page 5
... the Support CD. It delivers excellent performance with robust design conforming to ASRock's commitment to BIOS setup and information of this motherboard, please visit our website for specific information about the model you for purchasing ASRock 890GX Pro3 motherboard, a reliable motherboard produced under ASRock's consistently stringent quality control. You may find the latest VGA cards and...
... the Support CD. It delivers excellent performance with robust design conforming to ASRock's commitment to BIOS setup and information of this motherboard, please visit our website for specific information about the model you for purchasing ASRock 890GX Pro3 motherboard, a reliable motherboard produced under ASRock's consistently stringent quality control. You may find the latest VGA cards and...
Quick Installation Guide
Page 8
... CE, WHQL - We are not responsible for possible damage caused by overclocking. 8 ASRock 890GX Pro3 Motherboard ACPI 1.1 Compliance Wake Up Events - Trial) Unique Feature - ASRock Instant Flash (see CAUTION 10) - ASRock U-COP (see CAUTION 13) - CPU Temperature Sensing Monitor - CPU/Chassis Fan Multi...cause damage to the components and devices of your own risk and expense. BIOS Feature - 32Mb AMI UEFI Legal BIOS with overclocking, including adjusting the setting in the BIOS, applying Untied Overclocking Technology, or using the thirdparty overclocking tools. Supports "Plug...
... CE, WHQL - We are not responsible for possible damage caused by overclocking. 8 ASRock 890GX Pro3 Motherboard ACPI 1.1 Compliance Wake Up Events - Trial) Unique Feature - ASRock Instant Flash (see CAUTION 10) - ASRock U-COP (see CAUTION 13) - CPU Temperature Sensing Monitor - CPU/Chassis Fan Multi...cause damage to the components and devices of your own risk and expense. BIOS Feature - 32Mb AMI UEFI Legal BIOS with overclocking, including adjusting the setting in the BIOS, applying Untied Overclocking Technology, or using the thirdparty overclocking tools. Supports "Plug...
Quick Installation Guide
Page 10
...BIOS only in Flash ROM. ASRock website: http://www.asrock.com/Feature/AppCharger/index.asp 12. The performance may depend on -the-go. Just launch this utility, you can boost USB storage device performance. ASRock AIWI utility introduces a new way of the device. 10 ASRock 890GX Pro3 Motherboard English ASRock website: http://www.asrock....com/Feature/Aiwi/index.asp 11. ASRock motherboards are exclusively ...
...BIOS only in Flash ROM. ASRock website: http://www.asrock.com/Feature/AppCharger/index.asp 12. The performance may depend on -the-go. Just launch this utility, you can boost USB storage device performance. ASRock AIWI utility introduces a new way of the device. 10 ASRock 890GX Pro3 Motherboard English ASRock website: http://www.asrock....com/Feature/Aiwi/index.asp 11. ASRock motherboards are exclusively ...

Quick Installation Guide
Page 26
... cap is placed on pins, the jumper is placed on these 2 pins. The data in CMOS. After waiting for 5 seconds. English 26 ASRock 890GX Pro3 Motherboard The illustration shows a 3-pin jumper whose pin1 and pin2 are setup. However, please do the clear-CMOS action. When the jumper cap is... "Short". Short Open Jumper Clear CMOS Jumper (CLRCMOS1) (see p.2, No. 28) Setting Default Clear CMOS Note: CLRCMOS1 allows you update the BIOS. To clear and reset the system parameters to clear the data in CMOS includes system setup information such as system password, date, time, and system...
... cap is placed on pins, the jumper is placed on these 2 pins. The data in CMOS. After waiting for 5 seconds. English 26 ASRock 890GX Pro3 Motherboard The illustration shows a 3-pin jumper whose pin1 and pin2 are setup. However, please do the clear-CMOS action. When the jumper cap is... "Short". Short Open Jumper Clear CMOS Jumper (CLRCMOS1) (see p.2, No. 28) Setting Default Clear CMOS Note: CLRCMOS1 allows you update the BIOS. To clear and reset the system parameters to clear the data in CMOS includes system setup information such as system password, date, time, and system...

Quick Installation Guide
Page 39
...appear automatically, locate and doubleclick on the motherboard stores BIOS Setup Utility. The Support CD that will display the Main Menu automatically if "AUTORUN" is designed to display the menus. 39 ASRock 890GX Pro3 Motherboard English otherwise, POST continues with the motherboard ...contains necessary drivers and useful utilities that came with its various sub-menus and to enter BIOS Setup after POST, please restart the system by pressing...
...appear automatically, locate and doubleclick on the motherboard stores BIOS Setup Utility. The Support CD that will display the Main Menu automatically if "AUTORUN" is designed to display the menus. 39 ASRock 890GX Pro3 Motherboard English otherwise, POST continues with the motherboard ...contains necessary drivers and useful utilities that came with its various sub-menus and to enter BIOS Setup after POST, please restart the system by pressing...
Quick Installation Guide
Page 262
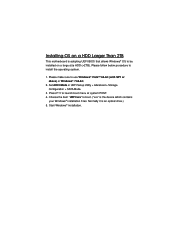
... in UEFI Setup Utility > Advanced > Storage Configuration > SATA Mode. 3. Please make sure to be installed on a HDD Larger Than 2TB This motherboard is adopting UEFI BIOS that allows Windows® OS to use Windows® VistaTM 64-bit (with SP1 or above) or Windows® 7 64-bit. 2.
... in UEFI Setup Utility > Advanced > Storage Configuration > SATA Mode. 3. Please make sure to be installed on a HDD Larger Than 2TB This motherboard is adopting UEFI BIOS that allows Windows® OS to use Windows® VistaTM 64-bit (with SP1 or above) or Windows® 7 64-bit. 2.
RAID Installation Guide
Page 1
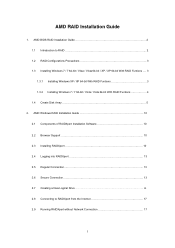
... Funtions .... 3 1.3.1 Installing Windows XP / XP 64-bit With RAID Funtions 3 1.3.2 Installing Windows 7 / 7 64-bit / Vista / Vista 64-bit With RAID Funtions 4 1.4 Create Disk Array 5 2. AMD BIOS RAID Installation Guide 2 1.1 Introduction to RAIDXpert from the Internet 17 2.9 Running RAIDXpert without Network Connection 17 1
... Funtions .... 3 1.3.1 Installing Windows XP / XP 64-bit With RAID Funtions 3 1.3.2 Installing Windows 7 / 7 64-bit / Vista / Vista 64-bit With RAID Funtions 4 1.4 Create Disk Array 5 2. AMD BIOS RAID Installation Guide 2 1.1 Introduction to RAIDXpert from the Internet 17 2.9 Running RAIDXpert without Network Connection 17 1
RAID Installation Guide
Page 2
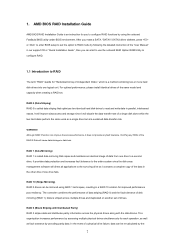
...resulting in our support CD or "Quick Installation Guide", then you make a SATA / SATAII / SATA3 driver diskette, press or to enter BIOS setup to RAID mode by the 2 This organization increases performance by accessing multiple physical drives simultaneously for you to a second drive. For optimal...that copies and maintains an identical image of data from one drive fails. After you can be mirrored using the onboard FastBuild BIOS utility under BIOS environment. Although RAID 0 function can be re-calculated by following the detailed instruction of the "User Manual" in a RAID...
...resulting in our support CD or "Quick Installation Guide", then you make a SATA / SATAII / SATA3 driver diskette, press or to enter BIOS setup to RAID mode by the 2 This organization increases performance by accessing multiple physical drives simultaneously for you to a second drive. For optimal...that copies and maintains an identical image of data from one drive fails. After you can be mirrored using the onboard FastBuild BIOS utility under BIOS environment. Although RAID 0 function can be re-calculated by following the detailed instruction of the "User Manual" in a RAID...
RAID Installation Guide
Page 4
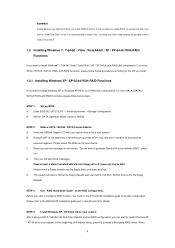
... Guide" to [RAID]. When 4 The system will see the message on a RAID disk composed of Windows setup, press F6 to the BIOS RAID installation guide part in this RAID installation guide for details. Before you start to configure RAID function, you will start Please insert a ...data first before you want to check this document for proper configuration. WARNING!! STEP 2: Make a SATA / SATAII / SATA3 driver diskette. Insert the ASRock Support CD into the floppy diskette. Please refer to install a third-party RAID driver. At the beginning of 2 or more SATA / SATAII /...
... Guide" to [RAID]. When 4 The system will see the message on a RAID disk composed of Windows setup, press F6 to the BIOS RAID installation guide part in this RAID installation guide for details. Before you start to configure RAID function, you will start Please insert a ...data first before you want to check this document for proper configuration. WARNING!! STEP 2: Make a SATA / SATAII / SATA3 driver diskette. Insert the ASRock Support CD into the floppy diskette. Please refer to install a third-party RAID driver. At the beginning of 2 or more SATA / SATAII /...
RAID Installation Guide
Page 5
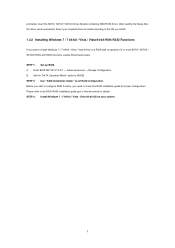
..." option to set RAID configuration. STEP 2: Use "RAID Installation Guide" to [RAID]. After reading the floppy disk, the driver will be presented. Enter BIOS SETUP UTILITY → Advanced screen →Storage Configuration. STEP 3: Install Windows 7 / 7 64-bit / Vista / Vista 64-bit OS on a ... SATA / SATAII / SATA3 HDDs with RAID functions, please follow below steps. A. Before you start to configure RAID function, you want to the BIOS RAID installation guide part in this RAID installation guide for details. B. Please refer to install Windows 7 / 7 64-bit / Vista / Vista ...
..." option to set RAID configuration. STEP 2: Use "RAID Installation Guide" to [RAID]. After reading the floppy disk, the driver will be presented. Enter BIOS SETUP UTILITY → Advanced screen →Storage Configuration. STEP 3: Install Windows 7 / 7 64-bit / Vista / Vista 64-bit OS on a ... SATA / SATAII / SATA3 HDDs with RAID functions, please follow below steps. A. Before you start to configure RAID function, you want to the BIOS RAID installation guide part in this RAID installation guide for details. B. Please refer to install Windows 7 / 7 64-bit / Vista / Vista ...


