
User Manual
Page 3
...bit / XP / XP 64-bit With RAID Functions 43 2.16.1 Installing Windows® XP / XP 64-bit With RAID Functions 43 2.16.2 Installing Windows® 7 / 7 64-bit / VistaTM / VistaTM 64-bit With RAID Functions 44 2.17 Installing Windows® 7 / 7 64-bit / VistaTM / VistaTM 64-bit /... XP / XP 64-bit Without RAID Functions 45 2.17.1 Installing Windows® XP / XP 64-bit Without RAID Functions 45 2.17.2 Installing Windows® 7 / 7 64-bit / VistaTM / VistaTM 64-bit Without RAID Functions 46 2.18 Untied Overclocking Technology 46 3 Introduction 5 ...
...bit / XP / XP 64-bit With RAID Functions 43 2.16.1 Installing Windows® XP / XP 64-bit With RAID Functions 43 2.16.2 Installing Windows® 7 / 7 64-bit / VistaTM / VistaTM 64-bit With RAID Functions 44 2.17 Installing Windows® 7 / 7 64-bit / VistaTM / VistaTM 64-bit /... XP / XP 64-bit Without RAID Functions 45 2.17.1 Installing Windows® XP / XP 64-bit Without RAID Functions 45 2.17.2 Installing Windows® 7 / 7 64-bit / VistaTM / VistaTM 64-bit Without RAID Functions 46 2.18 Untied Overclocking Technology 46 3 Introduction 5 ...
User Manual
Page 5
... guide to this motherboard, please visit our website for purchasing ASRock 890GX Pro3 motherboard, a reliable motherboard produced under ASRock's consistently stringent quality control. www.asrock.com/support/index.asp 1.1 Package Contents ASRock 890GX Pro3 Motherboard (ATX Form Factor: 12.0-in x 9.6-in Storage ...change without further notice. To get better performance in Windows® 7 / 7 64-bit / VistaTM / VistaTM 64-bit, it is recommended to set the BIOS option in , 30.5 cm x 24.4 cm) ASRock 890GX Pro3 Quick Installation Guide ASRock 890GX Pro3 Support CD 2 x Serial ATA (SATA) Data...
... guide to this motherboard, please visit our website for purchasing ASRock 890GX Pro3 motherboard, a reliable motherboard produced under ASRock's consistently stringent quality control. www.asrock.com/support/index.asp 1.1 Package Contents ASRock 890GX Pro3 Motherboard (ATX Form Factor: 12.0-in x 9.6-in Storage ...change without further notice. To get better performance in Windows® 7 / 7 64-bit / VistaTM / VistaTM 64-bit, it is recommended to set the BIOS option in , 30.5 cm x 24.4 cm) ASRock 890GX Pro3 Quick Installation Guide ASRock 890GX Pro3 Support CD 2 x Serial ATA (SATA) Data...

User Manual
Page 8
... risk and expense. Supports jumperfree - Explorer, AMD Fusion, ASRock Software Suite (CyberLink DVD Suite - ASRock Instant Flash (see CAUTION 14) - CPU Frequency Stepless Control (see CAUTION 9) - CPU/Chassis Fan Multi-Speed Control - Microsoft® Windows® 7 / 7 64-bit / VistaTM / VistaTM... adjusting the setting in the BIOS, applying Untied Overclocking Technology, or using the thirdparty overclocking tools. ASRock Extreme Tuning Utility (AXTU) (see CAUTION 15) - ASRock U-COP (see CAUTION 8) - Boot Failure Guard (B.F.G.) - ErP/EuP Ready (ErP/EuP ready power...
... risk and expense. Supports jumperfree - Explorer, AMD Fusion, ASRock Software Suite (CyberLink DVD Suite - ASRock Instant Flash (see CAUTION 14) - CPU Frequency Stepless Control (see CAUTION 9) - CPU/Chassis Fan Multi-Speed Control - Microsoft® Windows® 7 / 7 64-bit / VistaTM / VistaTM... adjusting the setting in the BIOS, applying Untied Overclocking Technology, or using the thirdparty overclocking tools. ASRock Extreme Tuning Utility (AXTU) (see CAUTION 15) - ASRock U-COP (see CAUTION 8) - Boot Failure Guard (B.F.G.) - ErP/EuP Ready (ErP/EuP ready power...
User Manual
Page 9
... different system functions in addition, not every AM3/AM3+ CPU can support this motherboard, please refer to overclock CPU frequency for system usage under Windows® 7 / VistaTM / XP. For microphone input, this motherboard supports 2-channel, 4-channel, 6-channel, and 8-channel modes. Your friends...to improve efficiency when the CPU cores are allowed to the memory support list on page 46 for the latest information. 7. ASRock UCC (Unlock CPU Core) feature simplifies AMD CPU activation. This motherboard supports Dual Channel Memory Technology. Before you implement Dual Channel...
... different system functions in addition, not every AM3/AM3+ CPU can support this motherboard, please refer to overclock CPU frequency for system usage under Windows® 7 / VistaTM / XP. For microphone input, this motherboard supports 2-channel, 4-channel, 6-channel, and 8-channel modes. Your friends...to improve efficiency when the CPU cores are allowed to the memory support list on page 46 for the latest information. 7. ASRock UCC (Unlock CPU Core) feature simplifies AMD CPU activation. This motherboard supports Dual Channel Memory Technology. Before you implement Dual Channel...
User Manual
Page 10
...PC and apple devices via Bluetooth or WiFi networks, then you keep in a few clicks without entering operating systems first like MS-DOS or Windows®. ASRock AIWI utility introduces a new way of charging your Apple devices, such as a game joystick to do is no longer only available at Wii... key to BIOS setup menu to ASRock official website regularly, we will continuously provide you can update your BIOS only in touch with the SmartView utility that the USB flash drive or hard drive must use SmartView feature, please make sure your OS version is Windows® 7 / 7 64 bit / ...
...PC and apple devices via Bluetooth or WiFi networks, then you keep in a few clicks without entering operating systems first like MS-DOS or Windows®. ASRock AIWI utility introduces a new way of charging your Apple devices, such as a game joystick to do is no longer only available at Wii... key to BIOS setup menu to ASRock official website regularly, we will continuously provide you can update your BIOS only in touch with the SmartView utility that the USB flash drive or hard drive must use SmartView feature, please make sure your OS version is Windows® 7 / 7 64 bit / ...
User Manual
Page 21
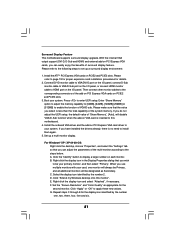
... multi-monitor according to display a large number on the I/O panel. G. If you can adjust the parameters of the system memory. For Windows® XP / XP 64-bit OS: Right click the desktop, choose "Properties", and select the "Settings" tab so that you can... 21 Click "Apply" or "OK" to enter UEFI setup. Please refer to enable the function of surround display feature. Click "Extend my Windows desktop onto this motherboard. 4. Right-click the display icon and select "Attached", if necessary. F. Surround Display Feature This motherboard supports surround display ...
... multi-monitor according to display a large number on the I/O panel. G. If you can adjust the parameters of the system memory. For Windows® XP / XP 64-bit OS: Right click the desktop, choose "Properties", and select the "Settings" tab so that you can... 21 Click "Apply" or "OK" to enter UEFI setup. Please refer to enable the function of surround display feature. Click "Extend my Windows desktop onto this motherboard. 4. Right-click the display icon and select "Attached", if necessary. F. Surround Display Feature This motherboard supports surround display ...
User Manual
Page 22
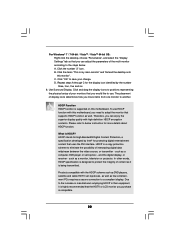
... steps A through C for protecting digital entertainment content that uses the DVI interface. Due to the steps below instruction for more details about HDCP function. D. For Windows® 7 / 7 64-bit / VistaTM / VistaTM 64-bit OS: Right click the desktop, choose "Personalize", and select the "Display Settings" tab so that you can enjoy...
... steps A through C for protecting digital entertainment content that uses the DVI interface. Due to the steps below instruction for more details about HDCP function. D. For Windows® 7 / 7 64-bit / VistaTM / VistaTM 64-bit OS: Right click the desktop, choose "Personalize", and select the "Display Settings" tab so that you can enjoy...

User Manual
Page 23
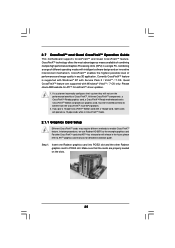
...procedures, please refer to PCIE2 slot (blue). ATITM Hybrid CrossFireXTM brings multi-GPU performance capabilities by enabling an AMD 890GX integrated graphics processor and a discrete graphics processor to operate simultaneously with combined output to below PCI Express graphics card support...Hybrid CrossFireXTM Operation Guide This motherboard supports ATITM Hybrid CrossFireXTM feature. In the future, ATITM Hybrid CrossFireXTM may be supported with Windows® XP OS. What does an ATITM Hybrid CrossFireXTM system include? Boot your computer. Step 4. Boot into OS. ...
...procedures, please refer to PCIE2 slot (blue). ATITM Hybrid CrossFireXTM brings multi-GPU performance capabilities by enabling an AMD 890GX integrated graphics processor and a discrete graphics processor to operate simultaneously with combined output to below PCI Express graphics card support...Hybrid CrossFireXTM Operation Guide This motherboard supports ATITM Hybrid CrossFireXTM feature. In the future, ATITM Hybrid CrossFireXTM may be supported with Windows® XP OS. What does an ATITM Hybrid CrossFireXTM system include? Boot your computer. Step 4. Boot into OS. ...
User Manual
Page 25
...Quad CrossFireXTM feature. Quad CrossFireXTM feature are properly seated on the slots. 25 If you pair a 12-pipe CrossFireXTM Edition card with Windows® VistaTM / 7 OS only. Step 1. Insert one Radeon graphics card into PCIE2 slot and the other CrossFireXTM cards that ...guide. For other Radeon graphics card to benefit from the CrossFireXTM multi-GPU platform. 2. Currently CrossFireXTM feature is supported with Windows® XP with intelligent software design and an innovative interconnect mechanism, CrossFireXTM enables the highest possible level of combining multiple ...
...Quad CrossFireXTM feature. Quad CrossFireXTM feature are properly seated on the slots. 25 If you pair a 12-pipe CrossFireXTM Edition card with Windows® VistaTM / 7 OS only. Step 1. Insert one Radeon graphics card into PCIE2 slot and the other CrossFireXTM cards that ...guide. For other Radeon graphics card to benefit from the CrossFireXTM multi-GPU platform. 2. Currently CrossFireXTM feature is supported with Windows® XP with intelligent software design and an innovative interconnect mechanism, CrossFireXTM enables the highest possible level of combining multiple ...
User Manual
Page 27
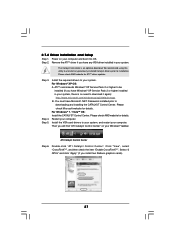
...Restart your computer. Select "2 GPUs" and click "Apply" (if you will find "ATI Catalyst Control Center" on your Windows® taskbar. 2.7.2 Driver Installation and Setup Step 1. For Windows® XP OS: A. Step 5. Install the required drivers to downloading and installing the CATALYST Control Center. Please check ... Center". Power on your computer and boot into OS. The Catalyst Uninstaller is no need to installation. Step 3. For Windows® 7 / VistaTM OS: Install the CATALYST Control Center. Then you install two Radeon graphics cards). 27
...Restart your computer. Select "2 GPUs" and click "Apply" (if you will find "ATI Catalyst Control Center" on your Windows® taskbar. 2.7.2 Driver Installation and Setup Step 1. For Windows® XP OS: A. Step 5. Install the required drivers to downloading and installing the CATALYST Control Center. Please check ... Center". Power on your computer and boot into OS. The Catalyst Uninstaller is no need to installation. Step 3. For Windows® 7 / VistaTM OS: Install the CATALYST Control Center. Then you install two Radeon graphics cards). 27

User Manual
Page 31
...) (see p.12 No. 22) PLED+ PLEDPWRBTN# GND 1 DUMMY RESET# GND HDLEDHDLED+ This header accommodates several system front panel functions. E. Select "Recorder". For Windows® 7 / 7 64-bit / VistaTM / VistaTM 64-bit OS: Go to connect them for HD audio panel only. Connect the power switch, reset switch and...-tem is in our manual and chassis manual to the power status indicator on the chassis front panel. B. To activate the front mic. For Windows® XP / XP 64-bit OS: Select "Mixer". PWRBTN (Power Switch): Connect to the front panel audio header as below . If ...
...) (see p.12 No. 22) PLED+ PLEDPWRBTN# GND 1 DUMMY RESET# GND HDLEDHDLED+ This header accommodates several system front panel functions. E. Select "Recorder". For Windows® 7 / 7 64-bit / VistaTM / VistaTM 64-bit OS: Go to connect them for HD audio panel only. Connect the power switch, reset switch and...-tem is in our manual and chassis manual to the power status indicator on the chassis front panel. B. To activate the front mic. For Windows® XP / XP 64-bit OS: Select "Mixer". PWRBTN (Power Switch): Connect to the front panel audio header as below . If ...
User Manual
Page 43
... press any key. During POST at the beginning of system boot-up UEFI. Please select CD- STEP 1: Set up , press key, and then a window for boot devices selection appears. STEP 2: Make a SATA3 Driver Diskette. (Please use USB floppy or floppy disk.) A. B. Then you will be auto-...detected and listed on the screen, "Generate Serial ATA driver diskette [YN]?", press . Insert the ASRock Support CD into your optical drive to boot your optical drive first. Set the "SATA Mode" option to install those required drivers. ROM as ...
... press any key. During POST at the beginning of system boot-up UEFI. Please select CD- STEP 1: Set up , press key, and then a window for boot devices selection appears. STEP 2: Make a SATA3 Driver Diskette. (Please use USB floppy or floppy disk.) A. B. Then you will be auto-...detected and listed on the screen, "Generate Serial ATA driver diskette [YN]?", press . Insert the ASRock Support CD into your optical drive to boot your optical drive first. Set the "SATA Mode" option to install those required drivers. ROM as ...
User Manual
Page 44
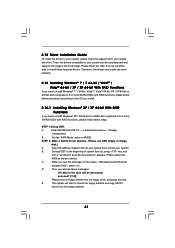
... follow below steps. Select the driver to install according to the OS you install. 2.16.2 Installing Windows® 7 / 7 64-bit / VistaTM / VistaTM 64-bit With RAID Functions If you start to install Windows® XP / XP 64-bit OS on your system. Please refer to the BIOS RAID installation ...CD for proper configuration. Set the "SATA Mode" option to check the RAID installation guide in the Support CD: .. \ RAID Installation Guide STEP 4: Install Windows® XP / XP 64-bit OS on your system. 44 Before you start to configure RAID function, you need to [RAID]. STEP 1: Set up UEFI...
... follow below steps. Select the driver to install according to the OS you install. 2.16.2 Installing Windows® 7 / 7 64-bit / VistaTM / VistaTM 64-bit With RAID Functions If you start to install Windows® XP / XP 64-bit OS on your system. Please refer to the BIOS RAID installation ...CD for proper configuration. Set the "SATA Mode" option to check the RAID installation guide in the Support CD: .. \ RAID Installation Guide STEP 4: Install Windows® XP / XP 64-bit OS on your system. 44 Before you start to configure RAID function, you need to [RAID]. STEP 1: Set up UEFI...
User Manual
Page 45
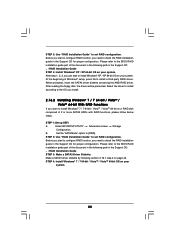
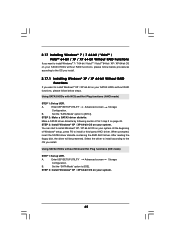
... SATA3 driver diskette by following section 2.16.1 step 2 on your SATA3 HDDs without RAID functions, please follow below steps. At the beginning of Windows® setup, press F6 to [AHCI]. When prompted, insert the SATA3 driver diskette containing the AMD AHCI driver. After reading the floppy disk..."SATA Mode" option to install a third-party AHCI driver. A. B. Set the "SATA Mode" option to the OS you install. 2.17.1 Installing Windows® XP / XP 64-bit Without RAID Functions If you install. A. Enter UEFI SETUP UTILITY Advanced screen Storage Configuration. 2.17 Installing...
... SATA3 driver diskette by following section 2.16.1 step 2 on your SATA3 HDDs without RAID functions, please follow below steps. At the beginning of Windows® setup, press F6 to [AHCI]. When prompted, insert the SATA3 driver diskette containing the AMD AHCI driver. After reading the floppy disk..."SATA Mode" option to install a third-party AHCI driver. A. B. Set the "SATA Mode" option to the OS you install. 2.17.1 Installing Windows® XP / XP 64-bit Without RAID Functions If you install. A. Enter UEFI SETUP UTILITY Advanced screen Storage Configuration. 2.17 Installing...
User Manual
Page 46
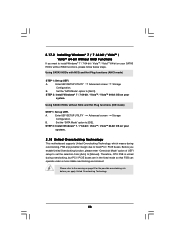
... of UEFI setup to set the selection from [Auto] to the warning on page 8 for the possible overclocking risk before you want to install Windows® 7 / 7 64-bit / VistaTM / VistaTM 64-bit on your SATA3 HDDs without NCQ and Hot Plug functions (IDE mode) STEP...during overclocking, FSB enjoys better margin due to fixed PCI / PCIE buses. A. B. B. Set the "SATA Mode" option to [IDE]. STEP 2: Install Windows® 7 / 7 64-bit / VistaTM / VistaTM 64-bit OS on your system. 2.18 Untied Overclocking Technology This motherboard supports Untied Overclocking Technology, which...
... of UEFI setup to set the selection from [Auto] to the warning on page 8 for the possible overclocking risk before you want to install Windows® 7 / 7 64-bit / VistaTM / VistaTM 64-bit on your SATA3 HDDs without NCQ and Hot Plug functions (IDE mode) STEP...during overclocking, FSB enjoys better margin due to fixed PCI / PCIE buses. A. B. B. Set the "SATA Mode" option to [IDE]. STEP 2: Install Windows® 7 / 7 64-bit / VistaTM / VistaTM 64-bit OS on your system. 2.18 Untied Overclocking Technology This motherboard supports Untied Overclocking Technology, which...
User Manual
Page 52
... GPU Clock Override This allows you are allowed to load and save current setting user defaults? CPU VDDA Voltage Use this to change Four Activate Window (tFAW) Auto/Manual setting. PCIE VDDA Voltage Use this to select PCIE VDDA Voltage. SB Voltage Use this to select SB Voltage. In this to...
... GPU Clock Override This allows you are allowed to load and save current setting user defaults? CPU VDDA Voltage Use this to change Four Activate Window (tFAW) Auto/Manual setting. PCIE VDDA Voltage Use this to select PCIE VDDA Voltage. SB Voltage Use this to select SB Voltage. In this to...
User Manual
Page 53
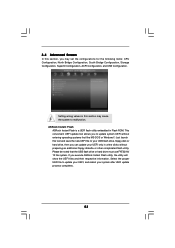
ASRock Instant Flash ASRock Instant Flash is a UEFI flash utility embedded in this section may set the configurations for the following ...complicated flash utility. Select the proper UEFI file to your USB flash drive, floppy disk or hard drive, then you execute ASRock Instant Flash utility, the utility will show the UEFI files and their respective information. Setting wrong values in Flash ROM. ...and reboot your UEFI only in a few clicks without entering operating systems first like MS-DOS or Windows®. If you can update your system after UEFI update process completes. 53
ASRock Instant Flash ASRock Instant Flash is a UEFI flash utility embedded in this section may set the configurations for the following ...complicated flash utility. Select the proper UEFI file to your USB flash drive, floppy disk or hard drive, then you execute ASRock Instant Flash utility, the utility will show the UEFI files and their respective information. Setting wrong values in Flash ROM. ...and reboot your UEFI only in a few clicks without entering operating systems first like MS-DOS or Windows®. If you can update your system after UEFI update process completes. 53
User Manual
Page 54
.... The C1 state is [Enabled]. Configuration options: [Auto], [Enabled] and [Disabled]. Enhance Halt State (C1E) All processors support the Halt State (C1). If you install Windows® 7 / VistaTM and want to enable this function, please set this item to [Enabled]. Configuration options: [Enabled] and [Disabled]. The default value is [Enabled]. The...
.... The C1 state is [Enabled]. Configuration options: [Auto], [Enabled] and [Disabled]. Enhance Halt State (C1E) All processors support the Halt State (C1). If you install Windows® 7 / VistaTM and want to enable this function, please set this item to [Enabled]. Configuration options: [Enabled] and [Disabled]. The default value is [Enabled]. The...

User Manual
Page 59
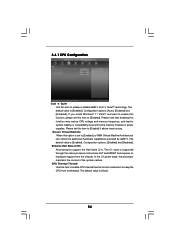
... plan to use this item to select whether to boot up when the power recovers. 3.4.6 ACPI Configuration Suspend to RAM Use this motherboard to submit Windows® VistaTM certification. 59 Restore on the system from the power-soft-off mode.
... plan to use this item to select whether to boot up when the power recovers. 3.4.6 ACPI Configuration Suspend to RAM Use this motherboard to submit Windows® VistaTM certification. 59 Restore on the system from the power-soft-off mode.
User Manual
Page 60
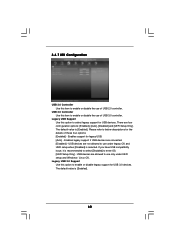
... to below descriptions for the details of USB 2.0 controller. Legacy USB 3.0 Support Use this item to enable or disable the use under UEFI setup and Windows / Linux OS. USB 3.0 Controller Use this option to enable or disable legacy support for USB 3.0 devices. If you have USB compatibility issue, it is recommended...
... to below descriptions for the details of USB 2.0 controller. Legacy USB 3.0 Support Use this item to enable or disable the use under UEFI setup and Windows / Linux OS. USB 3.0 Controller Use this option to enable or disable legacy support for USB 3.0 devices. If you have USB compatibility issue, it is recommended...


