
Owner's Manual
Page 5
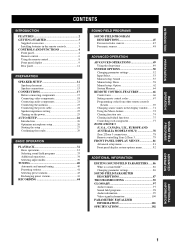
...CONTROLS AND FUNCTIONS 4 Front panel 4 Remote control 6 Using the remote control 8 Front panel display 9 Rear panel 11 PREPARATION SPEAKER SETUP 12 Speaker placement 12 Speaker connections 13 CONNECTIONS 17 Before connecting components 17 Connecting video components 18 Connecting audio components 21 Connecting the ... 49 Using the sleep timer 49 SYSTEM OPTIONS 50 Changing parameter settings 52 Input Select 53 Manual setup: Sound 55 Manual setup: Basic 58 Manual setup: Option 62 System Memory 64 REMOTE CONTROL FEATURES 66 Control area 66 Setting remote control codes 67...
...CONTROLS AND FUNCTIONS 4 Front panel 4 Remote control 6 Using the remote control 8 Front panel display 9 Rear panel 11 PREPARATION SPEAKER SETUP 12 Speaker placement 12 Speaker connections 13 CONNECTIONS 17 Before connecting components 17 Connecting video components 18 Connecting audio components 21 Connecting the ... 49 Using the sleep timer 49 SYSTEM OPTIONS 50 Changing parameter settings 52 Input Select 53 Manual setup: Sound 55 Manual setup: Basic 58 Manual setup: Option 62 System Memory 64 REMOTE CONTROL FEATURES 66 Control area 66 Setting remote control codes 67...
Owner's Manual
Page 6
and Europe models only) Other features ◆ YPAO: YAMAHA Parametric Room Acoustic Optimizer for automatic speaker setup ◆ 192-kHz/24-bit D/A converter ◆ GUI (graphical user interface) menus that lets the sound come through loud and clear without ...affecting your operation. • Some operations can be performed by playing it is too late, YAMAHA and the Electronic Industries Association...
and Europe models only) Other features ◆ YPAO: YAMAHA Parametric Room Acoustic Optimizer for automatic speaker setup ◆ 192-kHz/24-bit D/A converter ◆ GUI (graphical user interface) menus that lets the sound come through loud and clear without ...affecting your operation. • Some operations can be performed by playing it is too late, YAMAHA and the Electronic Industries Association...
Owner's Manual
Page 9
... and Australia models only) Turns the main unit on the lower part of the 5 preset station groups (A to or watching in conjunction with the AUTO SETUP function (see page 80). When set to the SOURCE/REMOTE position, the input source is selected, input signals (2-channel or multi-channel) are output to...
... and Australia models only) Turns the main unit on the lower part of the 5 preset station groups (A to or watching in conjunction with the AUTO SETUP function (see page 80). When set to the SOURCE/REMOTE position, the input source is selected, input signals (2-channel or multi-channel) are output to...
Owner's Manual
Page 13
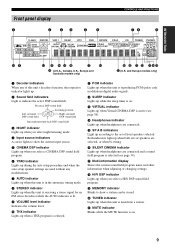
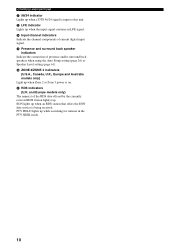
... be stored. E SP A B indicators Light up when you select a HiFi DSP sound field program. F SILENT CINEMA indicator Lights up during the auto setup procedure and when the auto setup speaker settings are connected and a sound field program is reproducing PCM (pulse code modulation) digital audio signals. H HiFi DSP indicator Lights up when...
... be stored. E SP A B indicators Light up when you select a HiFi DSP sound field program. F SILENT CINEMA indicator Lights up during the auto setup procedure and when the auto setup speaker settings are connected and a sound field program is reproducing PCM (pulse code modulation) digital audio signals. H HiFi DSP indicator Lights up when...
Owner's Manual
Page 14
.... 10 PTY HOLD lights up . Q RDS indicators (U.K. N Input channel indicators Indicate the channel components of presence and/or surround back speakers when using the Auto Setup setting (page 26) or Speaker Level setting (page 61). P ZONE 2/ZONE 3 indicators (U.S.A., Canada, U.K., Europe and Australia models only) Light up when an RDS station that...
.... 10 PTY HOLD lights up . Q RDS indicators (U.K. N Input channel indicators Indicate the channel components of presence and/or surround back speakers when using the Auto Setup setting (page 26) or Speaker Level setting (page 61). P ZONE 2/ZONE 3 indicators (U.S.A., Canada, U.K., Europe and Australia models only) Light up when an RDS station that...
Owner's Manual
Page 16
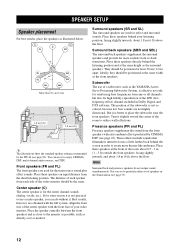
... more theater-like ambience. Center speaker (C) The center speaker is for the center channel sounds (dialog, vocals, etc.). SPEAKER SETUP + SPEAKER SETUP Speaker placement For best results, place the speakers as the YAMAHA Active Servo Processing Subwoofer System, is effective not only for reinforcing bass frequencies from any or all channels, but also...
... more theater-like ambience. Center speaker (C) The center speaker is for the center channel sounds (dialog, vocals, etc.). SPEAKER SETUP + SPEAKER SETUP Speaker placement For best results, place the speakers as the YAMAHA Active Servo Processing Subwoofer System, is effective not only for reinforcing bass frequencies from any or all channels, but also...

Owner's Manual
Page 17
... terminal wrench is useful for speaker impedance. • Before connecting the speakers, make sure that this unit is actually a pair of di-pole speaker SPEAKER SETUP Speaker connections Be sure to 6 ohms before using (see page 25). PREPARATION ■ Di-pole speaker layout Either di-pole or direct radiating speaker types...
... terminal wrench is useful for speaker impedance. • Before connecting the speakers, make sure that this unit is actually a pair of di-pole speaker SPEAKER SETUP Speaker connections Be sure to 6 ohms before using (see page 25). PREPARATION ■ Di-pole speaker layout Either di-pole or direct radiating speaker types...

Owner's Manual
Page 18
... terminals. Banana plug (With the exception of each terminal. Open the tab, then insert one bare wire into the hole of the corresponding terminal. SPEAKER SETUP 5 Tighten the knob to secure the wire.
... terminals. Banana plug (With the exception of each terminal. Open the tab, then insert one bare wire into the hole of the corresponding terminal. SPEAKER SETUP 5 Tighten the knob to secure the wire.
Owner's Manual
Page 19
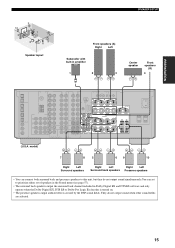
... included in amplifier 1 2 3 Center speaker Front speakers (B) 4 R+ -A - +L FRONT CENTER + -B - + - + R FRONT R SURROUND SUB WOOFER R L R+ L + CENTER R L SURROUND BACK/PRESENCE PRE OUT SURROUND - - +L R L + - - + L - PREPARATION 9 10 2 4 3 8 1 7 5 6 Speaker layout SPEAKER SETUP Front speakers (A) Right Left Subwoofer with built-in Dolby Digital EX and DTS ES software and only operate when the Dolby Digital EX, DTS ES...
... included in amplifier 1 2 3 Center speaker Front speakers (B) 4 R+ -A - +L FRONT CENTER + -B - + - + R FRONT R SURROUND SUB WOOFER R L R+ L + CENTER R L SURROUND BACK/PRESENCE PRE OUT SURROUND - - +L R L + - - + L - PREPARATION 9 10 2 4 3 8 1 7 5 6 Speaker layout SPEAKER SETUP Front speakers (A) Right Left Subwoofer with built-in Dolby Digital EX and DTS ES software and only operate when the Dolby Digital EX, DTS ES...
Owner's Manual
Page 20
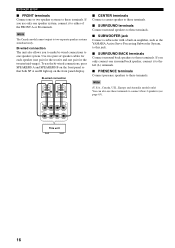
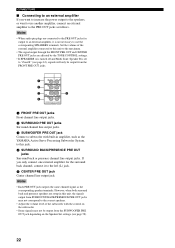
... Connect surround speakers to these terminals. ■ SUBWOOFER jack Connect a subwoofer with a built-in amplifier, such as the YAMAHA Active Servo Processing Subwoofer System, to this jack. ■ SURROUND BACK terminals Connect surround back speakers to these terminals to two... separate speaker systems simultaneously. Note (U.S.A., Canada, U.K., Europe and Australia models only) You can also use these terminals. SPEAKER SETUP ■ FRONT terminals Connect one speaker system. R+ -A - +L FRONT + -B - + This unit 16 Note The Canada model cannot output...
... Connect surround speakers to these terminals. ■ SUBWOOFER jack Connect a subwoofer with a built-in amplifier, such as the YAMAHA Active Servo Processing Subwoofer System, to this jack. ■ SURROUND BACK terminals Connect surround back speakers to these terminals to two... separate speaker systems simultaneously. Note (U.S.A., Canada, U.K., Europe and Australia models only) You can also use these terminals. SPEAKER SETUP ■ FRONT terminals Connect one speaker system. R+ -A - +L FRONT + -B - + This unit 16 Note The Canada model cannot output...
Owner's Manual
Page 26
.... Notes • Each PRE OUT jack outputs the same channel signal as follows. However, when both surround back and presence speakers are setup in amplifier, such as the YAMAHA Active Servo Processing Subwoofer System, to this unit to the maximum. • The signal output through the FRONT PRE OUT and CENTER PRE...
.... Notes • Each PRE OUT jack outputs the same channel signal as follows. However, when both surround back and presence speakers are setup in amplifier, such as the YAMAHA Active Servo Processing Subwoofer System, to this unit to the maximum. • The signal output through the FRONT PRE OUT and CENTER PRE...

Owner's Manual
Page 30
...upward, at the same height as your ears would be when you have completed the auto setup procedure, be output during the auto setup procedure. • If auto setup stops and error messages appear on the screen, follow the troubleshooting on page 30. Optimizer ...on top of each channel's parametric equalizer to give you avoid troublesome listening-based speaker setup and achieves highly accurate sound adjustments. AUTO SETUP AUTO SETUP Introduction This receiver employs YAMAHA Parametric Room Acoustic Optimizer (YPAO) technology which speakers are seated in your listening position. ...
...upward, at the same height as your ears would be when you have completed the auto setup procedure, be output during the auto setup procedure. • If auto setup stops and error messages appear on the screen, follow the troubleshooting on page 30. Optimizer ...on top of each channel's parametric equalizer to give you avoid troublesome listening-based speaker setup and achieves highly accurate sound adjustments. AUTO SETUP AUTO SETUP Introduction This receiver employs YAMAHA Parametric Room Acoustic Optimizer (YPAO) technology which speakers are seated in your listening position. ...
Owner's Manual
Page 31
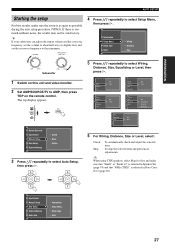
... or "Small x2" is selected in Speaker Set (page 58) and that "80Hz (THX)" is selected in Bass Cross Over (page 60). Information Setup Menu Setup Type Start Wiring Distance Size MIN MAX MIN MAX Subwoofer 5 Press k/n repeatedly to select Wiring, Distance, Size, Equalizing or Level, then press h. 1 ...volume and the crossover frequency, set the volume to about half way (or slightly less) and set the crossover frequency to select Auto Setup, then press h. AMP SOURCE TV TOP TITLE Wiring Distance Size Wiring Distance Size Equalizing Level Skip Check Skip Check Size Equalizing Level ...
... or "Small x2" is selected in Speaker Set (page 58) and that "80Hz (THX)" is selected in Bass Cross Over (page 60). Information Setup Menu Setup Type Start Wiring Distance Size MIN MAX MIN MAX Subwoofer 5 Press k/n repeatedly to select Wiring, Distance, Size, Equalizing or Level, then press h. 1 ...volume and the crossover frequency, set the volume to about half way (or slightly less) and set the crossover frequency to select Auto Setup, then press h. AMP SOURCE TV TOP TITLE Wiring Distance Size Wiring Distance Size Equalizing Level Skip Check Skip Check Size Equalizing Level ...
Owner's Manual
Page 32
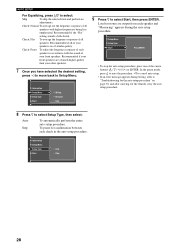
...are output from each check in accordance with higher frequencies being less emphasized. Loud test tones are of your front speakers. Information Setup Menu Setup Type Auto Start Step 28 Recommended if your other speakers. 7 Once you have selected the desired setting, press l to ...move back to cancel auto setup. • If an error message appears during the auto setup procedure. Check: Flat To average the frequency response of the cursor buttons (k / n / l / h) or ENTER. ...
...are output from each check in accordance with higher frequencies being less emphasized. Loud test tones are of your front speakers. Information Setup Menu Setup Type Auto Start Step 28 Recommended if your other speakers. 7 Once you have selected the desired setting, press l to ...move back to cancel auto setup. • If an error message appears during the auto setup procedure. Check: Flat To average the frequency response of the cursor buttons (k / n / l / h) or ENTER. ...

Owner's Manual
Page 33
...Next • Press n and select Next to start measurement of the next menu item. • Press k and select Retry to retry the auto setup procedure. • Press h and select Detail to Step. To set the measured values and exit, select Yes. After all items have been measured,... Over" appears on the characteristics of your subwoofer. If you set the measured values. • Press k and select Retry to retry the auto setup procedure. • Press h and select Detail to view information about measurement results and warning messages. y If you change the system parameters using an...
...Next • Press n and select Next to start measurement of the next menu item. • Press k and select Retry to retry the auto setup procedure. • Press h and select Detail to Step. To set the measured values and exit, select Yes. After all items have been measured,... Over" appears on the characteristics of your subwoofer. If you set the measured values. • Press k and select Retry to retry the auto setup procedure. • Press h and select Detail to view information about measurement results and warning messages. y If you change the system parameters using an...
Owner's Manual
Page 34
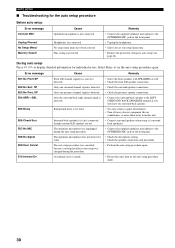
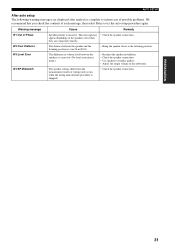
... jack on the front panel. • Check the microphone setting. • Check the speaker connections and placement. • Perform the auto setup procedure again. • Restart this unit. • Connect surround speakers when using (a) surround back speaker(s). • Connect the supplied optimizer ...speakers are not. Unplug Phones! Error message Cause Remedy E01:No Front SP E02:No Surr. Surround back speaker(s) is not connected. No Setup Menu! An internal error occurred. • Select the front speakers with SPEAKERS A or B. • Check the front L/R speaker connections...
... jack on the front panel. • Check the microphone setting. • Check the speaker connections and placement. • Perform the auto setup procedure again. • Restart this unit. • Connect surround speakers when using (a) surround back speaker(s). • Connect the supplied optimizer ...speakers are not. Unplug Phones! Error message Cause Remedy E01:No Front SP E02:No Surr. Surround back speaker(s) is not connected. No Setup Menu! An internal error occurred. • Select the front speakers with SPEAKERS A or B. • Check the front L/R speaker connections...
Owner's Manual
Page 35
... connections. The distance between the speakers is excessive. (No level correction is over 24 m (80 ft). • Bring the speaker closer to try the auto setup procedure again. AUTO SETUP After auto setup The following warning messages are connected correctly.
... connections. The distance between the speakers is excessive. (No level correction is over 24 m (80 ft). • Bring the speaker closer to try the auto setup procedure again. AUTO SETUP After auto setup The following warning messages are connected correctly.
Owner's Manual
Page 43
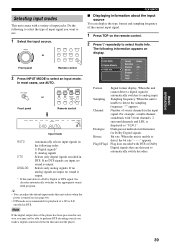
...). • DTS mode is output. * If this unit detects a Dolby Digital or DTS signal, the decoder automatically switches to detect the bit rate "- - -" appears. Auto Setup System Memory Audio Info Format Sampling Channel Bitrate Dialogue Flag1 Flag2 Analog --2/0/----------- When the unit is displayed as "3/2/0.1". appears. For example, a multi-channel soundtrack with...
...). • DTS mode is output. * If this unit detects a Dolby Digital or DTS signal, the decoder automatically switches to detect the bit rate "- - -" appears. Auto Setup System Memory Audio Info Format Sampling Channel Bitrate Dialogue Flag1 Flag2 Analog --2/0/----------- When the unit is displayed as "3/2/0.1". appears. For example, a multi-channel soundtrack with...
Owner's Manual
Page 54
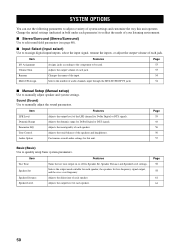
...off for this unit operates. Changes the name of audio channels input through the MULTI CH INPUT jacks Page 53 53 54 54 ■ Manual Setup (Manual setup) Use to manually adjust speaker and system settings. Selects the number of the input. Selects the output mode suitable for each speaker, the speakers...Assign Features Assigns jacks according to the component to manually adjust the sound parameters. Page 55 55 56 56 57 Basic (Basic) Use to quickly setup basic system parameters. Adjusts the output level of each speaker. Adjusts the delay time of each speaker.
...off for this unit operates. Changes the name of audio channels input through the MULTI CH INPUT jacks Page 53 53 54 54 ■ Manual Setup (Manual setup) Use to manually adjust speaker and system settings. Selects the number of the input. Selects the output mode suitable for each speaker, the speakers...Assign Features Assigns jacks according to the component to manually adjust the sound parameters. Page 55 55 56 56 57 Basic (Basic) Use to quickly setup basic system parameters. Adjusts the output level of each speaker. Adjusts the delay time of each speaker.
Owner's Manual
Page 55
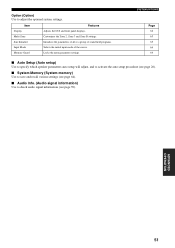
... of the source. Locks the menu parameter settings. SYSTEM OPTIONS Page 62 63 63 64 64 ■ Auto Setup (Auto setup) Use to specify which speaker parameters auto setup will adjust, and to activate the auto setup procedure (see page 26). ■ System Memory (System memory) Use to save and recall various settings (see...
... of the source. Locks the menu parameter settings. SYSTEM OPTIONS Page 62 63 63 64 64 ■ Auto Setup (Auto setup) Use to specify which speaker parameters auto setup will adjust, and to activate the auto setup procedure (see page 26). ■ System Memory (System memory) Use to save and recall various settings (see...


