

Owner's Manual
Page 30
...omni-directional microphone head upward, at the same height as your ears would be output during the auto setup procedure. • If auto setup stops and error messages appear on the screen, follow the troubleshooting on the front panel. Level Checks and adjusts the ...the OPTIMIZER MIC jack on page 30. Optimizer microphone setup 1 Connect the supplied optimizer microphone to reduce coloration across the channels and create a cohesive sound field. AUTO SETUP AUTO SETUP Introduction This receiver employs YAMAHA Parametric Room Acoustic Optimizer (YPAO) technology which speakers are...
...omni-directional microphone head upward, at the same height as your ears would be output during the auto setup procedure. • If auto setup stops and error messages appear on the screen, follow the troubleshooting on the front panel. Level Checks and adjusts the ...the OPTIMIZER MIC jack on page 30. Optimizer microphone setup 1 Connect the supplied optimizer microphone to reduce coloration across the channels and create a cohesive sound field. AUTO SETUP AUTO SETUP Introduction This receiver employs YAMAHA Parametric Room Acoustic Optimizer (YPAO) technology which speakers are...
Owner's Manual
Page 32
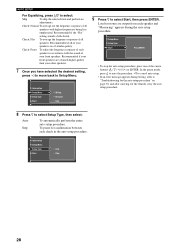
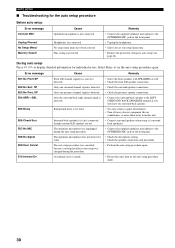
...check in accordance with higher frequencies being less emphasized. To pause for the auto setup procedure" on page 30, and after carrying out the remedy, retry the auto setup procedure. 8 Press n to Setup Menu. Recommended if all speakers. Recommended if the "Flat" setting sounds a ...your speakers are output from each speaker and "Measuring" appears during testing, refer to cancel auto setup. • If an error message appears during the auto setup procedure. Information Setup Menu Setup Type Auto Start Step 28 In the pause mode, press k to retry the procedure, l ...
...check in accordance with higher frequencies being less emphasized. To pause for the auto setup procedure" on page 30, and after carrying out the remedy, retry the auto setup procedure. 8 Press n to Setup Menu. Recommended if all speakers. Recommended if the "Flat" setting sounds a ...your speakers are output from each speaker and "Measuring" appears during testing, refer to cancel auto setup. • If an error message appears during the auto setup procedure. Information Setup Menu Setup Type Auto Start Step 28 In the pause mode, press k to retry the procedure, l ...
Owner's Manual
Page 34
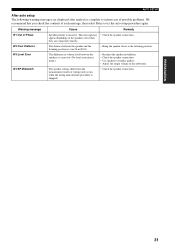
...! SP E03:No Pres. Cause Optimizer microphone is too loud. No setup menu items have one surround channel signal is detected. During auto setup Press l / h to try the auto setup procedure again. 30 AUTO SETUP ■ Troubleshooting for the auto setup procedure Before auto setup Error message Connect MIC! Select Retry to display detailed information for auto...
...! SP E03:No Pres. Cause Optimizer microphone is too loud. No setup menu items have one surround channel signal is detected. During auto setup Press l / h to try the auto setup procedure again. 30 AUTO SETUP ■ Troubleshooting for the auto setup procedure Before auto setup Error message Connect MIC! Select Retry to display detailed information for auto...
Owner's Manual
Page 35
.... • Use speakers of similar quality. • Adjust the output volume of each message, then select Retry to try the auto setup procedure again. The difference in volume level between the speaker and the listening position is incorrect. The speaker settings differ from the measurement results... of Phase W2:Over Distance W3:Level Error W4:SP Mismatch Cause Remedy Speaker polarity is over 24 m (80 ft). • Bring the speaker closer to inform you of possible...
.... • Use speakers of similar quality. • Adjust the output volume of each message, then select Retry to try the auto setup procedure again. The difference in volume level between the speaker and the listening position is incorrect. The speaker settings differ from the measurement results... of Phase W2:Over Distance W3:Level Error W4:SP Mismatch Cause Remedy Speaker polarity is over 24 m (80 ft). • Bring the speaker closer to inform you of possible...
Owner's Manual
Page 73
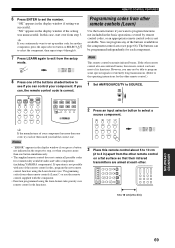
...remote control does not contain all possible codes for commercially available audio and video components (including YAMAHA components). Note This remote control transmits infrared beams. If the other remote controls (Learn)")...select the component, then repeat steps 4 through 6. 7 Press LEARN again to exit from the setup mode. If operation is not possible with any of its functions. In this case, start over.... "OK" appears in the display window if the setting was successful. Notes • "ERROR" appears in the display window if you can learn feature take priority over from step 3. You...
...remote control does not contain all possible codes for commercially available audio and video components (including YAMAHA components). Note This remote control transmits infrared beams. If the other remote controls (Learn)")...select the component, then repeat steps 4 through 6. 7 Press LEARN again to exit from the setup mode. If operation is not possible with any of its functions. In this case, start over.... "OK" appears in the display window if the setting was successful. Notes • "ERROR" appears in the display window if you can learn feature take priority over from step 3. You...
Owner's Manual
Page 78
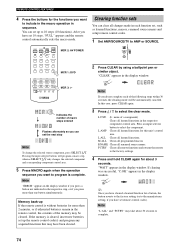
...the selected component and corresponding component control area. 5 Press MACRO again when the operation sequence you want to 10 steps (10 functions). Note "ERROR" appears in the display window if you do not complete each function set the next step Note To change the selected source component, press ...SELECT k/n. You can set , such as learned functions, macros, renamed source names and setup remote control codes. 1 Set AMP/SOURCE/TV to AMP or SOURCE. Memory back-up to program is without batteries for about 30 seconds to...
...the selected component and corresponding component control area. 5 Press MACRO again when the operation sequence you want to 10 steps (10 functions). Note "ERROR" appears in the display window if you do not complete each function set the next step Note To change the selected source component, press ...SELECT k/n. You can set , such as learned functions, macros, renamed source names and setup remote control codes. 1 Set AMP/SOURCE/TV to AMP or SOURCE. Memory back-up to program is without batteries for about 30 seconds to...

