

Owner's Manual
Page 1
U RX-V2500 AV Receiver OWNER'S MANUAL
U RX-V2500 AV Receiver OWNER'S MANUAL

Owner's Manual
Page 3
...is in particular, specifies that the cable ground shall be sure the service technician has used . Modifications not expressly approved by Yamaha may result in damage and will often require extensive work by a qualified technician to restore the product to its subsidiaries. ...Adjust only those products distributed by Yamaha Corporation of radio or TV interference, relocate/reorient the antenna. Upon completion of this product in a residential environment will not occur in this manual, meets FCC requirements. Compliance with FCC regulations does not...
...is in particular, specifies that the cable ground shall be sure the service technician has used . Modifications not expressly approved by Yamaha may result in damage and will often require extensive work by a qualified technician to restore the product to its subsidiaries. ...Adjust only those products distributed by Yamaha Corporation of radio or TV interference, relocate/reorient the antenna. Upon completion of this product in a residential environment will not occur in this manual, meets FCC requirements. Compliance with FCC regulations does not...
Owner's Manual
Page 4
... used. do not locate this unit must be held responsible for your local main voltage BEFORE plugging into the AC main supply. Contact qualified YAMAHA service personnel when any damage resulting from use force on the surface of this unit with a newspaper, tablecloth, curtain, etc. FOR CANADIAN... CUSTOMERS To prevent electric shock, match wide blade of this Owner's Manual in this unit to this unit. 6 Do not cover this unit upside-down. This unit is needed. IMPORTANT Please record the serial number of...
... used. do not locate this unit must be held responsible for your local main voltage BEFORE plugging into the AC main supply. Contact qualified YAMAHA service personnel when any damage resulting from use force on the surface of this unit with a newspaper, tablecloth, curtain, etc. FOR CANADIAN... CUSTOMERS To prevent electric shock, match wide blade of this Owner's Manual in this unit to this unit. 6 Do not cover this unit upside-down. This unit is needed. IMPORTANT Please record the serial number of...
Owner's Manual
Page 5
... PLAYBACK 32 Basic operations 32 Selecting sound field programs 33 Additional operations 34 Selecting input modes 39 TUNING 40 Automatic and manual tuning 40 Presetting stations 41 Selecting preset stations 43 Exchanging preset stations 43 RECORDING 44 SOUND FIELD PROGRAMS SOUND FIELD PROGRAM... ADVANCED OPERATIONS 49 Using the sleep timer 49 SYSTEM OPTIONS 50 Changing parameter settings 52 Input Select 53 Manual setup: Sound 55 Manual setup: Basic 58 Manual setup: Option 62 System Memory 64 REMOTE CONTROL FEATURES 66 Control area 66 Setting remote control codes 67...
... PLAYBACK 32 Basic operations 32 Selecting sound field programs 33 Additional operations 34 Selecting input modes 39 TUNING 40 Automatic and manual tuning 40 Presetting stations 41 Selecting preset stations 43 Exchanging preset stations 43 RECORDING 44 SOUND FIELD PROGRAMS SOUND FIELD PROGRAM... ADVANCED OPERATIONS 49 Using the sleep timer 49 SYSTEM OPTIONS 50 Changing parameter settings 52 Input Select 53 Manual setup: Sound 55 Manual setup: Basic 58 Manual setup: Option 62 System Memory 64 REMOTE CONTROL FEATURES 66 Control area 66 Setting remote control codes 67...
Owner's Manual
Page 6
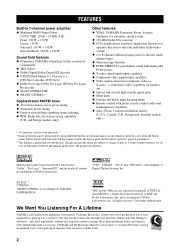
...trademarks of Dolby Laboratories. Surround EX is a trademark of Dolby Laboratories, Inc. and Europe models only) Other features ◆ YPAO: YAMAHA Parametric Room Acoustic Optimizer for automatic speaker setup ◆ 192-kHz/24-bit D/A converter ◆ GUI (graphical user interface) menus that.... "DTS", "DTS-ES", "Neo:6" and "DTS 96/24" are subject to change in parentheses. • This manual is too late, YAMAHA and the Electronic Industries Association's Consumer Electronics Group recommend you to get the most importantly, without annoying blaring or distortion - Used...
...trademarks of Dolby Laboratories. Surround EX is a trademark of Dolby Laboratories, Inc. and Europe models only) Other features ◆ YPAO: YAMAHA Parametric Room Acoustic Optimizer for automatic speaker setup ◆ 192-kHz/24-bit D/A converter ◆ GUI (graphical user interface) menus that.... "DTS", "DTS-ES", "Neo:6" and "DTS 96/24" are subject to change in parentheses. • This manual is too late, YAMAHA and the Electronic Industries Association's Consumer Electronics Group recommend you to get the most importantly, without annoying blaring or distortion - Used...
Owner's Manual
Page 8
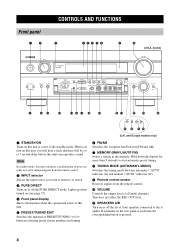
... Switches the function of PRESET/TUNING l / h between selecting preset station numbers and tuning. 6 FM/AM Switches the reception band between automatic ("AUTO" indicator on) and manual ("AUTO" indicator off the set of front speakers connected to or watch. 3 PURE DIRECT Turns on or off ). 9 Remote control sensor Receives signals from the...
... Switches the function of PRESET/TUNING l / h between selecting preset station numbers and tuning. 6 FM/AM Switches the reception band between automatic ("AUTO" indicator on) and manual ("AUTO" indicator off the set of front speakers connected to or watch. 3 PURE DIRECT Turns on or off ). 9 Remote control sensor Receives signals from the...
Owner's Manual
Page 31
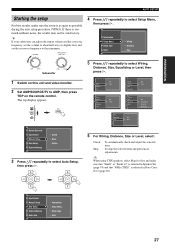
... Equalizing Level Wiring Distance Size Equalizing Distance Size Equalizing Level Skip Check Skip Check Skip Check: Natural Check: Flat Check: Front Stereo/Surround Input Select Manual Setup Auto Setup System Memory Sound Basic Option 3 Press k/n repeatedly to the maximum. PREPARATION AUTO SETUP Starting the setup For best results, make sure that..., Size, Equalizing or Level, then press h. 1 Switch on this unit and video monitor. 2 Set AMP/SOURCE/TV to select Setup Menu, then press h. Input Select Manual Setup Auto Setup System Memory Audio Info.
... Equalizing Level Wiring Distance Size Equalizing Distance Size Equalizing Level Skip Check Skip Check Skip Check: Natural Check: Flat Check: Front Stereo/Surround Input Select Manual Setup Auto Setup System Memory Sound Basic Option 3 Press k/n repeatedly to the maximum. PREPARATION AUTO SETUP Starting the setup For best results, make sure that..., Size, Equalizing or Level, then press h. 1 Switch on this unit and video monitor. 2 Set AMP/SOURCE/TV to select Setup Menu, then press h. Input Select Manual Setup Auto Setup System Memory Audio Info.

Owner's Manual
Page 33
... procedure" on the screen and the results for the same band to provide finer adjustments. 29 This may also be the case when using the Manual Setup menu. The results are displayed. • Press n and select Setup to set Setup Type to Step. AUTO SETUP If you select Exit, "...page 30. • Press l and select Exit to exit from the auto setup procedure. The results are displayed individually after making settings in the Manual Setup menu, navigate to the Information screen in the Auto Setup menu, press k/n repeatedly to select the parameter you change the system parameters using an...
... procedure" on the screen and the results for the same band to provide finer adjustments. 29 This may also be the case when using the Manual Setup menu. The results are displayed. • Press n and select Setup to set Setup Type to Step. AUTO SETUP If you select Exit, "...page 30. • Press l and select Exit to exit from the auto setup procedure. The results are displayed individually after making settings in the Manual Setup menu, navigate to the Information screen in the Auto Setup menu, press k/n repeatedly to select the parameter you change the system parameters using an...
Owner's Manual
Page 39
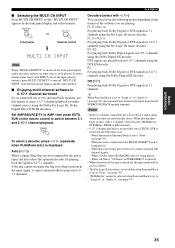
... "MULTI CH INPUT" from the left SURROUND BACK speaker terminals. To select another input source with 6.1-channel, select decoders (PLIIxMovie, PLIIxMusic, EX/ES or EX) manually. • 6.1/7.1-channel playback is displayed. Off (OFF) For playing back Dolby Digital or DTS signals in 6.1/7.1 channels using the Dolby Digital EX decoder.
... "MULTI CH INPUT" from the left SURROUND BACK speaker terminals. To select another input source with 6.1-channel, select decoders (PLIIxMovie, PLIIxMusic, EX/ES or EX) manually. • 6.1/7.1-channel playback is displayed. Off (OFF) For playing back Dolby Digital or DTS signals in 6.1/7.1 channels using the Dolby Digital EX decoder.
Owner's Manual
Page 44
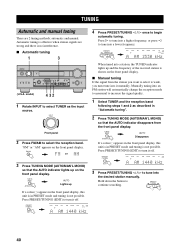
...CBL/SAT DTV DVD MD/TAPE CD-R CD TU SP A A~~AM~1440 kHz 3 Press PRESET/TUNING l / h to tune into the desired station manually. automatic and manual. "FM" or "AM" appears on the front panel display. Press PRESET/TUNING (EDIT) to increase the signal quality. 1 Select TUNER and the ...reception band following steps 1 and 2 as the input source. Hold down the button to select the reception band. Manually tuning into an FM station will automatically change the reception mode to monaural to turn it off . PRESET/ TUNING 40 Press PRESET/TUNING (EDIT...
...CBL/SAT DTV DVD MD/TAPE CD-R CD TU SP A A~~AM~1440 kHz 3 Press PRESET/TUNING l / h to tune into the desired station manually. automatic and manual. "FM" or "AM" appears on the front panel display. Press PRESET/TUNING (EDIT) to increase the signal quality. 1 Select TUNER and the ...reception band following steps 1 and 2 as the input source. Hold down the button to select the reception band. Manually tuning into an FM station will automatically change the reception mode to monaural to turn it off . PRESET/ TUNING 40 Press PRESET/TUNING (EDIT...
Owner's Manual
Page 45
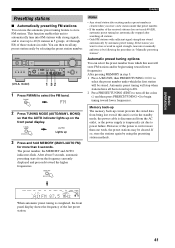
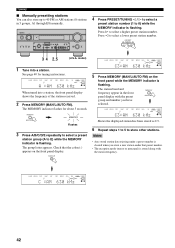
... automatically stopped after searching all been stored up circuit prevents the stored data from being lost even if this unit to automatically tune into it manually and store it by automatic preset tuning. After pressing MEMORY in step 3: 1 Press A/B/C/D/E, then PRESET/TUNING l / h to store is temporarily cut for more than 3 seconds...; Automatically presetting FM stations You can use the automatic preset tuning feature to select the FM band. This function enables this unit is set in "Manually presetting stations".
... automatically stopped after searching all been stored up circuit prevents the stored data from being lost even if this unit to automatically tune into it manually and store it by automatic preset tuning. After pressing MEMORY in step 3: 1 Press A/B/C/D/E, then PRESET/TUNING l / h to store is temporarily cut for more than 3 seconds...; Automatically presetting FM stations You can use the automatic preset tuning feature to select the FM band. This function enables this unit is set in "Manually presetting stations".
Owner's Manual
Page 46
... kHz dB VOLUME LR Shows the displayed station has been stored as C3. 6 Repeat steps 1 to 5 to 8) while the MEMORY indicator is flashing. TUNING ■ Manually presetting stations You can also store up to 40 FM or AM stations (8 stations in the front panel display with the station frequency. STANDBY /ON.../TUNING l / h to select a preset station number (1 to store other stations. The group letter appears. The station band and frequency appear in 5 groups, A1 through E8) manually.
... kHz dB VOLUME LR Shows the displayed station has been stored as C3. 6 Repeat steps 1 to 5 to 8) while the MEMORY indicator is flashing. TUNING ■ Manually presetting stations You can also store up to 40 FM or AM stations (8 stations in the front panel display with the station frequency. STANDBY /ON.../TUNING l / h to select a preset station number (1 to store other stations. The group letter appears. The station band and frequency appear in 5 groups, A1 through E8) manually.
Owner's Manual
Page 54
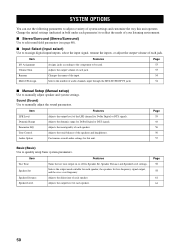
... following parameters to adjust a variety of audio channels input through the MULTI CH INPUT jacks Page 53 53 54 54 ■ Manual Setup (Manual setup) Use to manually adjust speaker and system settings. Selects the number of system settings and customize the way this unit. Adjusts the tonal quality of .... Adjusts the dynamic range for Speaker Set, Speaker Distance and Speaker Level settings. Page 55 55 56 56 57 Basic (Basic) Use to manually adjust the sound parameters. Adjusts the delay time of the input. Page 58 58 61 61 50 Sound (Sound) Use to quickly setup basic...
... following parameters to adjust a variety of audio channels input through the MULTI CH INPUT jacks Page 53 53 54 54 ■ Manual Setup (Manual setup) Use to manually adjust speaker and system settings. Selects the number of system settings and customize the way this unit. Adjusts the tonal quality of .... Adjusts the dynamic range for Speaker Set, Speaker Distance and Speaker Level settings. Page 55 55 56 56 57 Basic (Basic) Use to manually adjust the sound parameters. Adjusts the delay time of the input. Page 58 58 61 61 50 Sound (Sound) Use to quickly setup basic...
Owner's Manual
Page 57
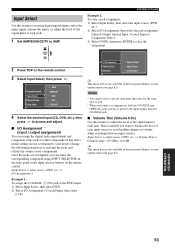
... trim) Use this feature to adjust the level of the signal input to each jack. 1 Set AMP/SOURCE/TV to AMP. Stereo/Surround Input Select Manual Setup Auto Setup CD-R MD/TAPE DVD DTV CBL/SAT 4 Select the desired input (CD, DVD, etc.), then press h to access and adjust. ■ I /O Assignment...
... trim) Use this feature to adjust the level of the signal input to each jack. 1 Set AMP/SOURCE/TV to AMP. Stereo/Surround Input Select Manual Setup Auto Setup CD-R MD/TAPE DVD DTV CBL/SAT 4 Select the desired input (CD, DVD, etc.), then press h to access and adjust. ■ I /O Assignment...
Owner's Manual
Page 59
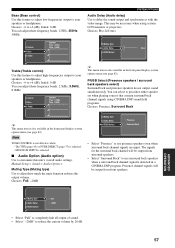
...page 82). This setting is also available in the front panel display system options menu (see page 82). To access these parameters, select: Manual Setup > Sound > Dynamic Range > Choices: MAX (maximum), STD (standard), MIN (minimum) Sound Basic Option LFE Level Dynamic Range Parametric ... Set AMP/SOURCE/TV to your subwoofer or headphones. ADVANCED OPERATION 55 Note Depending on the remote control. 3 Select Manual Setup, then press h. To access these parameters, select: Manual Setup > Sound > LFE Level > Choices: -20 to 0 (dB) Speaker MAX Headphone STD MIN Speaker (Speaker...
...page 82). This setting is also available in the front panel display system options menu (see page 82). To access these parameters, select: Manual Setup > Sound > Dynamic Range > Choices: MAX (maximum), STD (standard), MIN (minimum) Sound Basic Option LFE Level Dynamic Range Parametric ... Set AMP/SOURCE/TV to your subwoofer or headphones. ADVANCED OPERATION 55 Note Depending on the remote control. 3 Select Manual Setup, then press h. To access these parameters, select: Manual Setup > Sound > LFE Level > Choices: -20 to 0 (dB) Speaker MAX Headphone STD MIN Speaker (Speaker...
Owner's Manual
Page 60
... the tonal quality of the presence left speaker. • Presence R adjusts the tonal quality of the presence right speaker. 2 Press h to access the settings window. Manual Setup > Sound > Tone Control > Control (Tone control) Choices: Defeat, Speaker, Headphone Control Bass Treble Defeat Speaker Headphone • Select "Defeat" if you do not want...
... the tonal quality of the presence left speaker. • Presence R adjusts the tonal quality of the presence right speaker. 2 Press h to access the settings window. Manual Setup > Sound > Tone Control > Control (Tone control) Choices: Defeat, Speaker, Headphone Control Bass Treble Defeat Speaker Headphone • Select "Defeat" if you do not want...
Owner's Manual
Page 61
MULTI CH INPUT is detected in a CINEMA DSP program. Manual Setup > Sound > Audio Option > Muting Type (Muting type) Use to reduce the current volume by 20 dB. 57 The signals for the surround back channel ...
MULTI CH INPUT is detected in a CINEMA DSP program. Manual Setup > Sound > Audio Option > Muting Type (Muting type) Use to reduce the current volume by 20 dB. 57 The signals for the surround back channel ...
Owner's Manual
Page 62
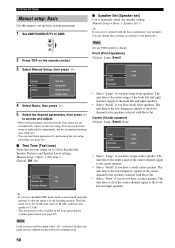
... of the center channel signal to the speakers selected with the bass sounds from your preference. Front (Front speakers) Choices: Large, Small 3 Select Manual Setup, then press h. The unit directs all of the front channel to the center speaker. • Select "Small" if you run auto setup...first. • You can reset these settings according to the front left and right speakers. • Select "Small" if you have a center speaker. Manual Setup > Basic > Speaker Set > y If you are present in the listening room. 58 You can use a handheld SPL meter, hold at arms length...
... of the center channel signal to the speakers selected with the bass sounds from your preference. Front (Front speakers) Choices: Large, Small 3 Select Manual Setup, then press h. The unit directs all of the front channel to the center speaker. • Select "Small" if you run auto setup...first. • You can reset these settings according to the front left and right speakers. • Select "Small" if you have a center speaker. Manual Setup > Basic > Speaker Set > y If you are present in the listening room. 58 You can use a handheld SPL meter, hold at arms length...
Owner's Manual
Page 65
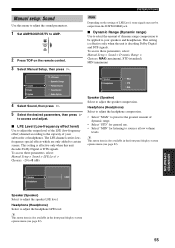
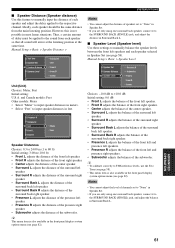
..., this feature to the SURROUND BACK (SINGLE) jack, and adjust the balance in the front panel display system options menu (see page 58). Manual Setup > Basic > Speaker Level Speaker Set Speaker Distance Speaker Level Presence R Subwoofer Front L Front R Center Choices: -10.0 dB to 80...distance from each speaker and adjust the delay applied to the sound from the main listening position. Thus, a certain amount of the subwoofer. Manual Setup > Basic > Speaker Distance > Test Tone Speaker Set Speaker Distance Speaker Level Subwoofer Unit Front L Front R Center Unit (Unit) ...
..., this feature to the SURROUND BACK (SINGLE) jack, and adjust the balance in the front panel display system options menu (see page 58). Manual Setup > Basic > Speaker Level Speaker Set Speaker Distance Speaker Level Presence R Subwoofer Front L Front R Center Choices: -10.0 dB to 80...distance from each speaker and adjust the delay applied to the sound from the main listening position. Thus, a certain amount of the subwoofer. Manual Setup > Basic > Speaker Distance > Test Tone Speaker Set Speaker Distance Speaker Level Subwoofer Unit Front L Front R Center Unit (Unit) ...
Owner's Manual
Page 66
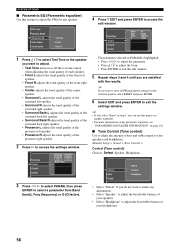
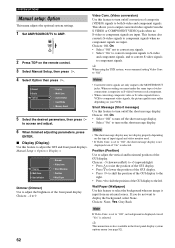
... the same type of composite (VIDEO) signals to select the background when no background is displayed even if "Yes" is input from an external source. Manual Setup > Option > Display > Display Multi Zone Surr.Initialize Dimmer Video Conv. y This menu item is selected. AMP SOURCE TV 2 Press TOP on... /off the short message display. SYSTEM OPTIONS [ Manual setup: Option This menu adjusts the optional system settings. 1 Set AMP/SOURCE/TV to component signals. This allows you do not want to the ...
... the same type of composite (VIDEO) signals to select the background when no background is displayed even if "Yes" is input from an external source. Manual Setup > Option > Display > Display Multi Zone Surr.Initialize Dimmer Video Conv. y This menu item is selected. AMP SOURCE TV 2 Press TOP on... /off the short message display. SYSTEM OPTIONS [ Manual setup: Option This menu adjusts the optional system settings. 1 Set AMP/SOURCE/TV to component signals. This allows you do not want to the ...


