Owner's Manual
Page 2
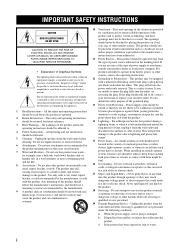
... USER-SERVICEABLE PARTS INSIDE. All operating and use instructions should be read before cleaning. for future reference. 3 Heed Warnings - in the cabinet are not likely to be taken to keep from the wall outlet and refer servicing to qualified service personnel under the following conditions: a) When the power-supply cord or plug is intended to alert you to the presence of important operating...
... USER-SERVICEABLE PARTS INSIDE. All operating and use instructions should be read before cleaning. for future reference. 3 Heed Warnings - in the cabinet are not likely to be taken to keep from the wall outlet and refer servicing to qualified service personnel under the following conditions: a) When the power-supply cord or plug is intended to alert you to the presence of important operating...
Owner's Manual
Page 3
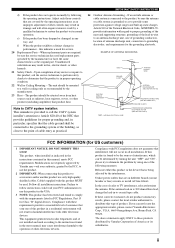
... in wire to an antenna discharge unit, size of grounding conductors, location of antenna discharge unit, connection to proper grounding of the mast and supporting structure, grounding of the lead-in FCC Regulations, Part 15 for service. 20 Replacement Parts - If these requirements provides a reasonable level of assurance that interference will often require extensive work by using one of the following the operating instructions...
... in wire to an antenna discharge unit, size of grounding conductors, location of antenna discharge unit, connection to proper grounding of the mast and supporting structure, grounding of the lead-in FCC Regulations, Part 15 for service. 20 Replacement Parts - If these requirements provides a reasonable level of assurance that interference will often require extensive work by using one of the following the operating instructions...
Owner's Manual
Page 4
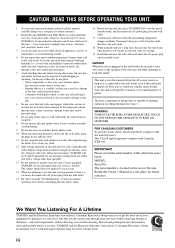
... not locate this unit in standby mode, and disconnect the AC power plug from use this unit for any service is needed. Contact qualified YAMAHA service personnel when any damage resulting from the wall outlet. 17 Condensation will form when the surrounding temperature changes suddenly. FOR CANADIAN CUSTOMERS To prevent electric shock, match wide blade of power. Retain this Owner's Manual in a well ventilated, cool...
... not locate this unit in standby mode, and disconnect the AC power plug from use this unit for any service is needed. Contact qualified YAMAHA service personnel when any damage resulting from the wall outlet. 17 Condensation will form when the surrounding temperature changes suddenly. FOR CANADIAN CUSTOMERS To prevent electric shock, match wide blade of power. Retain this Owner's Manual in a well ventilated, cool...
Owner's Manual
Page 5
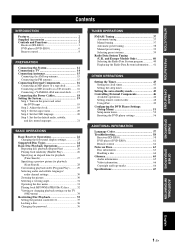
...44 Setting the auto-standby mode 45 Controlling External Components 46 Available operations 46 Setting remote control codes 48 Using iPod 49 Configuring the DVD Player Settings (Setup Menu 51 Setup menu items 52 Resetting the DVD player settings 56 ADDITIONAL INFORMATION Language Codes 57 Troubleshooting 58 Receiver (RX-E810 58 DVD player (DVD-E810 61 Remote control 62 Notes on the TV (OSD menu 34 Restricting Disc Playback 35 Setting the parental control level 35 Locking a disc 36 Changing the password 36 TUNER OPERATIONS FM/AM Tuning 37 Automatic tuning 37 Manual tuning...
...44 Setting the auto-standby mode 45 Controlling External Components 46 Available operations 46 Setting remote control codes 48 Using iPod 49 Configuring the DVD Player Settings (Setup Menu 51 Setup menu items 52 Resetting the DVD player settings 56 ADDITIONAL INFORMATION Language Codes 57 Troubleshooting 58 Receiver (RX-E810 58 DVD player (DVD-E810 61 Remote control 62 Notes on the TV (OSD menu 34 Restricting Disc Playback 35 Setting the parental control level 35 Locking a disc 36 Changing the password 36 TUNER OPERATIONS FM/AM Tuning 37 Automatic tuning 37 Manual tuning...
Owner's Manual
Page 6
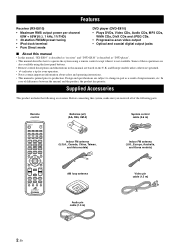
...-station FM/AM preset tuning • iPod dock terminal • Pure Direct mode DVD player (DVD-E810) • Plays DVDs, Video CDs, Audio CDs, MP3 CDs, WMA CDs, DivX CDs and JPEG CDs. • Progressive-scan video output • Optical and coaxial digital output jacks ■ About this manual • In this manual, "RX-E810" is described as "receiver" and "DVD-E810" is described as a result of the following accessories. Before connecting this manual are subject to production. Remote control STANDBY/ON POWER...
...-station FM/AM preset tuning • iPod dock terminal • Pure Direct mode DVD player (DVD-E810) • Plays DVDs, Video CDs, Audio CDs, MP3 CDs, WMA CDs, DivX CDs and JPEG CDs. • Progressive-scan video output • Optical and coaxial digital output jacks ■ About this manual • In this manual, "RX-E810" is described as "receiver" and "DVD-E810" is described as a result of the following accessories. Before connecting this manual are subject to production. Remote control STANDBY/ON POWER...
Owner's Manual
Page 7
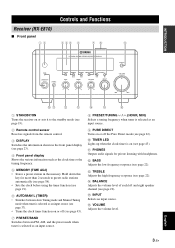
... Functions Receiver (RX-E810) ■ Front panel 12 345 6 78 9 NATURAL SOUND STEREO RECEIVER RX-E810 PURE DIRECT TIMER STANDBY/ON PHONES DISPLAY MEMORY AUTO/MAN'L PRESET/BAND PRESET/TUNING BASS TIME ADJ TIMER TREBLE HOUR BALANCE MIN INPUT L R VOLUME MIN MAX 0A B C D E F 1 STANDBY/ON Turns the receiver on or sets it to preset radio stations automatically (see page 38). • Sets the clock before using the timer function (see page 19). 6 AUTO/MAN'L (TIMER) • Switches between Auto Tuning mode and Manual Tuning mode when tuner...
... Functions Receiver (RX-E810) ■ Front panel 12 345 6 78 9 NATURAL SOUND STEREO RECEIVER RX-E810 PURE DIRECT TIMER STANDBY/ON PHONES DISPLAY MEMORY AUTO/MAN'L PRESET/BAND PRESET/TUNING BASS TIME ADJ TIMER TREBLE HOUR BALANCE MIN INPUT L R VOLUME MIN MAX 0A B C D E F 1 STANDBY/ON Turns the receiver on or sets it to preset radio stations automatically (see page 38). • Sets the clock before using the timer function (see page 19). 6 AUTO/MAN'L (TIMER) • Switches between Auto Tuning mode and Manual Tuning mode when tuner...
Owner's Manual
Page 9
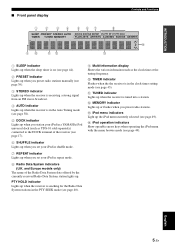
... 5 En C iPod menu indicators Light up the iPod menu currently selected (see page 49). and Europe models only) The name of the receiver (see page 17). 6 SHUFFLE indicator Lights up when you set your iPod in shuffle mode. 7 REPEAT indicator Lights up when you preset radio stations. B MEMORY indicator Lights up or flashes when you set your iPod in repeat mode. 8 Radio Data System indicators (U.K. INTRODUCTION ■ Front panel display Controls and Functions 1 2 34 5 67 8 SLEEP PRESET STEREO AUTO DOCK SHUFFLE...
... 5 En C iPod menu indicators Light up the iPod menu currently selected (see page 49). and Europe models only) The name of the receiver (see page 17). 6 SHUFFLE indicator Lights up when you set your iPod in shuffle mode. 7 REPEAT indicator Lights up when you preset radio stations. B MEMORY indicator Lights up or flashes when you set your iPod in repeat mode. 8 Radio Data System indicators (U.K. INTRODUCTION ■ Front panel display Controls and Functions 1 2 34 5 67 8 SLEEP PRESET STEREO AUTO DOCK SHUFFLE...

Owner's Manual
Page 12
... and audio language selection, etc. A-E SET UP PRESET ENTER MENU A-E TOP MENU /RETURN 3 4 TV VOL DISPLAY VOLUME SLEEP DVD/CD TUNER BAND TAPE/MD AUX/TV DOCK SUBTITLE ANGLE ZOOM AUDIO 6 7 Operations common to the receiver with the supplied system control cable (see page 19). 3 DISPLAY Switches the information shown in any operation modes. 1 Infrared signal transmitter Sends signals to the component you need to select a mode to the receiver using the remote control. Before operating functions in each mode, you want to control. 2 STANDBY/ON ( ) Turns the receiver...
... and audio language selection, etc. A-E SET UP PRESET ENTER MENU A-E TOP MENU /RETURN 3 4 TV VOL DISPLAY VOLUME SLEEP DVD/CD TUNER BAND TAPE/MD AUX/TV DOCK SUBTITLE ANGLE ZOOM AUDIO 6 7 Operations common to the receiver with the supplied system control cable (see page 19). 3 DISPLAY Switches the information shown in any operation modes. 1 Infrared signal transmitter Sends signals to the component you need to select a mode to the receiver using the remote control. Before operating functions in each mode, you want to control. 2 STANDBY/ON ( ) Turns the receiver...

Owner's Manual
Page 13
... mode 1 2 3 4 5 6 7 8 9 STANDBY/ON POWER TV 1 2 3 4 5 6 7 8 SCAN DIMMER 9 0 TV CH TV INPUT REPEAT A-B FREQ/TEXT PROG MODE PTY SEEK START SHUFFLE 0 A B C D ON SCREEN INFO. C PROG Displays the program list used for the DVD player. H AUDIO Selects the audio language (see page 31). E MENU Displays the DVD menu (see page 31) or PBC menu of CDs (see page 26). A-E SET UP PRESET ENTER MENU A-E TOP MENU /RETURN TV VOL DISPLAY VOLUME SLEEP E F G DVD/CD TUNER BAND TAPE/MD AUX/TV DOCK...
... mode 1 2 3 4 5 6 7 8 9 STANDBY/ON POWER TV 1 2 3 4 5 6 7 8 SCAN DIMMER 9 0 TV CH TV INPUT REPEAT A-B FREQ/TEXT PROG MODE PTY SEEK START SHUFFLE 0 A B C D ON SCREEN INFO. C PROG Displays the program list used for the DVD player. H AUDIO Selects the audio language (see page 31). E MENU Displays the DVD menu (see page 31) or PBC menu of CDs (see page 26). A-E SET UP PRESET ENTER MENU A-E TOP MENU /RETURN TV VOL DISPLAY VOLUME SLEEP E F G DVD/CD TUNER BAND TAPE/MD AUX/TV DOCK...
Owner's Manual
Page 21
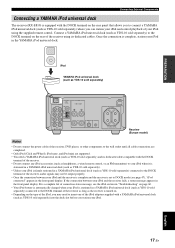
... / SPEAKER R L SUBWOOFER OUT TO DVD-E810 AUX R L MAINS AC OUTLETS SWITCHED 100W MAX. Connect a YAMAHA iPod universal dock (such as the receiver is turned on. • Depending on the type of the iPod, you may not be output properly. • Once the connection between your iPod in the YAMAHA iPod universal dock. Once the connection is complete, station your iPod and the receiver fails, a status message appears in the front panel display. English 17 En PREPARATION Connecting External Components Connecting a YAMAHA iPod universal dock...
... / SPEAKER R L SUBWOOFER OUT TO DVD-E810 AUX R L MAINS AC OUTLETS SWITCHED 100W MAX. Connect a YAMAHA iPod universal dock (such as the receiver is turned on. • Depending on the type of the iPod, you may not be output properly. • Once the connection between your iPod in the YAMAHA iPod universal dock. Once the connection is complete, station your iPod and the receiver fails, a status message appears in the front panel display. English 17 En PREPARATION Connecting External Components Connecting a YAMAHA iPod universal dock...

Owner's Manual
Page 23
... setting backward, press HOUR repeatedly while holding down PRESET/BAND. The front panel display of the DVD player to turn on the receiver. Step 1: Turn on the power and select the DVD input Step 2: Adjust the clock DISPLAY HOUR MIN STANDBY/ON DVD/CD STANDBY/ON POWER TV 1 2 3 4 5 6 7 8 SCAN DIMMER 9 0 SRLEEPEEAPT AB DVD/CD TUNER BAND TAPE/MD AUX/TV DOCK SUBTITLE ANGLE ZOOM AUDIO NATURAL SOUND STEREO RECEIVER RX-E810 PURE DIRECT TIMER STANDBY/ON PHONES DISPLAY MEMORY AUTO/MAN'L PRESET/BAND PRESET/TUNING BASS...
... setting backward, press HOUR repeatedly while holding down PRESET/BAND. The front panel display of the DVD player to turn on the receiver. Step 1: Turn on the power and select the DVD input Step 2: Adjust the clock DISPLAY HOUR MIN STANDBY/ON DVD/CD STANDBY/ON POWER TV 1 2 3 4 5 6 7 8 SCAN DIMMER 9 0 SRLEEPEEAPT AB DVD/CD TUNER BAND TAPE/MD AUX/TV DOCK SUBTITLE ANGLE ZOOM AUDIO NATURAL SOUND STEREO RECEIVER RX-E810 PURE DIRECT TIMER STANDBY/ON PHONES DISPLAY MEMORY AUTO/MAN'L PRESET/BAND PRESET/TUNING BASS...

Owner's Manual
Page 26
... AUTO/MAN'L PRESET/BAND PRESET/TUNING BASS TIME ADJ TIMER TREBLE HOUR BALANCE MIN INPUT L R VOLUME MIN MAX BASS TREBLE STANDBY/ON () STANDBY/ON POWER TV 1 5 AE 9 SET UP 2 3 4 6 7 8 ENTERSCAN 0 DIMMA EER TOP MENU /RETURN TV VOL DISPLAY VOLUME SLEEP DVD/CD TUNER BAND TAPE/MD AUX/TV DOCK SUBTITLE ANGLE ZOOM AUDIO VOLUME +/- TREBLE: Adjusts the high frequency response. BALANCE: Adjusts the volume level of the receiver to select an input source and adjust the sound settings on the Pure Direct mode. Basic Receiver Operations Basic Receiver Operations...
... AUTO/MAN'L PRESET/BAND PRESET/TUNING BASS TIME ADJ TIMER TREBLE HOUR BALANCE MIN INPUT L R VOLUME MIN MAX BASS TREBLE STANDBY/ON () STANDBY/ON POWER TV 1 5 AE 9 SET UP 2 3 4 6 7 8 ENTERSCAN 0 DIMMA EER TOP MENU /RETURN TV VOL DISPLAY VOLUME SLEEP DVD/CD TUNER BAND TAPE/MD AUX/TV DOCK SUBTITLE ANGLE ZOOM AUDIO VOLUME +/- TREBLE: Adjusts the high frequency response. BALANCE: Adjusts the volume level of the receiver to select an input source and adjust the sound settings on the Pure Direct mode. Basic Receiver Operations Basic Receiver Operations...
Owner's Manual
Page 49
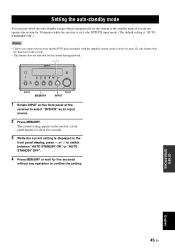
... set the system to the standby mode if you connect the receiver and the DVD player properly with the supplied system control cable (see page 12), this feature does not function for the system. • This feature does not function for five seconds without any operation to confirm the setting. u / d NATURAL SOUND STEREO RECEIVER RX-E810 PURE DIRECT TIMER STANDBY/ON PHONES DISPLAY MEMORY AUTO/MAN'L PRESET/BAND PRESET/TUNING BASS TIME ADJ TIMER TREBLE HOUR BALANCE MIN INPUT L R VOLUME...
... set the system to the standby mode if you connect the receiver and the DVD player properly with the supplied system control cable (see page 12), this feature does not function for the system. • This feature does not function for five seconds without any operation to confirm the setting. u / d NATURAL SOUND STEREO RECEIVER RX-E810 PURE DIRECT TIMER STANDBY/ON PHONES DISPLAY MEMORY AUTO/MAN'L PRESET/BAND PRESET/TUNING BASS TIME ADJ TIMER TREBLE HOUR BALANCE MIN INPUT L R VOLUME...
Owner's Manual
Page 55
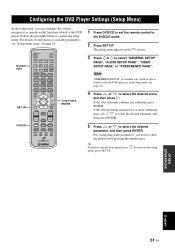
...). Number keys STANDBY/ON POWER TV 1 2 3 4 5 6 7 8 SCAN DIMMER 9 0 TV CH TV INPUT REPEAT A-B FREQ/TEXT PROG MODE PTY SEEK START SHUFFLE 1 Press DVD/CD to set the remote control to select the desired menu, and then press . A-E SET UP PRESET ENTER MENU A-E TOP MENU /RETURN TV VOL DISPLAY VOLUME SLEEP DVD/CD TUNER BAND TAPE/MD AUX/TV DOCK SUBTITLE ANGLE ZOOM AUDIO Cursor keys, ENTER 4 Press or to the DVD/CD mode. 2 Press SET...
...). Number keys STANDBY/ON POWER TV 1 2 3 4 5 6 7 8 SCAN DIMMER 9 0 TV CH TV INPUT REPEAT A-B FREQ/TEXT PROG MODE PTY SEEK START SHUFFLE 1 Press DVD/CD to set the remote control to select the desired menu, and then press . A-E SET UP PRESET ENTER MENU A-E TOP MENU /RETURN TV VOL DISPLAY VOLUME SLEEP DVD/CD TUNER BAND TAPE/MD AUX/TV DOCK SUBTITLE ANGLE ZOOM AUDIO Cursor keys, ENTER 4 Press or to the DVD/CD mode. 2 Press SET...
Owner's Manual
Page 56
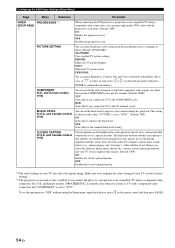
.... (Default: ENGLISH) SCREEN SAVER The screen saver function allows you connect the DVD player to prevent the TV screen from the multi speaker channels if the DVD player is not capable of decoding multi-channel audio. OFF: Disables the screen saver function. DIVX(R) VOD CODE You can configure the analog output setting. (Default: STEREO) STEREO: Delivers sounds from only the two front speaker channels. VIRTUAL SURR: Reproduces the surround channel sounds virtually. LPCM OUTPUT If you to a PCM compatible amplifier using the DivX® VOD service...
.... (Default: ENGLISH) SCREEN SAVER The screen saver function allows you connect the DVD player to prevent the TV screen from the multi speaker channels if the DVD player is not capable of decoding multi-channel audio. OFF: Disables the screen saver function. DIVX(R) VOD CODE You can configure the analog output setting. (Default: STEREO) STEREO: Delivers sounds from only the two front speaker channels. VIRTUAL SURR: Reproduces the surround channel sounds virtually. LPCM OUTPUT If you to a PCM compatible amplifier using the DivX® VOD service...
Owner's Manual
Page 57
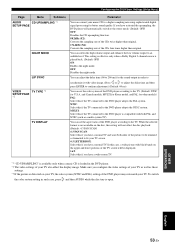
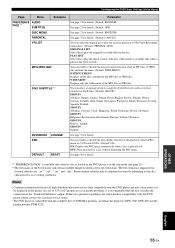
... original. NTSC: Select this if the TV connected to the DVD player adopts the PAL system. Configuring the DVD Player Settings (Setup Menu) Page Menu Submenu AUDIO CD UPSAMPLING *1 SETUP PAGE NIGHT MODE LIP SYNC VIDEO TV TYPE *3 SETUP PAGE *2 TV DISPLAY Parameter You can soften the high volume output and enhance the low volume output to an audible level. If you have activated the upsampling, the DVD player will not affect the disc playback. (Default: 4:3 PAN SCAN...
... original. NTSC: Select this if the TV connected to the DVD player adopts the PAL system. Configuring the DVD Player Settings (Setup Menu) Page Menu Submenu AUDIO CD UPSAMPLING *1 SETUP PAGE NIGHT MODE LIP SYNC VIDEO TV TYPE *3 SETUP PAGE *2 TV DISPLAY Parameter You can soften the high volume output and enhance the low volume output to an audible level. If you have activated the upsampling, the DVD player will not affect the disc playback. (Default: 4:3 PAN SCAN...
Owner's Manual
Page 58
... the COMPONENT jacks. and Europe models only) You can switch the jack (terminal) at which the component video signals are output between subtitles and captions is that the disc contains closed caption function. *2 The video settings of the audio. Subtitles rarely show sound effects (e.g., "phone ringing" and "footsteps"), while subtitles do not. Configuring the DVD Player Settings (Setup Menu) Page Menu Submenu Parameter VIDEO PROGRESSIVE *4 SETUP PAGE *2 When connecting the DVD player to a progressive scan compatible TV using a component video connection...
... the COMPONENT jacks. and Europe models only) You can switch the jack (terminal) at which the component video signals are output between subtitles and captions is that the disc contains closed caption function. *2 The video settings of the audio. Subtitles rarely show sound effects (e.g., "phone ringing" and "footsteps"), while subtitles do not. Configuring the DVD Player Settings (Setup Menu) Page Menu Submenu Parameter VIDEO PROGRESSIVE *4 SETUP PAGE *2 When connecting the DVD player to a progressive scan compatible TV using a component video connection...
Owner's Manual
Page 59
... picture problems, it is played back. The file extensions supported for external subtitles are fully compatible with this DVD player and may be displayed in the picture. In case of the playback control (PBC) menu for playback of VR (Video Recording) format discs. (Default: ORIGINAL LIST) ORIGINAL LIST: Select this to play the edited version of the DivX movie and external subtitle should note that the user switches the connection...
... picture problems, it is played back. The file extensions supported for external subtitles are fully compatible with this DVD player and may be displayed in the picture. In case of the playback control (PBC) menu for playback of VR (Video Recording) format discs. (Default: ORIGINAL LIST) ORIGINAL LIST: Select this to play the edited version of the DivX movie and external subtitle should note that the user switches the connection...
Owner's Manual
Page 60
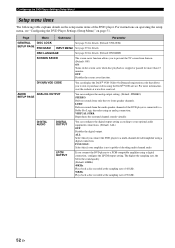
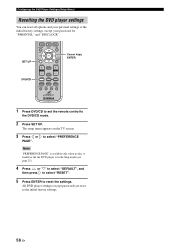
... VOL DISPLAY VOLUME SLEEP DVD/CD TUNER BAND TAPE/MD AUX/TV DOCK SUBTITLE ANGLE ZOOM AUDIO Cursor keys, ENTER 1 Press DVD/CD to set the remote control to the initial factory settings. 56 En Note "PREFERENCE PAGE" is available only when no disc is loaded or the the DVD player is in the Stop mode (see page 25). 4 Press or to select "DEFAULT", and then press to select "RESET". 5 Press...
... VOL DISPLAY VOLUME SLEEP DVD/CD TUNER BAND TAPE/MD AUX/TV DOCK SUBTITLE ANGLE ZOOM AUDIO Cursor keys, ENTER 1 Press DVD/CD to set the remote control to the initial factory settings. 56 En Note "PREFERENCE PAGE" is available only when no disc is loaded or the the DVD player is in the Stop mode (see page 25). 4 Press or to select "DEFAULT", and then press to select "RESET". 5 Press...

Owner's Manual
Page 63
... or the antenna connections are loose. The receiver has been disconnected for the best reception. The signal is multi-path interference. A TV set . Check the antenna connections. Adjust the antenna position to eliminate all noise. Use a high-quality directional FM antenna. Set preset stations Tighten the AM loop antenna connections and orient it is distortion, and clear reception cannot FM be tuned into with the automatic tuning method. Use the manual tuning method. The...
... or the antenna connections are loose. The receiver has been disconnected for the best reception. The signal is multi-path interference. A TV set . Check the antenna connections. Adjust the antenna position to eliminate all noise. Use a high-quality directional FM antenna. Set preset stations Tighten the AM loop antenna connections and orient it is distortion, and clear reception cannot FM be tuned into with the automatic tuning method. Use the manual tuning method. The...


