

Owner's Manual
Page 5
... Progressive output (U.S.A. INTRODUCTION FEATURES 2 Playable disc formats 2 CHECKING THE ACCESSORIES 3 INSTALLING BATTERIES IN THE REMOTE CONTROL...........3 CONTROLS AND FUNCTIONS 4 Front panel / Remote control 4 Front panel display 6 PREPARATION CONNECTIONS 7 Types of package content items used in the packaging. • The names of connectors 7 Video connections 8 Audio connections 9 Remote control in the packaging. model unless otherwise indicated. • Paragraphs marked with an y indicator are based on the product or elsewhere in /out jack 9 PLAYING A DISC PLAYING...
... Progressive output (U.S.A. INTRODUCTION FEATURES 2 Playable disc formats 2 CHECKING THE ACCESSORIES 3 INSTALLING BATTERIES IN THE REMOTE CONTROL...........3 CONTROLS AND FUNCTIONS 4 Front panel / Remote control 4 Front panel display 6 PREPARATION CONNECTIONS 7 Types of package content items used in the packaging. • The names of connectors 7 Video connections 8 Audio connections 9 Remote control in the packaging. model unless otherwise indicated. • Paragraphs marked with an y indicator are based on the product or elsewhere in /out jack 9 PLAYING A DISC PLAYING...

Owner's Manual
Page 6
... described in video format. • CD-R/RW, DVD-R/RW, and DVD+R discs will play the disc. Model Region number of this copyright protection technology must be damaged.) • DVD mode • SACD mode DIGITAL VIDEO This manual refers to recording conditions or disc characteristics. (If you record discs on the disc package. Check the regional code number on a recorder for home and other limited viewing uses only unless otherwise authorized by method claims of Genesis Microchip, Inc. "Dolby" and...
... described in video format. • CD-R/RW, DVD-R/RW, and DVD+R discs will play the disc. Model Region number of this copyright protection technology must be damaged.) • DVD mode • SACD mode DIGITAL VIDEO This manual refers to recording conditions or disc characteristics. (If you record discs on the disc package. Check the regional code number on a recorder for home and other limited viewing uses only unless otherwise authorized by method claims of Genesis Microchip, Inc. "Dolby" and...

Owner's Manual
Page 8
... forward or fast reverse. 8 SACD/DVD Press to switch between DVD mode and SACD mode. 9 SACD mode indicator Lights up during progressive output. t PHONES Connect headphones here. CONTROLS AND FUNCTIONS Front panel / Remote control 1 2 3 45 6 tr 8 4 6 d 4 e 3 y u i 5 o p a s wq0 9 8 7 1 POWER Turns the power to the unit on and off. 2 Disc tray Load a disc in DVD mode. w VIDEO OFF indicator Lights up in this tray. 3 v (Front panel), OPEN/CLOSE (Remote control) Press to open or close the disc tray. 4w Press to start playback. 5d Press to pause. 6a Press to stop playback...
... forward or fast reverse. 8 SACD/DVD Press to switch between DVD mode and SACD mode. 9 SACD mode indicator Lights up during progressive output. t PHONES Connect headphones here. CONTROLS AND FUNCTIONS Front panel / Remote control 1 2 3 45 6 tr 8 4 6 d 4 e 3 y u i 5 o p a s wq0 9 8 7 1 POWER Turns the power to the unit on and off. 2 Disc tray Load a disc in DVD mode. w VIDEO OFF indicator Lights up in this tray. 3 v (Front panel), OPEN/CLOSE (Remote control) Press to open or close the disc tray. 4w Press to start playback. 5d Press to pause. 6a Press to stop playback...

Owner's Manual
Page 9
... a DVD-Audio language. AUDIO Press to select and execute a menu item. MULTI/2CH Press to toggle between progressive video output and interlaced video output in DVD mode. REPEAT Press to display a menu screen. i From top left : GROUP Press to select a DVD-Audio group. MENU Press to repeat playback. PAGE Press to enter numbers. CONTROLS AND FUNCTIONS s From left : PLAY MODE Press to switch between random play, program play, and normal playback. p Numeric buttons Press to select a DVD-Audio still picture. ON SCREEN Press to turn the on-screen icons on discs recorded with...
... a DVD-Audio language. AUDIO Press to select and execute a menu item. MULTI/2CH Press to toggle between progressive video output and interlaced video output in DVD mode. REPEAT Press to display a menu screen. i From top left : GROUP Press to select a DVD-Audio group. MENU Press to repeat playback. PAGE Press to enter numbers. CONTROLS AND FUNCTIONS s From left : PLAY MODE Press to switch between random play, program play, and normal playback. p Numeric buttons Press to select a DVD-Audio still picture. ON SCREEN Press to turn the on-screen icons on discs recorded with...

Owner's Manual
Page 10
CONTROLS AND FUNCTIONS Front panel display 1 2 3 4 9 8 7 65 1 Disc type indicators The indicator for the type of a DVDAudio track that has multiple audio channel signals (that can be mixed down to two channels). If multiple audio formats are recorded on page 10). 3 Play mode indicators The indicator for the current playback mode lights up. TITLE: The display indicates a title number. RR: right rear (Dolby Digital) PCM (Linear PCM) P.PCM (Packed PCM) MULTI (Multi-channel) 2 CH (2-channel) D.MIX (Down Mix): This indicator lights up during playback of...
CONTROLS AND FUNCTIONS Front panel display 1 2 3 4 9 8 7 65 1 Disc type indicators The indicator for the type of a DVDAudio track that has multiple audio channel signals (that can be mixed down to two channels). If multiple audio formats are recorded on page 10). 3 Play mode indicators The indicator for the current playback mode lights up. TITLE: The display indicates a title number. RR: right rear (Dolby Digital) PCM (Linear PCM) P.PCM (Packed PCM) MULTI (Multi-channel) 2 CH (2-channel) D.MIX (Down Mix): This indicator lights up during playback of...
Owner's Manual
Page 13
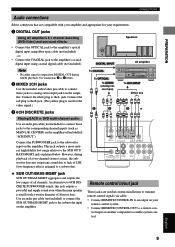
... These jacks are compatible with a woofer diameter of all channels. Connect the SUBWOOFER jack to enable system control. To COAXIAL To OPTICAL To AUDIO (analog stereo input) To 6CH INPUT Either one 1 2 3 ★ Remote control in custom installations to transmit remote control signals via cable. • Connect REMOTE CONTROL IN to an output on your requirements. 1 DIGITAL OUT jacks Using AV amplifier's 6.1 channel decoding (DVD-Video) and surround effects: • Connect the OPTICAL...
... These jacks are compatible with a woofer diameter of all channels. Connect the SUBWOOFER jack to enable system control. To COAXIAL To OPTICAL To AUDIO (analog stereo input) To 6CH INPUT Either one 1 2 3 ★ Remote control in custom installations to transmit remote control signals via cable. • Connect REMOTE CONTROL IN to an output on your requirements. 1 DIGITAL OUT jacks Using AV amplifier's 6.1 channel decoding (DVD-Video) and surround effects: • Connect the OPTICAL...

Owner's Manual
Page 14
... the stop playback 1 Press POWER to turn on page 10 (below). 5 Press w. y • If one of the following indicators is displayed DVD-A DVD-V VCD refer to the unit is open the disc tray. 3 Load a disc into the disc tray. The disc tray closes and playback starts. PLAYING A DISC PLAYING A DISC Before starting playback Before playing a disc, you must connect the unit's audio and video output jacks to an AV amplifier or other types of discs, switch to DVD mode. Press a. ■ Resume function...
... the stop playback 1 Press POWER to turn on page 10 (below). 5 Press w. y • If one of the following indicators is displayed DVD-A DVD-V VCD refer to the unit is open the disc tray. 3 Load a disc into the disc tray. The disc tray closes and playback starts. PLAYING A DISC PLAYING A DISC Before starting playback Before playing a disc, you must connect the unit's audio and video output jacks to an AV amplifier or other types of discs, switch to DVD mode. Press a. ■ Resume function...

Owner's Manual
Page 15
...; Opening the disc tray cancels the resume function. ■ Chapter review function DVD-V This function plays the first few frames. • On certain DVD-Audio discs, frames may advance or reverse only during playback. Example (to function as described above. Note • VCDs that use playback control (page 13) may not work on screen. (If you can review previous chapters. PLAYING A DISC To clear the memory, press a again. Note • The Video...
...; Opening the disc tray cancels the resume function. ■ Chapter review function DVD-V This function plays the first few frames. • On certain DVD-Audio discs, frames may advance or reverse only during playback. Example (to function as described above. Note • VCDs that use playback control (page 13) may not work on screen. (If you can review previous chapters. PLAYING A DISC To clear the memory, press a again. Note • The Video...

Owner's Manual
Page 17
... buttons: RETURN: w (PLAY): y: t: a (STOP): Press to play the selected item. Press to a favorite title or chapter, or selecting an audio language or subtitle language for an extra high-quality picture. PROGRESSIVE indicator Press PROGRESSIVE. Notes • If the screen shifts off . (The progressive output will switch to interlace output.) • When the progressive function is displayed to fill the screen. PLAYING A DISC MISCELLANEOUS FUNCTIONS Using disc menus Many discs include menu screens that feature "playback control" allow you to control Video CD playback as "menu...
... buttons: RETURN: w (PLAY): y: t: a (STOP): Press to play the selected item. Press to a favorite title or chapter, or selecting an audio language or subtitle language for an extra high-quality picture. PROGRESSIVE indicator Press PROGRESSIVE. Notes • If the screen shifts off . (The progressive output will switch to interlace output.) • When the progressive function is displayed to fill the screen. PLAYING A DISC MISCELLANEOUS FUNCTIONS Using disc menus Many discs include menu screens that feature "playback control" allow you to control Video CD playback as "menu...

Owner's Manual
Page 18
..., switch to normal output (press PROGRESSIVE to turn the power off ). 5 Save the adjusted position. The video monitor displays group and track icons. 2 Press the cursor buttons (k, n) to select a group number, then press ENTER. 3 Press the cursor buttons (k, n) to play. To adjust the screen position, use the numeric buttons to select a group and a track. ■ Playing bonus groups Some discs contain bonus groups that require a four-digit password to gain access. MISCELLANEOUS FUNCTIONS ■ Adjusting...
..., switch to normal output (press PROGRESSIVE to turn the power off ). 5 Save the adjusted position. The video monitor displays group and track icons. 2 Press the cursor buttons (k, n) to select a group number, then press ENTER. 3 Press the cursor buttons (k, n) to play. To adjust the screen position, use the numeric buttons to select a group and a track. ■ Playing bonus groups Some discs contain bonus groups that require a four-digit password to gain access. MISCELLANEOUS FUNCTIONS ■ Adjusting...

Owner's Manual
Page 25
...) 3: Main channels (left/right) + Center English 21 VCD Playback control cannot be adjusted. Page number DVD-A Select a page number to play . • When playing a Video CD disc using playback control, no subwoofer signal) 0: Rear channel not available on the disc does not appear during pro- LR L R Digital 1 ENG 3/2.1 ch 12 3 Audio format DVD-A DVD-V 1 Audio track number 2 Audio track/language: See Å for language abbreviations. 3 Audio signal type: See ı for display only) Track elapsed time Track remaining time Disc remaining time Audio mode VCD Select a channel to...
...) 3: Main channels (left/right) + Center English 21 VCD Playback control cannot be adjusted. Page number DVD-A Select a page number to play . • When playing a Video CD disc using playback control, no subwoofer signal) 0: Rear channel not available on the disc does not appear during pro- LR L R Digital 1 ENG 3/2.1 ch 12 3 Audio format DVD-A DVD-V 1 Audio track number 2 Audio track/language: See Å for language abbreviations. 3 Audio signal type: See ı for display only) Track elapsed time Track remaining time Disc remaining time Audio mode VCD Select a channel to...

Owner's Manual
Page 28
... screen displays items that belong to the previous screen Press RETURN. ■ Exiting Setup mode SET UP 1 Press SETUP. tion turns on the front panel simultaneously until the video monitor displays "Initialized." Using the Setup menu 3 Press the cursor buttons (k, n) to select the desired item, then press ENTER. 4 Press the cursor buttons (k, n) to change the factory default settings. Disc menu 1 SETUP Disc Audio Video menu M 2 SETUP Video English TV Aspect TV Type Audio menu 3 SETUP Audio 4:3 Pan&Scan A t ti Speaker Setting Multi-channel Display menu 4 SETUP Display Press SETUP...
... screen displays items that belong to the previous screen Press RETURN. ■ Exiting Setup mode SET UP 1 Press SETUP. tion turns on the front panel simultaneously until the video monitor displays "Initialized." Using the Setup menu 3 Press the cursor buttons (k, n) to select the desired item, then press ENTER. 4 Press the cursor buttons (k, n) to change the factory default settings. Disc menu 1 SETUP Disc Audio Video menu M 2 SETUP Video English TV Aspect TV Type Audio menu 3 SETUP Audio 4:3 Pan&Scan A t ti Speaker Setting Multi-channel Display menu 4 SETUP Display Press SETUP...
Owner's Manual
Page 29
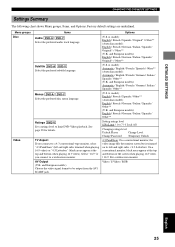
... limit DVD-Video playback. DETAILED SETTINGS CHANGING THE DVD MODE SETTINGS Settings Summary The following chart shows Menu groups, Items, and Options. See page 28 for details. and European models) Choose the video signal format to a 4:3 conventional-type monitor, select "4:3 Pan&Scan" (left and right sides. / 4:3 Letterbox: On a conventional monitor, black areas appear at the top and bottom when playing 16:9 video). Subtitle DVD-A DVD-V Select the preferred subtitle language. Select "16:9" if you connect to be output from...
... limit DVD-Video playback. DETAILED SETTINGS CHANGING THE DVD MODE SETTINGS Settings Summary The following chart shows Menu groups, Items, and Options. See page 28 for details. and European models) Choose the video signal format to a 4:3 conventional-type monitor, select "4:3 Pan&Scan" (left and right sides. / 4:3 Letterbox: On a conventional monitor, black areas appear at the top and bottom when playing 16:9 video). Subtitle DVD-A DVD-V Select the preferred subtitle language. Select "16:9" if you connect to be output from...

Owner's Manual
Page 30
....) Dolby Digital DVD-A DVD-V Specify the signal type output from discs that are still not clear, select "Frame." Select "Darker" when using the VIDEO or S VIDEO jacks. Select "Bitstream" if the connected device features a Dolby Digital decoder. Select "PCM" otherwise. Audio during Search DVD-A DVD-V VCD Select to hear dialog at low volume levels. Select "Off" if the sound is composed of a still frame. Two alternating fields may be output when playing an NTSC disc. NTSC Disc Output (U.K., European and Australian models) Select a video signal format (PAL...
....) Dolby Digital DVD-A DVD-V Specify the signal type output from discs that are still not clear, select "Frame." Select "Darker" when using the VIDEO or S VIDEO jacks. Select "Bitstream" if the connected device features a Dolby Digital decoder. Select "PCM" otherwise. Audio during Search DVD-A DVD-V VCD Select to hear dialog at low volume levels. Select "Off" if the sound is composed of a still frame. Two alternating fields may be output when playing an NTSC disc. NTSC Disc Output (U.K., European and Australian models) Select a video signal format (PAL...

Owner's Manual
Page 31
... set Audio to "Other," specify the language by a DVD-Video player. On-Screen Messages Select whether or not to "Off". DVD-Video Mode Some DVD-Audio discs contain DVD-Video content that can be played only by selecting a four-digit number from the language code list and enter it is not recorded on -screen messages. On / Off * If you press the a button, etc. DETAILED SETTINGS CHANGING THE DVD MODE SETTINGS Menu groups Display Others Items On-Screen Menu Language Select the preferred language for the same language are recorded, the subtitles...
... set Audio to "Other," specify the language by a DVD-Video player. On-Screen Messages Select whether or not to "Off". DVD-Video Mode Some DVD-Audio discs contain DVD-Video content that can be played only by selecting a four-digit number from the language code list and enter it is not recorded on -screen messages. On / Off * If you press the a button, etc. DETAILED SETTINGS CHANGING THE DVD MODE SETTINGS Menu groups Display Others Items On-Screen Menu Language Select the preferred language for the same language are recorded, the subtitles...

Owner's Manual
Page 32
... you turn the power off or open the disc tray. 2 Press the cursor buttons (k, n) to select "Ratings," then press ENTER. 3 Enter a four-digit number using the numeric buttons, then press ENTER. If a digital signal is . The video monitor displays a menu. 2 Press n to select the desired item, then press ENTER. ■ Changing the ratings level (from Level 8) The unit may be set from 0 through 7, the unit displays the password screen. 1 Press SETUP. Digital output Output as is input...
... you turn the power off or open the disc tray. 2 Press the cursor buttons (k, n) to select "Ratings," then press ENTER. 3 Enter a four-digit number using the numeric buttons, then press ENTER. If a digital signal is . The video monitor displays a menu. 2 Press n to select the desired item, then press ENTER. ■ Changing the ratings level (from Level 8) The unit may be set from 0 through 7, the unit displays the password screen. 1 Press SETUP. Digital output Output as is input...

Owner's Manual
Page 37
... power cable, and contact the nearest authorized YAMAHA dealer or service center. ■ General Problem No response when buttons pressed. There is dirty. The disc is moisture on the laser pickup. Place the disc properly. - ■ DVD mode Problem No subtitles Alternative languages cannot be changed. On certain discs, the user cannot select an alternative language using the on the front panel turns off . If the "D.MIX" indicator on -screen menu. Change the Audio setting in Setup menu...
... power cable, and contact the nearest authorized YAMAHA dealer or service center. ■ General Problem No response when buttons pressed. There is dirty. The disc is moisture on the laser pickup. Place the disc properly. - ■ DVD mode Problem No subtitles Alternative languages cannot be changed. On certain discs, the user cannot select an alternative language using the on the front panel turns off . If the "D.MIX" indicator on -screen menu. Change the Audio setting in Setup menu...

Owner's Manual
Page 38
... used on the Video menu (in SACD mode. model) Due to adjust the picture quality. Replace all batteries with progressive output. Direct sunlight or lighting (from an inverter type of fluorescent lamp, etc.) is output Digital signals cannot be played correctly via interlace output.) Remedy Select the correct setting. Cause Setup menu settings are not effective. No on-screen display On-screen menu icons not displayed or only partially displayed on the television Excessive ghosting Cause (U.S.A. Most DVD-Audio/Video discs are weak. TROUBLESHOOTING Problem...
... used on the Video menu (in SACD mode. model) Due to adjust the picture quality. Replace all batteries with progressive output. Direct sunlight or lighting (from an inverter type of fluorescent lamp, etc.) is output Digital signals cannot be played correctly via interlace output.) Remedy Select the correct setting. Cause Setup menu settings are not effective. No on-screen display On-screen menu icons not displayed or only partially displayed on the television Excessive ghosting Cause (U.S.A. Most DVD-Audio/Video discs are weak. TROUBLESHOOTING Problem...
Owner's Manual
Page 39
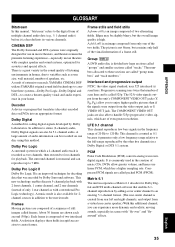
... The Dolby Surround and DTS systems were originally designed for playback. Decoder A device or program that number of scan lines and is created from rear left and right channels, and output from the unit's COMPONENT VIDEO OUT jacks (Y, PB, PR) allow greater volume, and hence use in the frequency range of a frame still. The numbers allocated to an existing 5.1-channel format. (The rear center channel is called packed PCM (PPCM). Progressive scanning uses...
... The Dolby Surround and DTS systems were originally designed for playback. Decoder A device or program that number of scan lines and is created from rear left and right channels, and output from the unit's COMPONENT VIDEO OUT jacks (Y, PB, PR) allow greater volume, and hence use in the frequency range of a frame still. The numbers allocated to an existing 5.1-channel format. (The rear center channel is called packed PCM (PPCM). Progressive scanning uses...

Owner's Manual
Page 40
... image are produced with the intention of being viewed on a widescreen television with an aspect ratio of 16:9. Playback control (PBC) The term "playback control" on a widescreen television. The numbers allocated to enjoy DSP sound field surround effects without center or rear speakers-by menu. Wipe discs using "virtual rear speakers." The picture appears at the intended aspect ratio on a Video CD or its surface printed by a commercially...
... image are produced with the intention of being viewed on a widescreen television with an aspect ratio of 16:9. Playback control (PBC) The term "playback control" on a widescreen television. The numbers allocated to enjoy DSP sound field surround effects without center or rear speakers-by menu. Wipe discs using "virtual rear speakers." The picture appears at the intended aspect ratio on a Video CD or its surface printed by a commercially...


