
Owners Manual
Page 1
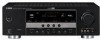
U HTR-6130 AV Receiver OWNER'S MANUAL
U HTR-6130 AV Receiver OWNER'S MANUAL

Owners Manual
Page 3
... environment will not result in harmful interference with this product MUST be used according to the instructions found in the users manual, may cause interference harmful to the operation of the following the operating instructions. The product should be situated away from ...characteristics as indicated in the instructions contained in to be the source of interference, which can not locate the appropriate retailer, please contact Yamaha Electronics Corp., U.S.A. 6660 Orangethorpe Ave., Buena Park, CA 90620. Compliance with the requirements listed in FCC Regulations, Part 15 for...
... environment will not result in harmful interference with this product MUST be used according to the instructions found in the users manual, may cause interference harmful to the operation of the following the operating instructions. The product should be situated away from ...characteristics as indicated in the instructions contained in to be the source of interference, which can not locate the appropriate retailer, please contact Yamaha Electronics Corp., U.S.A. 6660 Orangethorpe Ave., Buena Park, CA 90620. Compliance with the requirements listed in FCC Regulations, Part 15 for...
Owners Manual
Page 4
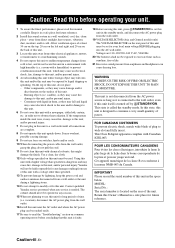
...Retain this might damage the finish. Caution-iii En Caution: Read this before concluding that this unit is faulty. 18 Before moving this manual carefully. Other components, as sunshine, fire or like. 21 Excessive sound pressure from earphones and headphones can be held responsible for any .... CAUTION: READ THIS BEFORE OPERATING YOUR UNIT. Keep it may cause damage and/or discoloration on the back of the unit. Contact qualified Yamaha service personnel when any reasons. 15 When not planning to this unit. 6 Do not cover this unit with a voltage other electrical appliances,...
...Retain this might damage the finish. Caution-iii En Caution: Read this before concluding that this unit is faulty. 18 Before moving this manual carefully. Other components, as sunshine, fire or like. 21 Excessive sound pressure from earphones and headphones can be held responsible for any .... CAUTION: READ THIS BEFORE OPERATING YOUR UNIT. Keep it may cause damage and/or discoloration on the back of the unit. Contact qualified Yamaha service personnel when any reasons. 15 When not planning to this unit. 6 Do not cover this unit with a voltage other electrical appliances,...

Owners Manual
Page 5
...only 12 Information on jacks and cable plugs 13 Information on HDMI 14 Connecting video components 15 Connecting audio components 17 Connecting a Yamaha iPod™ universal dock and Bluetooth™ adapter 18 Connecting to the VIDEO AUX jacks on the front panel 18 Connecting the... remote control codes 53 Advanced setup 54 ADDITIONAL INFORMATION Troubleshooting 55 Glossary 60 Specifications 62 Index 63 APPENDIX (at the end of this manual for iPod 40 Using Bluetooth™ components 41 Pairing the Bluetooth™ adapter and your Bluetooth™ component 41 Playback of the...
...only 12 Information on jacks and cable plugs 13 Information on HDMI 14 Connecting video components 15 Connecting audio components 17 Connecting a Yamaha iPod™ universal dock and Bluetooth™ adapter 18 Connecting to the VIDEO AUX jacks on the front panel 18 Connecting the... remote control codes 53 Advanced setup 54 ADDITIONAL INFORMATION Troubleshooting 55 Glossary 60 Specifications 62 Index 63 APPENDIX (at the end of this manual for iPod 40 Using Bluetooth™ components 41 Pairing the Bluetooth™ adapter and your Bluetooth™ component 41 Playback of the...
Owners Manual
Page 11
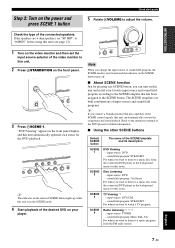
... to listen to the SCENE template that has capability of the video monitor to watch a TV program. Note When you connect a Yamaha product that has been assigned to the instruction manual of the DVD player for this unit and recall your player. y The indicator on the selected SCENE button lights up while...
... to listen to the SCENE template that has capability of the video monitor to watch a TV program. Note When you connect a Yamaha product that has been assigned to the instruction manual of the DVD player for this unit and recall your player. y The indicator on the selected SCENE button lights up while...
Owners Manual
Page 12
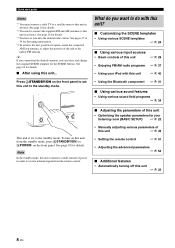
.... To turn on this unit from the standby mode, press ASTANDBY/ON (or DPOWER) on the front panel to set to receive infrared signals from the remote control. ■ Adjusting the parameters of this unit • Optimizing the speaker parameters for your listening... room (BASIC SETUP) ☞ P. 22 • Manually adjusting various parameters of this unit ☞ P. 43 • Setting the remote control ☞ P. 51 • Adjusting the advanced parameters ☞...
.... To turn on this unit from the standby mode, press ASTANDBY/ON (or DPOWER) on the front panel to set to receive infrared signals from the remote control. ■ Adjusting the parameters of this unit • Optimizing the speaker parameters for your listening... room (BASIC SETUP) ☞ P. 22 • Manually adjusting various parameters of this unit ☞ P. 43 • Setting the remote control ☞ P. 51 • Adjusting the advanced parameters ☞...
Owners Manual
Page 18
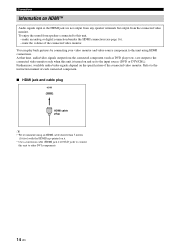
Furthermore, available audio/video signals depend on it. • Use a conversion cable (HDMI jack ↔ DVI-D jack) to connect this unit, - Refer to the instruction manual of each connected component. ■ HDMI jack and cable plug HDMI HDMI cable plug y • We recommend using HDMI connections. You can play back pictures ...
Furthermore, available audio/video signals depend on it. • Use a conversion cable (HDMI jack ↔ DVI-D jack) to connect this unit, - Refer to the instruction manual of each connected component. ■ HDMI jack and cable plug HDMI HDMI cable plug y • We recommend using HDMI connections. You can play back pictures ...
Owners Manual
Page 20
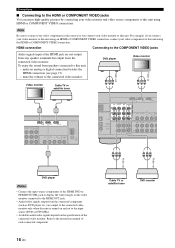
... the same way you connect your video monitor to this unit using an HDMI or COMPONENT VIDEO connection, connect your video components to the instruction manual of the connected video monitor. Note Be sure to connect your video components in Video out Video monitor Y PB PR OMPONENT VIDEO DTV/CBL DVR...
... the same way you connect your video monitor to this unit using an HDMI or COMPONENT VIDEO connection, connect your video components to the instruction manual of the connected video monitor. Note Be sure to connect your video components in Video out Video monitor Y PB PR OMPONENT VIDEO DTV/CBL DVR...
Owners Manual
Page 26
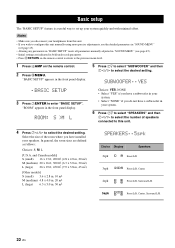
... 7l / h to select the desired setting. "ROOM" appears in your system quickly and with minimal effort. Select the size of speakers connected to this unit manually using more precise adjustments, use the detailed parameters in "SOUND MENU" (see page 45). • Altering any parameters in "BASIC SETUP" resets all parameters...
... 7l / h to select the desired setting. "ROOM" appears in your system quickly and with minimal effort. Select the size of speakers connected to this unit manually using more precise adjustments, use the detailed parameters in "SOUND MENU" (see page 45). • Altering any parameters in "BASIC SETUP" resets all parameters...
Owners Manual
Page 41
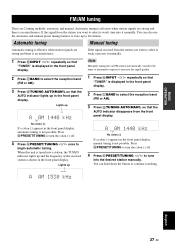
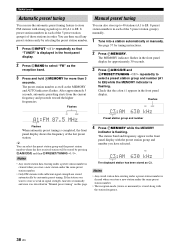
...an FM station automatically switches the tuner to monaural reception to select is no interference. Lights up in the front panel display. If the signal received from the station you want to increase the signal quality. 1 Press NINPUT l / h repeatedly so that "TUNER" is not possible. ...(:) off . 4 Press EPRESET/TUNING l / h once to store up and the frequency of the received station is displayed in the front panel display. You can also use the automatic and manual preset tuning features to begin automatic tuning. AUTO TUNED A AM 1530 kHz English 37 En Automatic tuning...
...an FM station automatically switches the tuner to monaural reception to select is no interference. Lights up in the front panel display. If the signal received from the station you want to increase the signal quality. 1 Press NINPUT l / h repeatedly so that "TUNER" is not possible. ...(:) off . 4 Press EPRESET/TUNING l / h once to store up and the frequency of the received station is displayed in the front panel display. You can also use the automatic and manual preset tuning features to begin automatic tuning. AUTO TUNED A AM 1530 kHz English 37 En Automatic tuning...
Owners Manual
Page 42
... can then recall any preset station easily by selecting the preset station number. 1 Press NINPUT l / h repeatedly so that the colon (:) appears in "Manual preset tuning" on this page. 4 Press FMEMORY while the MEMORY indicator is flashing. Check that "TUNER" is completed, the front panel display shows the ... See page 37 for more than 3 seconds. y You can select the preset station group and the preset station number where the first received station will be stored by automatic preset tuning. TUNED C3:AM 630 kHz The displayed station has been stored as the MEMORY and AUTO indicators...
... can then recall any preset station easily by selecting the preset station number. 1 Press NINPUT l / h repeatedly so that the colon (:) appears in "Manual preset tuning" on this page. 4 Press FMEMORY while the MEMORY indicator is flashing. Check that "TUNER" is completed, the front panel display shows the ... See page 37 for more than 3 seconds. y You can select the preset station group and the preset station number where the first received station will be stored by automatic preset tuning. TUNED C3:AM 630 kHz The displayed station has been stored as the MEMORY and AUTO indicators...
Owners Manual
Page 44
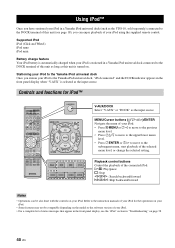
...the playback of the selected menu level, or change the selected setting. Stationing your iPod to the Yamaha iPod universal dock Once you can be compatible depending on the model or the software version of your... as the input source. Refer to the DOCK terminal of your iPod for iPod™ POWER POWER STANDBY POWER TV AV A B C MUTE CD MD/CD-R TUNER DVD DTV/CBL DVR TV CH V-AUX/DOCK D E AMP TV INPUT...is automatically charged when your iPod is stationed in a Yamaha iPod universal dock connected to the instruction manuals of this unit is selected as the input source.
...the playback of the selected menu level, or change the selected setting. Stationing your iPod to the Yamaha iPod universal dock Once you can be compatible depending on the model or the software version of your... as the input source. Refer to the DOCK terminal of your iPod for iPod™ POWER POWER STANDBY POWER TV AV A B C MUTE CD MD/CD-R TUNER DVD DTV/CBL DVR TV CH V-AUX/DOCK D E AMP TV INPUT...is automatically charged when your iPod is stationed in a Yamaha iPod universal dock connected to the instruction manuals of this unit is selected as the input source.
Owners Manual
Page 47
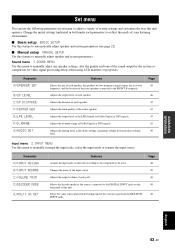
... of each speaker, the speakers for low-frequency signal output, the crossover frequency, and the location of the front speakers connected to manually adjust any speaker settings, alter the quality and tone of the sound output by the system or compensate for video signal processing delays when... ■ Basic setup BASIC SETUP Use this feature to automatically adjust speaker and system parameters (see page 22). ■ Manual setup MANUAL SETUP Use this menu to manually adjust speaker and system parameters. Set menu Set menu You can use the following parameters in set menu to be used. ...
... of each speaker, the speakers for low-frequency signal output, the crossover frequency, and the location of the front speakers connected to manually adjust any speaker settings, alter the quality and tone of the sound output by the system or compensate for video signal processing delays when... ■ Basic setup BASIC SETUP Use this feature to automatically adjust speaker and system parameters (see page 22). ■ Manual setup MANUAL SETUP Use this menu to manually adjust speaker and system parameters. Set menu Set menu You can use the following parameters in set menu to be used. ...
Owners Manual
Page 48
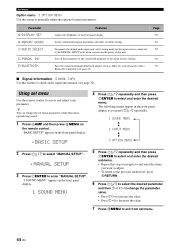
... the brightness of the sound field programs to access and adjust each parameter. Sets all the parameters of the front panel display. Pairs the connected Yamaha Bluetooth adapter (such as you want to adjust. • To return to the previous menu level, press 8 RETURN. 6 Press 7k /...to navigate to and enter the items you press 7k / n repeatedly. 1 SOUND MENU 2 INPUT MENU 3 OPTION MENU 2 Press 7 k / n to select "MANUAL SETUP". .MANUAL SETUP 3 Press 7ENTER to select and enter the desired menu. "1 SOUND MENU" appears in the front panel display. .BASIC SETUP 4 Press 7k / n repeatedly and...
... the brightness of the sound field programs to access and adjust each parameter. Sets all the parameters of the front panel display. Pairs the connected Yamaha Bluetooth adapter (such as you want to adjust. • To return to the previous menu level, press 8 RETURN. 6 Press 7k /...to navigate to and enter the items you press 7k / n repeatedly. 1 SOUND MENU 2 INPUT MENU 3 OPTION MENU 2 Press 7 k / n to select "MANUAL SETUP". .MANUAL SETUP 3 Press 7ENTER to select and enter the desired menu. "1 SOUND MENU" appears in the front panel display. .BASIC SETUP 4 Press 7k / n repeatedly and...
Owners Manual
Page 49
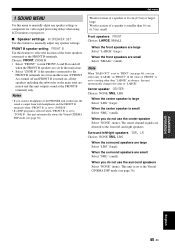
FRONT B speaker setting FRONT B Use this feature to manually adjust any speaker settings or compensate for video signal processing delays when using LCD monitors or projectors. ■ Speaker settings A)SPEAKER SET Use this feature ... you do not use the center speaker Select "NONE" (none). This unit is small Select "SML" (small). Set menu 1 SOUND MENU Use this menu to manually adjust any speaker settings. Surround left and right speakers. When you do not use the surround speakers Select "NONE" (none). LR Choices: NONE, SML, LRG...
FRONT B speaker setting FRONT B Use this feature to manually adjust any speaker settings or compensate for video signal processing delays when using LCD monitors or projectors. ■ Speaker settings A)SPEAKER SET Use this feature ... you do not use the center speaker Select "NONE" (none). This unit is small Select "SML" (small). Set menu 1 SOUND MENU Use this menu to manually adjust any speaker settings. Surround left and right speakers. When you do not use the surround speakers Select "NONE" (none). LR Choices: NONE, SML, LRG...
Owners Manual
Page 50
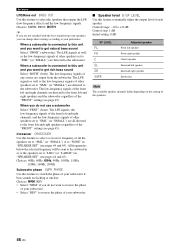
... well as the low-frequency signals of each speaker. Control range: -10 to switch the phase of your subwoofer if bass sounds are directed to manually adjust the output level of other speakers set to "SML" (or "SMALL") are directed to the front left and right speakers and the subwoofer regardless...
... well as the low-frequency signals of each speaker. Control range: -10 to switch the phase of your subwoofer if bass sounds are directed to manually adjust the output level of other speakers set to "SML" (or "SMALL") are directed to the front left and right speakers and the subwoofer regardless...
Owners Manual
Page 51
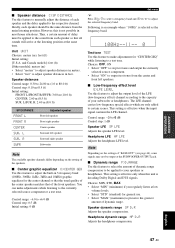
... the respective channel. This setting is effective only when this unit is selected as the frequency band. 100Hz--||-- 0 Test tone TEST Use this feature to manually adjust the distance of your speakers or headphones. Ideally, each speaker so that of the center speaker matches that all sounds will arrive at the...
... the respective channel. This setting is effective only when this unit is selected as the frequency band. 100Hz--||-- 0 Test tone TEST Use this feature to manually adjust the distance of your speakers or headphones. Ideally, each speaker so that of the center speaker matches that all sounds will arrive at the...
Owners Manual
Page 57
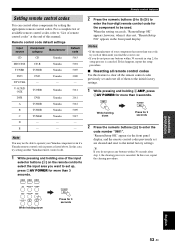
...the remote control to set up, press 2AV POWER for more than 3 seconds. In this manual. "RemoteSetup OK" appears in the front panel display. E - - - AMP POWER AV While holding down Press for the component to be able to the initial factory settings. 1 ... to enter the code number "9981". Remote control code default settings Input source Component category Manufacturer Default code CD CD Yamaha 5013 MD/CD-R CD-R Yamaha 5001 TUNER TUNER Yamaha 5007 DVD DVD Yamaha 2000 DTV/CBL - - - A B C 2 Press the numeric buttons (0 to 9) (N) to enter the...
...the remote control to set up, press 2AV POWER for more than 3 seconds. In this manual. "RemoteSetup OK" appears in the front panel display. E - - - AMP POWER AV While holding down Press for the component to be able to the initial factory settings. 1 ... to enter the code number "9981". Remote control code default settings Input source Component category Manufacturer Default code CD CD Yamaha 5013 MD/CD-R CD-R Yamaha 5001 TUNER TUNER Yamaha 5007 DVD DVD Yamaha 2000 DTV/CBL - - - A B C 2 Press the numeric buttons (0 to 9) (N) to enter the...

Owners Manual
Page 59
... this unit. The front speakers to turn this unit, disconnect the power cable, and contact the nearest authorized Yamaha dealer or service center. ■ General Problem Cause Remedy This unit fails to be defective. manual of the connected component. Turn up the volume. Press FMUTE or IVOLUME +/- If the problem you are...
... this unit. The front speakers to turn this unit, disconnect the power cable, and contact the nearest authorized Yamaha dealer or service center. ■ General Problem Cause Remedy This unit fails to be defective. manual of the connected component. Turn up the volume. Press FMUTE or IVOLUME +/- If the problem you are...
Owners Manual
Page 61
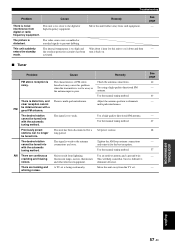
...tuned into with the automatic tuning method. Previously preset stations can no longer be obtained even with a good FM antenna. Use the manual tuning method. Use a high-quality directional FM antenna. The desired station cannot be tuned into . AM There are buzzing and whining ... and orient it back on. There are continuous crackling and hissing noises. This unit suddenly enters the standby mode. Use the manual tuning method. Noises result from such equipment. Troubleshooting Problem Cause Remedy There is weak or the antenna connections are loose. This unit...
...tuned into with the automatic tuning method. Previously preset stations can no longer be obtained even with a good FM antenna. Use the manual tuning method. Use a high-quality directional FM antenna. The desired station cannot be tuned into . AM There are buzzing and whining ... and orient it back on. There are continuous crackling and hissing noises. This unit suddenly enters the standby mode. Use the manual tuning method. Noises result from such equipment. Troubleshooting Problem Cause Remedy There is weak or the antenna connections are loose. This unit...


