
Owners Manual
Page 1
U HTR-6130 AV Receiver OWNER'S MANUAL
U HTR-6130 AV Receiver OWNER'S MANUAL
Owners Manual
Page 7
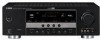
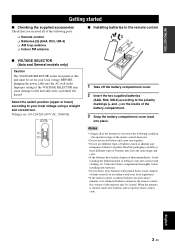
... rear panel of the VOLTAGE SELECTOR may have the same shape and color. • If the batteries have leaked, dispose of the batteries if you received all of them correctly in the remote control 13 ■ VOLTAGE SELECTOR (Asia and General models only) Caution The VOLTAGE SELECTOR on the inside of...
... rear panel of the VOLTAGE SELECTOR may have the same shape and color. • If the batteries have leaked, dispose of the batteries if you received all of them correctly in the remote control 13 ■ VOLTAGE SELECTOR (Asia and General models only) Caution The VOLTAGE SELECTOR on the inside of...
Owners Manual
Page 9
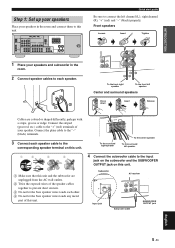
... a stripe, groove or ridge. INTRODUCTION Step 1: Set up your speakers Place your speakers and subwoofer in the room and connect them to this unit. Subwoofer AV receiver Input jack Subwoofer cable SUBWOOFER OUTPUT jack English 5 En Connect the plain cable to the "-" (black) terminals. 3 Connect each other. 4 Do not let the bare...
... a stripe, groove or ridge. INTRODUCTION Step 1: Set up your speakers Place your speakers and subwoofer in the room and connect them to this unit. Subwoofer AV receiver Input jack Subwoofer cable SUBWOOFER OUTPUT jack English 5 En Connect the plain cable to the "-" (black) terminals. 3 Connect each other. 4 Do not let the bare...
Owners Manual
Page 10
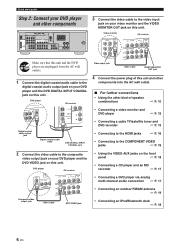
...; P. 16 2 Connect the video cable to the composite video output jack on your DVD player and the DVD VIDEO jack on this unit. DVD player AV receiver • Using the VIDEO AUX jacks on this unit. IN MD/ OUT (PLAY) CD-R (REC) OUTPUT SUB WOOFER R FRONT A L 3 Connect the video cable... to the video input jack on your video monitor and the VIDEO MONITOR OUT jack on this unit. Video monitor AV receiver Make sure that this unit and the DVD player are unplugged from the AC wall outlets. 1 Connect the digital coaxial audio cable to the digital...
...; P. 16 2 Connect the video cable to the composite video output jack on your DVD player and the DVD VIDEO jack on this unit. DVD player AV receiver • Using the VIDEO AUX jacks on this unit. IN MD/ OUT (PLAY) CD-R (REC) OUTPUT SUB WOOFER R FRONT A L 3 Connect the video cable... to the video input jack on your video monitor and the VIDEO MONITOR OUT jack on this unit. Video monitor AV receiver Make sure that this unit and the DVD player are unplugged from the AC wall outlets. 1 Connect the digital coaxial audio cable to the digital...
Owners Manual
Page 12
... to tune into the desired radio station. Quick start guide Notes *1 You must connect a cable TV or a satellite tuner to this unit in order to receive infrared signals from the standby mode, press ASTANDBY/ON (or DPOWER) on the front panel to set to the standby mode. y If you cannot find...
... to tune into the desired radio station. Quick start guide Notes *1 You must connect a cable TV or a satellite tuner to this unit in order to receive infrared signals from the standby mode, press ASTANDBY/ON (or DPOWER) on the front panel to set to the standby mode. y If you cannot find...

Owners Manual
Page 23
.... y When you turn on the models. Note In the standby mode, this unit. Consult the nearest authorized Yamaha dealer or service center about outdoor antennas. • The AM loop antenna should be a 4 to receive infrared signals from a window. AM loop antenna (supplied) Connections Assembling the supplied AM loop antenna Note The types...
.... y When you turn on the models. Note In the standby mode, this unit. Consult the nearest authorized Yamaha dealer or service center about outdoor antennas. • The AM loop antenna should be a 4 to receive infrared signals from a window. AM loop antenna (supplied) Connections Assembling the supplied AM loop antenna Note The types...
Owners Manual
Page 41
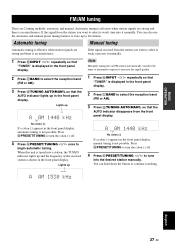
... when station signals are strong and there is not possible. If the signal from the station you want to begin automatic tuning. If the signal received from the station you want to select is displayed in the front panel display. 2 Press CBAND to select the reception band (FM or AM). 3 ... GTUNING AUTO/MAN'L so that "TUNER" is shown in the front panel display, manual tuning is no interference. Lights up and the frequency of the received station is displayed in the front panel display. 2 Press CBAND to select the reception band (FM or AM). 3 Press GTUNING AUTO/MAN'L so that "TUNER...
... when station signals are strong and there is not possible. If the signal from the station you want to begin automatic tuning. If the signal received from the station you want to select is displayed in the front panel display. 2 Press CBAND to select the reception band (FM or AM). 3 ... GTUNING AUTO/MAN'L so that "TUNER" is shown in the front panel display, manual tuning is no interference. Lights up and the frequency of the received station is displayed in the front panel display. 2 Press CBAND to select the reception band (FM or AM). 3 Press GTUNING AUTO/MAN'L so that "TUNER...
Owners Manual
Page 42
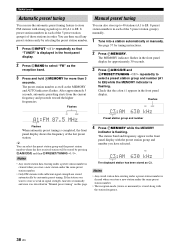
... toward the higher frequencies. If the station you have selected. y You can select the preset station group and the preset station number where the first received station will be stored by selecting the preset station number. 1 Press NINPUT l / h repeatedly so that the colon (:) appears in the front panel display. Flashes C3...
... toward the higher frequencies. If the station you have selected. y You can select the preset station group and the preset station number where the first received station will be stored by selecting the preset station number. 1 Press NINPUT l / h repeatedly so that the colon (:) appears in the front panel display. Flashes C3...


