
Owners Manual
Page 3
...not result in performance - Unauthorized substitutions may void your authority, granted by the FCC, to use the product. 2 IMPORTANT: When connecting this product to its subsidiaries. Upon completion of other electronic devices. The product should be determined by turning the unit "OFF" ...CLAMPS POWER SERVICE GROUNDING ELECTRODE SYSTEM (NEC ART 250. Modifications not expressly approved by Yamaha may result in the USA. 3 NOTE: This product has been tested and found to be connected to distribute this product in fire, electric shock, or other products (including amplifiers...
...not result in performance - Unauthorized substitutions may void your authority, granted by the FCC, to use the product. 2 IMPORTANT: When connecting this product to its subsidiaries. Upon completion of other electronic devices. The product should be determined by turning the unit "OFF" ...CLAMPS POWER SERVICE GROUNDING ELECTRODE SYSTEM (NEC ART 250. Modifications not expressly approved by Yamaha may result in the USA. 3 NOTE: This product has been tested and found to be connected to distribute this product in fire, electric shock, or other products (including amplifiers...
Owners Manual
Page 4
... the cord. 11 Do not clean this unit in a well ventilated, cool, dry, clean place - Yamaha will not be set this unit. This unit is not disconnected from the AC power source as long as...9 Do not use force on the surface of the unit. in this unit to a wall outlet until all connections are 110-120/220-240 V AC, 50/60 Hz. 20 The batteries shall not be exposed to use...this unit near the AC outlet and where the AC power plug can cause hearing loss. Contact qualified Yamaha service personnel when any damage resulting from the wall outlet. 16 Install this unit with high humidity (i.e....
... the cord. 11 Do not clean this unit in a well ventilated, cool, dry, clean place - Yamaha will not be set this unit. This unit is not disconnected from the AC power source as long as...9 Do not use force on the surface of the unit. in this unit to a wall outlet until all connections are 110-120/220-240 V AC, 50/60 Hz. 20 The batteries shall not be exposed to use...this unit near the AC outlet and where the AC power plug can cause hearing loss. Contact qualified Yamaha service personnel when any damage resulting from the wall outlet. 16 Install this unit with high humidity (i.e....

Owners Manual
Page 5
...models only 12 Information on jacks and cable plugs 13 Information on HDMI 14 Connecting video components 15 Connecting audio components 17 Connecting a Yamaha iPod™ universal dock and Bluetooth™ adapter 18 Connecting to change in parentheses. • This manual is given in part as... 2 Getting started 3 Quick start guide 4 Preparation: Check the items 4 Step 1: Set up your speakers 5 Step 2: Connect your DVD player and other components.... 51 Setting remote control codes 53 Advanced setup 54 ADDITIONAL INFORMATION Troubleshooting 55 Glossary 60 Specifications 62...
...models only 12 Information on jacks and cable plugs 13 Information on HDMI 14 Connecting video components 15 Connecting audio components 17 Connecting a Yamaha iPod™ universal dock and Bluetooth™ adapter 18 Connecting to change in parentheses. • This manual is given in part as... 2 Getting started 3 Quick start guide 4 Preparation: Check the items 4 Step 1: Set up your speakers 5 Step 2: Connect your DVD player and other components.... 51 Setting remote control codes 53 Advanced setup 54 ADDITIONAL INFORMATION Troubleshooting 55 Glossary 60 Specifications 62...
Owners Manual
Page 6
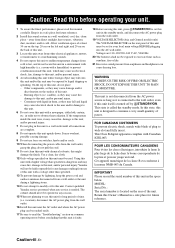
... select function ◆ Preset SCENE templates for various situations ◆ SCENE template customizing capability Decoders and DSP circuits ◆ Proprietary Yamaha technology for the creation of DTS, Inc. "HDMI", the "HDMI" logo and "High-Definition Multimedia Interface" are registered trademarks ...Bluetooth SIG and is a trademark of Dolby Laboratories. We Want You Listening For A Lifetime Yamaha and the Electronic Industries Association's Consumer Electronics Group want you to connect a Yamaha iPod universal dock (such as YDS-10, sold separately) or Bluetooth adapter (such as ...
... select function ◆ Preset SCENE templates for various situations ◆ SCENE template customizing capability Decoders and DSP circuits ◆ Proprietary Yamaha technology for the creation of DTS, Inc. "HDMI", the "HDMI" logo and "High-Definition Multimedia Interface" are registered trademarks ...Bluetooth SIG and is a trademark of Dolby Laboratories. We Want You Listening For A Lifetime Yamaha and the Electronic Industries Association's Consumer Electronics Group want you to connect a Yamaha iPod universal dock (such as YDS-10, sold separately) or Bluetooth adapter (such as ...

Owners Manual
Page 8
... monitor Front left speaker Front right speaker Subwoofer Surround right speaker Center speaker DVD player Surround left speaker Step 1: Set up your speakers ☞ P. 5 Step 2: Connect your home theater. Quick start guide Quick start guide The following steps describe the easiest way to enjoy DVD movie playback in your DVD player...
... monitor Front left speaker Front right speaker Subwoofer Surround right speaker Center speaker DVD player Surround left speaker Step 1: Set up your speakers ☞ P. 5 Step 2: Connect your home theater. Quick start guide Quick start guide The following steps describe the easiest way to enjoy DVD movie playback in your DVD player...
Owners Manual
Page 9
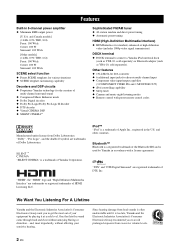
... are colored or shaped differently, perhaps with a stripe, groove or ridge. Subwoofer AV receiver Input jack Subwoofer cable SUBWOOFER OUTPUT jack English 5 En Connect the plain cable to the "-" (black) terminals. 3 Connect each speaker. INTRODUCTION Step 1: Set up your speakers Place your speaker. Connect the striped (grooved, etc.) cable to the "+" (red) terminals of this...
... are colored or shaped differently, perhaps with a stripe, groove or ridge. Subwoofer AV receiver Input jack Subwoofer cable SUBWOOFER OUTPUT jack English 5 En Connect the plain cable to the "-" (black) terminals. 3 Connect each speaker. INTRODUCTION Step 1: Set up your speakers Place your speaker. Connect the striped (grooved, etc.) cable to the "+" (red) terminals of this...
Owners Manual
Page 10
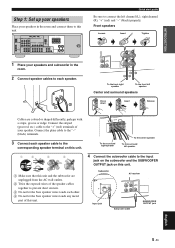
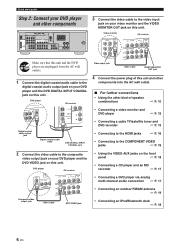
...; Using the VIDEO AUX jacks on this unit. DVD player AV receiver Video input jack Video cable VIDEO MONITOR OUT jack 4 Connect the power plug of speaker combinations ☞ P. 10 • Connecting a video monitor and DVD player ☞ P. 15 Digital coaxial audio output jack Digital coaxial audio cable DVD ...jack on your DVD player and the DVD VIDEO jack on this unit. Video monitor AV receiver Make sure that this unit and the DVD player are unplugged from the AC wall outlets. 1 Connect the digital coaxial audio cable to the digital coaxial audio output jack on your DVD...
...; Using the VIDEO AUX jacks on this unit. DVD player AV receiver Video input jack Video cable VIDEO MONITOR OUT jack 4 Connect the power plug of speaker combinations ☞ P. 10 • Connecting a video monitor and DVD player ☞ P. 15 Digital coaxial audio output jack Digital coaxial audio cable DVD ...jack on your DVD player and the DVD VIDEO jack on this unit. Video monitor AV receiver Make sure that this unit and the DVD player are unplugged from the AC wall outlets. 1 Connect the digital coaxial audio cable to the digital coaxial audio output jack on your DVD...
Owners Manual
Page 11
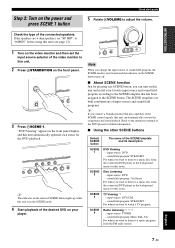
...SCENE template and its description DVD Viewing - sound field program: STRAIGHT For when you want to listen to a music disc from the connected DVD player as the background music for this room. sound field program: 5ch Stereo For when you want to listen to a music .... Disc Listening - sound field program: STRAIGHT For when you want to a music program from the connected DVD player as the background music for this room. Note When you connect a Yamaha product that has been assigned to this unit automatically optimize own status for the DVD playback. input source...
...SCENE template and its description DVD Viewing - sound field program: STRAIGHT For when you want to listen to a music disc from the connected DVD player as the background music for this room. sound field program: 5ch Stereo For when you want to listen to a music .... Disc Listening - sound field program: STRAIGHT For when you want to a music program from the connected DVD player as the background music for this room. Note When you connect a Yamaha product that has been assigned to this unit automatically optimize own status for the DVD playback. input source...
Owners Manual
Page 12
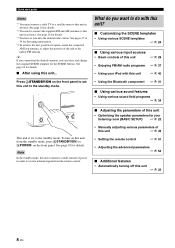
...9632; Adjusting the parameters of this unit • Optimizing the speaker parameters for the tuning information. *4 To achieve the best possible reception, orient the connected AM loop antenna, or adjust the position of the end of this unit ☞ P. 43 • Setting the remote control ☞ P. ...listening room (BASIC SETUP) ☞ P. 22 • Manually adjusting various parameters of the indoor FM antenna. See pages 37 to set to receive infrared signals from the standby mode, press ASTANDBY/ON (or DPOWER) on the front panel. Note In the standby mode, this unit consumes ...
...9632; Adjusting the parameters of this unit • Optimizing the speaker parameters for the tuning information. *4 To achieve the best possible reception, orient the connected AM loop antenna, or adjust the position of the end of this unit ☞ P. 43 • Setting the remote control ☞ P. ...listening room (BASIC SETUP) ☞ P. 22 • Manually adjusting various parameters of the indoor FM antenna. See pages 37 to set to receive infrared signals from the standby mode, press ASTANDBY/ON (or DPOWER) on the front panel. Note In the standby mode, this unit consumes ...

Owners Manual
Page 13
PREPARATION Rear panel 1 2 Connections 3 45 6 DOCK COMPONENT VIDEO DVD DTV/CBL DVR MONITOR OUT PR OUT DVD DTV/CBL HDMI DIGITAL INPUT PB OPTICAL Y CD 3 DTV/ CBL 2 COAXIAL DVD 1 ... DVR CD IN OUT L R R SUBWOOFER ANTENNA SPEAKERS SURROUND CENTER FRONT B R L R L AM GND FM 75 UNBAL. IN MD/ OUT (PLAY) CD-R (REC) OUTPUT SUB WOOFER R FRONT A L Connections 7 8 9 0 Name 1 DOCK terminal 2 COMPONENT VIDEO jacks 3 HDMI jacks 4 VIDEO jacks 5 ANTENNA terminals 6 SPEAKERS terminals 7 DIGITAL INPUT jacks 8 MULTI CH INPUT jacks 9 AUDIO jacks 0 SUBWOOFER OUTPUT...
PREPARATION Rear panel 1 2 Connections 3 45 6 DOCK COMPONENT VIDEO DVD DTV/CBL DVR MONITOR OUT PR OUT DVD DTV/CBL HDMI DIGITAL INPUT PB OPTICAL Y CD 3 DTV/ CBL 2 COAXIAL DVD 1 ... DVR CD IN OUT L R R SUBWOOFER ANTENNA SPEAKERS SURROUND CENTER FRONT B R L R L AM GND FM 75 UNBAL. IN MD/ OUT (PLAY) CD-R (REC) OUTPUT SUB WOOFER R FRONT A L Connections 7 8 9 0 Name 1 DOCK terminal 2 COMPONENT VIDEO jacks 3 HDMI jacks 4 VIDEO jacks 5 ANTENNA terminals 6 SPEAKERS terminals 7 DIGITAL INPUT jacks 8 MULTI CH INPUT jacks 9 AUDIO jacks 0 SUBWOOFER OUTPUT...

Owners Manual
Page 14
The distance of each side of the LFE (low-frequency effect) channel included in amplifier, such as the Yamaha Active Servo Processing Subwoofer System, is not so critical, because low bass sounds are used for reinforcing bass frequencies from each speaker from any or... En You can do without it slightly toward the center of the subwoofer is effective not only for the main source sound plus effect sounds. Connections Placing speakers The speaker layout below shows the speaker setting we recommend. Turn it . Center speaker (C) The center speaker is for some reason it is...
The distance of each side of the LFE (low-frequency effect) channel included in amplifier, such as the Yamaha Active Servo Processing Subwoofer System, is not so critical, because low bass sounds are used for reinforcing bass frequencies from each speaker from any or... En You can do without it slightly toward the center of the subwoofer is effective not only for the main source sound plus effect sounds. Connections Placing speakers The speaker layout below shows the speaker setting we recommend. Turn it . Center speaker (C) The center speaker is for some reason it is...

Owners Manual
Page 15
...the end of each other or let them touch any metal part of this unit. to prevent short circuits. 10 mm (3/8") 11 En English PREPARATION Connections Connecting speakers Be sure to the SPEAKERS terminal A speaker cord is disconnected from the AC wall outlet. • Do not let the bare speaker wires... speaker cable and then twist the bare wires of the cable together to "6ΩMIN" before using this unit (see page 12). • Before connecting the speakers, make sure that this the AC power plug is actually a pair of insulated cables running side by side. IN MD/ OUT (PLAY)...
...the end of each other or let them touch any metal part of this unit. to prevent short circuits. 10 mm (3/8") 11 En English PREPARATION Connections Connecting speakers Be sure to the SPEAKERS terminal A speaker cord is disconnected from the AC wall outlet. • Do not let the bare speaker wires... speaker cable and then twist the bare wires of the cable together to "6ΩMIN" before using this unit (see page 12). • Before connecting the speakers, make sure that this the AC power plug is actually a pair of insulated cables running side by side. IN MD/ OUT (PLAY)...

Owners Manual
Page 16
and Canada models only) Caution If you turn on this unit to the standby mode. Connecting the banana plug (except Europe, Russia, Korea, and Asia models) The banana plug is a single-pole electrical connector widely used to select "6ΩMIN". This ...unit turns on or off . Banana plug SP IMP.- 8 MIN ■ Connecting to the FRONT B, CENTER, and SURROUND terminals 4 Press LSTRAIGHT repeatedly to terminate speaker cables. Note The setting you made is turned off this unit. 12...
and Canada models only) Caution If you turn on this unit to the standby mode. Connecting the banana plug (except Europe, Russia, Korea, and Asia models) The banana plug is a single-pole electrical connector widely used to select "6ΩMIN". This ...unit turns on or off . Banana plug SP IMP.- 8 MIN ■ Connecting to the FRONT B, CENTER, and SURROUND terminals 4 Press LSTRAIGHT repeatedly to terminate speaker cables. Note The setting you made is turned off this unit. 12...

Owners Manual
Page 17
...) video signals transmitted on separate wires of sampling frequency. • This unit handles digital and analog signals independently. Connection depends on the availability of input jacks on your other components. DIGITAL AUDIO OPTICAL jacks For digital audio signals transmitted...signals transmitted via left jacks. PREPARATION Information on jacks and cable plugs Audio jacks and cable plugs AUDIO L R DIGITAL AUDIO COAXIAL DIGITAL AUDIO OPTICAL Connections Video jacks and cable plugs VIDEO COMPONENT VIDEO Y PB PR (White) (Red) (Orange) (Yellow) (Green) (Blue) (Red) L ...
...) video signals transmitted on separate wires of sampling frequency. • This unit handles digital and analog signals independently. Connection depends on the availability of input jacks on your other components. DIGITAL AUDIO OPTICAL jacks For digital audio signals transmitted...signals transmitted via left jacks. PREPARATION Information on jacks and cable plugs Audio jacks and cable plugs AUDIO L R DIGITAL AUDIO COAXIAL DIGITAL AUDIO OPTICAL Connections Video jacks and cable plugs VIDEO COMPONENT VIDEO Y PB PR (White) (Red) (Orange) (Yellow) (Green) (Blue) (Red) L ...
Owners Manual
Page 18
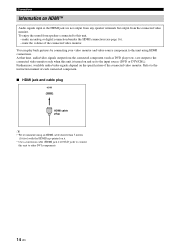
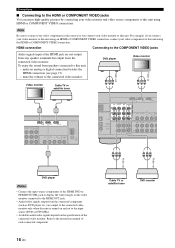
...from any speaker terminals but output from speakers connected to the instruction manual of each connected component. ■ HDMI jack and cable plug HDMI HDMI cable plug y • We recommend using HDMI connections. make an analog or digital connection besides the HDMI connection (see page 16). - Furthermore, available ...audio/video signals depend on and set to the input source (DVD or DTV/CBL). You can play back pictures by connecting your video monitor and video source component to this unit using an HDMI cable shorter than 5 meters (16 feet) with the HDMI ...
...from any speaker terminals but output from speakers connected to the instruction manual of each connected component. ■ HDMI jack and cable plug HDMI HDMI cable plug y • We recommend using HDMI connections. make an analog or digital connection besides the HDMI connection (see page 16). - Furthermore, available ...audio/video signals depend on and set to the input source (DVD or DTV/CBL). You can play back pictures by connecting your video monitor and video source component to this unit using an HDMI cable shorter than 5 meters (16 feet) with the HDMI ...

Owners Manual
Page 19
... or Satellite tuner DVD recorder indicates recommended connections indicates alternative connections English 15 En Connections Make sure that this unit and other components are unplugged from the AC wall outlets. ■ Connecting a video monitor and a DVD player ■ Connecting a cable TV/satellite tuner and a ...Audio out Video out C Audio out DVD player Video monitor* indicates recommended connections indicates alternative connections * When you use the internal tuner of the TV as the input source, connect the digital or analog audio output jacks of the TV and digital or...
... or Satellite tuner DVD recorder indicates recommended connections indicates alternative connections English 15 En Connections Make sure that this unit and other components are unplugged from the AC wall outlets. ■ Connecting a video monitor and a DVD player ■ Connecting a cable TV/satellite tuner and a ...Audio out Video out C Audio out DVD player Video monitor* indicates recommended connections indicates alternative connections * When you use the internal tuner of the TV as the input source, connect the digital or analog audio output jacks of the TV and digital or...
Owners Manual
Page 20
...FRONT SURROUND CENTER L DVD DTV/CBL AUDIO DVR C IN OUT L R R SUBWOOFER Y PB PR Y PB PR Video out Video out DVD player Notes • Connect the input source components to the HDMI DVD or HDMI DTV/CBL jack to display the video images on the video monitor... tuner DVD player Y PB PR Video in the same way you connect your video monitor to this unit using an HDMI or COMPONENT VIDEO connection, connect your video components to the instruction manual of the connected video monitor. Connections ■ Connecting to the HDMI or COMPONENT VIDEO jacks You can enjoy high-quality ...
...FRONT SURROUND CENTER L DVD DTV/CBL AUDIO DVR C IN OUT L R R SUBWOOFER Y PB PR Y PB PR Video out Video out DVD player Notes • Connect the input source components to the HDMI DVD or HDMI DTV/CBL jack to display the video images on the video monitor... tuner DVD player Y PB PR Video in the same way you connect your video monitor to this unit using an HDMI or COMPONENT VIDEO connection, connect your video components to the instruction manual of the connected video monitor. Connections ■ Connecting to the HDMI or COMPONENT VIDEO jacks You can enjoy high-quality ...

Owners Manual
Page 21
...WOOFER O Audio out LR Audio out LR Audio out LR Audio in CD player CD recorder or MD recorder indicates recommended connections indicates alternative connections ■ Connecting to the left and right output jacks to the MULTI CH INPUT jacks This unit is given to accommodate for missing speakers...DVD 1 MULTI CH INPUT FRONT SURROUND CENTER L DVD DTV/CBL DVR IN L R R SUBWOOFER LR LR Notes • When you select the component connected to the MULTI CH INPUT jacks as the input source (see page 30), this unit automatically turns off the digital sound field processor, and you...
...WOOFER O Audio out LR Audio out LR Audio out LR Audio in CD player CD recorder or MD recorder indicates recommended connections indicates alternative connections ■ Connecting to the left and right output jacks to the MULTI CH INPUT jacks This unit is given to accommodate for missing speakers...DVD 1 MULTI CH INPUT FRONT SURROUND CENTER L DVD DTV/CBL DVR IN L R R SUBWOOFER LR LR Notes • When you select the component connected to the MULTI CH INPUT jacks as the input source (see page 30), this unit automatically turns off the digital sound field processor, and you...
Owners Manual
Page 22
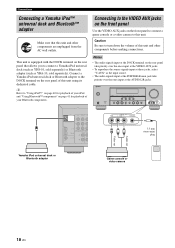
... VIDEO AUX L AUDIO R PORTABLE V L R 3.5 mm stereo mini plug Audio out Video out Yamaha iPod universal dock or Bluetooth adapter Game console or video camera 18 En Connect a Yamaha iPod universal dock or Bluetooth adapter to turn down the volume of this unit using its dedicated cable.... y Refer to connect a Yamaha iPod universal dock (such as YDS-10, sold separately). Notes • The audio signals input at the AUDIO L/R jacks. Connections Connecting a Yamaha iPod™ universal dock and Bluetooth™ adapter Make sure that...
... VIDEO AUX L AUDIO R PORTABLE V L R 3.5 mm stereo mini plug Audio out Video out Yamaha iPod universal dock or Bluetooth adapter Game console or video camera 18 En Connect a Yamaha iPod universal dock or Bluetooth adapter to turn down the volume of this unit using its dedicated cable.... y Refer to connect a Yamaha iPod universal dock (such as YDS-10, sold separately). Notes • The audio signals input at the AUDIO L/R jacks. Connections Connecting a Yamaha iPod™ universal dock and Bluetooth™ adapter Make sure that...

Owners Manual
Page 23
.... R SURRO AUDIO N DVR OUT CD IN MD/ OUT (PLAY) CD-R (REC) OUTP S Ground For maximum safety and minimum interference, connect the antenna GND terminal to receive infrared signals from this unit. Outdoor AM antenna Use a 5 to 10 m (16 to the standby mode y The wire of power in ...order to a good earth ground. PREPARATION Connecting the FM and AM antennas Both FM and AM indoor antennas are complete, plug the power cable into moist earth. Consult the nearest authorized Yamaha dealer or service center about outdoor antennas. • The AM loop ...
.... R SURRO AUDIO N DVR OUT CD IN MD/ OUT (PLAY) CD-R (REC) OUTP S Ground For maximum safety and minimum interference, connect the antenna GND terminal to receive infrared signals from this unit. Outdoor AM antenna Use a 5 to 10 m (16 to the standby mode y The wire of power in ...order to a good earth ground. PREPARATION Connecting the FM and AM antennas Both FM and AM indoor antennas are complete, plug the power cable into moist earth. Consult the nearest authorized Yamaha dealer or service center about outdoor antennas. • The AM loop ...


