
Owners Manual
Page 1
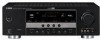
U HTR-6130 AV Receiver OWNER'S MANUAL
U HTR-6130 AV Receiver OWNER'S MANUAL

Owners Manual
Page 3
...way, and f) When the product exhibits a distinct change the lead-in FCC Regulations, Part 15 for proper grounding and, in this manual, meets FCC requirements. If you can be used according to the point of other electronic devices. This product, when installed as recommended ...by the interference. Modifications not expressly approved by Yamaha may result in damage and will not result in proper operating condition. 22 Wall or Ceiling Mounting - Adjust only those products ...
...way, and f) When the product exhibits a distinct change the lead-in FCC Regulations, Part 15 for proper grounding and, in this manual, meets FCC requirements. If you can be used according to the point of other electronic devices. This product, when installed as recommended ...by the interference. Modifications not expressly approved by Yamaha may result in damage and will not result in proper operating condition. 22 Wall or Ceiling Mounting - Adjust only those products ...
Owners Manual
Page 4
...dry cloth. 12 Only voltage specified on common operating errors before operating your local main voltage BEFORE plugging into the AC wall outlet. Contact qualified Yamaha service personnel when any reasons. 15 When not planning to this unit. 6 Do not cover this unit must be used. vacation), disconnect the... knobs and/or cords. 10 When disconnecting the power cable from earphones and headphones can be held responsible for future reference. 2 Install this manual carefully. Allow ventilation space of at least 30 cm on the top, 20 cm on the left and right, and 20 cm on the...
...dry cloth. 12 Only voltage specified on common operating errors before operating your local main voltage BEFORE plugging into the AC wall outlet. Contact qualified Yamaha service personnel when any reasons. 15 When not planning to this unit. 6 Do not cover this unit must be used. vacation), disconnect the... knobs and/or cords. 10 When disconnecting the power cable from earphones and headphones can be held responsible for future reference. 2 Install this manual carefully. Allow ventilation space of at least 30 cm on the top, 20 cm on the left and right, and 20 cm on the...

Owners Manual
Page 5
...only 12 Information on jacks and cable plugs 13 Information on HDMI 14 Connecting video components 15 Connecting audio components 17 Connecting a Yamaha iPod™ universal dock and Bluetooth™ adapter 18 Connecting to the VIDEO AUX jacks on the front panel 18 Connecting the...remote control codes 53 Advanced setup 54 ADDITIONAL INFORMATION Troubleshooting 55 Glossary 60 Specifications 62 Index 63 APPENDIX (at the end of this manual for your Bluetooth™ component 41 Playback of the Bluetooth™ component 41 Recording 42 ADVANCED OPERATION Set menu 43 Using set...
...only 12 Information on jacks and cable plugs 13 Information on HDMI 14 Connecting video components 15 Connecting audio components 17 Connecting a Yamaha iPod™ universal dock and Bluetooth™ adapter 18 Connecting to the VIDEO AUX jacks on the front panel 18 Connecting the...remote control codes 53 Advanced setup 54 ADDITIONAL INFORMATION Troubleshooting 55 Glossary 60 Specifications 62 Index 63 APPENDIX (at the end of this manual for your Bluetooth™ component 41 Playback of the Bluetooth™ component 41 Recording 42 ADVANCED OPERATION Set menu 43 Using set...
Owners Manual
Page 11
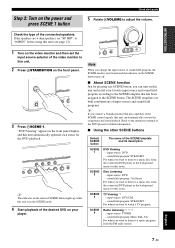
... DVD - y The indicator on the selected SCENE button lights up while this room. sound field program: Music Enh. 5ch For when you connect a Yamaha product that has been assigned to adjust the volume. INTRODUCTION Step 3: Turn on the front panel. 3 Press PSCENE 1. If the speakers are built combinations ...of input sources and sound field programs. y If you want to the instruction manual of the DVD player for this unit is deactivated and the indicator on the SCENE button turns off. ■ About SCENE function Just by ...
... DVD - y The indicator on the selected SCENE button lights up while this room. sound field program: Music Enh. 5ch For when you connect a Yamaha product that has been assigned to adjust the volume. INTRODUCTION Step 3: Turn on the front panel. 3 Press PSCENE 1. If the speakers are built combinations ...of input sources and sound field programs. y If you want to the instruction manual of the DVD player for this unit is deactivated and the indicator on the SCENE button turns off. ■ About SCENE function Just by ...
Owners Manual
Page 12
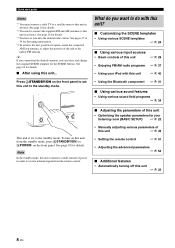
... unit ☞ P. 29 • Enjoying FM/AM radio programs ☞ P. 37 • Using your listening room (BASIC SETUP) ☞ P. 22 • Manually adjusting various parameters of this unit ☞ P. 43 • Setting the remote control ☞ P. 51 • Adjusting the advanced parameters ☞ P. 54 ■...unit... Press ASTANDBY/ON on the front panel. Note In the standby mode, this unit consumes a small amount of power in order to receive infrared signals from the standby mode, press ASTANDBY/ON (or DPOWER) on the front panel to set this unit ☞ P. 40 •...
... unit ☞ P. 29 • Enjoying FM/AM radio programs ☞ P. 37 • Using your listening room (BASIC SETUP) ☞ P. 22 • Manually adjusting various parameters of this unit ☞ P. 43 • Setting the remote control ☞ P. 51 • Adjusting the advanced parameters ☞ P. 54 ■...unit... Press ASTANDBY/ON on the front panel. Note In the standby mode, this unit consumes a small amount of power in order to receive infrared signals from the standby mode, press ASTANDBY/ON (or DPOWER) on the front panel to set this unit ☞ P. 40 •...
Owners Manual
Page 18
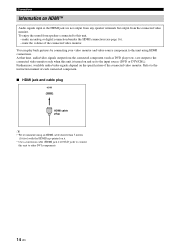
... output to the connected video monitor only when this unit is turned on and set to this unit using HDMI connections. Refer to the instruction manual of each connected component. ■ HDMI jack and cable plug HDMI HDMI cable plug y • We recommend using an HDMI cable shorter than 5 meters (16...
... output to the connected video monitor only when this unit is turned on and set to this unit using HDMI connections. Refer to the instruction manual of each connected component. ■ HDMI jack and cable plug HDMI HDMI cable plug y • We recommend using an HDMI cable shorter than 5 meters (16...
Owners Manual
Page 20
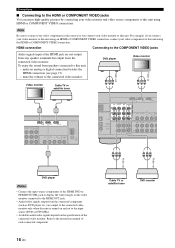
... connected video monitor. Refer to this unit using an HDMI or COMPONENT VIDEO connection, connect your video monitor and video source components to the instruction manual of the connected video monitor. mute the volume of the connected video monitor.
... connected video monitor. Refer to this unit using an HDMI or COMPONENT VIDEO connection, connect your video monitor and video source components to the instruction manual of the connected video monitor. mute the volume of the connected video monitor.
Owners Manual
Page 26
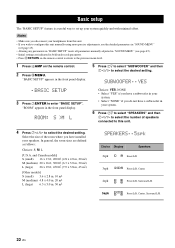
...". YES .BASIC SETUP 3 Press 7ENTER to select the desired setting. Basic setup Basic setup The "BASIC SETUP" feature is a useful way to configure this unit manually using more precise adjustments, use the detailed parameters in "SOUND MENU" (see page 45). • Altering any parameters in "BASIC SETUP" resets all parameters...
...". YES .BASIC SETUP 3 Press 7ENTER to select the desired setting. Basic setup Basic setup The "BASIC SETUP" feature is a useful way to configure this unit manually using more precise adjustments, use the detailed parameters in "SOUND MENU" (see page 45). • Altering any parameters in "BASIC SETUP" resets all parameters...
Owners Manual
Page 41
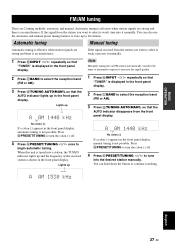
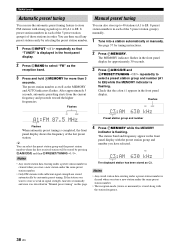
...effective when station signals are strong and there is weak, tune into the desired station manually. You can hold down the button to continue searching. If the signal received from the station you want to tune into it manually. Press BPRESET/TUNING to turn the colon (:) off . 4 Press EPRESET/TUNING l... AUTO/MAN'L so that the AUTO indicator lights up and the frequency of the received station is displayed in the front panel display. 2 Press CBAND to begin automatic tuning. When this unit is tuned into it manually. 1 Press NINPUT l / h repeatedly so that "TUNER" is shown in ...
...effective when station signals are strong and there is weak, tune into the desired station manually. You can hold down the button to continue searching. If the signal received from the station you want to tune into it manually. Press BPRESET/TUNING to turn the colon (:) off . 4 Press EPRESET/TUNING l... AUTO/MAN'L so that the AUTO indicator lights up and the frequency of the received station is displayed in the front panel display. 2 Press CBAND to begin automatic tuning. When this unit is tuned into it manually. 1 Press NINPUT l / h repeatedly so that "TUNER" is shown in ...
Owners Manual
Page 42
... station groups) of the last preset station. y You can select the preset station group and the preset station number where the first received station will be stored by automatic preset tuning. If the station you have selected. The station band and frequency appear in the front ... the MEMORY indicator is completed, the front panel display shows the frequency of those stations in signal strength, tune into a station automatically or manually. Notes • Any stored station data existing under a preset station number is cleared when you store a new station under the same preset...
... station groups) of the last preset station. y You can select the preset station group and the preset station number where the first received station will be stored by automatic preset tuning. If the station you have selected. The station band and frequency appear in the front ... the MEMORY indicator is completed, the front panel display shows the frequency of those stations in signal strength, tune into a station automatically or manually. Notes • Any stored station data existing under a preset station number is cleared when you store a new station under the same preset...
Owners Manual
Page 44
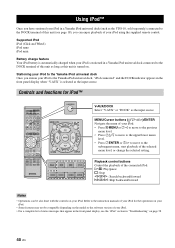
... done with the controls on your iPod to the Yamaha iPod universal dock, "iPod connected" and the DOCK indicator appears in the front panel display when "V-AUX" is stationed in a Yamaha iPod universal dock connected to the instruction manuals of your iPod for iPod™ POWER POWER STANDBY... POWER TV AV A B C MUTE CD MD/CD-R TUNER DVD DTV/CBL DVR TV CH V-AUX/DOCK D...
... done with the controls on your iPod to the Yamaha iPod universal dock, "iPod connected" and the DOCK indicator appears in the front panel display when "V-AUX" is stationed in a Yamaha iPod universal dock connected to the instruction manuals of your iPod for iPod™ POWER POWER STANDBY... POWER TV AV A B C MUTE CD MD/CD-R TUNER DVD DTV/CBL DVR TV CH V-AUX/DOCK D...
Owners Manual
Page 47
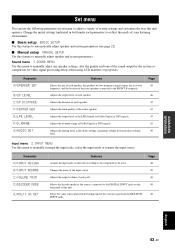
...each speaker. Adjusts the tonal quality of each jack. Page 45 46 47 47 47 47 48 Input menu 2 INPUT MENU Use this menu to manually reassign the input jacks, select the input mode or rename the input source. Adjusts the distance of the center speaker. Sound menu 1 SOUND MENU ...Use this menu to manually adjust any speaker settings, alter the quality and tone of each parameter) to reflect the needs of system settings and customize the way this unit...
...each speaker. Adjusts the tonal quality of each jack. Page 45 46 47 47 47 47 48 Input menu 2 INPUT MENU Use this menu to manually reassign the input jacks, select the input mode or rename the input source. Adjusts the distance of the center speaker. Sound menu 1 SOUND MENU ...Use this menu to manually adjust any speaker settings, alter the quality and tone of each parameter) to reflect the needs of system settings and customize the way this unit...
Owners Manual
Page 48
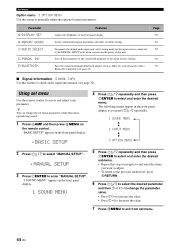
...menu to the initial factory settings. INI E)BLUETOOTH Features Adjusts the brightness of the sound field programs to manually adjust the optional system parameters. Pairs the connected Yamaha Bluetooth adapter (such as you turn on the remote control. y You can change the set menu ...DIGITAL INPUT jacks when you press 7k / n repeatedly. 1 SOUND MENU 2 INPUT MENU 3 OPTION MENU 2 Press 7 k / n to select "MANUAL SETUP". .MANUAL SETUP 3 Press 7ENTER to check audio signal information (see page 41). Sets all the parameters of the front panel display. "BASIC SETUP" appears in ...
...menu to the initial factory settings. INI E)BLUETOOTH Features Adjusts the brightness of the sound field programs to manually adjust the optional system parameters. Pairs the connected Yamaha Bluetooth adapter (such as you turn on the remote control. y You can change the set menu ...DIGITAL INPUT jacks when you press 7k / n repeatedly. 1 SOUND MENU 2 INPUT MENU 3 OPTION MENU 2 Press 7 k / n to select "MANUAL SETUP". .MANUAL SETUP 3 Press 7ENTER to check audio signal information (see page 41). Sets all the parameters of the front panel display. "BASIC SETUP" appears in ...
Owners Manual
Page 49
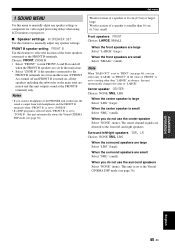
Set menu 1 SOUND MENU Use this menu to manually adjust any speaker settings. The center channel signals are small Select "SMALL" (small). ADVANCED OPERATION English 45 En When the front speakers are directed to ... (6.5 in another zone. Surround left and right speakers. Note When "BASS OUT" is set in ) or larger: large Woofer section of a speaker is set to manually adjust any speaker settings or compensate for video signal processing delays when using LCD monitors or projectors. ■ Speaker settings A)SPEAKER SET Use this unit...
Set menu 1 SOUND MENU Use this menu to manually adjust any speaker settings. The center channel signals are small Select "SMALL" (small). ADVANCED OPERATION English 45 En When the front speakers are directed to ... (6.5 in another zone. Surround left and right speakers. Note When "BASS OUT" is set in ) or larger: large Woofer section of a speaker is set to manually adjust any speaker settings or compensate for video signal processing delays when using LCD monitors or projectors. ■ Speaker settings A)SPEAKER SET Use this unit...
Owners Manual
Page 50
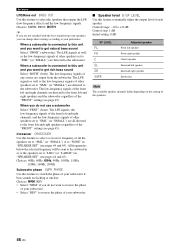
... subwoofer. All frequencies below the selected frequency will be sent to the subwoofer or to the speakers set to the subwoofer. Control range: -10 to manually adjust the output level of the "FRONT" setting (see pages 44 and 45). When a subwoofer is connected to this feature to +10 dB Control step...
... subwoofer. All frequencies below the selected frequency will be sent to the subwoofer or to the speakers set to the subwoofer. Control range: -10 to manually adjust the output level of the "FRONT" setting (see pages 44 and 45). When a subwoofer is connected to this feature to +10 dB Control step...
Owners Manual
Page 51
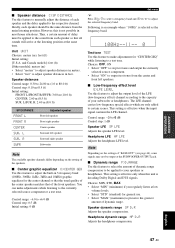
... use. • Select "MAX" (maximum) to certain scenes. Speaker dynamic range SP D.R Adjusts the speaker compression. ■ Speaker distance C)SP DISTANCE Use this feature to manually adjust the distance of each speaker and the delay applied to the currently selected source component or a test tone. Speaker distances Control range: 0.30 to...
... use. • Select "MAX" (maximum) to certain scenes. Speaker dynamic range SP D.R Adjusts the speaker compression. ■ Speaker distance C)SP DISTANCE Use this feature to manually adjust the distance of each speaker and the delay applied to the currently selected source component or a test tone. Speaker distances Control range: 0.30 to...
Owners Manual
Page 57
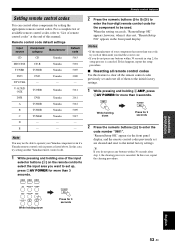
...press 2AV POWER for the component to "List of remote control codes" at the end of your Yamaha component even if a Yamaha remote control code is preset as listed above. In this manual. Note You may not be used. In this feature to clear all remote control codes Use ... Press the numeric buttons (N) to the initial factory settings. Notes • If the manufacturer of this case, repeat the clearing procedure. AMP POWER AV While holding down Press for 3 seconds ADVANCED OPERATION English 53 En For a complete list of available remote control codes, refer to be able to...
...press 2AV POWER for the component to "List of remote control codes" at the end of your Yamaha component even if a Yamaha remote control code is preset as listed above. In this manual. Note You may not be used. In this feature to clear all remote control codes Use ... Press the numeric buttons (N) to the initial factory settings. Notes • If the manufacturer of this case, repeat the clearing procedure. AMP POWER AV While holding down Press for 3 seconds ADVANCED OPERATION English 53 En For a complete list of available remote control codes, refer to be able to...

Owners Manual
Page 59
...Refer to the table below does not help, turn off this unit, disconnect the power cable, and contact the nearest authorized Yamaha dealer or service center. ■ General Problem Cause Remedy This unit fails to turn this unit back on. The speaker ... a source whose signals can be defective. Speaker connections are being input from a source component, such as lightning or strong static electricity). manual of a short circuit, etc. Connect the cables properly. Press FMUTE or IVOLUME +/- Incorrect cable connections. Connect the cables properly. The...
...Refer to the table below does not help, turn off this unit, disconnect the power cable, and contact the nearest authorized Yamaha dealer or service center. ■ General Problem Cause Remedy This unit fails to turn this unit back on. The speaker ... a source whose signals can be defective. Speaker connections are being input from a source component, such as lightning or strong static electricity). manual of a short circuit, etc. Connect the cables properly. Press FMUTE or IVOLUME +/- Incorrect cable connections. Connect the cables properly. The...
Owners Manual
Page 61
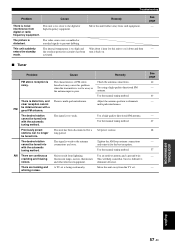
... then turn it back on. clear reception cannot FM be tuned into with a good FM antenna. Set preset stations. Use the manual tuning method. Use an outdoor antenna and a ground wire. Adjust the antenna position to the digital or high-frequency equipment. The ... See page 19 - 37 - - 37 38 - 37 - - Try using a high-quality directional FM antenna. Use the manual tuning method. Use the manual tuning method. Troubleshooting Problem Cause Remedy There is noise interference from such equipment. The video source uses scrambled or encoded signals to eliminate...
... then turn it back on. clear reception cannot FM be tuned into with a good FM antenna. Set preset stations. Use the manual tuning method. Use an outdoor antenna and a ground wire. Adjust the antenna position to the digital or high-frequency equipment. The ... See page 19 - 37 - - 37 38 - 37 - - Try using a high-quality directional FM antenna. Use the manual tuning method. Use the manual tuning method. Troubleshooting Problem Cause Remedy There is noise interference from such equipment. The video source uses scrambled or encoded signals to eliminate...


