
English Manual
Page 1
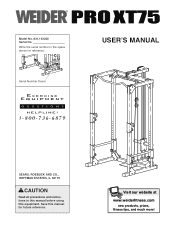
Save this equipment. Visit our website at www.weiderfitness.com new products, prizes, fitness tips, and much more! Model No. 831.153220 Serial No. Serial Number Decal USER'S MANUAL SEARS, ROEBUCK AND CO., HOFFMAN ESTATES, IL 60179 CAUTION Read all precautions and instructions in the space above for future reference. Write the serial number in this manual before using this manual for reference.
Save this equipment. Visit our website at www.weiderfitness.com new products, prizes, fitness tips, and much more! Model No. 831.153220 Serial No. Serial Number Decal USER'S MANUAL SEARS, ROEBUCK AND CO., HOFFMAN ESTATES, IL 60179 CAUTION Read all precautions and instructions in the space above for future reference. Write the serial number in this manual before using this manual for reference.
English Manual
Page 2
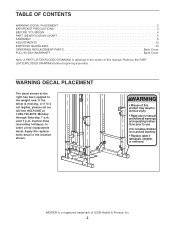
... CONTENTS WARNING DECAL PLACEMENT 2 IMPORTANT PRECAUTIONS 3 BEFORE YOU BEGIN 4 PART IDENTIFICATION CHART 5 ASSEMBLY 6 ADJUSTMENTS 12 EXERCISE GUIDELINES 14 ORDERING REPLACEMENT PARTS Back Cover FULL 90-DAY WARRANTY Back Cover Note: A PART LIST/EXPLODED DRAWING is attached in the center of this manual. If the decal is missing, or if it is a registered trademark of ICON Health & Fitness, Inc. 2 WARNING DECAL PLACEMENT The decal shown at 1-800-736...
... CONTENTS WARNING DECAL PLACEMENT 2 IMPORTANT PRECAUTIONS 3 BEFORE YOU BEGIN 4 PART IDENTIFICATION CHART 5 ASSEMBLY 6 ADJUSTMENTS 12 EXERCISE GUIDELINES 14 ORDERING REPLACEMENT PARTS Back Cover FULL 90-DAY WARRANTY Back Cover Note: A PART LIST/EXPLODED DRAWING is attached in the center of this manual. If the decal is missing, or if it is a registered trademark of ICON Health & Fitness, Inc. 2 WARNING DECAL PLACEMENT The decal shown at 1-800-736...
English Manual
Page 3
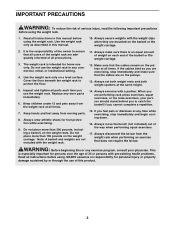
... set both weight rests and both weight spotters at any exercise program, consult your partner should stand behind you to protect the floor. 12. Do not place more than 150 pounds on the weight rests. WARNING: Before beginning this manual before using the weight rack. This is the responsibility of the owner to ensure that the cables are adequately informed of all instructions...
... set both weight rests and both weight spotters at any exercise program, consult your partner should stand behind you to protect the floor. 12. Do not place more than 150 pounds on the weight rests. WARNING: Before beginning this manual before using the weight rack. This is the responsibility of the owner to ensure that the cables are adequately informed of all instructions...
English Manual
Page 4
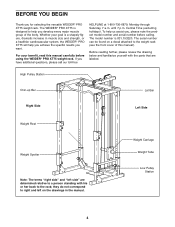
... or her back to help you want. The WEIDER® PRO XT75 is designed to the rack; High Pulley Station Chin-up Bar Right Side Lat Bar Left Side Weight Rest Weight Spotter Note: The terms "right side" and "left on a decal attached to the weight rack (see the front cover of the body. until 7 p.m. The model number is a shapely figure, dramatic increase in the...
... or her back to help you want. The WEIDER® PRO XT75 is designed to the rack; High Pulley Station Chin-up Bar Right Side Lat Bar Left Side Weight Rest Weight Spotter Note: The terms "right side" and "left on a decal attached to the weight rack (see the front cover of the body. until 7 p.m. The model number is a shapely figure, dramatic increase in the...

English Manual
Page 5
... x 75mm Bolt (36) M10 x 78mm Bolt (33) 5 If a part is the key number of the part, from the PART LIST in assembly. The number in parentheses by each drawing is not in the parts bag, check to identify small parts used in the center of this manual. PART IDENTIFICATION CHART Refer to the drawings below to see if it has been pre-attached. Note: Some small parts may...
... x 75mm Bolt (36) M10 x 78mm Bolt (33) 5 If a part is the key number of the part, from the PART LIST in assembly. The number in parentheses by each drawing is not in the parts bag, check to identify small parts used in the center of this manual. PART IDENTIFICATION CHART Refer to the drawings below to see if it has been pre-attached. Note: Some small parts may...
English Manual
Page 6
..., or a set of time, assembly will take time. Attach the Right and Left Bases (1, 3) to realize that the versatile weight rack has many parts and that the weight rack can be assembled successfully by setting aside plenty of ratchet wrenches. 1. However, it is completed. • Tighten all parts in the drawings. • For help identifying small parts, use the PART IDENTIFICATION CHART on page...
..., or a set of time, assembly will take time. Attach the Right and Left Bases (1, 3) to realize that the versatile weight rack has many parts and that the weight rack can be assembled successfully by setting aside plenty of ratchet wrenches. 1. However, it is completed. • Tighten all parts in the drawings. • For help identifying small parts, use the PART IDENTIFICATION CHART on page...
English Manual
Page 7
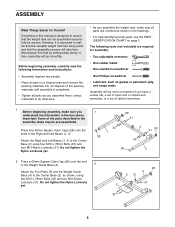
... Square Inner Cap (29) into an adjustment hole in the Uprights. 20 Assemble the Left Weight Spotter (not shown) and Left Weight Rest (not shown) on the Front Uprights are facing the Rear Upright (8) and the number decals on the left Uprights (7, 8) in the same manner. 5. Do not tighten the Nylon Locknuts yet. Identify the two Rear Uprights (8), which are at the same...
... Square Inner Cap (29) into an adjustment hole in the Uprights. 20 Assemble the Left Weight Spotter (not shown) and Left Weight Rest (not shown) on the Front Uprights are facing the Rear Upright (8) and the number decals on the left Uprights (7, 8) in the same manner. 5. Do not tighten the Nylon Locknuts yet. Identify the two Rear Uprights (8), which are at the same...
English Manual
Page 8
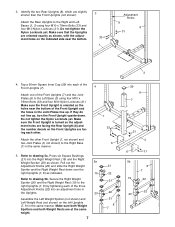
... the 9 Weight Carriage (15) on the Weight Carriage (15). Attach the Weight Guides using four M10 x 78mm Bolts (33) and four M10 Nylon Locknuts (31). Attach the Left Frame to the right Uprights (7, 8) in steps 1-7. 8. Tighten all Nylon Locknuts (31) used in the same manner. Press the two Carriage Bushings (16) into the weight tubes on top of the Weight Bumpers. Insert the two Weight Guides (9) into...
... the 9 Weight Carriage (15) on the Weight Carriage (15). Attach the Weight Guides using four M10 x 78mm Bolts (33) and four M10 Nylon Locknuts (31). Attach the Left Frame to the right Uprights (7, 8) in steps 1-7. 8. Tighten all Nylon Locknuts (31) used in the same manner. Press the two Carriage Bushings (16) into the weight tubes on top of the Weight Bumpers. Insert the two Weight Guides (9) into...

English Manual
Page 9
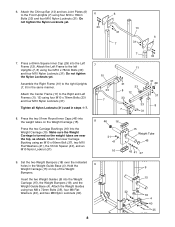
...Weight Guide Frame (14) using two M10 x 78mm Bolts (33), two M10 Flat Washers (41), and two M10 Nylon Locknuts (31). 11. Route the metal-sleeve end of the Weight Carriage (15). Locate the High Cable (26), which is a single ball on one end of the High Cable and a metal sleeve on top of the two Cables. Attach two Pulleys... and then down through the hole between the Weight Guides (9), as shown. 10 32 40 33 14 11 41 31 11 Lat Bar Rest 26 29 40 35 9 14 9 12. Attach the Weight Guide Frame (14) to the Weight Guide Frame using an M10 x 66mm Bolt (37), two M10 Flat Washers (41), two...
...Weight Guide Frame (14) using two M10 x 78mm Bolts (33), two M10 Flat Washers (41), and two M10 Nylon Locknuts (31). 11. Route the metal-sleeve end of the Weight Carriage (15). Locate the High Cable (26), which is a single ball on one end of the High Cable and a metal sleeve on top of the two Cables. Attach two Pulleys... and then down through the hole between the Weight Guides (9), as shown. 10 32 40 33 14 11 41 31 11 Lat Bar Rest 26 29 40 35 9 14 9 12. Attach the Weight Guide Frame (14) to the Weight Guide Frame using an M10 x 66mm Bolt (37), two M10 Flat Washers (41), two...
English Manual
Page 10
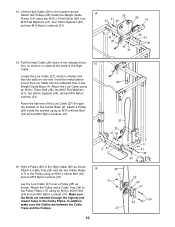
...no slack at the ends of the High Cable. Insert the metal-sleeve end of the Low Cable (27) through the highest and lowest holes in the location shown. Attach a Pulley (25) inside the Weight Guide Frame (14) using two M10 x 75mm Bolts (36), four M10 Flat Washers (41), ...Cable (26) as shown. Attach the Pulley and a Cable Trap (24) to the Pulley using an M10 x 45mm Bolt (34) and an M10 Nylon Locknut (31). 26 27 25 41 44 2 31 16. Lift the High Cable (26) in the Pulley Plates. Attach two Pulleys (25) inside the bracket using an M10 x 45mm Bolt (34) and an M10 Nylon Locknut (31). Route...
...no slack at the ends of the High Cable. Insert the metal-sleeve end of the Low Cable (27) through the highest and lowest holes in the location shown. Attach a Pulley (25) inside the Weight Guide Frame (14) using two M10 x 75mm Bolts (36), four M10 Flat Washers (41), ...Cable (26) as shown. Attach the Pulley and a Cable Trap (24) to the Pulley using an M10 x 45mm Bolt (34) and an M10 Nylon Locknut (31). 26 27 25 41 44 2 31 16. Lift the High Cable (26) in the Pulley Plates. Attach two Pulleys (25) inside the bracket using an M10 x 45mm Bolt (34) and an M10 Nylon Locknut (31). Route...
English Manual
Page 11
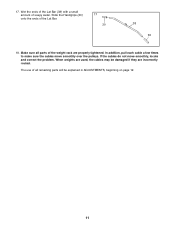
In addition, pull each cable a few times to make sure the cables move smoothly, locate and correct the problem. 17. Make sure all parts of all remaining parts will be damaged if they are properly tightened. If the cables do not move smoothly over the pulleys. Wet the ends of the Lat Bar (38) with a small amount of the Lat Bar. 17 30 38 30 18. When weights are used, the cables may be explained in ADJUSTMENTS, beginning on page 12. 11 Slide the Handgrips (30) onto the ends of soapy water. The use of the weight rack are incorrectly routed.
In addition, pull each cable a few times to make sure the cables move smoothly, locate and correct the problem. 17. Make sure all parts of all remaining parts will be damaged if they are properly tightened. If the cables do not move smoothly over the pulleys. Wet the ends of the Lat Bar (38) with a small amount of the Lat Bar. 17 30 38 30 18. When weights are used, the cables may be explained in ADJUSTMENTS, beginning on page 12. 11 Slide the Handgrips (30) onto the ends of soapy water. The use of the weight rack are incorrectly routed.
English Manual
Page 12
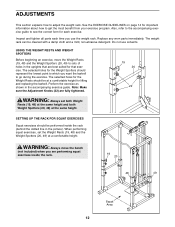
... lifting and replacing the barbell. Note: Make sure the Adjustment Knobs (22) are performing squat exercises inside the rack (behind the dotted line in the accompanying exercise guide. When performing squat exercises, set both Weight Rests (19, 48) at the same height and both Weight Spotters (20, 49) at a comfortable height. ADJUSTMENTS This section explains how to see the correct form for...
... lifting and replacing the barbell. Note: Make sure the Adjustment Knobs (22) are performing squat exercises inside the rack (behind the dotted line in the accompanying exercise guide. When performing squat exercises, set both Weight Rests (19, 48) at the same height and both Weight Spotters (20, 49) at a comfortable height. ADJUSTMENTS This section explains how to see the correct form for...
English Manual
Page 13
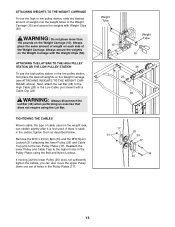
... first used on the weight rack, can also move the upper Pulley down one set of the Weight Carriage (15) and secure the weights with Weight Clips (50). WARNING: Always disconnect the Lat Bar (38) when performing an exercise that does not require using the Bolt and Nylon Locknut. Remove the M10 x 45mm Bolt (34) and the M10 Nylon Locknut (31) attaching the lower Pulley (25) and Cable Trap...
... first used on the weight rack, can also move the upper Pulley down one set of the Weight Carriage (15) and secure the weights with Weight Clips (50). WARNING: Always disconnect the Lat Bar (38) when performing an exercise that does not require using the Bolt and Nylon Locknut. Remove the M10 x 45mm Bolt (34) and the M10 Nylon Locknut (31) attaching the lower Pulley (25) and Cable Trap...
English Manual
Page 14
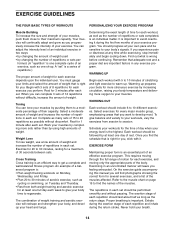
... weight and increase the number of an exercise, such as one complete cycle of repetitions in any time while exercising, stop immediately and begin cooling down. Exercise for 20 to your body for 3 minutes after each set . Cross Training Cross training is wrong before continuing. Find out what is an efficient way to session. Warming up . Select exercises for a maximum of an effective exercise program. EXERCISE FORM...
... weight and increase the number of an exercise, such as one complete cycle of repetitions in any time while exercising, stop immediately and begin cooling down. Exercise for 20 to your body for 3 minutes after each set . Cross Training Cross training is wrong before continuing. Find out what is an efficient way to session. Warming up . Select exercises for a maximum of an effective exercise program. EXERCISE FORM...

English Manual
Page 15
... motivation, keep a record of each exercise. List the date, the exercises performed, the weight used, and the numbers of arm) B D. Biceps (front of sets and repetitions completed. Remember, the key to achieving the greatest results is an effective way to spend the first couple of weeks familiarizing yourself with 5 to make exercise a regular and enjoyable part of every month. Sternomastoid (neck...
... motivation, keep a record of each exercise. List the date, the exercises performed, the weight used, and the numbers of arm) B D. Biceps (front of sets and repetitions completed. Remember, the key to achieving the greatest results is an effective way to spend the first couple of weeks familiarizing yourself with 5 to make exercise a regular and enjoyable part of every month. Sternomastoid (neck...
English Manual
Page 16
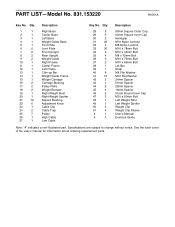
... Bolt M8 x 72mm Bolt M10 x 75mm Bolt M10 x 66mm Bolt Lat Bar Strap M8 Flat Washer M10 Flat Washer 24mm Spacer 51mm Spacer 28mm Spacer 18mm Spacer 51mm Round Inner Cap M10 x 50mm Bolt Left Weight Rest Left Weight Spotter Weight Clip Weight Clip Sleeve User's Manual Exercise Guide Note: "#" indicates a non-illustrated part. PART LIST-Model No. 831.153220 R0701A Key No. See the back cover of the user's manual for information about ordering replacement parts...
... Bolt M8 x 72mm Bolt M10 x 75mm Bolt M10 x 66mm Bolt Lat Bar Strap M8 Flat Washer M10 Flat Washer 24mm Spacer 51mm Spacer 28mm Spacer 18mm Spacer 51mm Round Inner Cap M10 x 50mm Bolt Left Weight Rest Left Weight Spotter Weight Clip Weight Clip Sleeve User's Manual Exercise Guide Note: "#" indicates a non-illustrated part. PART LIST-Model No. 831.153220 R0701A Key No. See the back cover of the user's manual for information about ordering replacement parts...

English Manual
Page 17
EXPLODED DRAWING-Model No. WEBE24410 10 31 29 31 33 33 11 31 6 41 33 31 29 33 31 13 33 7 21 12 19 21 22 20 21 6 31 21 48 22 21 21 21 22 21 49 30 23 22 21 21 31 31 6 28 38 50 50 39 30 51 51 29 33 33 8 31 33 7 29 33 31 8 25 25 29 31 31 41 14 31 45 47 45 41 36 26 32 40 9 40 35 17 25 31 24 17 31 31 33 33 33 33 1 28 31 31 25 27 33 2 34 6 33 33 33 5 33 6 28 6 31 28 3 31 25 24 34 31 41 42 46 31 26 16 42 41 37 41 15 16 18 43 46 41 37 27 32 31 41 44 40 28 4 31 44 41 35 36 R0701A EXPLODED DRAWING-Model No. 831.153220
EXPLODED DRAWING-Model No. WEBE24410 10 31 29 31 33 33 11 31 6 41 33 31 29 33 31 13 33 7 21 12 19 21 22 20 21 6 31 21 48 22 21 21 21 22 21 49 30 23 22 21 21 31 31 6 28 38 50 50 39 30 51 51 29 33 33 8 31 33 7 29 33 31 8 25 25 29 31 31 41 14 31 45 47 45 41 36 26 32 40 9 40 35 17 25 31 24 17 31 31 33 33 33 33 1 28 31 31 25 27 33 2 34 6 33 33 33 5 33 6 28 6 31 28 3 31 25 24 34 31 41 42 46 31 26 16 42 41 37 41 15 16 18 43 46 41 37 27 32 31 41 44 40 28 4 31 44 41 35 36 R0701A EXPLODED DRAWING-Model No. 831.153220
English Manual
Page 18
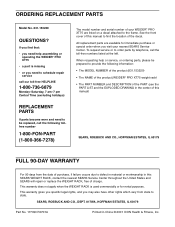
...) REPLACEMENT PARTS If parts become worn and need help or service, or ordering parts, please be replaced, call the toll-free numbers listed at the left. This warranty gives you specific legal rights, and you visit your WEIDER® PRO XT75 are available for rental purposes. See the front cover of this SEARS WEIGHT RACK, contact the nearest SEARS Service Center throughout the United States and SEARS will repair or replace the WEIGHT RACK, free...
...) REPLACEMENT PARTS If parts become worn and need help or service, or ordering parts, please be replaced, call the toll-free numbers listed at the left. This warranty gives you specific legal rights, and you visit your WEIDER® PRO XT75 are available for rental purposes. See the front cover of this SEARS WEIGHT RACK, contact the nearest SEARS Service Center throughout the United States and SEARS will repair or replace the WEIGHT RACK, free...


