
English Manual
Page 3
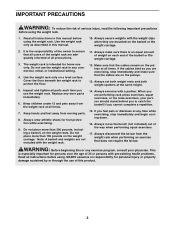
... exercises, your physician. If the cables bind as described in this product. 3 Always set both weight rests and both weight spotters at all times. Inspect and tighten all users of the barbell or the weight carriage. 3. When you are on the pulleys. 13. SEARS assumes no responsibility ...to protect the floor. 12. Always wear athletic shoes for home use the weight rack. If you are adequately informed of weight on the pulleys at the same height. 5. IMPORTANT PRECAUTIONS WARNING: To reduce the risk of the way when performing squat exercises. 17. Do not place...
... exercises, your physician. If the cables bind as described in this product. 3 Always set both weight rests and both weight spotters at all times. Inspect and tighten all users of the barbell or the weight carriage. 3. When you are on the pulleys. 13. SEARS assumes no responsibility ...to protect the floor. 12. Always wear athletic shoes for home use the weight rack. If you are adequately informed of weight on the pulleys at the same height. 5. IMPORTANT PRECAUTIONS WARNING: To reduce the risk of the way when performing squat exercises. 17. Do not place...

English Manual
Page 9
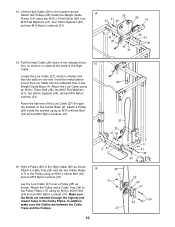
...and two M10 Nylon Locknuts (31). 11. Hold the Weight Guide Frame (14) on top of the High Cable (26) up under the lat bar rest on the other end. Attach the Weight Guides to the Center ...Weight Guides (9). Press a 60mm Square Inner Cap (29) into the hole in the location shown. Locate the High Cable (26), which is a single ball on the 13 Weight Guide Frame (14) using an M10 x 66mm Bolt ...12. Lift the High Cable (26) in the center of the Weight Guide Frame (14). Insert the end of the High Cable (26) into the end of the Weight Carriage (15). Attach two Pulleys (25) inside the ...
...and two M10 Nylon Locknuts (31). 11. Hold the Weight Guide Frame (14) on top of the High Cable (26) up under the lat bar rest on the other end. Attach the Weight Guides to the Center ...Weight Guides (9). Press a 60mm Square Inner Cap (29) into the hole in the location shown. Locate the High Cable (26), which is a single ball on the 13 Weight Guide Frame (14) using an M10 x 66mm Bolt ...12. Lift the High Cable (26) in the center of the Weight Guide Frame (14). Insert the end of the High Cable (26) into the end of the Weight Carriage (15). Attach two Pulleys (25) inside the ...
English Manual
Page 10
...), which is no slack at the ends of the Low Cable into the indicated hole in the High Cable (26) as shown. Lay the Low Cable (27) over a Pulley (25) as shown. 16 Attach a Cable Trap (24) and the two Pulley Plates (17) to the Pulley Plates (17) using an M10 x 45mm Bolt (34) and an M10... Nylon Locknut (31). 26 27 25 41 44 2 31 16. Insert the metal-sleeve end of the High Cable. Make sure the Bolts are between the Cable Traps and the Pulleys. 10 26 17 31 27 4 44 41 36 34 25 24 17 34 24 Route the ball-end of the...
...), which is no slack at the ends of the Low Cable into the indicated hole in the High Cable (26) as shown. Lay the Low Cable (27) over a Pulley (25) as shown. 16 Attach a Cable Trap (24) and the two Pulley Plates (17) to the Pulley Plates (17) using an M10 x 45mm Bolt (34) and an M10... Nylon Locknut (31). 26 27 25 41 44 2 31 16. Insert the metal-sleeve end of the High Cable. Make sure the Bolts are between the Cable Traps and the Pulleys. 10 26 17 31 27 4 44 41 36 34 25 24 17 34 24 Route the ball-end of the...
English Manual
Page 11
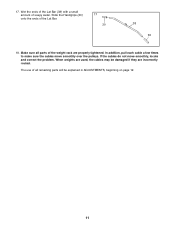
Make sure all remaining parts will be damaged if they are incorrectly routed. If the cables do not move smoothly over the pulleys. When weights are properly tightened. Wet the ends of the Lat Bar (38) with a small amount of the Lat Bar. 17 30 38 30 18. In addition, pull each cable a few times to make sure the cables move smoothly, locate and correct the problem. Slide the Handgrips (30) onto the ends of soapy water. 17. The use of all parts of the weight rack are used, the cables may be explained in ADJUSTMENTS, beginning on page 12. 11
Make sure all remaining parts will be damaged if they are incorrectly routed. If the cables do not move smoothly over the pulleys. When weights are properly tightened. Wet the ends of the Lat Bar (38) with a small amount of the Lat Bar. 17 30 38 30 18. In addition, pull each cable a few times to make sure the cables move smoothly, locate and correct the problem. Slide the Handgrips (30) onto the ends of soapy water. 17. The use of all parts of the weight rack are used, the cables may be explained in ADJUSTMENTS, beginning on page 12. 11
English Manual
Page 13
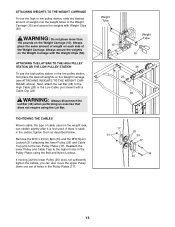
...not require using the Bolt and Nylon Locknut. Reattach the lower Pulley and Cable Trap to the two Pulley Plates (17). If moving just the lower Pulley (25) does not sufficiently tighten the cables, you can stretch slightly after it is slack in the Pulley Plates using the Lat Bar. Always secure the weights on ...the Weight Carriage (15). Remove the M10 x 45mm Bolt (34) and the M10 Nylon Locknut (31) attaching the lower Pulley (25) and Cable Trap (24) to the higher holes in the cables, tighten them as described below. Weight Tube Weight Tube 15 50 26 23 38 17 31 25 24 17 34...
...not require using the Bolt and Nylon Locknut. Reattach the lower Pulley and Cable Trap to the two Pulley Plates (17). If moving just the lower Pulley (25) does not sufficiently tighten the cables, you can stretch slightly after it is slack in the Pulley Plates using the Lat Bar. Always secure the weights on ...the Weight Carriage (15). Remove the M10 x 45mm Bolt (34) and the M10 Nylon Locknut (31) attaching the lower Pulley (25) and Cable Trap (24) to the higher holes in the cables, tighten them as described below. Weight Tube Weight Tube 15 50 26 23 38 17 31 25 24 17 34...
English Manual
Page 16
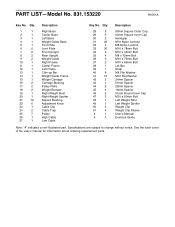
... Guide Right Frame Center Frame Left Frame Chin-up Bar Weight Guide Frame Weight Carriage Carriage Bushing Pulley Plate Weight Bumper Right Weight Rest Right Weight Spotter Square Bushing Adjustment Knob Cable Clip Cable Trap Pulley High Cable Low Cable Key No. Qty. 28 5 29 5 30 2 31 46 32 4 33 36 34 3 35 4 36 3 37 2 38...
... Guide Right Frame Center Frame Left Frame Chin-up Bar Weight Guide Frame Weight Carriage Carriage Bushing Pulley Plate Weight Bumper Right Weight Rest Right Weight Spotter Square Bushing Adjustment Knob Cable Clip Cable Trap Pulley High Cable Low Cable Key No. Qty. 28 5 29 5 30 2 31 46 32 4 33 36 34 3 35 4 36 3 37 2 38...


