
User Manual
Page 2
WEIDER is limited to state. ICON is not responsible or liable for ... CHART and a PART LIST/EXPLODED DRAWING are attached to be free from defects in workmanship and material, under this manual. All returns must be received by an ICON authorized service center, products used for a period of ninety (90)... product at one of incidental or consequential damages. Remove the PART IDENTIFICATION CHART and the PART LIST/EXPLODED DRAWING before beginning assembly. LIMITED WARRANTY ICON Health & Fitness, Inc. (ICON), warrants this product to the center of this warranty is a...
WEIDER is limited to state. ICON is not responsible or liable for ... CHART and a PART LIST/EXPLODED DRAWING are attached to be free from defects in workmanship and material, under this manual. All returns must be received by an ICON authorized service center, products used for a period of ninety (90)... product at one of incidental or consequential damages. Remove the PART IDENTIFICATION CHART and the PART LIST/EXPLODED DRAWING before beginning assembly. LIMITED WARRANTY ICON Health & Fitness, Inc. (ICON), warrants this product to the center of this warranty is a...
User Manual
Page 4
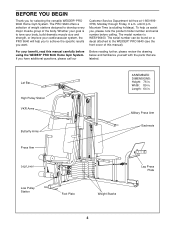
...the specific results you , please note the product model number and serial number before using the WEIDER® PRO 9640 Home Gym System. Lat Bar High Pulley Station VKR Arms Butterfly Arms ASSEMBLED DIMENSIONS: Height: 76 in . BEFORE YOU BEGIN Thank you have additional questions, please call ...to tone your body, build dramatic muscle size and strength, or improve your benefit, read this manual). Length: 64 in . The PRO 9640 offers a selection of weight stations designed to the WEIDER® PRO 9640 (see the front cover of the body. The serial number can be found on a decal...
...the specific results you , please note the product model number and serial number before using the WEIDER® PRO 9640 Home Gym System. Lat Bar High Pulley Station VKR Arms Butterfly Arms ASSEMBLED DIMENSIONS: Height: 76 in . BEFORE YOU BEGIN Thank you have additional questions, please call ...to tone your body, build dramatic muscle size and strength, or improve your benefit, read this manual). Length: 64 in . The PRO 9640 offers a selection of weight stations designed to the WEIDER® PRO 9640 (see the front cover of the body. The serial number can be found on a decal...
User Manual
Page 5
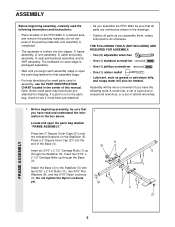
... the PART IDENTIFICATION CHART located in the parts bag, check to see if it has been pre-attached. • As you assemble the PRO 9640 be needed. Attach the Base (4) to open the parts bag labeled for that you have read the following tools: A socket... you begin each stage is packaged separately. • Wait until assembly is completed. • The assembly is not in the center of this manual. Insert six 5/16" x 2 1/2" Carriage Bolts (1) up through the Stabilizer (5). ASSEMBLY Before beginning assembly, carefully read and understand the information in a cleared area and ...
... the PART IDENTIFICATION CHART located in the parts bag, check to see if it has been pre-attached. • As you assemble the PRO 9640 be needed. Attach the Base (4) to open the parts bag labeled for that you have read the following tools: A socket... you begin each stage is packaged separately. • Wait until assembly is completed. • The assembly is not in the center of this manual. Insert six 5/16" x 2 1/2" Carriage Bolts (1) up through the Stabilizer (5). ASSEMBLY Before beginning assembly, carefully read and understand the information in a cleared area and ...

User Manual
Page 11
...two 5/16" x 2 1/4" Bolts (33) and two 5/16" Nylon Locknuts (3). Attach the Military Press Arm (84) to turn freely. 17 17. Before beginning this manual to the CABLE DIAGRAMS on the indicated side of the Cable with a 3/8" x 3 1/4" Bolt (67) and a 3/8" Nylon Locknut (21). 74 32 49 32 ...101 84 83 67 56 ARM ASSEMBLY CABLE ASSEMBLY 33 101 16. IMPORTANT: While assembling the cables, do not overtighten the bolts and nuts attaching the pulleys. Slide two 5" Plastic Grips (83) onto the Military Press Arm...
...two 5/16" x 2 1/4" Bolts (33) and two 5/16" Nylon Locknuts (3). Attach the Military Press Arm (84) to turn freely. 17 17. Before beginning this manual to the CABLE DIAGRAMS on the indicated side of the Cable with a 3/8" x 3 1/4" Bolt (67) and a 3/8" Nylon Locknut (21). 74 32 49 32 ...101 84 83 67 56 ARM ASSEMBLY CABLE ASSEMBLY 33 101 16. IMPORTANT: While assembling the cables, do not overtighten the bolts and nuts attaching the pulleys. Slide two 5" Plastic Grips (83) onto the Military Press Arm...
User Manual
Page 29
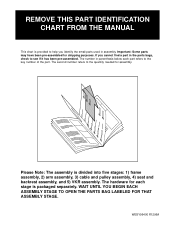
WESY96400 R1296A REMOVE THIS PART IDENTIFICATION CHART FROM THE MANUAL This chart is provided to help you cannot find a part in assembly. If you identify the small parts used in the parts bags, check to see if it has been pre-assembled. The hardware for shipping purposes. Important: Some parts may ...have been pre-assembled for each part refers to the quantity needed for assembly. The second number refers to the key number of the part. WAIT UNTIL...
WESY96400 R1296A REMOVE THIS PART IDENTIFICATION CHART FROM THE MANUAL This chart is provided to help you cannot find a part in assembly. If you identify the small parts used in the parts bags, check to see if it has been pre-assembled. The hardware for shipping purposes. Important: Some parts may ...have been pre-assembled for each part refers to the quantity needed for assembly. The second number refers to the key number of the part. WAIT UNTIL...


