
English Manual
Page 2
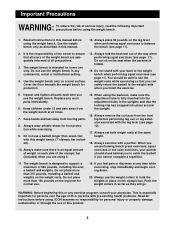
...or removed. • Do not allow children on the weight bench. Table of Contents Warning Decal Placement 2 Important Precautions 3 Before You Begin 4 Part Identification Chart 5 Assembly 6 Adjusting the Weight Bench 10 Exercise Guidelines 13 Ordering Replacement Parts Back Cover Limited Warranty Back Cover Note: A Part List/Exploded Drawing is not legible, please call our Customer... and follow all warnings and operating instructions prior to the location shown. ! Mountain Time, to the center of this manual. Remove the Part List/Exploded Drawing before beginning assembly.
...or removed. • Do not allow children on the weight bench. Table of Contents Warning Decal Placement 2 Important Precautions 3 Before You Begin 4 Part Identification Chart 5 Assembly 6 Adjusting the Weight Bench 10 Exercise Guidelines 13 Ordering Replacement Parts Back Cover Limited Warranty Back Cover Note: A Part List/Exploded Drawing is not legible, please call our Customer... and follow all warnings and operating instructions prior to the location shown. ! Mountain Time, to the center of this manual. Remove the Part List/Exploded Drawing before beginning assembly.
English Manual
Page 3
... tighten all times. 7. When using the weight bench. 1. Do not use the weight collars to the weight rests when you finish the exercise. 5. Do not stand with pre-existing health problems. Read all instructions before using the weight bench. Keep children under 12 and pets away from the weight bench at all parts each side of the olympic bar...
... tighten all times. 7. When using the weight bench. 1. Do not use the weight collars to the weight rests when you finish the exercise. 5. Do not stand with pre-existing health problems. Read all instructions before using the weight bench. Keep children under 12 and pets away from the weight bench at all parts each side of the olympic bar...
English Manual
Page 4
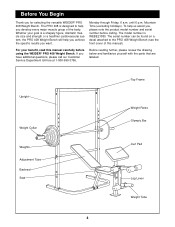
... model number and serial number before using the WEIDER® PRO 408 Weight Bench. Mountain Time (excluding holidays). The model number is a shapely figure, dramatic muscle size and strength or a healthier cardiovascular system, the PRO 408 Weight Bench will help you achieve the specific results you ...3756, Before reading further, please review the drawing below and familiarize yourself with the parts that are labeled. until 6 p.m. Monday through Friday, 6 a.m. If you for selecting the versatile WEIDER® PRO 408 Weight Bench. Whether your benefit, read this manual).
... model number and serial number before using the WEIDER® PRO 408 Weight Bench. Mountain Time (excluding holidays). The model number is a shapely figure, dramatic muscle size and strength or a healthier cardiovascular system, the PRO 408 Weight Bench will help you achieve the specific results you ...3756, Before reading further, please review the drawing below and familiarize yourself with the parts that are labeled. until 6 p.m. Monday through Friday, 6 a.m. If you for selecting the versatile WEIDER® PRO 408 Weight Bench. Whether your benefit, read this manual).
English Manual
Page 6
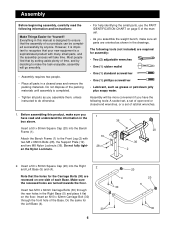
...not dispose of the packing materials until assembly is completed. • Tighten all parts as you assemble the weight bench, make the task enjoyable, assembly will take time. Attach the Bench Frame (1) to make sure all parts in this product, make sure you have the following tools (not included) ...people. • Place all parts are required for Yourself! Everything in a cleared area and remove the packing materials. Make sure the recessed holes are recessed on page 5 of time, and by anyone. Insert a 50 x 50mm Square Cap (20) into the Bench Frame (1). Do the same for...
...not dispose of the packing materials until assembly is completed. • Tighten all parts as you assemble the weight bench, make the task enjoyable, assembly will take time. Attach the Bench Frame (1) to make sure all parts in this product, make sure you have the following tools (not included) ...people. • Place all parts are required for Yourself! Everything in a cleared area and remove the packing materials. Make sure the recessed holes are recessed on page 5 of time, and by anyone. Insert a 50 x 50mm Square Cap (20) into the Bench Frame (1). Do the same for...
English Manual
Page 9
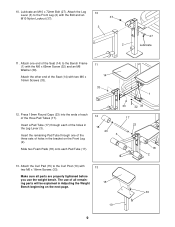
.... 33 10 9 Insert a Pad Tube (17) through one end of all parts are properly tightened before you use of the Seat (14) to the Bench Frame (1) with two M6 x 16mm Screws (33). 11 14 33 1 12. 10. The use the weight bench. Attach the Curl Pad (15) to the Front Leg (2) with 13 two... M6 x 16mm Screws (33). Lubricate an M10 x 72mm Bolt (27). Press 19mm Round Caps (23) into the ends of the holes in Adjusting the Weight 15 Bench beginning on the Front Leg (2). Attach the Leg 10 Lever (3) to the Curl Post (10) with the Bolt and an M10 Nylon Locknut (37). 37...
.... 33 10 9 Insert a Pad Tube (17) through one end of all parts are properly tightened before you use of the Seat (14) to the Bench Frame (1) with two M6 x 16mm Screws (33). 11 14 33 1 12. 10. The use the weight bench. Attach the Curl Pad (15) to the Front Leg (2) with 13 two... M6 x 16mm Screws (33). Lubricate an M10 x 72mm Bolt (27). Press 19mm Round Caps (23) into the ends of the holes in Adjusting the Weight 15 Bench beginning on the Front Leg (2). Attach the Leg 10 Lever (3) to the Curl Post (10) with the Bolt and an M10 Nylon Locknut (37). 37...
English Manual
Page 10
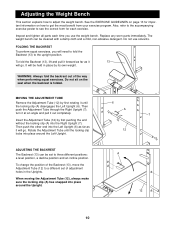
...12) by first rotating it 13 will go . Inspect and tighten all parts each exercise. Do not use the weight bench. ADJUSTING THE BACKREST The Backrest (13) can be held in the Uprights. Replace any worn parts immediately. To fold the Backrest (13), lift and pull it forward as ... Tube (12) to get the most benefit from your exercise program. Then push the other end into place around the Upright. Adjusting the Weight Bench This section explains how to three different positions: a level position, a decline position and an incline position. FOLDING THE BACKREST To perform squat...
...12) by first rotating it 13 will go . Inspect and tighten all parts each exercise. Do not use the weight bench. ADJUSTING THE BACKREST The Backrest (13) can be held in the Uprights. Replace any worn parts immediately. To fold the Backrest (13), lift and pull it forward as ... Tube (12) to get the most benefit from your exercise program. Then push the other end into place around the Upright. Adjusting the Weight Bench This section explains how to three different positions: a level position, a decline position and an incline position. FOLDING THE BACKREST To perform squat...
English Manual
Page 16
... allow limitations on how long an implied warranty lasts. The MODEL NUMBER of the product (WEIDER® PRO 408 Weight Bench). 3. Some states do not allow the exclusion or limitation of incidental or consequential damages. Ordering Replacement Parts To order replacement parts, simply call our Customer Service Department toll-free at the center of this manual). Mountain...
... allow limitations on how long an implied warranty lasts. The MODEL NUMBER of the product (WEIDER® PRO 408 Weight Bench). 3. Some states do not allow the exclusion or limitation of incidental or consequential damages. Ordering Replacement Parts To order replacement parts, simply call our Customer Service Department toll-free at the center of this manual). Mountain...
English Manual
Page 18
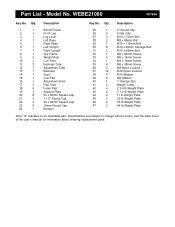
... Weight Plate 5 1/2 lb Weight Plate 11 lb Weight Plate 22 lb Weight Plate 33 lb Weight Plate 44 lb Weight Plate Note: "#" indicates a non-illustrated part. Part List - See the back cover of the user's manual for information about ordering replacement parts. Qty. 1 1 2 1 3 1 4 1 5 1 6 1 7 1 8 1 9 2 10 1 11 2 12 1 13 1 14 1 15 1 16 1 17 3 18 6 19 1 20 8 21 2 22 4 23 6 24 1 Description Bench...
... Weight Plate 5 1/2 lb Weight Plate 11 lb Weight Plate 22 lb Weight Plate 33 lb Weight Plate 44 lb Weight Plate Note: "#" indicates a non-illustrated part. Part List - See the back cover of the user's manual for information about ordering replacement parts. Qty. 1 1 2 1 3 1 4 1 5 1 6 1 7 1 8 1 9 2 10 1 11 2 12 1 13 1 14 1 15 1 16 1 17 3 18 6 19 1 20 8 21 2 22 4 23 6 24 1 Description Bench...


