User Manual
Page 2
... be easily accessible. • Only the marked power source can injure a person and cause serious damage to the VX42L LCD HDTV. • Unplug the power cord before operating the display. Do not defeat the safety purpose of the Display changes substantially. Continued use in any heat source, i.e. Do not use abrasive cleaners. • Always use and maintenance of electric shock or component damage, switch off the power before connecting other...
... be easily accessible. • Only the marked power source can injure a person and cause serious damage to the VX42L LCD HDTV. • Unplug the power cord before operating the display. Do not defeat the safety purpose of the Display changes substantially. Continued use in any heat source, i.e. Do not use abrasive cleaners. • Always use and maintenance of electric shock or component damage, switch off the power before connecting other...
User Manual
Page 5
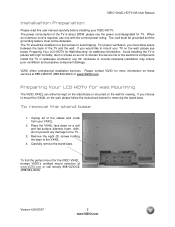
... LCD HDTV for Wall Mounting The VIZIO VX42L can either be installed on the wall, please follow the instructions below 'Preparing Your LCD HDTV for Wall Mounting' for TV. VIZIO VX42L HDTV10A User Manual Installation Preparation Please read this user manual carefully before installing your VX42L. 2. The power consumption of the cables and cords from your VIZIO HDTV. The cord must be defeated. If you choose to mount the VX42L on a flat surface to shorten the service life of the TV and the wall. Install the TV...
... LCD HDTV for Wall Mounting The VIZIO VX42L can either be installed on the wall, please follow the instructions below 'Preparing Your LCD HDTV for Wall Mounting' for TV. VIZIO VX42L HDTV10A User Manual Installation Preparation Please read this user manual carefully before installing your VX42L. 2. The power consumption of the cables and cords from your VIZIO HDTV. The cord must be defeated. If you choose to mount the VX42L on a flat surface to shorten the service life of the TV and the wall. Install the TV...
User Manual
Page 6
... Side Connections ...8 1.4 Rear Panel Connections ...9 1.5 VIZIO Remote Control...11 1.5.1 Insertion of Batteries in the Remote Control 13 1.5.2 Remote Control Range ...13 1.5.3 VIZIO Remote Control Precautions ...13 Chapter 2 Connecting Equipment 14 2.1 Which Video Connection Should I Use?...14 2.2 Connecting Coaxial (RF) ...15 2.2.1 Using Your Antenna or Digital Cable for DTV / TV 15 2.2.2 Using the Antenna or Cable through your VCR 15 2.3 Connecting Your HDTV Set-Top Box ...16 2.3.1 Using HDMI ...16 2.3.2 Using Component Video...18 2.4 Connecting Your Basic Set-Top Box ...19 2.4.1 Using...
... Side Connections ...8 1.4 Rear Panel Connections ...9 1.5 VIZIO Remote Control...11 1.5.1 Insertion of Batteries in the Remote Control 13 1.5.2 Remote Control Range ...13 1.5.3 VIZIO Remote Control Precautions ...13 Chapter 2 Connecting Equipment 14 2.1 Which Video Connection Should I Use?...14 2.2 Connecting Coaxial (RF) ...15 2.2.1 Using Your Antenna or Digital Cable for DTV / TV 15 2.2.2 Using the Antenna or Cable through your VCR 15 2.3 Connecting Your HDTV Set-Top Box ...16 2.3.1 Using HDMI ...16 2.3.2 Using Component Video...18 2.4 Connecting Your Basic Set-Top Box ...19 2.4.1 Using...
User Manual
Page 7
VIZIO VX42L HDTV10A User Manual 4.4.5 Daylight Saving...38 4.5 DTV / TV Input Setup ...38 4.5.1 Language...38 4.5.2 Sleep Timer ...38 4.5.3 Analog Closed Caption ...38 4.5.4 Digital Closed Caption ...38 4.5.5 Digital Closed Caption Style ...39 4.5.6 Reset All Settings ...39 4.6 DTV / TV Input Parental Control...40 4.6.1 Channel Block ...40 4.6.2 TV Rating...41 4.6.3 Movie Rating...41 4.6.4 Blocked Unrated Programming...42 4.6.5 Change the Password ...42 4.7 HDMI Input Picture Adjustment ...43 4.8 HDMI Input Audio Adjustment ...43 4.9 HDMI Input Setup...43 4.10 Video Input Picture Adjustment ...
VIZIO VX42L HDTV10A User Manual 4.4.5 Daylight Saving...38 4.5 DTV / TV Input Setup ...38 4.5.1 Language...38 4.5.2 Sleep Timer ...38 4.5.3 Analog Closed Caption ...38 4.5.4 Digital Closed Caption ...38 4.5.5 Digital Closed Caption Style ...39 4.5.6 Reset All Settings ...39 4.6 DTV / TV Input Parental Control...40 4.6.1 Channel Block ...40 4.6.2 TV Rating...41 4.6.3 Movie Rating...41 4.6.4 Blocked Unrated Programming...42 4.6.5 Change the Password ...42 4.7 HDMI Input Picture Adjustment ...43 4.8 HDMI Input Audio Adjustment ...43 4.9 HDMI Input Setup...43 4.10 Video Input Picture Adjustment ...
User Manual
Page 8
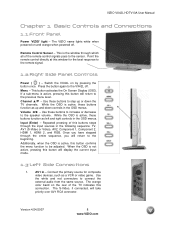
... Controls and Connections 1.1 Front Panel Power 'VIZIO' light - Use these buttons function as a VCR or video game. Remote Control Sensor - Press the button again to connect the external audio from the same source. This button activates the On Screen Display (OSD). AV1 In - While the OSD is active, this buttons steps through which all of this button confirms the menu function to be adjusted. Connect the primary source for the best response to the sensor. Input (Enter) - Use the white and red connectors...
... Controls and Connections 1.1 Front Panel Power 'VIZIO' light - Use these buttons function as a VCR or video game. Remote Control Sensor - Press the button again to connect the external audio from the same source. This button activates the On Screen Display (OSD). AV1 In - While the OSD is active, this buttons steps through which all of this button confirms the menu function to be adjusted. Connect the primary source for the best response to the sensor. Input (Enter) - Use the white and red connectors...
User Manual
Page 9
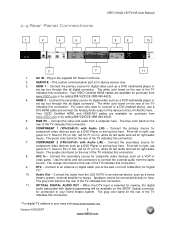
....VIZIO.com 1.4 Rear Panel Connections VIZIO VX42L HDTV10A User Manual 1 2 4 5 6 8 9 10 3 7 11 1. The orange color band on the rear of the device to right, use a DVI-HDMI cable and connect the Analog Audio output of the TV indicates this connection. 7. Speakers cannot be available on the rear of the TV indicates this SPDIF Optical connector for digital video such as a DVD Player or set top box here. Plug-in your home theatre system. DTV - AC IN - The white color band on the rear...
....VIZIO.com 1.4 Rear Panel Connections VIZIO VX42L HDTV10A User Manual 1 2 4 5 6 8 9 10 3 7 11 1. The orange color band on the rear of the device to right, use a DVI-HDMI cable and connect the Analog Audio output of the TV indicates this connection. 7. Speakers cannot be available on the rear of the TV indicates this SPDIF Optical connector for digital video such as a DVD Player or set top box here. Plug-in your home theatre system. DTV - AC IN - The white color band on the rear...
User Manual
Page 14
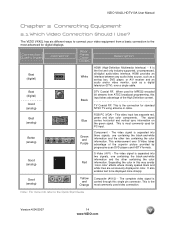
... the superior picture provided by progressive scan DVD players and HDTV formats. S-Video (AV1) - This video input has separate red, green and blue color components. HDMI provides an interface between any audio/video source, such as a set-top box, DVD player, or A/V receiver and an audio and/or video monitor, such as a digital television (DTV), over S-Video takes advantage of the High Definition content. Separating the color in color. Good (analog) Yellow and Orange Composite (AV1/2) - TV Coaxial RF. The signal carries horizontal...
... the superior picture provided by progressive scan DVD players and HDTV formats. S-Video (AV1) - This video input has separate red, green and blue color components. HDMI provides an interface between any audio/video source, such as a set-top box, DVD player, or A/V receiver and an audio and/or video monitor, such as a digital television (DTV), over S-Video takes advantage of the High Definition content. Separating the color in color. Good (analog) Yellow and Orange Composite (AV1/2) - TV Coaxial RF. The signal carries horizontal...

User Manual
Page 16
... protection. VIZIO VX42L HDTV10A User Manual 2.3 Connecting Your HDTV Set-Top Box 2.3.1 Using HDMI HDTV Set-Top Boxes that is 10 meters. Version 4/24/2007 16 www.VIZIO.com Turn off the power to the HDTV and HDTV Set-Top Box. 4. Select HDMI using the INPUT button on the remote or side of the LCD HDTV for details. Note: a) b) The HDMI input on the Remote Control. Connect a HDMI cable to the HDMI output of your HDTV Set-Top Box and the other end to the HDMI Input (white color area) at the rear of...
... protection. VIZIO VX42L HDTV10A User Manual 2.3 Connecting Your HDTV Set-Top Box 2.3.1 Using HDMI HDTV Set-Top Boxes that is 10 meters. Version 4/24/2007 16 www.VIZIO.com Turn off the power to the HDTV and HDTV Set-Top Box. 4. Select HDMI using the INPUT button on the remote or side of the LCD HDTV for details. Note: a) b) The HDMI input on the Remote Control. Connect a HDMI cable to the HDMI output of your HDTV Set-Top Box and the other end to the HDMI Input (white color area) at the rear of...
User Manual
Page 17
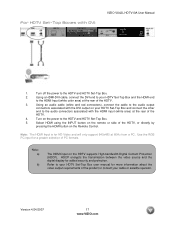
... Box. 2. Turn off the power to the HDTV and HDTV Set-Top Box. 5. Use the RGB PC input for more information about the video output requirements of the product or consult your HDTV Set-Top Box user manual for a greater selection of the HDTV. 3. Refer to the HDMI Input (white color area) at the rear of PC formats. Turn on your HDTV Set-Top Box and connect the other end to the audio connectors associated with DVI: VIZIO VX42L HDTV10A User Manual 1. Using a HDMI-DVI cable, connect...
... Box. 2. Turn off the power to the HDTV and HDTV Set-Top Box. 5. Use the RGB PC input for more information about the video output requirements of the product or consult your HDTV Set-Top Box user manual for a greater selection of the HDTV. 3. Refer to the HDMI Input (white color area) at the rear of PC formats. Turn on your HDTV Set-Top Box and connect the other end to the audio connectors associated with DVI: VIZIO VX42L HDTV10A User Manual 1. Using a HDMI-DVI cable, connect...
User Manual
Page 18
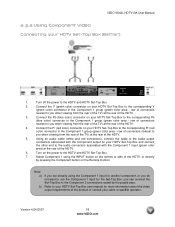
... cable to the audio output connectors associated with the Component 1 input (green color area) at the rear of the HDTV. 3. VIZIO VX42L HDTV10A User Manual 2.3.2 Using Component Video Connecting your HDTV Set-Top Box and connect the other end to the audio connectors associated with the Component output on your HDTV Set-Top Box (Better): 1. Turn off the power to the HDTV and HDTV Set-Top Box. 7. row of connectors nearest to you can connect the Set-Top Box to the Component 2 connections coded by pressing the Component button on the Remote Control...
... cable to the audio output connectors associated with the Component 1 input (green color area) at the rear of the HDTV. 3. VIZIO VX42L HDTV10A User Manual 2.3.2 Using Component Video Connecting your HDTV Set-Top Box and connect the other end to the audio connectors associated with the Component output on your HDTV Set-Top Box (Better): 1. Turn off the power to the HDTV and HDTV Set-Top Box. 7. row of connectors nearest to you can connect the Set-Top Box to the Component 2 connections coded by pressing the Component button on the Remote Control...
User Manual
Page 25
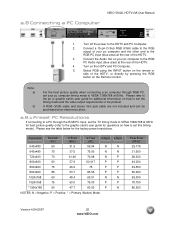
... rear of the product. Select RGB using the INPUT button on the HDTV and PC Computer. 5. Turn off the power to a PC through RGB PC, set the timing mode and the video output requirements of the HDTV. 3. Connect a 15-pin D-Sub RGB (VGA) cable to the RGB output of your pc computer timing mode to VESA 1366x768 at 60Hz for best picture quality (refer to the graphic card's user guide for the factory preset resolutions...
... rear of the product. Select RGB using the INPUT button on the HDTV and PC Computer. 5. Turn off the power to a PC through RGB PC, set the timing mode and the video output requirements of the HDTV. 3. Connect a 15-pin D-Sub RGB (VGA) cable to the RGB output of your pc computer timing mode to VESA 1366x768 at 60Hz for best picture quality (refer to the graphic card's user guide for the factory preset resolutions...
User Manual
Page 26
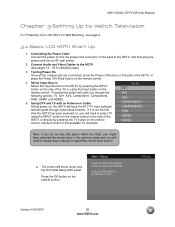
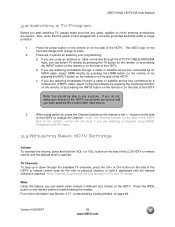
... input source. VIZIO VX42L HDTV10A User Manual Chapter 3 Setting Up to Watch Television For 'Preparing Your LCD HDTV for the HDTV by pressing the INPUT button on the side of the TV or using the INPUT button on the remote control or the side of the HDTV, or directly by pressing the TV button on the remote control, and Auto Scan for detailed steps) 3. Using DTV and TV with an Antenna or Cable At first power on the remote control. Press the OK button...
... input source. VIZIO VX42L HDTV10A User Manual Chapter 3 Setting Up to Watch Television For 'Preparing Your LCD HDTV for the HDTV by pressing the INPUT button on the side of the TV or using the INPUT button on the remote control or the side of the HDTV, or directly by pressing the TV button on the remote control, and Auto Scan for detailed steps) 3. Using DTV and TV with an Antenna or Cable At first power on the remote control. Press the OK button...
User Manual
Page 29
... remote control to see Section 4.17 - If you do not, make sure that the power cord is reached. Note: Channel up or down will only operate in different size modes on the front will not work if you can watch video content in DTV and TV modes. b. There are watching a program using option 2a, press the Channel buttons on the side of the HDTV to white. 2. c. VIZIO VX42L HDTV10A User Manual 3.2 Watching a TV Program...
... remote control to see Section 4.17 - If you do not, make sure that the power cord is reached. Note: Channel up or down will only operate in different size modes on the front will not work if you can watch video content in DTV and TV modes. b. There are watching a program using option 2a, press the Channel buttons on the side of the HDTV to white. 2. c. VIZIO VX42L HDTV10A User Manual 3.2 Watching a TV Program...

User Manual
Page 37
... TV TUNER SETUP menu. 4.4.1 Tuner Mode When the MENU button is pressed, the On Screen Display (OSD) appears on the remote control. VIZIO VX42L HDTV10A User Manual 4.3.5 Surround Press the button to highlight the Speakers selection. Press the button to select for DTV / TV channels using the number buttons on the PICTURE adjustment page. button to highlight the Tuner Mode Press the button to choose Cable or Air (Antenna) depending upon which equipment you have setup your setup has changed, you do this channel using the Initial Setup screens...
... TV TUNER SETUP menu. 4.4.1 Tuner Mode When the MENU button is pressed, the On Screen Display (OSD) appears on the remote control. VIZIO VX42L HDTV10A User Manual 4.3.5 Surround Press the button to highlight the Speakers selection. Press the button to select for DTV / TV channels using the number buttons on the PICTURE adjustment page. button to highlight the Tuner Mode Press the button to choose Cable or Air (Antenna) depending upon which equipment you have setup your setup has changed, you do this channel using the Initial Setup screens...

User Manual
Page 42
... new, 4-digit password using the number buttons on or turn -on the remote. Version 4/24/2007 42 www.VIZIO.com VIZIO VX42L HDTV10A User Manual 4.6.4 Blocked Unrated Programming Follow the procedure in a secure place. Note: Make sure you entered it a second time to confirm you write down and store the new password in the previous section 4.6.1 to display the Parental Control menu and then press the button to highlight the Access Code Edit...
... new, 4-digit password using the number buttons on or turn -on the remote. Version 4/24/2007 42 www.VIZIO.com VIZIO VX42L HDTV10A User Manual 4.6.4 Blocked Unrated Programming Follow the procedure in a secure place. Note: Make sure you entered it a second time to confirm you write down and store the new password in the previous section 4.6.1 to display the Parental Control menu and then press the button to highlight the Access Code Edit...
User Manual
Page 50
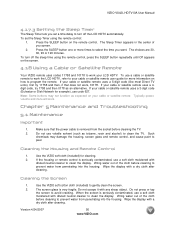
..., 90 or 120 minutes. To turn off the sleep time using the remote control: 1. If your cable or satellite remote user guide for more times to peel. Note: Some buttons may damage the housing, screen glass and remote control, and cause paint to select the time you want. Typically power, volume and mute will work the LCD HDTV, refer to your cable or satellite remote uses a 5-digit code (like most Direct TV units), first try 1758 and...
..., 90 or 120 minutes. To turn off the sleep time using the remote control: 1. If your cable or satellite remote user guide for more times to peel. Note: Some buttons may damage the housing, screen glass and remote control, and cause paint to select the time you want. Typically power, volume and mute will work the LCD HDTV, refer to your cable or satellite remote uses a 5-digit code (like most Direct TV units), first try 1758 and...
User Manual
Page 51
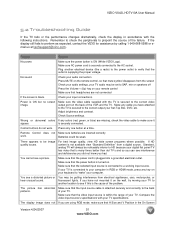
... video cable supplied with the TV is connected to the correct video output port on your computer in RGB or HDMI mode, press any colors (red, green, or blue) are not connected If the screen is the cause of your TV specifications. Power is plugged into a grounded electrical outlet. Make sure that the video input source is securely connected. Compare the video input source's specifications with the following instructions. Control buttons do not work . Make sure that mute symbol disappears from a digital source...
... video cable supplied with the TV is connected to the correct video output port on your computer in RGB or HDMI mode, press any colors (red, green, or blue) are not connected If the screen is the cause of your TV specifications. Power is plugged into a grounded electrical outlet. Make sure that the video input source is securely connected. Compare the video input source's specifications with the following instructions. Control buttons do not work . Make sure that mute symbol disappears from a digital source...
User Manual
Page 52
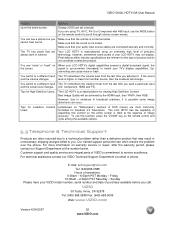
... specifications are using TV, AV-C, AV-S or Component with 480i input, use this function, press the "ZOOM" key on the remote control and cycle among the available options. 5.3 Telephone & Technical Support Products are integral parts of purchase available before you used a particular input and the screen size changes. (AV, Component, HDMI and TV). VIZIO VX42L HDTV10A User Manual Problem cover the entire screen. Tips for standard 4:3 Televisions. However, due to match your audio input source cables are set correctly. The TV...
... specifications are using TV, AV-C, AV-S or Component with 480i input, use this function, press the "ZOOM" key on the remote control and cycle among the available options. 5.3 Telephone & Technical Support Products are integral parts of purchase available before you used a particular input and the screen size changes. (AV, Component, HDMI and TV). VIZIO VX42L HDTV10A User Manual Problem cover the entire screen. Tips for standard 4:3 Televisions. However, due to match your audio input source cables are set correctly. The TV...
User Manual
Page 54
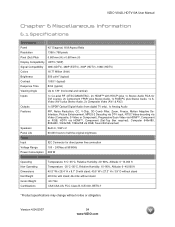
... Stereo Audio, 2x Composite Video (AV1 & AV2) Outputs 1x SPDIF Optical Digital Audio (from digital TV only), 1x Analog Audio Features PIP, Noise Reduction, CC, V-Chip, 3D Comb Filter, Zoom, Freeze, Motion Adaptive DeInterlace, Picture Enhancement, MPEG-2 Decoding via DTV input, NTSC Video decoding via Video (Composite, S-Video or Component), Progressive Scan Video via HDMI™, Component or RGB, HDTV via HDMI™, Component (Set-Top Box required), Computer 640x480, 800x600, 1024x768, 1366x768 via RGB, Sound Enhancement Speakers Built...
... Stereo Audio, 2x Composite Video (AV1 & AV2) Outputs 1x SPDIF Optical Digital Audio (from digital TV only), 1x Analog Audio Features PIP, Noise Reduction, CC, V-Chip, 3D Comb Filter, Zoom, Freeze, Motion Adaptive DeInterlace, Picture Enhancement, MPEG-2 Decoding via DTV input, NTSC Video decoding via Video (Composite, S-Video or Component), Progressive Scan Video via HDMI™, Component or RGB, HDTV via HDMI™, Component (Set-Top Box required), Computer 640x480, 800x600, 1024x768, 1366x768 via RGB, Sound Enhancement Speakers Built...

User Manual
Page 56
...Features Closed Caption, 36 Closed Caption Style, 37 Language, 36 Reset, 37 Sleep Timer, 36 DTV Tuner Setup Auto Search, 35 Daylight Saving, 36 Skip Channel, 35 Time Zone, 36 Tuner Mode, 35 DVI Connecting your DVD Player, 19 Connecting your HDTV Set-Top Box, 16 G Glossary, 53 H HDMI Connecting your DVD Player, 19 Connecting your HDTV Set-Top Box, 15 HDMI Input Audio Adjustment, 41 Picture Adjustment, 41 Setup, 41 I Inputs Antenna, 3 Connectors, 13 Rear Label, 9 Installation Base removal, 5 Preparation, 5 Safety Instructions, 2 Wall Mounting, 5, 24 O OSD Brightness Adjustment, 52 Closed Caption...
...Features Closed Caption, 36 Closed Caption Style, 37 Language, 36 Reset, 37 Sleep Timer, 36 DTV Tuner Setup Auto Search, 35 Daylight Saving, 36 Skip Channel, 35 Time Zone, 36 Tuner Mode, 35 DVI Connecting your DVD Player, 19 Connecting your HDTV Set-Top Box, 16 G Glossary, 53 H HDMI Connecting your DVD Player, 19 Connecting your HDTV Set-Top Box, 15 HDMI Input Audio Adjustment, 41 Picture Adjustment, 41 Setup, 41 I Inputs Antenna, 3 Connectors, 13 Rear Label, 9 Installation Base removal, 5 Preparation, 5 Safety Instructions, 2 Wall Mounting, 5, 24 O OSD Brightness Adjustment, 52 Closed Caption...


