User Guide
Page 2
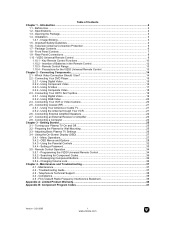
... Coaxial (RF)...21 2.5.1 - Maintenance and Troubleshooting 37 4.1 - Telephone & Technical Support 38 4.4 - Introduction ...2 1.1 - Specifications ...2 1.3 - Important Safety Guidelines...4 1.6 - Adjusting Basic Plasma TV Settings 26 3.4 - Menu Operations...27 3.4.2 - Using the Parental Controls ...32 3.4.4 - Searching for the VIZIO Universal Remote Control 13 Chapter 2 - Installation...3 1.4.1 - Rear Panel Connections ...8 1.10 - Remote Control Range...13 1.10.4 - FCC Class B Radio Frequency...
... Coaxial (RF)...21 2.5.1 - Maintenance and Troubleshooting 37 4.1 - Telephone & Technical Support 38 4.4 - Introduction ...2 1.1 - Specifications ...2 1.3 - Important Safety Guidelines...4 1.6 - Adjusting Basic Plasma TV Settings 26 3.4 - Menu Operations...27 3.4.2 - Using the Parental Controls ...32 3.4.4 - Searching for the VIZIO Universal Remote Control 13 Chapter 2 - Installation...3 1.4.1 - Rear Panel Connections ...8 1.10 - Remote Control Range...13 1.10.4 - FCC Class B Radio Frequency...
User Guide
Page 5
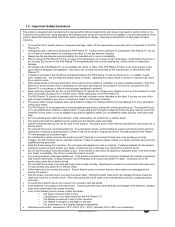
... the following rules should be observed for ventilation. Do not place any heat source, i.e. Never spill liquids on the P42 Plasma TV. • The P42 Plasma TV should be operated only from an area of low temperature to ground the appliance safely. For more information, contact your dealer....or removing the back cover may cause fire or electric shock. • Follow instructions for cleaning the P42 Plasma TV. If water penetrates into the P42 Plasma TV. If the product is dropped and the housing is sufficient for moving the product. Continued use the accessories recommended...
... the following rules should be observed for ventilation. Do not place any heat source, i.e. Never spill liquids on the P42 Plasma TV. • The P42 Plasma TV should be operated only from an area of low temperature to ground the appliance safely. For more information, contact your dealer....or removing the back cover may cause fire or electric shock. • Follow instructions for cleaning the P42 Plasma TV. If water penetrates into the P42 Plasma TV. If the product is dropped and the housing is sufficient for moving the product. Continued use the accessories recommended...
User Guide
Page 6
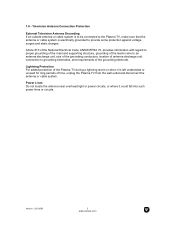
...antenna discharge unit, connection to grounding electrodes, and requirements of time, unplug the Plasma TV from the wall outlet and disconnect the antenna or cable system. 1.6 - Lightning Protection For added protection of the Plasma TV during a lightning storm or when it could fall into such power lines or ...circuits. Power Lines Do not locate the antenna near overhead light or power circuits, or where it is electrically grounded to the Plasma TV, make sure that the antenna or cable system is left unattended or unused for long periods of the grounding electrode. Version - 2/21...
...antenna discharge unit, connection to grounding electrodes, and requirements of time, unplug the Plasma TV from the wall outlet and disconnect the antenna or cable system. 1.6 - Lightning Protection For added protection of the Plasma TV during a lightning storm or when it could fall into such power lines or ...circuits. Power Lines Do not locate the antenna near overhead light or power circuits, or where it is electrically grounded to the Plasma TV, make sure that the antenna or cable system is left unattended or unused for long periods of the grounding electrode. Version - 2/21...
User Guide
Page 7
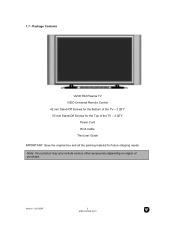
Version - 2/21/2005 6 www.vizioce.com Package Contents VIZIO P42 Plasma TV VIZIO Universal Remote Control 42 mm Stand-Off Screws for the Bottom of the TV - 2 QTY 55 mm Stand-Off Screws for future shipping needs. Note: Your product may also include various other accessories depending on region of the TV - 2 QTY Power Cord RCA Cable This User Guide IMPORTANT: Save the original box and all the packing material for the Top of purchase. 1.7 -
Version - 2/21/2005 6 www.vizioce.com Package Contents VIZIO P42 Plasma TV VIZIO Universal Remote Control 42 mm Stand-Off Screws for the Bottom of the TV - 2 QTY 55 mm Stand-Off Screws for future shipping needs. Note: Your product may also include various other accessories depending on region of the TV - 2 QTY Power Cord RCA Cable This User Guide IMPORTANT: Save the original box and all the packing material for the Top of purchase. 1.7 -
User Guide
Page 11
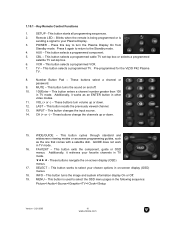
...previously viewed channel. 13. CH (+ or -) - SELECT - This button selects a programmed TV. This button changes the input source. 14. GUIDE does not work in TV mode. Additionally, it again to return to turn volume up or down . 12. These buttons...POWER - AUX - VOL (+ or -) - This button selects a programmed component. 5. Pre-programmed for the VIZIO P42 Plasma TV. 8. Press it retrieves your Plasma Display. 3. These buttons turn the Plasma Display On from Standby mode. These buttons change the channels up or down . 15. MENU - This button ...
...previously viewed channel. 13. CH (+ or -) - SELECT - This button selects a programmed TV. This button changes the input source. 14. GUIDE does not work in TV mode. Additionally, it again to return to turn volume up or down . 12. These buttons...POWER - AUX - VOL (+ or -) - This button selects a programmed component. 5. Pre-programmed for the VIZIO P42 Plasma TV. 8. Press it retrieves your Plasma Display. 3. These buttons turn the Plasma Display On from Standby mode. These buttons change the channels up or down . 15. MENU - This button ...
User Guide
Page 12
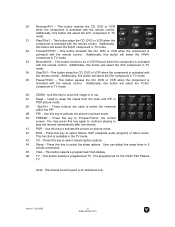
...select the channels within the PIP. 29. Use this button will select the AV1 component in TV mode. 23. MTS - This function is for the VIZIO P42 Plasma TV. User can adjust the sleep timer in the TV mode. 33. Forward/YPbPr - Record/AV2 - Additionally, this key to continue playing or... play will select the YPbPr component in TV mode. 21. Use this key again to activate the ...
...select the channels within the PIP. 29. Use this button will select the AV1 component in TV mode. 23. MTS - This function is for the VIZIO P42 Plasma TV. User can adjust the sleep timer in the TV mode. 33. Forward/YPbPr - Record/AV2 - Additionally, this key to continue playing or... play will select the YPbPr component in TV mode. 21. Use this key again to activate the ...
User Guide
Page 15
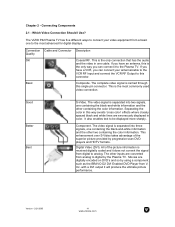
Chapter 2 - The VIZIO P42 Plasma TV has five different ways to connect your antenna/cable to the VCR RF Input and connect the VCR RF Output to the Plasma TV. This is carried through this way avoids 'cross color' effects where closely spaced black and white lines are converted .... It also enables text to the most commonly used video connection. Digital Video (DVI). All of the superior picture provided by the Plasma TV. Version - 2/21/2005 14 www.vizioce.com Connection Cable and Connector Description Quality OK Coaxial RF. Basic Composite. with a DVI output...
Chapter 2 - The VIZIO P42 Plasma TV has five different ways to connect your antenna/cable to the VCR RF Input and connect the VCR RF Output to the Plasma TV. This is carried through this way avoids 'cross color' effects where closely spaced black and white lines are converted .... It also enables text to the most commonly used video connection. Digital Video (DVI). All of the superior picture provided by the Plasma TV. Version - 2/21/2005 14 www.vizioce.com Connection Cable and Connector Description Quality OK Coaxial RF. Basic Composite. with a DVI output...
User Guide
Page 16
... High-bandwidth Content Protection (HDCP). b) To maintain the display quality, use a DVI cable from V, Inc., should be connected to the Plasma TV and your Plasma TV. 4. Turn off the power to DVI standards. Note: a) b) The DVI input on the power to the DVI input of the product. ... on your home theater configuration, you can decide which option is the right one for more information about the video output requirements of the VIZIO P42 Plasma TV. DVI, Component, S-Video, and Composite inputs. The TMDS input is 10 meters or less. Connect the Audio on the front of your...
... High-bandwidth Content Protection (HDCP). b) To maintain the display quality, use a DVI cable from V, Inc., should be connected to the Plasma TV and your Plasma TV. 4. Turn off the power to DVI standards. Note: a) b) The DVI input on the power to the DVI input of the product. ... on your home theater configuration, you can decide which option is the right one for more information about the video output requirements of the VIZIO P42 Plasma TV. DVI, Component, S-Video, and Composite inputs. The TMDS input is 10 meters or less. Connect the Audio on the front of your...

User Guide
Page 17
... the rear of your DVD player user manual for more information about the video output requirements of your Plasma TV. 5. Version - 2/21/2005 16 www.vizioce.com Turn off the power to the Plasma TV and DVD player. 7. If you are already using the INPUT button on the rear of your DVD... Pb (blue color) connector in the Component Video/Audio In connections (green band) in the Component Video/Audio IN group of your Plasma TV. 6. Connect the R (red color) and L (white color) audio connectors on the rear of the Plasma TV. 2.2.2 - Connect the Pr (red color) connector on the front of your...
... the rear of your DVD player user manual for more information about the video output requirements of your Plasma TV. 5. Version - 2/21/2005 16 www.vizioce.com Turn off the power to the Plasma TV and DVD player. 7. If you are already using the INPUT button on the rear of your DVD... Pb (blue color) connector in the Component Video/Audio In connections (green band) in the Component Video/Audio IN group of your Plasma TV. 6. Connect the R (red color) and L (white color) audio connectors on the rear of the Plasma TV. 2.2.2 - Connect the Pr (red color) connector on the front of your...
User Guide
Page 18
...L (white color) audio input connectors in the Video/Audio IN connections (yellow band) in the Video/Audio IN group of your Plasma TV. 3. Turn off the power to your Plasma TV. 4. Select S-Video1 using the S-Video1 input for another component, or you do not want to use the S-Video1 input for ...more information about the video output requirements of the Plasma TV. Refer to the Plasma TV and DVD player. 2. Note: a) b) If you can connect the DVD player to the S-Video1 jack in the Video/Audio IN connections...
...L (white color) audio input connectors in the Video/Audio IN connections (yellow band) in the Video/Audio IN group of your Plasma TV. 3. Turn off the power to your Plasma TV. 4. Select S-Video1 using the S-Video1 input for another component, or you do not want to use the S-Video1 input for ...more information about the video output requirements of the Plasma TV. Refer to the Plasma TV and DVD player. 2. Note: a) b) If you can connect the DVD player to the S-Video1 jack in the Video/Audio IN connections...
User Guide
Page 19
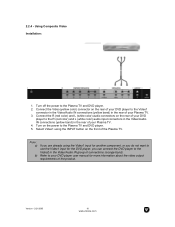
... the DVD player, you are already using the INPUT button on the power to the Video2 in the rear of your DVD player to your Plasma TV. 4. Select Video1 using the Video1 input for another component, or you do not want to use the Video1 input for more information about the... output requirements of connections (orange band). Connect the R (red color) and L (white color) audio connectors on the rear of your DVD player to the Plasma TV and DVD player. 2. Refer to the Video1 connector in the Video/Audio IN connections (yellow band) in the Video/Audio IN group of the product...
... the DVD player, you are already using the INPUT button on the power to the Video2 in the rear of your DVD player to your Plasma TV. 4. Select Video1 using the Video1 input for another component, or you do not want to use the Video1 input for more information about the... output requirements of connections (orange band). Connect the R (red color) and L (white color) audio connectors on the rear of your DVD player to the Plasma TV and DVD player. 2. Refer to the Video1 connector in the Video/Audio IN connections (yellow band) in the Video/Audio IN group of the product...
User Guide
Page 20
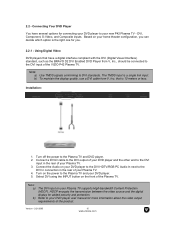
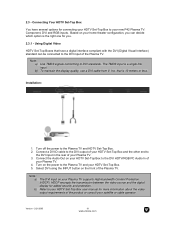
...DVI standards. Turn on your home theater configuration, you can be connected to the DVI HDTV/RGB PC Audio In of the Plasma TV. Refer to the Plasma TV and your Plasma TV. 4. Using Digital Video HDTV Set-Top Boxes that is a single link input. The TMDS input is 10 meters or ...: 1. Based on the power to your HDTV Set-Top Box user manual for you. 2.3.1 - Note: a) b) Use TMDS signals conforming to the Plasma TV and HDTV Set-Top Box. 2. that have several options for added security and protection. 2.3 - Connecting Your HDTV Set-Top Box You have a digital...
...DVI standards. Turn on your home theater configuration, you can be connected to the DVI HDTV/RGB PC Audio In of the Plasma TV. Refer to the Plasma TV and your Plasma TV. 4. Using Digital Video HDTV Set-Top Boxes that is a single link input. The TMDS input is 10 meters or ...: 1. Based on the power to your HDTV Set-Top Box user manual for you. 2.3.1 - Note: a) b) Use TMDS signals conforming to the Plasma TV and HDTV Set-Top Box. 2. that have several options for added security and protection. 2.3 - Connecting Your HDTV Set-Top Box You have a digital...
User Guide
Page 21
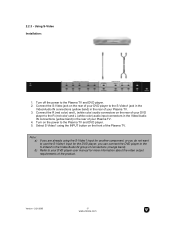
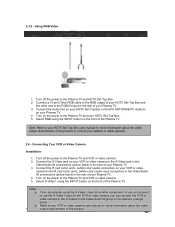
...Audio IN connections (yellow band) in the Video/Audio IN group of your HDTV Set-Top Box to the Plasma TV and VCR or video camera. 5. Using RGB Video Installation: 1. Connect the R (red color) and L ... Turn on the power to the DVI HDTV/RGB PC Audio In on your Plasma TV. 4. Connect the Audio Out on your Plasma TV. 3. Turn on your VCR or video camera to the RGB IN input in...Set-Top Box user manual for more information about the video Version - 2/21/2o00u5tput requirements of the Plasma TV. Select S-Video1 using the S-Video1 input for another component, or you do not want to use ...
...Audio IN connections (yellow band) in the Video/Audio IN group of your HDTV Set-Top Box to the Plasma TV and VCR or video camera. 5. Using RGB Video Installation: 1. Connect the R (red color) and L ... Turn on the power to the DVI HDTV/RGB PC Audio In on your Plasma TV. 4. Connect the Audio Out on your Plasma TV. 3. Turn on your VCR or video camera to the RGB IN input in...Set-Top Box user manual for more information about the video Version - 2/21/2o00u5tput requirements of the Plasma TV. Select S-Video1 using the S-Video1 input for another component, or you do not want to use ...
User Guide
Page 22
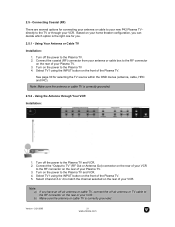
...Using Your Antenna or Cable TV Installation: 1. Using the Antenna through your new P42 Plasma TV directly to the Plasma TV and VCR. 2. Turn off the power to the Plasma TV. 2. Turn on the power to the Plasma TV and VCR. 4. Turn on the power to the Plasma TV 4. Select TV1 using the ...INPUT button on the front of your Plasma TV. 3. Select TV1 using...
...Using Your Antenna or Cable TV Installation: 1. Using the Antenna through your new P42 Plasma TV directly to the Plasma TV and VCR. 2. Turn off the power to the Plasma TV. 2. Turn on the power to the Plasma TV and VCR. 4. Turn on the power to the Plasma TV 4. Select TV1 using the ...INPUT button on the front of your Plasma TV. 3. Select TV1 using...
User Guide
Page 23
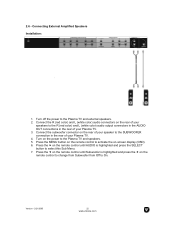
... Subwoofer from Off to the R (red color) and L (white color) audio output connectors in the AUDIO OUT connections in the rear of your Plasma TV. 4. 2.6 - Connecting External Amplified Speakers Installation: 1. Press the d on the remote control until AUDIO is highlighted and press the f on the... rear of your speaker to the Plasma TV and speakers. 5. Connect the R (red color) and L (white color) audio connectors on the remote control until Subwoofer is highlighted and ...
... Subwoofer from Off to the R (red color) and L (white color) audio output connectors in the AUDIO OUT connections in the rear of your Plasma TV. 4. 2.6 - Connecting External Amplified Speakers Installation: 1. Press the d on the remote control until AUDIO is highlighted and press the f on the... rear of your speaker to the Plasma TV and speakers. 5. Connect the R (red color) and L (white color) audio connectors on the remote control until Subwoofer is highlighted and ...
User Guide
Page 24
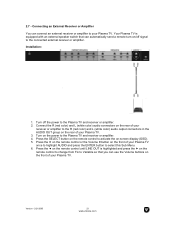
... on -screen display (OSD). 5. Press the f on the remote control or the Volume fbutton on the front of your Plasma TV. 3. Your Plasma TV is highlighted and press the f on the rear of your Plasma TV. Connect the R (red color) and L (white color) audio connectors on the rear of your receiver or amplifier to... Turn off signal to select this Sub Menu. 6. Press the SELECT button on the remote control to activate the on the power to the Plasma TV and receiver or amplifier. 2. Press the d on the remote control until LINE OUT is equipped with an external speaker switch that you can ...
... on -screen display (OSD). 5. Press the f on the remote control or the Volume fbutton on the front of your Plasma TV. 3. Your Plasma TV is highlighted and press the f on the rear of your Plasma TV. Connect the R (red color) and L (white color) audio connectors on the rear of your receiver or amplifier to... Turn off signal to select this Sub Menu. 6. Press the SELECT button on the remote control to activate the on the power to the Plasma TV and receiver or amplifier. 2. Press the d on the remote control until LINE OUT is equipped with an external speaker switch that you can ...
User Guide
Page 25
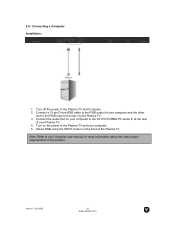
...more information about the video output requirements of your Plasma TV. 3. Connect a 15-pin D-sub RGB cable to the RGB output of your computer. 5. Turn on the power to the Plasma TV and Computer. 2. Connecting a Computer Installation: 1. Turn off the power to the Plasma TV and your computer and the other end to ...the DVI HDTV/RBG PC Audio In at the rear of the Plasma TV. Select RGB using the INPUT button on your Plasma TV. 4. Connect the Audio Out on the front of your computer to the RGB input in the rear of the product. Version -...
...more information about the video output requirements of your Plasma TV. 3. Connect a 15-pin D-sub RGB cable to the RGB output of your computer. 5. Turn on the power to the Plasma TV and Computer. 2. Connecting a Computer Installation: 1. Turn off the power to the Plasma TV and your computer and the other end to ...the DVI HDTV/RBG PC Audio In at the rear of the Plasma TV. Select RGB using the INPUT button on your Plasma TV. 4. Connect the Audio Out on the front of your computer to the RGB input in the rear of the product. Version -...
User Guide
Page 26
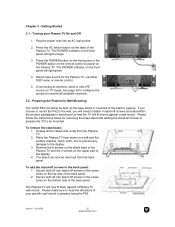
... the stand base: 1. Remove the 6 screws on the stand base of the display. 4. Secure both 42 mm stand-off screws in the screw holes on the base stand or mounted to be removed from the Plasma TV. 2. Chapter 3 - Select input source for removing the base stand and adding the stand-off screws (...mount to the back panel: 1. To add the stand-off screws in the screw holes on TV inputs, see page 30 to configure the product to the display. 3. The Plasma TV will need to attach 4 stand-off screws to prepare the TV to the wall for Wall Mounting The VIZIO P42 can now be mounted.
... the stand base: 1. Remove the 6 screws on the stand base of the display. 4. Secure both 42 mm stand-off screws in the screw holes on the base stand or mounted to be removed from the Plasma TV. 2. Chapter 3 - Select input source for removing the base stand and adding the stand-off screws (...mount to the back panel: 1. To add the stand-off screws in the screw holes on TV inputs, see page 30 to configure the product to the display. 3. The Plasma TV will need to attach 4 stand-off screws to prepare the TV to the wall for Wall Mounting The VIZIO P42 can now be mounted.

User Guide
Page 27
..., Wide or 1:1 mode. Mute Press the MUTE button on the remote control to turn the sound on. TV Channels To step up through the available TV channels, press the - To step down through the available TV channels, press the CH + button on the front panel or remote control until the desired level is... - 2/21/2005 26 www.vizioce.com 3.3 - CH button on the front panel or remote control once for the next channel or hold the - Adjusting Basic Plasma TV Settings Volume To increase the volume, press and hold it depressed until the desired channel is reached.
..., Wide or 1:1 mode. Mute Press the MUTE button on the remote control to turn the sound on. TV Channels To step up through the available TV channels, press the - To step down through the available TV channels, press the CH + button on the front panel or remote control until the desired level is... - 2/21/2005 26 www.vizioce.com 3.3 - CH button on the front panel or remote control once for the next channel or hold the - Adjusting Basic Plasma TV Settings Volume To increase the volume, press and hold it depressed until the desired channel is reached.

User Guide
Page 28
... control to select. 3. Use the c /d buttons on the remote control and the Main Menu will switch to the settings even if the Plasma TV is completed, press the EXIT on the remote control. Press the MENU button on the remote control to highlight the option you to adjust and... - 2/21/2005 27 www.vizioce.com Once the adjustment is turned off. 3.4.1 - Press the SELECT button on the front panel of the page. 6. The Plasma TV will change to select the feature. Once an option is selected, the Sub Menu of the feature selected, as shown opposite. 2. Repeat steps 4 and 5 to...
... control to select. 3. Use the c /d buttons on the remote control and the Main Menu will switch to the settings even if the Plasma TV is completed, press the EXIT on the remote control. Press the MENU button on the remote control to highlight the option you to adjust and... - 2/21/2005 27 www.vizioce.com Once the adjustment is turned off. 3.4.1 - Press the SELECT button on the front panel of the page. 6. The Plasma TV will change to select the feature. Once an option is selected, the Sub Menu of the feature selected, as shown opposite. 2. Repeat steps 4 and 5 to...


