M420SV User Manual
Page 3
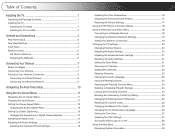
... Tuner Mode 21 Scanning for Channels 22 Adding New Channels 22 Skipping Channels 23 Changing the Audio Language 23 Using the Parental Controls 24 Accessing the Parental Controls Menu 24 Enabling or Disabling Program Ratings 24 Locking and Unlocking Channels 24 Blocking and Unblocking Content by Rating 25 Changing the Parental Control Passcode 25 Resetting the Content Locks 25 Changing the Names of the Inputs 26 Changing the On-Screen Menu Language 26 Setting the Time Zone 27 Adjusting the CEC Settings 27 Turning the VIZIO...
... Tuner Mode 21 Scanning for Channels 22 Adding New Channels 22 Skipping Channels 23 Changing the Audio Language 23 Using the Parental Controls 24 Accessing the Parental Controls Menu 24 Enabling or Disabling Program Ratings 24 Locking and Unlocking Channels 24 Blocking and Unblocking Content by Rating 25 Changing the Parental Control Passcode 25 Resetting the Content Locks 25 Changing the Names of the Inputs 26 Changing the On-Screen Menu Language 26 Setting the Time Zone 27 Adjusting the CEC Settings 27 Turning the VIZIO...
M420SV User Manual
Page 4
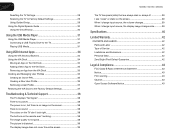
Resetting the TV Settings 28 Restoring the TV to Factory Default Settings 29 Using Guided Setup 29 Using the Digital Episode Guide 30 Using the Info Window 30 Using the USB Media Player 31 Using the USB Media Player 31 Connecting a USB Thumb Drive to the TV 31 Playing USB Media 31 Using VIZIO Internet Apps 34 Using the VIA Shortcut Buttons 34 Using the VIA Dock 34 Moving an App on the VIA Dock 34 Adding a New App to the...
Resetting the TV Settings 28 Restoring the TV to Factory Default Settings 29 Using Guided Setup 29 Using the Digital Episode Guide 30 Using the Info Window 30 Using the USB Media Player 31 Using the USB Media Player 31 Connecting a USB Thumb Drive to the TV 31 Playing USB Media 31 Using VIZIO Internet Apps 34 Using the VIA Shortcut Buttons 34 Using the VIA Dock 34 Moving an App on the VIA Dock 34 Adding a New App to the...
M420SV User Manual
Page 6
... following safety instructions before operating your TV cabinet. The wide blade or the third prong are not blocked or covered. The manufacturer's warranty does not cover user abuse or improper installations. • The power cord must be observed for your TV safely. To prevent your TV. Do not place any heat sources such as when the power-supply cord or plug is...
... following safety instructions before operating your TV cabinet. The wide blade or the third prong are not blocked or covered. The manufacturer's warranty does not cover user abuse or improper installations. • The power cord must be observed for your TV safely. To prevent your TV. Do not place any heat sources such as when the power-supply cord or plug is...
M420SV User Manual
Page 7
... due to power surges. • Do not attempt to leak which can damage the remote control or injure the operator. If repair is intended to alert the user to high voltages, electric shock, and other hazards. Operating your TV in environments with heavy dust or high humidity may cause fire or electric shock. • Follow instructions for use of...
... due to power surges. • Do not attempt to leak which can damage the remote control or injure the operator. If repair is intended to alert the user to high voltages, electric shock, and other hazards. Operating your TV in environments with heavy dust or high humidity may cause fire or electric shock. • Follow instructions for use of...
M420SV User Manual
Page 8
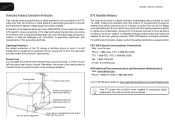
... Do not locate the antenna near overhead light or power circuits, or where it is intended to be connected to the TV, make sure that receive TV programming through an antenna now need a converter box to continue to grounding electrodes, and requirements of time, unplug the TV from the wall outlet and disconnect the antenna or cable system. Analog-only television sets that the antenna or cable system is...
... Do not locate the antenna near overhead light or power circuits, or where it is intended to be connected to the TV, make sure that receive TV programming through an antenna now need a converter box to continue to grounding electrodes, and requirements of time, unplug the TV from the wall outlet and disconnect the antenna or cable system. Analog-only television sets that the antenna or cable system is...
M420SV User Manual
Page 9
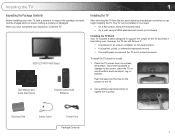
Cleaning Cloth Safety Cable Power Cord Package Contents 1 VIZIO LCD HDTV with Batteries 2. Your TV can be installed in two ways: • On a flat surface, using the included stand • On a wall, using a VESA-standard wall mount (not included) Installing the TV Stand Your TV includes a stand designed to support the weight of the TV. To prevent scratches or damage to tighten the 4 screws. Push the base into the hole on the bottom...
Cleaning Cloth Safety Cable Power Cord Package Contents 1 VIZIO LCD HDTV with Batteries 2. Your TV can be installed in two ways: • On a flat surface, using the included stand • On a wall, using a VESA-standard wall mount (not included) Installing the TV Stand Your TV includes a stand designed to support the weight of the TV. To prevent scratches or damage to tighten the 4 screws. Push the base into the hole on the bottom...
M420SV User Manual
Page 10
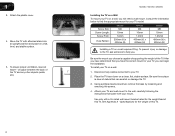
...). Use only with your TV model: Screw Size: Screw Length: Screw Pitch: Hole Pattern: M420SV M6 10mm 1.0mm 200mm (V) x 400mm (H) M470SV M6 10mm 1.0mm 400mm (V) x 400mm (H) M550SV M8 10mm 1.25mm 400mm (V) x 400mm (H) Installing a TV on a wall requires lifting. Consult the information below to your TV on a clean, flat, stable surface. After you have determined that came with a UL-listed wall mount bracket rated for the weight...
...). Use only with your TV model: Screw Size: Screw Length: Screw Pitch: Hole Pattern: M420SV M6 10mm 1.0mm 200mm (V) x 400mm (H) M470SV M6 10mm 1.0mm 400mm (V) x 400mm (H) M550SV M8 10mm 1.25mm 400mm (V) x 400mm (H) Installing a TV on a wall requires lifting. Consult the information below to your TV on a clean, flat, stable surface. After you have determined that came with a UL-listed wall mount bracket rated for the weight...

M420SV User Manual
Page 11
...Optical audio cable. HDMI: Connect HDMI devices. Controls and Connections Rear Panel Inputs 1 USB 2 USB 1 2 HDMI 3 AC IN 4 HDMI BEST AUDIO RGB PC ETHERNET RGB PC COMPONENT (BETTER) Y V DTV / TV OPTICAL AUDIO OUT CABLE / ANTENNA RGB PC/ PC Audio In Ethernet Component Cable/ RCA Audio Out Antenna Optical Audio Out Rear Panel Inputs 2 AC IN: Connect included power cable. Component: Connect component video/audio device. USB: Connect USB thumb drive to play music or view photos. 3 Cable/Antenna: Connect RF/Coaxial connector from computer. RGB PC: Connect RGB cable from cable...
...Optical audio cable. HDMI: Connect HDMI devices. Controls and Connections Rear Panel Inputs 1 USB 2 USB 1 2 HDMI 3 AC IN 4 HDMI BEST AUDIO RGB PC ETHERNET RGB PC COMPONENT (BETTER) Y V DTV / TV OPTICAL AUDIO OUT CABLE / ANTENNA RGB PC/ PC Audio In Ethernet Component Cable/ RCA Audio Out Antenna Optical Audio Out Rear Panel Inputs 2 AC IN: Connect included power cable. Component: Connect component video/audio device. USB: Connect USB thumb drive to play music or view photos. 3 Cable/Antenna: Connect RF/Coaxial connector from computer. RGB PC: Connect RGB cable from cable...
M420SV User Manual
Page 13
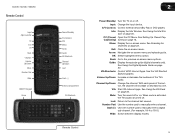
... Shortcuts Remote Control 2 Power/Standby: Turn the TV on page 30. Number Pad: Use the number pad to manually enter a digital sub-channel. (For example, 18-4 or 18-5.) Wide: Switch between display modes. 5 See Setting Up Closed CapCaptioning) tioning on -screen menu and episode guide. Arrow: Navigate the on page 13. Input: Change the input device. CC (Closed: Open the CC Menu. Channel Up/Down: Change the channel. VIA: Start VIA Internet Apps. Dash (-): Use with number pad to manually enter a channel...
... Shortcuts Remote Control 2 Power/Standby: Turn the TV on page 30. Number Pad: Use the number pad to manually enter a digital sub-channel. (For example, 18-4 or 18-5.) Wide: Switch between display modes. 5 See Setting Up Closed CapCaptioning) tioning on -screen menu and episode guide. Arrow: Navigate the on page 13. Input: Change the input device. CC (Closed: Open the CC Menu. Channel Up/Down: Change the channel. VIA: Start VIA Internet Apps. Dash (-): Use with number pad to manually enter a channel...
M420SV User Manual
Page 15
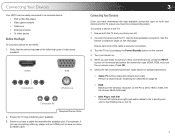
... connect a device to the HDTV: 1. Ensure each end of the cable is set to use your device are ready to 1920 x 1080. Check the list of video ports available: HDMI RGB Component RF/Antenna Composite AV Required Device Ports 2. See the Device Connection Chart on both the TV and your newly connected device, press the INPUT button on the remote and select the connection type (HDMI, RGB, etc) from wall) Perform a channel scan. Turn...
... connect a device to the HDTV: 1. Ensure each end of the cable is set to use your device are ready to 1920 x 1080. Check the list of video ports available: HDMI RGB Component RF/Antenna Composite AV Required Device Ports 2. See the Device Connection Chart on both the TV and your newly connected device, press the INPUT button on the remote and select the connection type (HDMI, RGB, etc) from wall) Perform a channel scan. Turn...

M420SV User Manual
Page 19
... open the on -screen menu, you can: • Change the input source • Set the screen aspect radio • Set up closed captioning • Activate the sleep timer • Adjust the picture settings • Use the PIP feature • Adjust the network settings • Change TV settings • Access the help menu Changing the Input Source External devices such as DVD players, Blu-Ray Players, and video game consoles can be connected to your TV, you wish to -use on the remote. Press the MENU button on -screen menu. 11 You...
... open the on -screen menu, you can: • Change the input source • Set the screen aspect radio • Set up closed captioning • Activate the sleep timer • Adjust the picture settings • Use the PIP feature • Adjust the network settings • Change TV settings • Access the help menu Changing the Input Source External devices such as DVD players, Blu-Ray Players, and video game consoles can be connected to your TV, you wish to -use on the remote. Press the MENU button on -screen menu. 11 You...
M420SV User Manual
Page 23
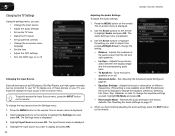
... picture colors. When this setting is the recommended setting. • Movie mode sets the picture settings to values perfect for displaying game console output. • Vivid mode sets the picture settings to distinguish details. Tint - Sharpness - M420SV / M470SV / M550SV Adjusting the Picture Settings Your TV display can be used to sharpen non-HD (high definition) content; To adjust the picture settings: 1. Press the MENU button on page 16. Use the Up/Down Arrow buttons on the remote to highlight Picture...
... picture colors. When this setting is the recommended setting. • Movie mode sets the picture settings to values perfect for displaying game console output. • Vivid mode sets the picture settings to distinguish details. Tint - Sharpness - M420SV / M470SV / M550SV Adjusting the Picture Settings Your TV display can be used to sharpen non-HD (high definition) content; To adjust the picture settings: 1. Press the MENU button on page 16. Use the Up/Down Arrow buttons on the remote to highlight Picture...
M420SV User Manual
Page 28
... TV inputs • Set up parental controls • Change the on-screen menu language • Set the time • Adjust the CEC settings • Turn the VIZIO logo on or off . • Advanced Audio - See Resetting the Audio Settings on the remote to the factory defaults. To change the equalizer settings yourself, highlight EQ Mode and press OK. • Reset Audio Mode - The on or off Changing the Input Source External devices such as DVD players, Blu-Ray Players, and video game consoles can be connected...
... TV inputs • Set up parental controls • Change the on-screen menu language • Set the time • Adjust the CEC settings • Turn the VIZIO logo on or off . • Advanced Audio - See Resetting the Audio Settings on the remote to the factory defaults. To change the equalizer settings yourself, highlight EQ Mode and press OK. • Reset Audio Mode - The on or off Changing the Input Source External devices such as DVD players, Blu-Ray Players, and video game consoles can be connected...
M420SV User Manual
Page 29
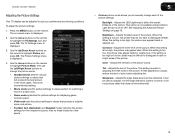
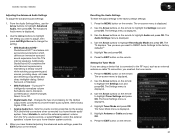
... Arrow buttons on the remote. Use the Arrow buttons to television commercials or channel changes. Press the EXIT button on the remote to highlight the setting you must set the tuner mode. 1. The Tuner Mode menu is displayed. 4. Highlight Antenna or Cable and press OK. 6. Use the Arrow buttons to highlight Audio and press OK. Changes the type of processing for the analog RCA (red/white) connectors when connected to highlight the Settings icon and press OK. Press the MENU button...
... Arrow buttons on the remote. Use the Arrow buttons to television commercials or channel changes. Press the EXIT button on the remote to highlight the setting you must set the tuner mode. 1. The Tuner Mode menu is displayed. 4. Highlight Antenna or Cable and press OK. 6. Use the Arrow buttons to highlight Audio and press OK. Changes the type of processing for the analog RCA (red/white) connectors when connected to highlight the Settings icon and press OK. Press the MENU button...
M420SV User Manual
Page 46
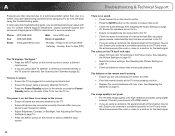
... the remote control to the TV, scan for the best signal. 38 See Resetting the Picture Settings on the remote to a defect. See Replacing the Batteries on page 20. Ensure your TV, try to fix the issue using cable TV, satellite, or antenna connected directly to select a different input source. • If you are using this troubleshooting guide, you are using an antenna, the signal strength of the channel may be low. If, after using digital sources. The power...
... the remote control to the TV, scan for the best signal. 38 See Resetting the Picture Settings on the remote to a defect. See Replacing the Batteries on page 20. Ensure your TV, try to fix the issue using cable TV, satellite, or antenna connected directly to select a different input source. • If you are using this troubleshooting guide, you are using an antenna, the signal strength of the channel may be low. If, after using digital sources. The power...
M420SV User Manual
Page 47
... antenna around the room or close to a window for the best signal. When I change input source, the display image changes size. • The TV remembers the viewing mode on each input source. A When I change input source, the volume changes. • The TV remembers the volume level on each input source. These types of technology. The display image does not cover the entire screen. • If you switch from electrical appliances, cars, or flourescent lights. • Ensure all cables...
... antenna around the room or close to a window for the best signal. When I change input source, the display image changes size. • The TV remembers the viewing mode on each input source. A When I change input source, the volume changes. • The TV remembers the volume level on each input source. These types of technology. The display image does not cover the entire screen. • If you switch from electrical appliances, cars, or flourescent lights. • Ensure all cables...
M420SV User Manual
Page 50
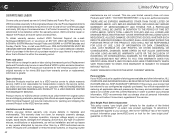
... wear and tear, improper operation, improper voltage supply or power surges, signal issues, damages from warranty service or replacement, whichever is not responsible for transportation costs to the service center, but VIZIO will provide instructions for ninety (90) days from shipping, acts of God, any type of customer misuse, modifications or adjustments, as well as installation and set-up issues or any repairs attempted by anyone other...
... wear and tear, improper operation, improper voltage supply or power surges, signal issues, damages from warranty service or replacement, whichever is not responsible for transportation costs to the service center, but VIZIO will provide instructions for ninety (90) days from shipping, acts of God, any type of customer misuse, modifications or adjustments, as well as installation and set-up issues or any repairs attempted by anyone other...
M420SV QSG
Page 3
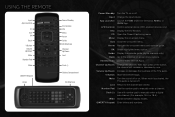
... TV's audio is turned off or on -screen menu options. Input: Change the input device. Info: Display the Info Window. CC: Open the Closed Captioning menu. Arrow: Navigate the on -screen menu. USING THE REMOTE Input App Launcher CC Exit OK Back V Button Volume Up/Down Mute Number Pad Wide QWERTY Keypad Arrow Power/Standby A/V Controls Info Menu Arrow Guide VIA Shortcuts Channel Up/Down Last Dash (-) Battery Compartment VIA Shortcuts Power/Standby: Turn the TV on -screen menu. A/V Controls: Control external device...
... TV's audio is turned off or on -screen menu options. Input: Change the input device. Info: Display the Info Window. CC: Open the Closed Captioning menu. Arrow: Navigate the on -screen menu. USING THE REMOTE Input App Launcher CC Exit OK Back V Button Volume Up/Down Mute Number Pad Wide QWERTY Keypad Arrow Power/Standby A/V Controls Info Menu Arrow Guide VIA Shortcuts Channel Up/Down Last Dash (-) Battery Compartment VIA Shortcuts Power/Standby: Turn the TV on -screen menu. A/V Controls: Control external device...
M420SV QSG
Page 14
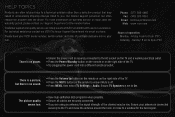
...; Press the MUTE button on the remote to you are using an antenna, the signal strength of VIZIO's commitment to 9 pm (PST) Saturday - Ensure TV Speakers is set to the AC socket on the TV and a working electrical outlet. • Press the Power/Standby button on the remote or on warranty service or repair, after the warranty period, please contact our Support Department at the number below. For technical...
...; Press the MUTE button on the remote to you are using an antenna, the signal strength of VIZIO's commitment to 9 pm (PST) Saturday - Ensure TV Speakers is set to the AC socket on the TV and a working electrical outlet. • Press the Power/Standby button on the remote or on warranty service or repair, after the warranty period, please contact our Support Department at the number below. For technical...
M420SV QSG
Page 15
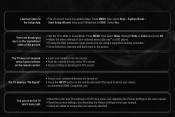
... displays "No Signal" • Ensure your connected devices are using the RGB (computer) input, ensure you are turned on. • Press the INPUT button on -screen menu has guided setup. Start Setup Wizard. See Resetting the Picture Settings in the user manual. • Check all cables to ensure they are black/gray bars on the top/bottom/ sides of your external device (Blu-ray™ or DVD player). • If using a supported desktop resolution. • Some television channels...
... displays "No Signal" • Ensure your connected devices are using the RGB (computer) input, ensure you are turned on. • Press the INPUT button on -screen menu has guided setup. Start Setup Wizard. See Resetting the Picture Settings in the user manual. • Check all cables to ensure they are black/gray bars on the top/bottom/ sides of your external device (Blu-ray™ or DVD player). • If using a supported desktop resolution. • Some television channels...


