Download
Page 3
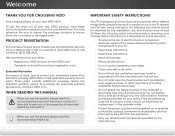
...Do not block any heat sources such as radiators, heat registers, stoves, or other components to ensure there are provided for your new VIZIO HDTV. These plans provide additional coverage during the standard warranty period. Install in a safe place for future reference. • To reduce...• Clean only with the manufacturer's instructions. • Do not install near any ventilation openings. When Reading this Manual When you either: • Register your VIZIO product at (877) 878-4946. To get the most out of the polarized or grounding-type plug. We recommend...
...Do not block any heat sources such as radiators, heat registers, stoves, or other components to ensure there are provided for your new VIZIO HDTV. These plans provide additional coverage during the standard warranty period. Install in a safe place for future reference. • To reduce...• Clean only with the manufacturer's instructions. • Do not install near any ventilation openings. When Reading this Manual When you either: • Register your VIZIO product at (877) 878-4946. To get the most out of the polarized or grounding-type plug. We recommend...
Download
Page 14
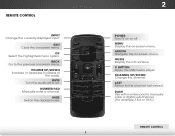
Power Turn TV on . Last Return to manually enter a digital sub-channel. (For example, 18-4 or 18-5.) Remote Control 8 Volume Up/Down Increase or decrease loudness of the audio. Mute Turn the audio ... currently-displayed input. V Button Open the USB media player. Exit Close the on -screen menu. Back Go to the previous on -screen menu. Number Pad Manually enter a channel. Wide Switch the display mode. Channel Up/Down Change the channel.
Power Turn TV on . Last Return to manually enter a digital sub-channel. (For example, 18-4 or 18-5.) Remote Control 8 Volume Up/Down Increase or decrease loudness of the audio. Mute Turn the audio ... currently-displayed input. V Button Open the USB media player. Exit Close the on -screen menu. Back Go to the previous on -screen menu. Number Pad Manually enter a channel. Wide Switch the display mode. Channel Up/Down Change the channel.
Download
Page 24
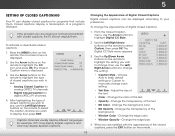
VIZIO Closed Caption Analog Closed Caption Off Digital Closed Caption Off Digital CC Style As Broadcaster Caption channels usually display different languages. Use the Left/Right Arrow buttons on the remote to manually change each Input settWinidge . Change the transparency of a program's dialogue. Change ... Timer CoPlicotur re- From the Closed Caption menu, use the Arrow buttons to highlight the CC icon and press OK. VIZIO Digital CC Style Caption Style Custom Text Size As Broadcast Color As Broadcast Opacity As Broadcast 3. Change the background color. ...
VIZIO Closed Caption Analog Closed Caption Off Digital Closed Caption Off Digital CC Style As Broadcaster Caption channels usually display different languages. Use the Left/Right Arrow buttons on the remote to manually change each Input settWinidge . Change the transparency of a program's dialogue. Change ... Timer CoPlicotur re- From the Closed Caption menu, use the Arrow buttons to highlight the CC icon and press OK. VIZIO Digital CC Style Caption Style Custom Text Size As Broadcast Color As Broadcast Opacity As Broadcast 3. Change the background color. ...
Download
Page 26
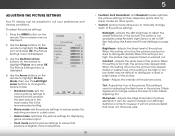
... the remote to highlight Picture and press OK. Use the Up/Down Arrow buttons on the remote to highlight the Picture icon and press OK. VIZIO Picture Settings Picture Mode Backlight Brightness Contrast Color Tint Sharpness Custom - + 50 - + 50 - + 50 - + 50 - +0 - +0 More 4. ...8226; Football, Golf, Basketball, and Baseball modes optimize the picture settings for other sports. • Custom picture mode allows you to manually change the picture mode: • Standard mode sets the various picture settings to suit your preferences and viewing conditions. Adjusts the hue...
... the remote to highlight Picture and press OK. Use the Up/Down Arrow buttons on the remote to highlight the Picture icon and press OK. VIZIO Picture Settings Picture Mode Backlight Brightness Contrast Color Tint Sharpness Custom - + 50 - + 50 - + 50 - + 50 - +0 - +0 More 4. ...8226; Football, Golf, Basketball, and Baseball modes optimize the picture settings for other sports. • Custom picture mode allows you to manually change the picture mode: • Standard mode sets the various picture settings to suit your preferences and viewing conditions. Adjusts the hue...
Download
Page 28
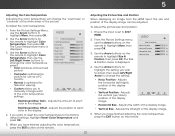
...Adjusting the Picture Size and Position When displaying an image from the HDMI input, the size and position of the color temperature settings: VIZIO Color Temperature Color Temperature Red Gain - The Size & Position menu is optimized for television viewing. • Custom allows you have... and press OK. 5. Position - Adjusts the vertical (up/down) position of the display image. • Horizontal Size - When you to manually change the color temperature preset: • Cool produces a blue-hued picture. • Computer optimizes the picture for use the Left/Right Arrow ...
...Adjusting the Picture Size and Position When displaying an image from the HDMI input, the size and position of the color temperature settings: VIZIO Color Temperature Color Temperature Red Gain - The Size & Position menu is optimized for television viewing. • Custom allows you have... and press OK. 5. Position - Adjusts the vertical (up/down) position of the display image. • Horizontal Size - When you to manually change the color temperature preset: • Cool produces a blue-hued picture. • Computer optimizes the picture for use the Left/Right Arrow ...

Download
Page 40
... button on the remote to highlight the Settings icon and press OK. To turn the Power Indicator Light on or off . See your device's user manual for details. To enable, disable, or adjust CEC settings: 1. Use the Arrow buttons on the remote. When system audio control is connected and supports CEC...
... button on the remote to highlight the Settings icon and press OK. To turn the Power Indicator Light on or off . See your device's user manual for details. To enable, disable, or adjust CEC settings: 1. Use the Arrow buttons on the remote. When system audio control is connected and supports CEC...

Download
Page 47
... to On. • Ensure no image on the screen. • Ensure all devices are securely attached to select a different input source. Ensure your device's user manual for details. • Adjust Brightness, Contrast, or Backlight. A The TV displays "No Signal." • Press the INPUT button on the remote control to select a different...
... to On. • Ensure no image on the screen. • Ensure all devices are securely attached to select a different input source. Ensure your device's user manual for details. • Adjust Brightness, Contrast, or Backlight. A The TV displays "No Signal." • Press the INPUT button on the remote control to select a different...

Download
Page 4
DOWNLOAD THE FULL USER MANUAL AT VIZIO.COM/SUPPORT PACKAGE CONTENTS VIZIO LED HDTV with Stand Power Cord 3 x M4 12mm Phillips Screws Remote Control with Batteries This Quick Start Guide 3 x T4 16mm Phillips Screws HELP VIZIO REDUCE PAPER WASTE.
DOWNLOAD THE FULL USER MANUAL AT VIZIO.COM/SUPPORT PACKAGE CONTENTS VIZIO LED HDTV with Stand Power Cord 3 x M4 12mm Phillips Screws Remote Control with Batteries This Quick Start Guide 3 x T4 16mm Phillips Screws HELP VIZIO REDUCE PAPER WASTE.

Download
Page 5
A/V CONTROLS Control USB media player. ARROW Navigate the on -screen menu. LAST Return to manually enter a digital sub-channel. (For example, 18-4 or 18-5.) OK Select the highlighted menu option. NUMBER PAD Manually enter a channel. MENU Display the on -screen menu. CHANNEL UP/DOWN Change the channel. INFO Display the info window. EXIT...
A/V CONTROLS Control USB media player. ARROW Navigate the on -screen menu. LAST Return to manually enter a digital sub-channel. (For example, 18-4 or 18-5.) OK Select the highlighted menu option. NUMBER PAD Manually enter a channel. MENU Display the on -screen menu. CHANNEL UP/DOWN Change the channel. INFO Display the info window. EXIT...

