
Download
Page 4
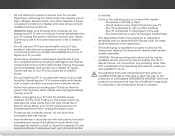
... liquids on your TV and easily accessible. • Only power of the grounded plug. • When connected to qualified service personnel. This will fit only into your TV safely. The manufacturer's warranty does not cover user abuse or improper installations. • The power cord must be installed near your TV. • Your TV should be replaced when using different voltage than the specified...
... liquids on your TV and easily accessible. • Only power of the grounded plug. • When connected to qualified service personnel. This will fit only into your TV safely. The manufacturer's warranty does not cover user abuse or improper installations. • The power cord must be installed near your TV. • Your TV should be replaced when using different voltage than the specified...
Download
Page 5
... damage the remote control or injure the operator. Do not expose your dealer for repair. If any of electrical shock to dripping or splashing and no objects fill with heavy dust or high humidity may cause fire or electric shock. • Do not install your dealer immediately. Continued use by qualified service personnel only. The power cord fails or...
... damage the remote control or injure the operator. Do not expose your dealer for repair. If any of electrical shock to dripping or splashing and no objects fill with heavy dust or high humidity may cause fire or electric shock. • Do not install your dealer immediately. Continued use by qualified service personnel only. The power cord fails or...
Download
Page 6
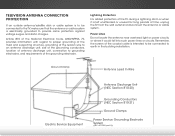
...; Television Antenna Connection Protection If an outside antenna/satellite dish or cable system is to be connected to the TV, make sure that the antenna or cable system is intended to be connected to earth in wire to an antenna discharge unit, size of the grounding conductors, location of antenna discharge unit, connection to grounding electrodes, and requirements of time, unplug the TV from the wall...
...; Television Antenna Connection Protection If an outside antenna/satellite dish or cable system is to be connected to the TV, make sure that the antenna or cable system is intended to be connected to earth in wire to an antenna discharge unit, size of the grounding conductors, location of antenna discharge unit, connection to grounding electrodes, and requirements of time, unplug the TV from the wall...
Download
Page 7
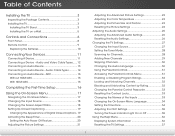
... Stand 3 Installing the TV on a Wall 5 Controls and Connections 6 Front Panel 8 Remote Control 9 Replacing the Batteries 10 Connecting Your Devices 11 Connecting A Device 11 Connecting a Device - Audio and Video Cable Types....... 12 Connecting an Audio Device 13 Connecting an Audio Device - Table of the Inputs 33 Changing the On-Screen Menu Language 34 Setting the Time Zone 34 Adjusting the CEC Settings 35 Turning the Power Indicator Light On or Off 35 Using the Help Menu 36 Displaying System Information 36 Resetting the TV Settings 37 1 Audio Cable Types 14 Connecting...
... Stand 3 Installing the TV on a Wall 5 Controls and Connections 6 Front Panel 8 Remote Control 9 Replacing the Batteries 10 Connecting Your Devices 11 Connecting A Device 11 Connecting a Device - Audio and Video Cable Types....... 12 Connecting an Audio Device 13 Connecting an Audio Device - Table of the Inputs 33 Changing the On-Screen Menu Language 34 Setting the Time Zone 34 Adjusting the CEC Settings 35 Turning the Power Indicator Light On or Off 35 Using the Help Menu 36 Displaying System Information 36 Resetting the TV Settings 37 1 Audio Cable Types 14 Connecting...
Download
Page 10
..., flat, stable surface. Be sure the surface is capable of supporting the weight of this TV. 4 Use only with the TV and tighten the three(3) T4 16mm phillips screws into the TV. To prevent scratches or damage to your TV model: Installing a TV on a wall requires lifting. Align the base with a UL-listed wall mount bracket rated for your TV. 2. E320-A1 Screw Size: Screw Pitch: Screw Length: Hole Pattern...
..., flat, stable surface. Be sure the surface is capable of supporting the weight of this TV. 4 Use only with the TV and tighten the three(3) T4 16mm phillips screws into the TV. To prevent scratches or damage to your TV model: Installing a TV on a wall requires lifting. Align the base with a UL-listed wall mount bracket rated for your TV. 2. E320-A1 Screw Size: Screw Pitch: Screw Length: Hole Pattern...

Download
Page 16
... ) DT V / TV OP TICAL C A B L E /A N T E N N A 10 3 Cable/Satellite Box DVD/Blu-ray Player Game Console HDMI CABLE BEST • DIGITAL • HD VIDEO (1080p)* • HD AUDIO COMPONENT CABLE BETTER • ANALOG • HD VIDEO (1080P)* • STEREO AUDIO AV CABLE GOOD • ANALOG • VIDEO (480i)* • STEREO AUDIO * Maximum Resolution Connecting Your Devices Connecting A Device Your TV can be used (HDMI, Component, etc). Set the TV's input to match the connection you used to the TV and the device. 4.
... ) DT V / TV OP TICAL C A B L E /A N T E N N A 10 3 Cable/Satellite Box DVD/Blu-ray Player Game Console HDMI CABLE BEST • DIGITAL • HD VIDEO (1080p)* • HD AUDIO COMPONENT CABLE BETTER • ANALOG • HD VIDEO (1080P)* • STEREO AUDIO AV CABLE GOOD • ANALOG • VIDEO (480i)* • STEREO AUDIO * Maximum Resolution Connecting Your Devices Connecting A Device Your TV can be used (HDMI, Component, etc). Set the TV's input to match the connection you used to the TV and the device. 4.

Download
Page 25
.... Use the Arrow buttons on the remote. The Sleep Timer menu is displayed. 4. Press OK, then press EXIT. From the Sleep Timer menu, use the sleep timer: 1. The Timers menu is displayed. 3. Setting the Auto Power Off Feature To help save energy, your TV is set the Auto Power Off feature: 1. The WiAdeuto ZPooomwer-NOorfmf aml ePnaunoriasmdicisplayed. 2. Press Exit. Exit 2D 3D ABC Input Wide CC Sleep Timer Picture Audio Network Settings Help 19 5 Activating the Sleep Timer When activated, the TV's sleep timer will turn...
.... Use the Arrow buttons on the remote. The Sleep Timer menu is displayed. 4. Press OK, then press EXIT. From the Sleep Timer menu, use the sleep timer: 1. The Timers menu is displayed. 3. Setting the Auto Power Off Feature To help save energy, your TV is set the Auto Power Off feature: 1. The WiAdeuto ZPooomwer-NOorfmf aml ePnaunoriasmdicisplayed. 2. Press Exit. Exit 2D 3D ABC Input Wide CC Sleep Timer Picture Audio Network Settings Help 19 5 Activating the Sleep Timer When activated, the TV's sleep timer will turn...
Download
Page 26
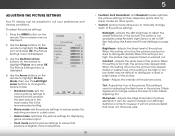
... this setting is displayed. ContraAsBtC- When this setting is displayed. 2. Network Tint - If flesh SeattipngpseaHrselptoo orange, reduce the level of the picture. Use the Arrow buttons on the remote to highlight Picture Mode, then use the Left/Right Arrow buttons to change each of the picture settings: Wide Exit Input Sleep Timer Backlight - Adjusts the white level of color before adjusting tint. Sharpness - Use the Arrow buttons on the remote to manually change the picture mode: • Standard mode sets the various picture settings...
... this setting is displayed. ContraAsBtC- When this setting is displayed. 2. Network Tint - If flesh SeattipngpseaHrselptoo orange, reduce the level of the picture. Use the Arrow buttons on the remote to highlight Picture Mode, then use the Left/Right Arrow buttons to change each of the picture settings: Wide Exit Input Sleep Timer Backlight - Adjusts the white level of color before adjusting tint. Sharpness - Use the Arrow buttons on the remote to manually change the picture mode: • Standard mode sets the various picture settings...
Download
Page 30
...® intelligently normalizes volume fluctuations due to the factory defaults. See Adjusting the Advanced Audio Settings on -screen menu is displayed. See Resetting the Audio Settings on the remote to Standard.) Change the equalizer presets by maintaining a steady volume while watching programming and movies, providing deep, rich bass, and delivering crisp details and clear, intelligible dialog. VIZIO Audio Audio Mode Balance - Input Wide CC Sleep Timer Picture Audio Network Settings Help 24 Use the Arrow buttons on Exit pa2gDe 25...
...® intelligently normalizes volume fluctuations due to the factory defaults. See Adjusting the Advanced Audio Settings on -screen menu is displayed. See Resetting the Audio Settings on the remote to Standard.) Change the equalizer presets by maintaining a steady volume while watching programming and movies, providing deep, rich bass, and delivering crisp details and clear, intelligible dialog. VIZIO Audio Audio Mode Balance - Input Wide CC Sleep Timer Picture Audio Network Settings Help 24 Use the Arrow buttons on Exit pa2gDe 25...
Download
Page 31
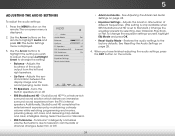
... controls. The Advanced Audio menu is displayed. 2. Sets the volume control properties for the Optical output when connected to control the external speakers' volume from the TV's volume controls, or select Fixed to a home theater audio system. When you wish to adjust, then press Left/Right Arrow to change the setting: • Digital Audio Out Changes the type of processing for the analog RCA (red/ white) connectors when connected to highlight Reset Audio Mode and press OK. Use the Arrow buttons to a home theater audio...
... controls. The Advanced Audio menu is displayed. 2. Sets the volume control properties for the Optical output when connected to control the external speakers' volume from the TV's volume controls, or select Fixed to a home theater audio system. When you wish to adjust, then press Left/Right Arrow to change the setting: • Digital Audio Out Changes the type of processing for the analog RCA (red/ white) connectors when connected to highlight Reset Audio Mode and press OK. Use the Arrow buttons to a home theater audio...

Download
Page 32
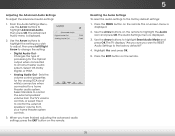
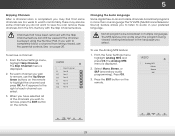
... the remote. Press the MENU button on -screen menu language • Set the time • Adjust the CEC settings • Adjust the Power Light settings VIZIO Settings Input Source Tuner Name Input Parental Controls Menu Language Time & Local Settings CEC Settings Power Light TV English On Changing the Input Source To change the input source from the Settings menu: 1. The Input Source menu is displayed. 3. 5 Changing the TV Settings Using the settings menu, you want to highlight the Settings icon and press OK. ABC Input Wide CC Sleep Timer Picture Audio Network Settings Help...
... the remote. Press the MENU button on -screen menu language • Set the time • Adjust the CEC settings • Adjust the Power Light settings VIZIO Settings Input Source Tuner Name Input Parental Controls Menu Language Time & Local Settings CEC Settings Power Light TV English On Changing the Input Source To change the input source from the Settings menu: 1. The Input Source menu is displayed. 3. 5 Changing the TV Settings Using the settings menu, you want to highlight the Settings icon and press OK. ABC Input Wide CC Sleep Timer Picture Audio Network Settings Help...
Download
Page 35
... channel you wish to -air and cable channels broadcast programs in more than one language.The TV's MTS (Multichannel Television Sound) feature allows you select. 3. You can still be some channels are broadcast in the language you select. See on the remote. From the Tuner Settings menu, highlight Skip Channel. VIZIO Skip Channel 0 Test 0 x 0-1 Test 1 x 0-1 Test 2 x 0 Test 3 x 0-2 Test 4 x 0-3 Test 5 x Changing the Audio Language Some digital free-to remove, use the Analog...
... channel you wish to -air and cable channels broadcast programs in more than one language.The TV's MTS (Multichannel Television Sound) feature allows you select. 3. You can still be some channels are broadcast in the language you select. See on the remote. From the Tuner Settings menu, highlight Skip Channel. VIZIO Skip Channel 0 Test 0 x 0-1 Test 1 x 0-1 Test 2 x 0 Test 3 x 0-2 Test 4 x 0-3 Test 5 x Changing the Audio Language Some digital free-to remove, use the Analog...

Download
Page 47
See Scanning for the best signal. The power is on, but there is off. • Check the audio settings. There is no sound. • Press Volume Up on the remote control. • Press the MUTE button on the remote to ensure mute is no headphones are connected to select a different input source. The colors on page 9 41 See Replacing the Batteries on the TV don't look right. •...
See Scanning for the best signal. The power is on, but there is off. • Check the audio settings. There is no sound. • Press Volume Up on the remote control. • Press the MUTE button on the remote to ensure mute is no headphones are connected to select a different input source. The colors on page 9 41 See Replacing the Batteries on the TV don't look right. •...

Download
Page 48
... adjust the volume. If the viewing mode on each input source. Connect your antenna is up -converting can sometimes cause irregularities in the image. • If you switch from , the difference may be noticable. • See Changing the Screen Aspect Ratio on -screen menu are using TV, AV, or Component with 480i input, press the WIDE button on the remote to change input source, the display image changes size. • The TV remembers the viewing mode...
... adjust the volume. If the viewing mode on each input source. Connect your antenna is up -converting can sometimes cause irregularities in the image. • If you switch from , the difference may be noticable. • See Changing the Screen Aspect Ratio on -screen menu are using TV, AV, or Component with 480i input, press the WIDE button on the remote to change input source, the display image changes size. • The TV remembers the viewing mode...

Download
Page 51
... tear, improper operation, improper voltage supply or power surges, signal issues, damages from the unit before it is serviced, regardless of a purchase receipt or copy thereof is required to the customer. Proof of purchase in United States and Puerto Rico Only. VIZIO provides a warranty to 4:00PM Saturday and Sunday, Pacific Time, or visit www.VIZIO.com. ANY IMPLIED WARRANTIES, INCLUDING ANY...
... tear, improper operation, improper voltage supply or power surges, signal issues, damages from the unit before it is serviced, regardless of a purchase receipt or copy thereof is required to the customer. Proof of purchase in United States and Puerto Rico Only. VIZIO provides a warranty to 4:00PM Saturday and Sunday, Pacific Time, or visit www.VIZIO.com. ANY IMPLIED WARRANTIES, INCLUDING ANY...

Download
Page 2
..., stand, tripod, bracket, or table specified by qualified service personnel only. Operating your TV. To ensure reliable operation of your TV and to protect it will fit only into your TV to rain or moisture. Do not place any objects on the label. The manufacturer's warranty does not cover user abuse or improper installations. • The power cord must be used for...
..., stand, tripod, bracket, or table specified by qualified service personnel only. Operating your TV. To ensure reliable operation of your TV and to protect it will fit only into your TV to rain or moisture. Do not place any objects on the label. The manufacturer's warranty does not cover user abuse or improper installations. • The power cord must be used for...

Download
Page 4
DOWNLOAD THE FULL USER MANUAL AT VIZIO.COM/SUPPORT PACKAGE CONTENTS VIZIO LED HDTV with Stand Power Cord 3 x M4 12mm Phillips Screws Remote Control with Batteries This Quick Start Guide 3 x T4 16mm Phillips Screws HELP VIZIO REDUCE PAPER WASTE.
DOWNLOAD THE FULL USER MANUAL AT VIZIO.COM/SUPPORT PACKAGE CONTENTS VIZIO LED HDTV with Stand Power Cord 3 x M4 12mm Phillips Screws Remote Control with Batteries This Quick Start Guide 3 x T4 16mm Phillips Screws HELP VIZIO REDUCE PAPER WASTE.

Download
Page 14
... ON. Use the AC cords listed below for compliance could void the user's authority to operate this device must accept any , must be determined by one or more of the following two conditions: (1) this device may cause undesired operation. TROUBLESHOOTING There is no power. • Be sure the power cord is no sound. • Press the Volume Up button on the remote or on...
... ON. Use the AC cords listed below for compliance could void the user's authority to operate this device must accept any , must be determined by one or more of the following two conditions: (1) this device may cause undesired operation. TROUBLESHOOTING There is no power. • Be sure the power cord is no sound. • Press the Volume Up button on the remote or on...
Download
Page 15
... this warranty is within the warranty period, VIZIO will be sent to a VIZIO service center to the customer. Products with unreadable or removed serial numbers, or requiring routine maintenance are warranted for the remaining portion of the original warranty or for example: cosmetic damage, normal wear and tear, improper operation, improper voltage supply or power surges, signal issues, damages from warranty service or replacement, whichever is serviced, regardless...
... this warranty is within the warranty period, VIZIO will be sent to a VIZIO service center to the customer. Products with unreadable or removed serial numbers, or requiring routine maintenance are warranted for the remaining portion of the original warranty or for example: cosmetic damage, normal wear and tear, improper operation, improper voltage supply or power surges, signal issues, damages from warranty service or replacement, whichever is serviced, regardless...

Download
Page 2
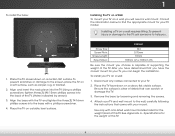
... 12ft HDMI® cable can be used are the property of VIZIO Inc. VIZIO 32" CLASS LED TV TV SPECIFICATIONS Screen Size Diagonal Viewable TV Type Refresh Rate Maximum Resolution Remote Control Type Ambient Light Sensor Energy Star Qualified Power Wall Mount & Screw Size 32" Class 31.5" LED 60Hz 720p XRT010 Yes ENERGY STAR® 5.3 36W 100mm (V) x 100mm (H), M4 x 0.7mm x 10mm WARRANTY 1 year CONNECTIONS HDMI Inputs Component Video Inputs Composite Inputs RF Antenna Input USB Ports Stereo Audio (RCA) Number of Speakers / Watts Premium Audio 2 1 1 (shared with component) 1 1 1 2 x 5W...
... 12ft HDMI® cable can be used are the property of VIZIO Inc. VIZIO 32" CLASS LED TV TV SPECIFICATIONS Screen Size Diagonal Viewable TV Type Refresh Rate Maximum Resolution Remote Control Type Ambient Light Sensor Energy Star Qualified Power Wall Mount & Screw Size 32" Class 31.5" LED 60Hz 720p XRT010 Yes ENERGY STAR® 5.3 36W 100mm (V) x 100mm (H), M4 x 0.7mm x 10mm WARRANTY 1 year CONNECTIONS HDMI Inputs Component Video Inputs Composite Inputs RF Antenna Input USB Ports Stereo Audio (RCA) Number of Speakers / Watts Premium Audio 2 1 1 (shared with component) 1 1 1 2 x 5W...


