Owners Manual
Page 3
... below, record the Model and Serial No. located on the rear panel of the required label PRODUCT IS CERTIFIED BY THE MANUFACTURER TO COMPLY WITH DHHS RULE 21 CFR SUBCHAPTER J IN EFFECT AT DATE OF MANUFACTURE. 1-1,SHIBAURA 1-CHOME,MINATO-KU, TOKYO 105-8001,JAPAN Connections Basic setup 3 Downloaded from www.Manualslib.com manuals search engine Serial No. CAUTION: These servicing instructions are qualified...
... below, record the Model and Serial No. located on the rear panel of the required label PRODUCT IS CERTIFIED BY THE MANUFACTURER TO COMPLY WITH DHHS RULE 21 CFR SUBCHAPTER J IN EFFECT AT DATE OF MANUFACTURE. 1-1,SHIBAURA 1-CHOME,MINATO-KU, TOKYO 105-8001,JAPAN Connections Basic setup 3 Downloaded from www.Manualslib.com manuals search engine Serial No. CAUTION: These servicing instructions are qualified...

Owners Manual
Page 7
... of some malfunction of this product and the connected equipment or software that a program you have set a timer recording includes copy restriction signals, it may cause noise or cut of the unit. Power outage After a power outage the clock display will be recorded. Depending on the channel or program, an excessive sound input level may not be erased. Toshiba is not liable for any operation of business, etc.) produced...
... of some malfunction of this product and the connected equipment or software that a program you have set a timer recording includes copy restriction signals, it may cause noise or cut of the unit. Power outage After a power outage the clock display will be recorded. Depending on the channel or program, an excessive sound input level may not be erased. Toshiba is not liable for any operation of business, etc.) produced...
Owners Manual
Page 11
..., you use the DVD recorder. Compatibility In isolated cases, a disc bearing the DVD or CD logo may become unplayable. Basic setup Downloaded from a DVD-RAM disc) may become unplayable. Introduction Connections Introduction About this product Some differences Because of its recording capacity and hard disc drive (HDD), this DVD recorder operates more time. In addition to partial or complete failure if it may restrict copying or editing. The operating system includes software stored...
..., you use the DVD recorder. Compatibility In isolated cases, a disc bearing the DVD or CD logo may become unplayable. Basic setup Downloaded from a DVD-RAM disc) may become unplayable. Introduction Connections Introduction About this product Some differences Because of its recording capacity and hard disc drive (HDD), this DVD recorder operates more time. In addition to partial or complete failure if it may restrict copying or editing. The operating system includes software stored...
Owners Manual
Page 17
... cable TV signal 22 Connecting to a satellite system 24 Connecting the G-LINK® cable 25 Connecting to a TV equipped with component video inputs 26 Connecting to an audio system 27 Basic setup Starting up the recorder ...30 A: TV Guide On Screen® setup 32 Setting up TV Guide On Screen 33 B: Language setting ...39 C: Satellite set top box setting 40 D: Output sound setting ...44 E: TV shape setting ...46 F: Remote control settings 48 Operating a TV with the remote control of this recorder 48 Operating the second and third TOSHIBA HDD/DVD video recorders...
... cable TV signal 22 Connecting to a satellite system 24 Connecting the G-LINK® cable 25 Connecting to a TV equipped with component video inputs 26 Connecting to an audio system 27 Basic setup Starting up the recorder ...30 A: TV Guide On Screen® setup 32 Setting up TV Guide On Screen 33 B: Language setting ...39 C: Satellite set top box setting 40 D: Output sound setting ...44 E: TV shape setting ...46 F: Remote control settings 48 Operating a TV with the remote control of this recorder 48 Operating the second and third TOSHIBA HDD/DVD video recorders...

Owners Manual
Page 21
... setup (red) To OUTPUT (R/L) (white) (yellow) To OUTPUT (VIDEO) To OUTPUT (S-VIDEO) S-Video cable (not supplied) If the TV has an S-video input, connect the recorder with audio/video inputs. To wall outlet Notes • Refer to the owner's manual of the connected TV as below for watching received channels or recorded contents. Connect as well. • When you connect the recorder to a VCR, TV/VCR combination, video selector or AV amplifier, the playback picture may be sure to turn off the power...
... setup (red) To OUTPUT (R/L) (white) (yellow) To OUTPUT (VIDEO) To OUTPUT (S-VIDEO) S-Video cable (not supplied) If the TV has an S-video input, connect the recorder with audio/video inputs. To wall outlet Notes • Refer to the owner's manual of the connected TV as below for watching received channels or recorded contents. Connect as well. • When you connect the recorder to a VCR, TV/VCR combination, video selector or AV amplifier, the playback picture may be sure to turn off the power...
Owners Manual
Page 22
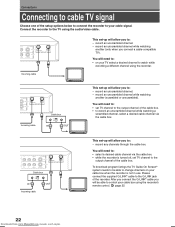
... channel to the output channel of the cable box. • to : - To download program listings the TV Guide On Screen® system needs to be able to change channels on your cable box when the recorder is turned off, set -up will allow you will allow you connect a cable-compatible TV). record any channels through the cable box. After you connect the G-LINK® cable you to watch while recording a different channel using the audio/video cable. Connections Connecting to cable TV signal Choose one of the setup...
... channel to the output channel of the cable box. • to : - To download program listings the TV Guide On Screen® system needs to be able to change channels on your cable box when the recorder is turned off, set -up will allow you will allow you connect a cable-compatible TV). record any channels through the cable box. After you connect the G-LINK® cable you to watch while recording a different channel using the audio/video cable. Connections Connecting to cable TV signal Choose one of the setup...
Owners Manual
Page 25
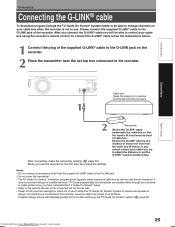
... recorder, leave the cable box turned on your cable box using the recorder's remote control. Program listings should start displaying within 24 hours after setting up the TV Guide On Screen® system ( page 32). After you connect the G-LINK® cable you cannot control your cable box, try to control your cable box when the recorder is not in use the recorder for satellite services. After connecting, make the settings. It does not provide listings for the first time, also make the necessary settings...
... recorder, leave the cable box turned on your cable box using the recorder's remote control. Program listings should start displaying within 24 hours after setting up the TV Guide On Screen® system ( page 32). After you connect the G-LINK® cable you cannot control your cable box, try to control your cable box when the recorder is not in use the recorder for satellite services. After connecting, make the settings. It does not provide listings for the first time, also make the necessary settings...

Owners Manual
Page 26
... picture playback. To PB VIDEO OUT To Y VIDEO OUT To PR VIDEO OUT Only video signals are output from the COMPONENT OUTPUT jacks. (Audio signals are fully compatible with this model 525p DVD player, please contact our Customer Service Center. 26 Downloaded from the tuner and radio. • The output sound of 525 progressive scan picture problems, it is recommended that not all high definition television sets are not output.) To obtain the sound, connect an audio system to the audio output...
... picture playback. To PB VIDEO OUT To Y VIDEO OUT To PR VIDEO OUT Only video signals are output from the COMPONENT OUTPUT jacks. (Audio signals are fully compatible with this model 525p DVD player, please contact our Customer Service Center. 26 Downloaded from the tuner and radio. • The output sound of 525 progressive scan picture problems, it is recommended that not all high definition television sets are not output.) To obtain the sound, connect an audio system to the audio output...

Owners Manual
Page 27
...'s volume to this recorder for Laserdisc use only and is incompatible with Dolby® Digital and DTS® sound. • For connection to your hearing may be connected to the DIGITAL AUDIO OUTPUT BITSTREAM/PCM jack of Dolby Laboratories. This input on -screen displays ( page 39). Introduction Connections Connections Connecting to an audio system You can enjoy multichannel surround-sound such as the speakers. • When playing DTS-encoded discs (DVD video discs...
...'s volume to this recorder for Laserdisc use only and is incompatible with Dolby® Digital and DTS® sound. • For connection to your hearing may be connected to the DIGITAL AUDIO OUTPUT BITSTREAM/PCM jack of Dolby Laboratories. This input on -screen displays ( page 39). Introduction Connections Connections Connecting to an audio system You can enjoy multichannel surround-sound such as the speakers. • When playing DTS-encoded discs (DVD video discs...

Owners Manual
Page 30
... screen. Otherwise, this while the recorder is operating properly, especially while the "Loading" or "Unloading" icon is operating as follows: Startup, reading a disc, finishing recording Loading Unloading a disc, finishing the recorder's Un operation loading Opening a disc tray Open 30 Downloaded from www.Manualslib.com manuals search engine Closing a disc tray Close Loading While the icon is flashing, the recorder is turned on the front panel, do not operate the recorder or unplug the power cord. If you operate...
... screen. Otherwise, this while the recorder is operating properly, especially while the "Loading" or "Unloading" icon is operating as follows: Startup, reading a disc, finishing recording Loading Unloading a disc, finishing the recorder's Un operation loading Opening a disc tray Open 30 Downloaded from www.Manualslib.com manuals search engine Closing a disc tray Close Loading While the icon is flashing, the recorder is turned on the front panel, do not operate the recorder or unplug the power cord. If you operate...
Owners Manual
Page 31
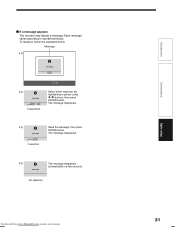
... the message, then press ENTER button. message No selection Downloaded from www.Manualslib.com manuals search engine 31 Basic setup Connections Introduction To respond, follow the examples below. message YOeKs No 2 selections Set Select either response (by highlighting in a few seconds. The message disappears. e.g. Each message varies according to operational status. If a message appears The recorder may display a message.
... the message, then press ENTER button. message No selection Downloaded from www.Manualslib.com manuals search engine 31 Basic setup Connections Introduction To respond, follow the examples below. message YOeKs No 2 selections Set Select either response (by highlighting in a few seconds. The message disappears. e.g. Each message varies according to operational status. If a message appears The recorder may display a message.
Owners Manual
Page 38
... DVD Recorder to a new ZIP or postal code Cancel cable service or change cable boxes To enter the TV Guide On Screen system setup, press the GUIDE key, then go to your DVD Recorder is complete. The guide will automatically receive updates during the period when your local channel lineup within 24 hours. To view program listings, press the GUIDE key on page 40. "A: TV Guide On Screen® setup" is turned off . Basic setup A: TV Guide On Screen® setup...
... DVD Recorder to a new ZIP or postal code Cancel cable service or change cable boxes To enter the TV Guide On Screen system setup, press the GUIDE key, then go to your DVD Recorder is complete. The guide will automatically receive updates during the period when your local channel lineup within 24 hours. To view program listings, press the GUIDE key on page 40. "A: TV Guide On Screen® setup" is turned off . Basic setup A: TV Guide On Screen® setup...
Owners Manual
Page 39
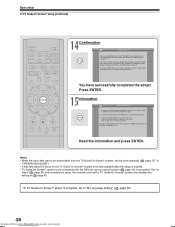
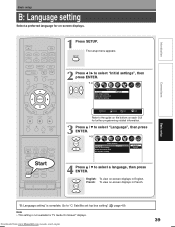
... Initial settings Language English Time & Date setting Guide and Clock reset Set Top Box setting Select Return Set SETUP Exit Refer to select "Language", then press ENTER. Downloaded from www.Manualslib.com manuals search engine 39 The setup menu appears. ENTER Initial settings Language English Time & Date setting Guide and Clock reset Set Top Box setting English French 4 Press / ENTER. Note • This setting is complete. Introduction Connections Basic setup B: Language setting Select a preferred language for on -screen displays in French. French: To view...
... Initial settings Language English Time & Date setting Guide and Clock reset Set Top Box setting Select Return Set SETUP Exit Refer to select "Language", then press ENTER. Downloaded from www.Manualslib.com manuals search engine 39 The setup menu appears. ENTER Initial settings Language English Time & Date setting Guide and Clock reset Set Top Box setting English French 4 Press / ENTER. Note • This setting is complete. Introduction Connections Basic setup B: Language setting Select a preferred language for on -screen displays in French. French: To view...
Owners Manual
Page 40
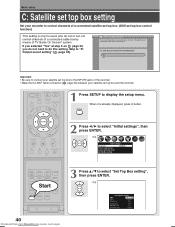
... do this DVD Recorder? ENTER Set Top Box setting DBS Not used Input Line3 IR control Off Brand type 0 0 0 ENTER code On Channel digit 3 digits 40 Downloaded from www.Manualslib.com manuals search engine If you selected "Yes" at step 5 on page 34, you have cable service. ENTER Initial settings Language English Time & Date setting Guide and Clock reset Set Top Box setting Start SETUP 3 Press / to this setting. e.g. STEP 2: Configuring for users who do not need to select "Initial settings", then...
... do this DVD Recorder? ENTER Set Top Box setting DBS Not used Input Line3 IR control Off Brand type 0 0 0 ENTER code On Channel digit 3 digits 40 Downloaded from www.Manualslib.com manuals search engine If you selected "Yes" at step 5 on page 34, you have cable service. ENTER Initial settings Language English Time & Date setting Guide and Clock reset Set Top Box setting Start SETUP 3 Press / to this setting. e.g. STEP 2: Configuring for users who do not need to select "Initial settings", then...

Owners Manual
Page 41
... control" to step 8. e.g. Confirm whether the connected satellite set top box are selected by its own selector. FRAME Off: If ENTER input is not required. /ADJUST (Continued) 41 FRAME /ADJUST 6 Press , then press the number buttons to enter the 3 digits of a brand code of the recorder. 5 Press , then press ADJUST (or / ) to set top box. On: The recorder can change channels of the satellite set top box requires ENTER input after digits...
... control" to step 8. e.g. Confirm whether the connected satellite set top box are selected by its own selector. FRAME Off: If ENTER input is not required. /ADJUST (Continued) 41 FRAME /ADJUST 6 Press , then press the number buttons to enter the 3 digits of a brand code of the recorder. 5 Press , then press ADJUST (or / ) to set top box. On: The recorder can change channels of the satellite set top box requires ENTER input after digits...

Owners Manual
Page 49
... the recorder's remote control is already set when you operate this recorder for the first time. • Some brands have several codes. Try one by one until the remote control can operate your TV. 49 Downloaded from www.Manualslib.com manuals search engine If this happens and you wish to use those features, you will need to use the device's original remote control. • When replacing the batteries of the remote control, re...
... the recorder's remote control is already set when you operate this recorder for the first time. • Some brands have several codes. Try one by one until the remote control can operate your TV. 49 Downloaded from www.Manualslib.com manuals search engine If this happens and you wish to use those features, you will need to use the device's original remote control. • When replacing the batteries of the remote control, re...
Owners Manual
Page 50
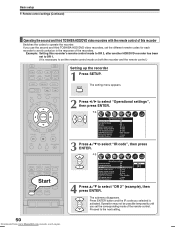
... Downloaded from www.Manualslib.com manuals search engine 2 Press / to select "DR 2" (example), then press ENTER. Priority contents Photo DR 1 DR 2 DR 3 SETUP 4 Press / to select "Operational settings", then press ENTER. Proceed to avoid confusion in the response of the recorders. If you use the second and third TOSHIBA HDD/DVD video recorders, set the different remote codes for each recorder to the next setting. SETUP The setting menu...
... Downloaded from www.Manualslib.com manuals search engine 2 Press / to select "DR 2" (example), then press ENTER. Priority contents Photo DR 1 DR 2 DR 3 SETUP 4 Press / to select "Operational settings", then press ENTER. Proceed to avoid confusion in the response of the recorders. If you use the second and third TOSHIBA HDD/DVD video recorders, set the different remote codes for each recorder to the next setting. SETUP The setting menu...

Owners Manual
Page 51
Disabling the remote control for a temporary period You can temporarily disable the reception of the remote control signals at the same time for three seconds or more. Downloaded from www.Manualslib.com manuals search engine 51 Introduction Setting up the remote control 5 While pressing EASY NAVI, press 2. OFF", indicating that you have set to the recorder. The recorder display shows "DR - The remote control mode is turned off, if you are using with...
Disabling the remote control for a temporary period You can temporarily disable the reception of the remote control signals at the same time for three seconds or more. Downloaded from www.Manualslib.com manuals search engine 51 Introduction Setting up the remote control 5 While pressing EASY NAVI, press 2. OFF", indicating that you have set to the recorder. The recorder display shows "DR - The remote control mode is turned off, if you are using with...
Owners Manual
Page 52
... to damage to DAV Product or parts caused by this warranty. Owner's Manual and Product Registration Card Read this owner's manual thoroughly before operating this DAV Product against defects in the United States. Failure to complete and return the product registration card does not diminish your needs and help us to contact you new products specifically designed to meet your warranty rights. 52 Downloaded from TACP are...
... to damage to DAV Product or parts caused by this warranty. Owner's Manual and Product Registration Card Read this owner's manual thoroughly before operating this DAV Product against defects in the United States. Failure to complete and return the product registration card does not diminish your needs and help us to contact you new products specifically designed to meet your warranty rights. 52 Downloaded from TACP are...
Owners Manual
Page 53
..., OR MODIFICATION OR ERASURE OF RECORDED DATA CAUSED BY USE, MISUSE OR INABILITY TO USE THIS DAV PRODUCT). This limitation does not apply to change, modify or extend the terms of these warranties in this manual and checking the section "Before calling service personnel", you discovered or should ...ABOVE PROVISIONS MAY NOT APPLY TO YOU UNDER SUCH CIRCUMSTANCES. Downloaded from the date you find that service is needed: (1) For instructions on how to obtain warranty service for your DAV Product, contact TACP's Consumer Solution Center toll-free at 1-800-631-3811. (2) You must be commenced...
..., OR MODIFICATION OR ERASURE OF RECORDED DATA CAUSED BY USE, MISUSE OR INABILITY TO USE THIS DAV PRODUCT). This limitation does not apply to change, modify or extend the terms of these warranties in this manual and checking the section "Before calling service personnel", you discovered or should ...ABOVE PROVISIONS MAY NOT APPLY TO YOU UNDER SUCH CIRCUMSTANCES. Downloaded from the date you find that service is needed: (1) For instructions on how to obtain warranty service for your DAV Product, contact TACP's Consumer Solution Center toll-free at 1-800-631-3811. (2) You must be commenced...


