
User Guide
Page 63
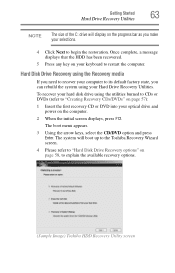
The boot menu appears. 3 Using the arrow keys, select the CD/DVD option and press Enter. Once complete, a message displays that the HDD has been recovered. 5 Press any key on page 58, to explain the available recovery options. (Sample Image) Toshiba HDD Recovery Utility screen Hard Disk Drive Recovery... When the initial screen displays, press F12. Getting Started 63 Hard Drive Recovery Utilities NOTE The size of the C: drive will boot up to the Toshiba Recovery Wizard screen. 4 Please refer to "Hard Disk Drive Recovery options" on your keyboard to restart the computer. To recover ...
The boot menu appears. 3 Using the arrow keys, select the CD/DVD option and press Enter. Once complete, a message displays that the HDD has been recovered. 5 Press any key on page 58, to explain the available recovery options. (Sample Image) Toshiba HDD Recovery Utility screen Hard Disk Drive Recovery... When the initial screen displays, press F12. Getting Started 63 Hard Drive Recovery Utilities NOTE The size of the C: drive will boot up to the Toshiba Recovery Wizard screen. 4 Please refer to "Hard Disk Drive Recovery options" on your keyboard to restart the computer. To recover ...
User Guide
Page 153
... 153 NOTE To create a bootable SD card with the Read from a bootable SD card: 1 Create a bootable SD card (see "TOSHIBA SD™ Memory Boot Utility" on page 152 for instructions). 2 Verify that no floppy disk is installed in the optional external floppy disk drive. 3 Insert a bootable SD ...card into the SD card slot. 4 Power on the computer. 5 During the boot process, press the F12 key. Booting from a bootable SD card To boot from an image file option, you need a third-party application. The system displays the Boot menu. 6 Use the arrow keys to select the SD/Floppy icon. 7 Press the ...
... 153 NOTE To create a bootable SD card with the Read from a bootable SD card: 1 Create a bootable SD card (see "TOSHIBA SD™ Memory Boot Utility" on page 152 for instructions). 2 Verify that no floppy disk is installed in the optional external floppy disk drive. 3 Insert a bootable SD ...card into the SD card slot. 4 Power on the computer. 5 During the boot process, press the F12 key. Booting from a bootable SD card To boot from an image file option, you need a third-party application. The system displays the Boot menu. 6 Use the arrow keys to select the SD/Floppy icon. 7 Press the ...
User Guide
Page 181
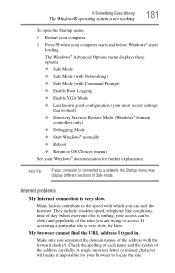
The Windows® Advanced Options menu displays these options: ❖ Safe Mode ❖ Safe Mode (with Networking) ❖ Safe Mode (with Command Prompt) ❖ Enable Boot Logging ❖ Enable VGA Mode ❖ Last known good configuration (your most recent settings that worked) &#...Start Windows® normally ❖ Reboot ❖ Return to the speed with the forward slash (/). Many factors contribute to OS Choices (menu) See your Windows® documentation for your computer is connected to locate the site. If accessing a particular site is very slow. A ...
The Windows® Advanced Options menu displays these options: ❖ Safe Mode ❖ Safe Mode (with Networking) ❖ Safe Mode (with Command Prompt) ❖ Enable Boot Logging ❖ Enable VGA Mode ❖ Last known good configuration (your most recent settings that worked) &#...Start Windows® normally ❖ Reboot ❖ Return to the speed with the forward slash (/). Many factors contribute to OS Choices (menu) See your Windows® documentation for your computer is connected to locate the site. If accessing a particular site is very slow. A ...


