
User Guide
Page 28
... display panel 47 Your computer's features and specifications ....48 Turning on the power 48 Adding memory (optional 49 Installing a memory module 50 Removing a memory module 54 Checking total memory 55 Hard Drive Recovery Utilities 56 Creating Recovery CDs/DVDs 57 Hard Disk Drive Recovery options... 58 Hard Disk Drive Recovery using the Recovery media 63 Installing drivers and applications 64 Using the Toshiba Dual...
... display panel 47 Your computer's features and specifications ....48 Turning on the power 48 Adding memory (optional 49 Installing a memory module 50 Removing a memory module 54 Checking total memory 55 Hard Drive Recovery Utilities 56 Creating Recovery CDs/DVDs 57 Hard Disk Drive Recovery options... 58 Hard Disk Drive Recovery using the Recovery media 63 Installing drivers and applications 64 Using the Toshiba Dual...
User Guide
Page 32
...-esse 150 TOSHIBA SD™ Memory Card Format Utility .........151 TOSHIBA SD™ Memory Boot Utility 152 Booting from a bootable SD card 153 TOSHIBA Power Saver 154 Preset Power Profiles 155 Quickly creating a new power profile 155 Customizing a power profile 155 Mouse Utility 156 TOSHIBA Hardware Setup 157 TOSHIBA Zooming Utility 159 TOSHIBA Mobile Extension 160 TOSHIBA Button Controls...
...-esse 150 TOSHIBA SD™ Memory Card Format Utility .........151 TOSHIBA SD™ Memory Boot Utility 152 Booting from a bootable SD card 153 TOSHIBA Power Saver 154 Preset Power Profiles 155 Quickly creating a new power profile 155 Customizing a power profile 155 Mouse Utility 156 TOSHIBA Hardware Setup 157 TOSHIBA Zooming Utility 159 TOSHIBA Mobile Extension 160 TOSHIBA Button Controls...
User Guide
Page 33
...conflict 182 A plan of action 182 Resolving hardware conflicts on your own .....183 Fixing a problem with Device Manager ...........184 Memory problems 185 Power and the batteries 186 Keyboard problems 188 Display problems 188 Disk drive problems 190 Optical drive problems 192 Sound... backup in the Windows® operating system 203 If you need further assistance 208 Before you contact Toshiba 208 Contacting Toshiba 208 Other Toshiba Internet Web sites 209 Toshiba's worldwide offices 209 Appendix A: Hot Keys 211 Volume Mute 211 Password security 212 Without a password ...
...conflict 182 A plan of action 182 Resolving hardware conflicts on your own .....183 Fixing a problem with Device Manager ...........184 Memory problems 185 Power and the batteries 186 Keyboard problems 188 Display problems 188 Disk drive problems 190 Optical drive problems 192 Sound... backup in the Windows® operating system 203 If you need further assistance 208 Before you contact Toshiba 208 Contacting Toshiba 208 Other Toshiba Internet Web sites 209 Toshiba's worldwide offices 209 Appendix A: Hot Keys 211 Volume Mute 211 Password security 212 Without a password ...
User Guide
Page 42
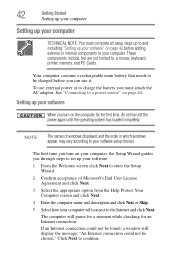
... on the computer for an Internet connection. If an Internet connection could not be charged before adding external or internal components to , a mouse, keyboard, printer, memory, and PC Cards. Click Next to be chosen." Your computer contains a rechargeable main battery that needs to continue. 42 Getting Started Setting up your computer...
... on the computer for an Internet connection. If an Internet connection could not be charged before adding external or internal components to , a mouse, keyboard, printer, memory, and PC Cards. Click Next to be chosen." Your computer contains a rechargeable main battery that needs to continue. 42 Getting Started Setting up your computer...
User Guide
Page 43
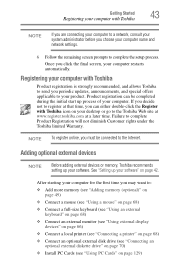
... decide not to register at a later time. Adding optional external devices NOTE Before adding external devices or memory, Toshiba recommends setting up process of your desktop or go to complete Product Registration will not diminish Customer rights under the... starting your computer restarts automatically. Product registration can either double-click the Register with Toshiba Product registration is strongly recommended, and allows Toshiba to send you can be connected to : ❖ Add more memory (see "Adding memory (optional)" on page 49) ❖ Connect a mouse (see "Using a ...
... decide not to register at a later time. Adding optional external devices NOTE Before adding external devices or memory, Toshiba recommends setting up process of your desktop or go to complete Product Registration will not diminish Customer rights under the... starting your computer restarts automatically. Product registration can either double-click the Register with Toshiba Product registration is strongly recommended, and allows Toshiba to send you can be connected to : ❖ Add more memory (see "Adding memory (optional)" on page 49) ❖ Connect a mouse (see "Using a ...

User Guide
Page 49
...on the power The preinstalled operating system will load automatically. Adding memory (optional) HINT: To purchase additional memory modules, see the accessories information packaged with enough memory to increase the computer's memory if you turn on the computer for the first time, do ... second. (Sample Illustration) Turning on page 42. NOTE Before adding external devices or memory, Toshiba recommends setting up your system or visit accessories.toshiba.com. Getting Started 49 Adding memory (optional) 3 Press and hold the power button in until the operating system has ...
...on the power The preinstalled operating system will load automatically. Adding memory (optional) HINT: To purchase additional memory modules, see the accessories information packaged with enough memory to increase the computer's memory if you turn on the computer for the first time, do ... second. (Sample Illustration) Turning on page 42. NOTE Before adding external devices or memory, Toshiba recommends setting up your system or visit accessories.toshiba.com. Getting Started 49 Adding memory (optional) 3 Press and hold the power button in until the operating system has ...
User Guide
Page 50
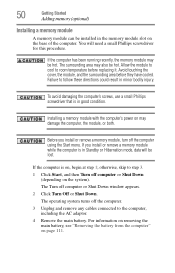
... remove any cables connected to step 3. 1 Click Start, and then Turn off the computer using the Start menu. Before you install or remove a memory module while the computer is in good condition. For information on removing the main battery, see "Removing the battery from the computer" on the system...). Allow the module to cool to follow these directions could result in the memory module slot on , begin at step 1; If you install or remove a memory module, turn off computer or Shut Down (depending on page 111. You will be hot. Installing...
... remove any cables connected to step 3. 1 Click Start, and then Turn off the computer using the Start menu. Before you install or remove a memory module while the computer is in good condition. For information on removing the main battery, see "Removing the battery from the computer" on the system...). Allow the module to cool to follow these directions could result in the memory module slot on , begin at step 1; If you install or remove a memory module, turn off computer or Shut Down (depending on page 111. You will be hot. Installing...
User Guide
Page 51
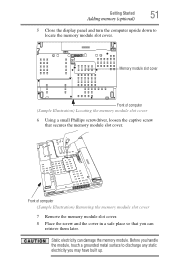
... screwdriver, loosen the captive screw that you can damage the memory module. Before you handle the module, touch a grounded metal surface to locate the memory module slot cover. Memory module slot cover Front of computer (Sample Illustration) Removing the memory module slot cover 7 Remove the memory module slot cover. 8 Place the screw and the cover...
... screwdriver, loosen the captive screw that you can damage the memory module. Before you handle the module, touch a grounded metal surface to locate the memory module slot cover. Memory module slot cover Front of computer (Sample Illustration) Removing the memory module slot cover 7 Remove the memory module slot cover. 8 Place the screw and the cover...
User Guide
Page 52
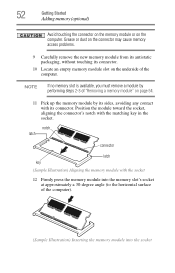
...without touching its connector. Position the module toward the socket, aligning the connector's notch with the socket 12 Firmly press the memory module into the memory slot's socket at approximately a 30-degree angle (to the horizontal surface of the computer. notch latch connector latch key (Sample... of the computer). (Sample Illustration) Inserting the memory module into the socket NOTE If no memory slot is available, you must remove a module by performing steps 2-3 of "Removing a memory module" on page 54. 11 Pick up the memory module by its sides, avoiding any contact with its...
...without touching its connector. Position the module toward the socket, aligning the connector's notch with the socket 12 Firmly press the memory module into the memory slot's socket at approximately a 30-degree angle (to the horizontal surface of the computer. notch latch connector latch key (Sample... of the computer). (Sample Illustration) Inserting the memory module into the socket NOTE If no memory slot is available, you must remove a module by performing steps 2-3 of "Removing a memory module" on page 54. 11 Pick up the memory module by its sides, avoiding any contact with its...
User Guide
Page 53
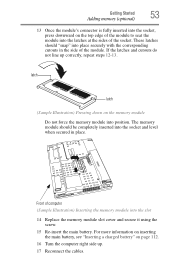
... (Sample Illustration) Inserting the memory module into the slot 14 Replace the memory module slot cover and secure it using the screw. 15 Re-insert the main battery. latch latch (Sample Illustration) Pressing down on the memory module Do not force the memory module into the socket and ...level when secured in the side of the module. Getting Started 53 Adding memory (optional) 13 Once the module's connector is fully inserted into the ...
... (Sample Illustration) Inserting the memory module into the slot 14 Replace the memory module slot cover and secure it using the screw. 15 Re-insert the main battery. latch latch (Sample Illustration) Pressing down on the memory module Do not force the memory module into the socket and ...level when secured in the side of the module. Getting Started 53 Adding memory (optional) 13 Once the module's connector is fully inserted into the ...
User Guide
Page 54
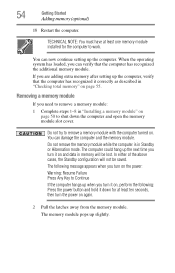
.... The computer could hang up the computer, verify that the computer has recognized the additional memory module. 54 Getting Started Adding memory (optional) 18 Restart the computer. If you are adding extra memory after setting up the next time you can verify that the computer has recognized it down ...the computer and open the memory module slot cover. Do not remove the memory module while the computer is in memory will not be lost. The following : Press the power button and hold it correctly as described in...
.... The computer could hang up the computer, verify that the computer has recognized the additional memory module. 54 Getting Started Adding memory (optional) 18 Restart the computer. If you are adding extra memory after setting up the next time you can verify that the computer has recognized it down ...the computer and open the memory module slot cover. Do not remove the memory module while the computer is in memory will not be lost. The following : Press the power button and hold it correctly as described in...
User Guide
Page 55
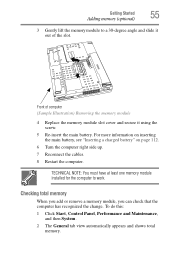
... then System. 2 The General tab view automatically appears and shows total memory. Front of the slot. Getting Started 55 Adding memory (optional) 3 Gently lift the memory module to work. TECHNICAL NOTE: You must have at least one memory module installed for the computer to a 30-degree angle and slide it... out of computer (Sample Illustration) Removing the memory module 4 Replace the memory module slot cover and secure it using the screw. 5 Re-insert the main battery. For more information on inserting the main battery, see...
... then System. 2 The General tab view automatically appears and shows total memory. Front of the slot. Getting Started 55 Adding memory (optional) 3 Gently lift the memory module to work. TECHNICAL NOTE: You must have at least one memory module installed for the computer to a 30-degree angle and slide it... out of computer (Sample Illustration) Removing the memory module 4 Replace the memory module slot cover and secure it using the screw. 5 Re-insert the main battery. For more information on inserting the main battery, see...
User Guide
Page 56
... software features or utilities. 56 Getting Started Hard Drive Recovery Utilities If the computer does not recognize the memory configuration, turn off the computer and remove the memory module slot cover (complete steps 1-8 in "Installing a memory module" on page 50), and then check that you create recovery CDs/DVDs before using a writable drive...
... software features or utilities. 56 Getting Started Hard Drive Recovery Utilities If the computer does not recognize the memory configuration, turn off the computer and remove the memory module slot cover (complete steps 1-8 in "Installing a memory module" on page 50), and then check that you create recovery CDs/DVDs before using a writable drive...
User Guide
Page 72
... consumes less main battery power than restarting from turning off the computer. ❖ Since information is being retrieved from the hard disk rather than from memory, restarting from Hibernation takes a little more time and consumes more main battery power to start up than when restarting from Standby. ❖ When starting up...
... consumes less main battery power than restarting from turning off the computer. ❖ Since information is being retrieved from the hard disk rather than from memory, restarting from Hibernation takes a little more time and consumes more main battery power to start up than when restarting from Standby. ❖ When starting up...
User Guide
Page 73
... battery power. ❖ The Standby command does not store unsaved information on page 78. Factors to turn off . Be sure to the mode in system memory (RAM) so that, when you restart the computer, you can continue working from where you power down using Standby, see "Using and configuring Standby mode...
... battery power. ❖ The Standby command does not store unsaved information on page 78. Factors to turn off . Be sure to the mode in system memory (RAM) so that, when you restart the computer, you can continue working from where you power down using Standby, see "Using and configuring Standby mode...
User Guide
Page 82
... your software documentation for further information. HINT: Some programs have an automatic save it to the disk. See your work stays in the computer's temporary memory until you save feature that can be activated. Computing tips ❖ Save your battery runs out of charge while you are working, you will lose...
... your software documentation for further information. HINT: Some programs have an automatic save it to the disk. See your work stays in the computer's temporary memory until you save feature that can be activated. Computing tips ❖ Save your battery runs out of charge while you are working, you will lose...
User Guide
Page 102
... a configuration that will provide the most stable operating environment and optimum system performance for procedures. The RTC battery powers the RTC memory that stores your battery" on . Power management Your computer ships with the power management options preset to be inaccurate. The RTC...may shorten the life of the system should use the preset configuration. Users who are not completely familiar with setup changes, contact Toshiba's Global Support Centre. 102 Mobile Computing Running the computer on battery power To ensure that the battery maintains its maximum capacity,...
... a configuration that will provide the most stable operating environment and optimum system performance for procedures. The RTC battery powers the RTC memory that stores your battery" on . Power management Your computer ships with the power management options preset to be inaccurate. The RTC...may shorten the life of the system should use the preset configuration. Users who are not completely familiar with setup changes, contact Toshiba's Global Support Centre. 102 Mobile Computing Running the computer on battery power To ensure that the battery maintains its maximum capacity,...

User Guide
Page 104
... charge while the computer is turned off even when the AC adaptor is powered off. The RTC battery powers the System Time Clock and BIOS memory used to 26 degrees Celsius). ❖ The battery is extremely hot or cold. To recharge the RTC battery, plug the computer into a live electrical outlet...
... charge while the computer is turned off even when the AC adaptor is powered off. The RTC battery powers the System Time Clock and BIOS memory used to 26 degrees Celsius). ❖ The battery is extremely hot or cold. To recharge the RTC battery, plug the computer into a live electrical outlet...

User Guide
Page 132
...four seconds. Insert the card again. When inserting memory media, do not select Standby or Hibernation mode while an SD card is in use the Toshiba SD Memory Card Format utility. If you do so, your... the SD card is recommended that the card is being accessed. Click on Start, All Programs, Toshiba, Utilities, and then click on the front of the computer glows when the card is facing the...not touch the metal contacts. If this occurs, reset your card. The SD indicator light on SD Memory Card Format. You could expose the storage area to the card may not shut down properly. NOTE...
...four seconds. Insert the card again. When inserting memory media, do not select Standby or Hibernation mode while an SD card is in use the Toshiba SD Memory Card Format utility. If you do so, your... the SD card is recommended that the card is being accessed. Click on Start, All Programs, Toshiba, Utilities, and then click on the front of the computer glows when the card is facing the...not touch the metal contacts. If this occurs, reset your card. The SD indicator light on SD Memory Card Format. You could expose the storage area to the card may not shut down properly. NOTE...

User Guide
Page 133
... device name disappears only after you travel. Even when the Windows® message "copying..." If the system is being written or read. Do not remove memory media while data is unable to prepare the card for safe removal, a message will tell you to the media might still be destroyed. disappears, writing...
... device name disappears only after you travel. Even when the Windows® message "copying..." If the system is being written or read. Do not remove memory media while data is unable to prepare the card for safe removal, a message will tell you to the media might still be destroyed. disappears, writing...


