

User Guide
Page 24
... To use of the label and manufacturing information may vary.) Copyright This guide is assumed, however, with all rights reserved. Always contact an authorized Toshiba service provider, if any other safety hazards, resulting in any form without the prior written permission of the Required Label (Sample shown below. 24 ...contains a laser system and is required. with respect to the use this guide cannot be exposed to disassemble, adjust or repair a HD DVD, CD/DVD drive, CD-RW drive, Multi-drive or any repair or adjustment is classified as a CLASS 1 LASER PRODUCT.
... To use of the label and manufacturing information may vary.) Copyright This guide is assumed, however, with all rights reserved. Always contact an authorized Toshiba service provider, if any other safety hazards, resulting in any form without the prior written permission of the Required Label (Sample shown below. 24 ...contains a laser system and is required. with respect to the use this guide cannot be exposed to disassemble, adjust or repair a HD DVD, CD/DVD drive, CD-RW drive, Multi-drive or any repair or adjustment is classified as a CLASS 1 LASER PRODUCT.
User Guide
Page 28
... (optional 49 Installing a memory module 50 Removing a memory module 54 Checking total memory 55 Hard Drive Recovery Utilities 56 Creating Recovery CDs/DVDs 57 Hard Disk Drive Recovery options 58 Hard Disk Drive Recovery using the Recovery media 63 Installing drivers and applications 64 Using the... Toshiba Dual Pointing Device 64 Using the TouchPad 65 Scrolling with the TouchPad 66 Control buttons 66 Disabling or enabling the TouchPad 66 Using...
... (optional 49 Installing a memory module 50 Removing a memory module 54 Checking total memory 55 Hard Drive Recovery Utilities 56 Creating Recovery CDs/DVDs 57 Hard Disk Drive Recovery options 58 Hard Disk Drive Recovery using the Recovery media 63 Installing drivers and applications 64 Using the... Toshiba Dual Pointing Device 64 Using the TouchPad 65 Scrolling with the TouchPad 66 Control buttons 66 Disabling or enabling the TouchPad 66 Using...
User Guide
Page 29
... Backing up your work 92 Restoring your work 93 Using the optical drive 93 Optical drive components 94 Inserting a compact disc 94 Playing an audio CD 96 Playing optical media 97 Creating a CD/DVD 97 Removing a disc with the computer on 98 Removing a disc with the computer off 98 Caring for...
... Backing up your work 92 Restoring your work 93 Using the optical drive 93 Optical drive components 94 Inserting a compact disc 94 Playing an audio CD 96 Playing optical media 97 Creating a CD/DVD 97 Removing a disc with the computer on 98 Removing a disc with the computer off 98 Caring for...
User Guide
Page 32
... Power Profiles 155 Quickly creating a new power profile 155 Customizing a power profile 155 Mouse Utility 156 TOSHIBA Hardware Setup 157 TOSHIBA Zooming Utility 159 TOSHIBA Mobile Extension 160 TOSHIBA Button Controls 162 CD/DVD Drive Acoustic Silencer 163 TOSHIBA Accessibility 164 Trusted Platform Module (TPM 165 Fingerprint Authentication Utility 165 Fingerprint utility limitations 166 Fingerprint Enrollment...
... Power Profiles 155 Quickly creating a new power profile 155 Customizing a power profile 155 Mouse Utility 156 TOSHIBA Hardware Setup 157 TOSHIBA Zooming Utility 159 TOSHIBA Mobile Extension 160 TOSHIBA Button Controls 162 CD/DVD Drive Acoustic Silencer 163 TOSHIBA Accessibility 164 Trusted Platform Module (TPM 165 Fingerprint Authentication Utility 165 Fingerprint utility limitations 166 Fingerprint Enrollment...
User Guide
Page 56
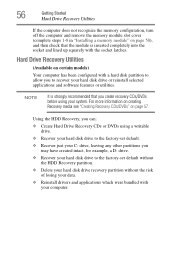
...cover (complete steps 1-8 in "Installing a memory module" on page 50), and then check that the module is strongly recommended that you create recovery CDs/DVDs before using a writable drive. ❖ Recover your hard disk drive to the factory-set default. ❖ Recover just your C: drive, ...bundled with your computer. Hard Drive Recovery Utilities (Available on page 57. For more information on creating Recovery media see "Creating Recovery CDs/DVDs" on certain models) Your computer has been configured with the socket latches. NOTE It is inserted completely into the socket and lined...
...cover (complete steps 1-8 in "Installing a memory module" on page 50), and then check that the module is strongly recommended that you create recovery CDs/DVDs before using a writable drive. ❖ Recover your hard disk drive to the factory-set default. ❖ Recover just your C: drive, ...bundled with your computer. Hard Drive Recovery Utilities (Available on page 57. For more information on creating Recovery media see "Creating Recovery CDs/DVDs" on certain models) Your computer has been configured with the socket latches. NOTE It is inserted completely into the socket and lined...
User Guide
Page 57
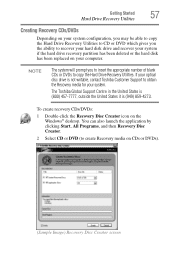
...able to copy the Hard Drive Recovery Utilities to CD or DVD which gives you to insert the appropriate number of blank CDs or DVDs to copy the Hard Drive Recovery Utilities. If your optical disc drive is (949) 859-4273. The Toshiba Global Support Centre in the United States is (800...) 457-7777, outside the United States it is not writable, contact Toshiba Customer Support to create ...
...able to copy the Hard Drive Recovery Utilities to CD or DVD which gives you to insert the appropriate number of blank CDs or DVDs to copy the Hard Drive Recovery Utilities. If your optical disc drive is (949) 859-4273. The Toshiba Global Support Centre in the United States is (800...) 457-7777, outside the United States it is not writable, contact Toshiba Customer Support to create ...

User Guide
Page 58
... to the item's Name-recovery files, applications (original bundled drivers and applications), or both the recovery files and applications. 4 Click Create. 5 Insert the first blank CD or DVD into your C: drive and then recovering it. 58 Getting Started Hard Drive Recovery Utilities 3 Select the items you have created with a user specified...
... to the item's Name-recovery files, applications (original bundled drivers and applications), or both the recovery files and applications. 4 Click Create. 5 Insert the first blank CD or DVD into your C: drive and then recovering it. 58 Getting Started Hard Drive Recovery Utilities 3 Select the items you have created with a user specified...
User Guide
Page 63
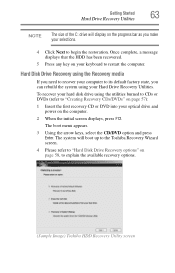
...recovered. 5 Press any key on page 58, to explain the available recovery options. (Sample Image) Toshiba HDD Recovery Utility screen The boot menu appears. 3 Using the arrow keys, select the CD/DVD option and press Enter. To recover your hard disk drive using your selections. 4 Click Next to... begin the restoration. Getting Started 63 Hard Drive Recovery Utilities NOTE The size of the C: drive will boot up to the Toshiba Recovery Wizard screen. 4 Please...
...recovered. 5 Press any key on page 58, to explain the available recovery options. (Sample Image) Toshiba HDD Recovery Utility screen The boot menu appears. 3 Using the arrow keys, select the CD/DVD option and press Enter. To recover your hard disk drive using your selections. 4 Click Next to... begin the restoration. Getting Started 63 Hard Drive Recovery Utilities NOTE The size of the C: drive will boot up to the Toshiba Recovery Wizard screen. 4 Please...
User Guide
Page 89
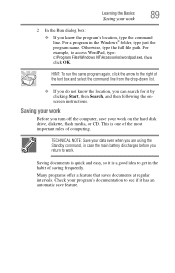
... habit of computing. This is a good idea to work. Learning the Basics 89 Saving your work on the hard disk drive, diskette, flash media, or CD. Saving your work Before you return to get in the Windows® folder, type just the program name. HINT: To run the same program again...
... habit of computing. This is a good idea to work. Learning the Basics 89 Saving your work on the hard disk drive, diskette, flash media, or CD. Saving your work Before you return to get in the Windows® folder, type just the program name. HINT: To run the same program again...

User Guide
Page 92
... on diskettes if an optional external diskette drive is available. To back up several files at one time, use a high-capacity backup system, such as CDs, DVDs, diskettes, or to a network, if available. For example, the range of pages and number of copies to your work 2 In your hard ...disk may prefer to CDs with the Windows® operating system" on your Windows® application, click File, and then Print. You may take a considerable amount of media such as...
... on diskettes if an optional external diskette drive is available. To back up several files at one time, use a high-capacity backup system, such as CDs, DVDs, diskettes, or to a network, if available. For example, the range of pages and number of copies to your work 2 In your hard ...disk may prefer to CDs with the Windows® operating system" on your Windows® application, click File, and then Print. You may take a considerable amount of media such as...
User Guide
Page 95
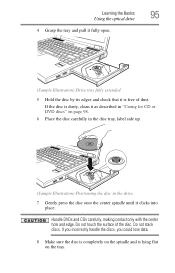
... Illustration) Drive tray fully extended 5 Hold the disc by its edges and check that it as described in "Caring for CD or DVD discs" on the tray. Handle DVDs and CDs carefully, making contact only with the center hole and edge. If the disc is dusty, clean it is lying flat on...
... Illustration) Drive tray fully extended 5 Hold the disc by its edges and check that it as described in "Caring for CD or DVD discs" on the tray. Handle DVDs and CDs carefully, making contact only with the center hole and edge. If the disc is dusty, clean it is lying flat on...
User Guide
Page 96
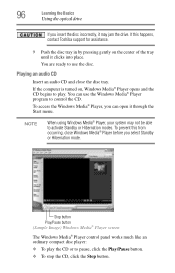
...If you insert the disc incorrectly, it through the Start menu. You are ready to use the Windows Media® Player program to control the CD. To prevent this happens, contact Toshiba support for assistance. 9 Push the disc tray in by pressing gently on , Windows Media® Player opens and the... CD begins to play the CD or to activate Standby or Hibernation modes. If the computer is turned on the center of the tray until it clicks into...
...If you insert the disc incorrectly, it through the Start menu. You are ready to use the Windows Media® Player program to control the CD. To prevent this happens, contact Toshiba support for assistance. 9 Push the disc tray in by pressing gently on , Windows Media® Player opens and the... CD begins to play the CD or to activate Standby or Hibernation modes. If the computer is turned on the center of the tray until it clicks into...
User Guide
Page 97
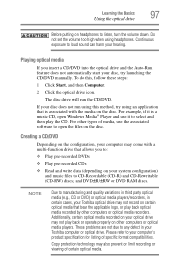
...media on the disc. Playing optical media If you to manufacturing and quality variations in third party optical media (e.g., CD or DVD) or optical media players/recorders, in your Toshiba optical drive may not record on certain optical media that bear the applicable logo, or play back or operate ...177;R/±RW or DVD RAM discs. These problems are not due to your hearing. Please refer to any defect in certain cases, your Toshiba computer or optical drive. Continuous exposure to listen, turn the volume down. Learning the Basics 97 Using the optical drive Before putting on ...
...media on the disc. Playing optical media If you to manufacturing and quality variations in third party optical media (e.g., CD or DVD) or optical media players/recorders, in your Toshiba optical drive may not record on certain optical media that bear the applicable logo, or play back or operate ...177;R/±RW or DVD RAM discs. These problems are not due to your hearing. Please refer to any defect in certain cases, your Toshiba computer or optical drive. Continuous exposure to listen, turn the volume down. Learning the Basics 97 Using the optical drive Before putting on ...

User Guide
Page 98
... 1 inch). The disc tray slides partially out of , a disc. ❖ Hold a disc by its outside edge. Removing a disc with the computer on To remove a disc (CD or DVD) with the computer turned off inside the computer and damage it. 2 Pull the tray out until it is fully open the disc tray..., wait for CD or DVD discs ❖ Store your discs in to close it in its protective cover. 3 Gently press the tray in -use a pencil to direct sunlight...
... 1 inch). The disc tray slides partially out of , a disc. ❖ Hold a disc by its outside edge. Removing a disc with the computer on To remove a disc (CD or DVD) with the computer turned off inside the computer and damage it. 2 Pull the tray out until it is fully open the disc tray..., wait for CD or DVD discs ❖ Store your discs in to close it in its protective cover. 3 Gently press the tray in -use a pencil to direct sunlight...
User Guide
Page 127
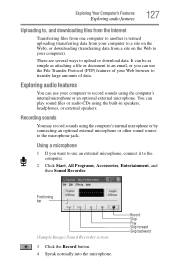
... Record button. 4 Speak normally into the microphone. There are several ways to the microphone jack. Exploring audio features You can play sound files or audio CDs using the computer's internal microphone or by connecting an optional external microphone or other sound source to upload or download data.
... Record button. 4 Speak normally into the microphone. There are several ways to the microphone jack. Exploring audio features You can play sound files or audio CDs using the computer's internal microphone or by connecting an optional external microphone or other sound source to upload or download data.
User Guide
Page 138
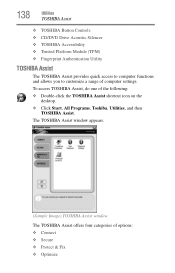
... window appears. (Sample Image) TOSHIBA Assist window The TOSHIBA Assist offers four categories of computer settings. 138 Utilities TOSHIBA Assist ❖ TOSHIBA Button Controls ❖ CD/DVD Drive Acoustic Silencer ❖ TOSHIBA Accessibility ❖ Trusted Platform Module (TPM) ❖ Fingerprint Authentication Utility TOSHIBA Assist The TOSHIBA Assist provides quick access to computer functions and allows you to customize...
... window appears. (Sample Image) TOSHIBA Assist window The TOSHIBA Assist offers four categories of computer settings. 138 Utilities TOSHIBA Assist ❖ TOSHIBA Button Controls ❖ CD/DVD Drive Acoustic Silencer ❖ TOSHIBA Accessibility ❖ Trusted Platform Module (TPM) ❖ Fingerprint Authentication Utility TOSHIBA Assist The TOSHIBA Assist provides quick access to computer functions and allows you to customize...
User Guide
Page 142
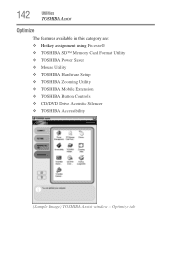
142 Utilities TOSHIBA Assist Optimize The features available in this category are: ❖ Hotkey assignment using Fn-esse® ❖ TOSHIBA SD™ Memory Card Format Utility ❖ TOSHIBA Power Saver ❖ Mouse Utility ❖ TOSHIBA Hardware Setup ❖ TOSHIBA Zooming Utility ❖ TOSHIBA Mobile Extension ❖ TOSHIBA Button Controls ❖ CD/DVD Drive Acoustic Silencer ❖ TOSHIBA Accessibility (Sample Image) TOSHIBA Assist window - Optimize tab
142 Utilities TOSHIBA Assist Optimize The features available in this category are: ❖ Hotkey assignment using Fn-esse® ❖ TOSHIBA SD™ Memory Card Format Utility ❖ TOSHIBA Power Saver ❖ Mouse Utility ❖ TOSHIBA Hardware Setup ❖ TOSHIBA Zooming Utility ❖ TOSHIBA Mobile Extension ❖ TOSHIBA Button Controls ❖ CD/DVD Drive Acoustic Silencer ❖ TOSHIBA Accessibility (Sample Image) TOSHIBA Assist window - Optimize tab
User Guide
Page 163
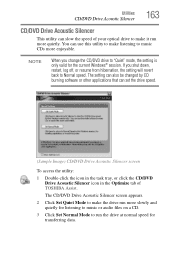
... setting can also be changed by CD burning software or other applications that can set the drive speed. (Sample Image) CD/DVD Drive Acoustic Silencer screen To... icon in the task tray, or click the CD/DVD Drive Acoustic Silencer icon in the Optimize tab...listening to music or audio files on a CD. 3 Click Set Normal Mode to make it run the drive at...normal speed for the current Windows® session. The CD/DVD Drive Acoustic Silencer screen appears. 2 Click Set Quiet...music CDs more quietly. Utilities CD/DVD Drive Acoustic Silencer 163 CD/DVD Drive Acoustic Silencer This utility can slow ...
... setting can also be changed by CD burning software or other applications that can set the drive speed. (Sample Image) CD/DVD Drive Acoustic Silencer screen To... icon in the task tray, or click the CD/DVD Drive Acoustic Silencer icon in the Optimize tab...listening to music or audio files on a CD. 3 Click Set Normal Mode to make it run the drive at...normal speed for the current Windows® session. The CD/DVD Drive Acoustic Silencer screen appears. 2 Click Set Quiet...music CDs more quietly. Utilities CD/DVD Drive Acoustic Silencer 163 CD/DVD Drive Acoustic Silencer This utility can slow ...

User Guide
Page 192
... a straightened paper clip, to operate. Pencil lead can interfere with a bootable diskette. If the optical drive is an external drive, make sure that holds the CD or DVD is in the tray. Make sure the tray is lying flat, label side up. Make sure that the disc is clean. This button...
... a straightened paper clip, to operate. Pencil lead can interfere with a bootable diskette. If the optical drive is an external drive, make sure that holds the CD or DVD is in the tray. Make sure the tray is lying flat, label side up. Make sure that the disc is clean. This button...
User Guide
Page 193
... sections in any sound system when input from the computer's speakers. Check to see if the volume control on the computer is with a data CD or DVD, refer to see "You press the disc eject button, but others do not. It occurs in this chapter may apply. If Something... using . The optical drive supports the Digital Versatile Disc (DVD) formats DVD±R, DVD±RW, and DVD RAM, plus the CD formats CD-Recordable (CD-R) and CDRewritable (CD-RW). on page 182. Adjust the volume control. If you are securely connected to the speakers and the speaker volume is coming from...
... sections in any sound system when input from the computer's speakers. Check to see if the volume control on the computer is with a data CD or DVD, refer to see "You press the disc eject button, but others do not. It occurs in this chapter may apply. If Something... using . The optical drive supports the Digital Versatile Disc (DVD) formats DVD±R, DVD±RW, and DVD RAM, plus the CD formats CD-Recordable (CD-R) and CDRewritable (CD-RW). on page 182. Adjust the volume control. If you are securely connected to the speakers and the speaker volume is coming from...


