
User Guide
Page 17
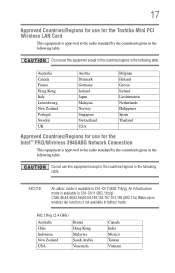
... Malaysia Norway Singapore Switzerland USA Belgium Finland Greece Ireland Liechtenstein Netherlands Philippines Spain Thailand Approved Countries/Regions for use for the Toshiba Mini PCI Wireless LAN Card This equipment is approved to the radio standard by the countries/regions in the following table.... this equipment except in the countries/regions in the following table. Do not use this equipment except in the countries/regions in battery mode. 802.11b/g (2.4 GHz) Australia Chile Indonesia New Zealand USA Brunei Hong Kong Malaysia Saudi Arabia Venezuela Canada India Mexico ...
... Malaysia Norway Singapore Switzerland USA Belgium Finland Greece Ireland Liechtenstein Netherlands Philippines Spain Thailand Approved Countries/Regions for use for the Toshiba Mini PCI Wireless LAN Card This equipment is approved to the radio standard by the countries/regions in the following table.... this equipment except in the countries/regions in the following table. Do not use this equipment except in the countries/regions in battery mode. 802.11b/g (2.4 GHz) Australia Chile Indonesia New Zealand USA Brunei Hong Kong Malaysia Saudi Arabia Venezuela Canada India Mexico ...
User Guide
Page 27
Contents Introduction 35 This guide 36 Safety icons 37 Other icons used 37 Other documentation 38 Service options 38 Chapter 1: Getting Started 39 Selecting a place to work 39 Creating a computer-friendly environment........39 Keeping yourself comfortable 40 Precautions 40 Important information on your computer's cooling fan 41 Setting up your computer 42 Setting up your software 42 Registering your computer with Toshiba 43 Adding optional external devices 43 Connecting to a power source 44 Charging the main battery 46 27
Contents Introduction 35 This guide 36 Safety icons 37 Other icons used 37 Other documentation 38 Service options 38 Chapter 1: Getting Started 39 Selecting a place to work 39 Creating a computer-friendly environment........39 Keeping yourself comfortable 40 Precautions 40 Important information on your computer's cooling fan 41 Setting up your computer 42 Setting up your software 42 Registering your computer with Toshiba 43 Adding optional external devices 43 Connecting to a power source 44 Charging the main battery 46 27
User Guide
Page 30
... Computing 100 Toshiba's energy-saver design 100 Running the computer on battery power 101 Battery Notice 101 Power management 102 Using additional batteries 103 Charging batteries 103 Charging the main battery 103 Charging the RTC battery 104 Monitoring main battery power 105 Determining remaining battery power 106 What to do when the main battery runs low ...107 Setting battery alarms 108...
... Computing 100 Toshiba's energy-saver design 100 Running the computer on battery power 101 Battery Notice 101 Power management 102 Using additional batteries 103 Charging batteries 103 Charging the main battery 103 Charging the RTC battery 104 Monitoring main battery power 105 Determining remaining battery power 106 What to do when the main battery runs low ...107 Setting battery alarms 108...
User Guide
Page 33
... Resolving hardware conflicts on your own .....183 Fixing a problem with Device Manager ...........184 Memory problems 185 Power and the batteries 186 Keyboard problems 188 Display problems 188 Disk drive problems 190 Optical drive problems 192 Sound system problems 193 PC Card ...configuration backup in the Windows® operating system 203 If you need further assistance 208 Before you contact Toshiba 208 Contacting Toshiba 208 Other Toshiba Internet Web sites 209 Toshiba's worldwide offices 209 Appendix A: Hot Keys 211 Volume Mute 211 Password security 212 Without a password ...
... Resolving hardware conflicts on your own .....183 Fixing a problem with Device Manager ...........184 Memory problems 185 Power and the batteries 186 Keyboard problems 188 Display problems 188 Disk drive problems 190 Optical drive problems 192 Sound system problems 193 PC Card ...configuration backup in the Windows® operating system 203 If you need further assistance 208 Before you contact Toshiba 208 Contacting Toshiba 208 Other Toshiba Internet Web sites 209 Toshiba's worldwide offices 209 Appendix A: Hot Keys 211 Volume Mute 211 Password security 212 Without a password ...
User Guide
Page 40
... object on the power again until you have taken the computer to withstand the rigors of the computer. Keeping yourself comfortable The Toshiba Instruction Manual for Safety and Comfort, that shipped with your computer, contains helpful information for setting up your computer, and never expose...or surface of travel. You should accidentally occur, immediately: 1. Disconnect the AC adaptor from the power plug socket and computer. 3. Remove the battery pack. Never allow any liquids to spill into any of your work ❖ Extreme heat, cold, or humidity. ❖ Liquids and corrosive...
... object on the power again until you have taken the computer to withstand the rigors of the computer. Keeping yourself comfortable The Toshiba Instruction Manual for Safety and Comfort, that shipped with your computer, contains helpful information for setting up your computer, and never expose...or surface of travel. You should accidentally occur, immediately: 1. Disconnect the AC adaptor from the power plug socket and computer. 3. Remove the battery pack. Never allow any liquids to spill into any of your work ❖ Extreme heat, cold, or humidity. ❖ Liquids and corrosive...
User Guide
Page 42
... Started Setting up your computer Setting up your computer TECHNICAL NOTE: You must attach the AC adaptor. To use external power or to charge the battery you must complete all setup steps up to and including "Setting up your software" on your software setup choices. Setting up your software. 1...for a moment while checking for the first time, do not turn on page 42 before you can use it. Your computer contains a rechargeable main battery that needs to the Internet and click Next. The first time you through steps to a power source" on the computer for an Internet connection....
... Started Setting up your computer Setting up your computer TECHNICAL NOTE: You must attach the AC adaptor. To use external power or to charge the battery you must complete all setup steps up to and including "Setting up your software" on your software setup choices. Setting up your software. 1...for a moment while checking for the first time, do not turn on page 42 before you can use it. Your computer contains a rechargeable main battery that needs to the Internet and click Next. The first time you through steps to a power source" on the computer for an Internet connection....

User Guide
Page 44
...that may have been provided with your computer and the TOSHIBA Battery Charger (that the power plug (and extension cable plug if used) has been fully inserted into the socket, to the computer. Be careful if you use the TOSHIBA AC adaptor that was provided with your computer), or use... AC adaptors and battery chargers specified by use of an incompatible adaptor or charger. TOSHIBA assumes no liability for any damage caused by TOSHIBA to avoid any risk of an incompatible AC adaptor or Battery Charger could cause a fire or electric shock, possibly ...
...that may have been provided with your computer and the TOSHIBA Battery Charger (that the power plug (and extension cable plug if used) has been fully inserted into the socket, to the computer. Be careful if you use the TOSHIBA AC adaptor that was provided with your computer), or use... AC adaptors and battery chargers specified by use of an incompatible adaptor or charger. TOSHIBA assumes no liability for any damage caused by TOSHIBA to avoid any risk of an incompatible AC adaptor or Battery Charger could cause a fire or electric shock, possibly ...
User Guide
Page 46
...the AC adaptor is not plugged into an AC power source with its battery already installed. Your computer's Power Saver utility can damage the battery. Disconnect the AC power cord/cable and remove the main battery pack. After that reduces the power required for system operation and will...the power provided by the AC adaptor to power the computer. Continuing to charge a fully charged battery can be completely charged and ready to run applications, features, and devices. Charging the main battery Your computer came with the computer turned off for information on replacing the main...
...the AC adaptor is not plugged into an AC power source with its battery already installed. Your computer's Power Saver utility can damage the battery. Disconnect the AC power cord/cable and remove the main battery pack. After that reduces the power required for system operation and will...the power provided by the AC adaptor to power the computer. Continuing to charge a fully charged battery can be completely charged and ready to run applications, features, and devices. Charging the main battery Your computer came with the computer turned off for information on replacing the main...
User Guide
Page 47
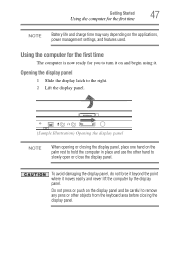
... not force it beyond the point where it . Using the computer for the first time The computer is now ready for the first time NOTE Battery life and charge time may vary depending on and begin using it moves easily and never lift the computer by the display panel. Getting Started...
... not force it beyond the point where it . Using the computer for the first time The computer is now ready for the first time NOTE Battery life and charge time may vary depending on and begin using it moves easily and never lift the computer by the display panel. Getting Started...
User Guide
Page 48
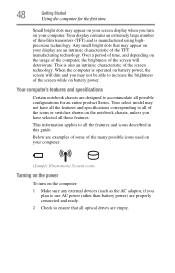
...contains an extremely large number of thin-film transistors (TFT) and is also an intrinsic characteristic of the icons or switches shown on battery power. Your computer's features and specifications Certain notebook chassis are an intrinsic characteristic of the screen while on the notebook chassis, unless ...you plan to use AC power rather than battery power) are empty. Below are examples of some of the many possible icons used on your computer: (Sample Illustration) System icons...
...contains an extremely large number of thin-film transistors (TFT) and is also an intrinsic characteristic of the icons or switches shown on battery power. Your computer's features and specifications Certain notebook chassis are an intrinsic characteristic of the screen while on the notebook chassis, unless ...you plan to use AC power rather than battery power) are empty. Below are examples of some of the many possible icons used on your computer: (Sample Illustration) System icons...
User Guide
Page 50
... the computer. The surrounding area may also be hot. Allow the module to cool to the computer, including the AC adaptor. 4 Remove the main battery. Failure to step 3. 1 Click Start, and then Turn off the computer using the Start menu. Installing a memory module with the computer's power...you install or remove a memory module, turn off computer or Shut Down (depending on may be hot. For information on removing the main battery, see "Removing the battery from the computer" on , begin at step 1; The operating system turns off computer or Shut Down window appears. 2 Click Turn Off...
... the computer. The surrounding area may also be hot. Allow the module to cool to the computer, including the AC adaptor. 4 Remove the main battery. Failure to step 3. 1 Click Start, and then Turn off the computer using the Start menu. Installing a memory module with the computer's power...you install or remove a memory module, turn off computer or Shut Down (depending on may be hot. For information on removing the main battery, see "Removing the battery from the computer" on , begin at step 1; The operating system turns off computer or Shut Down window appears. 2 Click Turn Off...
User Guide
Page 53
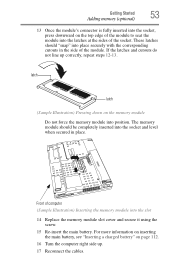
... the socket, press downward on the top edge of the module to seat the module into position. For more information on inserting the main battery, see "Inserting a charged battery" on page 112. 16 Turn the computer right side up correctly, repeat steps 12-13. Front of computer (Sample Illustration) Inserting the memory... should be completely inserted into the slot 14 Replace the memory module slot cover and secure it using the screw. 15 Re-insert the main battery.
... the socket, press downward on the top edge of the module to seat the module into position. For more information on inserting the main battery, see "Inserting a charged battery" on page 112. 16 Turn the computer right side up correctly, repeat steps 12-13. Front of computer (Sample Illustration) Inserting the memory... should be completely inserted into the slot 14 Replace the memory module slot cover and secure it using the screw. 15 Re-insert the main battery.
User Guide
Page 55
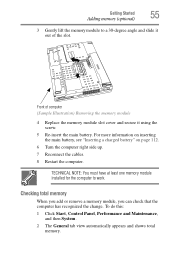
...at least one memory module installed for the computer to a 30-degree angle and slide it using the screw. 5 Re-insert the main battery. Front of computer (Sample Illustration) Removing the memory module 4 Replace the memory module slot cover and secure it out of the slot. For... more information on inserting the main battery, see "Inserting a charged battery" on page 112. 6 Turn the computer right side up. 7 Reconnect the cables. 8 Restart the computer. Getting Started 55 Adding memory (...
...at least one memory module installed for the computer to a 30-degree angle and slide it using the screw. 5 Re-insert the main battery. Front of computer (Sample Illustration) Removing the memory module 4 Replace the memory module slot cover and secure it out of the slot. For... more information on inserting the main battery, see "Inserting a charged battery" on page 112. 6 Turn the computer right side up. 7 Reconnect the cables. 8 Restart the computer. Getting Started 55 Adding memory (...
User Guide
Page 71
... Down Factors to consider when choosing either Turn Off or Shut Down: ❖ Use the Turn Off command if you to fully charge the main battery. Make sure the system indicator panel's disk light and the drive-in-use light are using it for the first time, leave the computer plugged...
... Down Factors to consider when choosing either Turn Off or Shut Down: ❖ Use the Turn Off command if you to fully charge the main battery. Make sure the system indicator panel's disk light and the drive-in-use light are using it for the first time, leave the computer plugged...
User Guide
Page 72
... uses no data is being retrieved from the hard disk rather than from memory, restarting from Hibernation takes a little more time and consumes more main battery power to start up than when restarting from Standby. ❖ When starting up again, the computer returns to where you left it, including all , ... of these options to shut down completely, but it first saves the current state of the system is stored on the hard disk, no main battery power. ❖ Because the state of the computer to the hard disk. For information on again. Since Hibernation mode does not require power to ...
... uses no data is being retrieved from the hard disk rather than from memory, restarting from Hibernation takes a little more time and consumes more main battery power to start up than when restarting from Standby. ❖ When starting up again, the computer returns to where you left it, including all , ... of these options to shut down completely, but it first saves the current state of the system is stored on the hard disk, no main battery power. ❖ Because the state of the computer to the hard disk. For information on again. Since Hibernation mode does not require power to ...
User Guide
Page 73
...Factors to save your work first. Be sure to consider when choosing Standby: ❖ While in Standby mode, the computer uses some main battery power. ❖ The Standby command does not store unsaved information on your work before putting your computer on page 78. Getting Started 73... down using Standby, see "Using and configuring Standby mode" on Standby. ❖ Restarting from Standby takes less time and consumes less main battery power than restarting from where you left it, including all open programs and files you were using Hibernation mode. ❖ When starting up ...
...Factors to save your work first. Be sure to consider when choosing Standby: ❖ While in Standby mode, the computer uses some main battery power. ❖ The Standby command does not store unsaved information on your work before putting your computer on page 78. Getting Started 73... down using Standby, see "Using and configuring Standby mode" on Standby. ❖ Restarting from Standby takes less time and consumes less main battery power than restarting from where you left it, including all open programs and files you were using Hibernation mode. ❖ When starting up ...

User Guide
Page 75
... down when you want from the drop-down lists. NOTE These options are set . NOTE For more information about the Power Saver utility, see "TOSHIBA Power Saver" on battery power or while connected to AC power. ❖ When I press the power button Set this option to Shut down if you want the...
... down when you want from the drop-down lists. NOTE These options are set . NOTE For more information about the Power Saver utility, see "TOSHIBA Power Saver" on battery power or while connected to AC power. ❖ When I press the power button Set this option to Shut down if you want the...
User Guide
Page 77
... the computer is running on page 154. Getting Started 77 Turning off light glows green. NOTE For more information about the Power Saver utility, see "TOSHIBA Power Saver" on battery power or while connected to AC power. ❖ When I close the display panel. 5 Click Apply. 6 Click OK.
... the computer is running on page 154. Getting Started 77 Turning off light glows green. NOTE For more information about the Power Saver utility, see "TOSHIBA Power Saver" on battery power or while connected to AC power. ❖ When I close the display panel. 5 Click Apply. 6 Click OK.
User Guide
Page 78
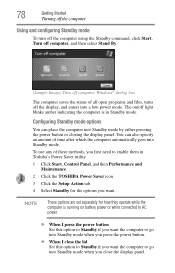
... the power button or closing the display panel. NOTE These options are set separately for the options you close the display panel. The on battery power or while connected to AC power. ❖ When I press the power button Set this option to Standby if you want the computer...the status of all open programs and files, turns off light blinks amber indicating the computer is in Toshiba's Power Saver utility. 1 Click Start, Control Panel, and then Performance and Maintenance. 2 Click the TOSHIBA Power Saver icon. 3 Click the Setup Action tab. 4 Select Standby for how they operate while ...
... the power button or closing the display panel. NOTE These options are set separately for the options you close the display panel. The on battery power or while connected to AC power. ❖ When I press the power button Set this option to Standby if you want the computer...the status of all open programs and files, turns off light blinks amber indicating the computer is in Toshiba's Power Saver utility. 1 Click Start, Control Panel, and then Performance and Maintenance. 2 Click the TOSHIBA Power Saver icon. 3 Click the Setup Action tab. 4 Select Standby for how they operate while ...

User Guide
Page 79
... button until the on page 154. You may also wish to keep dust and dirt out of your battery" on page 113. For more information about taking care of your computer's battery, see "Taking care of the computer. Caring for details. Once the computer is configured, you have ...(s) you can customize your computer to suit your computer This section gives tips on the Standby options set. NOTE For more information, see "TOSHIBA Power Saver" on /off the computer, close the display panel to customize your computer's settings There are additional custom settings you can place ...
... button until the on page 154. You may also wish to keep dust and dirt out of your battery" on page 113. For more information about taking care of your computer's battery, see "Taking care of the computer. Caring for details. Once the computer is configured, you have ...(s) you can customize your computer to suit your computer This section gives tips on the Standby options set. NOTE For more information, see "TOSHIBA Power Saver" on /off the computer, close the display panel to customize your computer's settings There are additional custom settings you can place ...


