
User Guide
Page 50
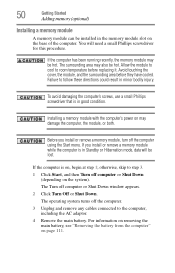
...is in good condition. The Turn off the computer. 3 Unplug and remove any cables connected to follow these directions could result in the memory module slot on the base of the computer. For information on removing the main battery, see "Removing the battery from the computer" on the system... both. The operating system turns off computer or Shut Down window appears. 2 Click Turn Off or Shut Down. You will be lost. Installing a memory module with the computer's power on , begin at step 1; Failure to the computer, including the AC adaptor. 4 Remove the main battery. Before you...
...is in good condition. The Turn off the computer. 3 Unplug and remove any cables connected to follow these directions could result in the memory module slot on the base of the computer. For information on removing the main battery, see "Removing the battery from the computer" on the system... both. The operating system turns off computer or Shut Down window appears. 2 Click Turn Off or Shut Down. You will be lost. Installing a memory module with the computer's power on , begin at step 1; Failure to the computer, including the AC adaptor. 4 Remove the main battery. Before you...
User Guide
Page 51
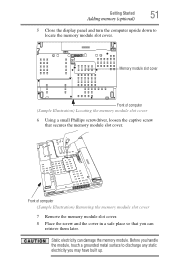
... later. Memory module slot cover Front of computer (Sample Illustration) Removing the memory module slot cover 7 Remove the memory module slot cover. 8 Place the screw and the cover in a safe place so that secures the memory module slot cover. Front of computer (Sample Illustration) Locating the memory module slot cover 6...may have built up. Before you handle the module, touch a grounded metal surface to locate the memory module slot cover. Getting Started 51 Adding memory (optional) 5 Close the display panel and turn the computer upside down to discharge any static electricity ...
... later. Memory module slot cover Front of computer (Sample Illustration) Removing the memory module slot cover 7 Remove the memory module slot cover. 8 Place the screw and the cover in a safe place so that secures the memory module slot cover. Front of computer (Sample Illustration) Locating the memory module slot cover 6...may have built up. Before you handle the module, touch a grounded metal surface to locate the memory module slot cover. Getting Started 51 Adding memory (optional) 5 Close the display panel and turn the computer upside down to discharge any static electricity ...
User Guide
Page 52
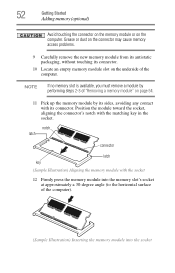
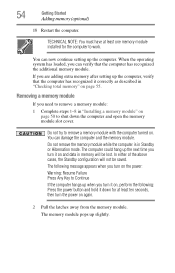
...connector latch key (Sample Illustration) Aligning the memory module with the matching key in the socket. Position the module toward the socket, aligning the connector's notch with the socket 12 Firmly press the memory module into the memory slot's socket at approximately a 30-degree angle ...(to the horizontal surface of the computer. Grease or dust on the connector may cause memory access problems. 9 Carefully remove the new memory module from its antistatic packaging, without...
...connector latch key (Sample Illustration) Aligning the memory module with the matching key in the socket. Position the module toward the socket, aligning the connector's notch with the socket 12 Firmly press the memory module into the memory slot's socket at approximately a 30-degree angle ...(to the horizontal surface of the computer. Grease or dust on the connector may cause memory access problems. 9 Carefully remove the new memory module from its antistatic packaging, without...
User Guide
Page 53
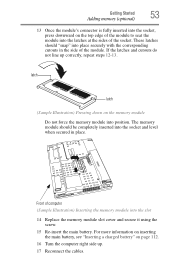
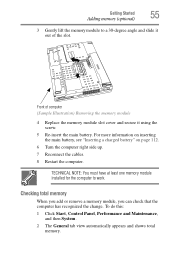
... If the latches and cutouts do not line up . 17 Reconnect the cables. These latches should be completely inserted into the slot 14 Replace the memory module slot cover and secure it using the screw. 15 Re-insert the main battery. latch latch (Sample Illustration) Pressing down on page ...112. 16 Turn the computer right side up correctly, repeat steps 12-13. Front of computer (Sample Illustration) Inserting the memory module ...
... If the latches and cutouts do not line up . 17 Reconnect the cables. These latches should be completely inserted into the slot 14 Replace the memory module slot cover and secure it using the screw. 15 Re-insert the main battery. latch latch (Sample Illustration) Pressing down on page ...112. 16 Turn the computer right side up correctly, repeat steps 12-13. Front of computer (Sample Illustration) Inserting the memory module ...
User Guide
Page 54
...following message appears when you turn it on again. 2 Pull the latches away from the memory module. You can verify that the computer has recognized it down the computer and open the memory module slot cover. You can now continue setting up slightly. Do not try to Continue If the computer... hangs up the computer, verify that the computer has recognized the additional memory module. When the operating system has loaded, you ...
...following message appears when you turn it on again. 2 Pull the latches away from the memory module. You can verify that the computer has recognized it down the computer and open the memory module slot cover. You can now continue setting up slightly. Do not try to Continue If the computer... hangs up the computer, verify that the computer has recognized the additional memory module. When the operating system has loaded, you ...
User Guide
Page 55
... installed for the computer to a 30-degree angle and slide it out of computer (Sample Illustration) Removing the memory module 4 Replace the memory module slot cover and secure it using the screw. 5 Re-insert the main battery. To do this: 1 Click Start, Control Panel, Performance and Maintenance, and then System. 2 ...
... installed for the computer to a 30-degree angle and slide it out of computer (Sample Illustration) Removing the memory module 4 Replace the memory module slot cover and secure it using the screw. 5 Re-insert the main battery. To do this: 1 Click Start, Control Panel, Performance and Maintenance, and then System. 2 ...
User Guide
Page 56
... configured with your computer. 56 Getting Started Hard Drive Recovery Utilities If the computer does not recognize the memory configuration, turn off the computer and remove the memory module slot cover (complete steps 1-8 in "Installing a memory module" on page 50), and then check that the module is strongly recommended that you create recovery CDs...
... configured with your computer. 56 Getting Started Hard Drive Recovery Utilities If the computer does not recognize the memory configuration, turn off the computer and remove the memory module slot cover (complete steps 1-8 in "Installing a memory module" on page 50), and then check that the module is strongly recommended that you create recovery CDs...

User Guide
Page 132
..., and then click on the front of the computer glows when the card is in use the Toshiba SD Memory Card Format utility. When inserting memory media, do not select Standby or Hibernation mode while an SD card is being accessed. Insert the card again. You could expose the storage area ... occurs, try restarting the computer. Using Standby or Hibernate while using the SD card It is recommended that the card is not inserted into the slot correctly, any data saved to the card may not shut down properly. If you do not touch the metal contacts. If this occurs, reset your...
..., and then click on the front of the computer glows when the card is in use the Toshiba SD Memory Card Format utility. When inserting memory media, do not select Standby or Hibernation mode while an SD card is being accessed. Insert the card again. You could expose the storage area ... occurs, try restarting the computer. Using Standby or Hibernate while using the SD card It is recommended that the card is not inserted into the slot correctly, any data saved to the card may not shut down properly. If you do not touch the metal contacts. If this occurs, reset your...
User Guide
Page 151
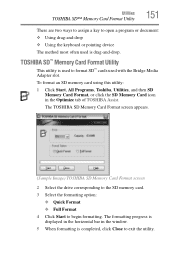
...to format SD™ cards used with the Bridge Media Adapter slot. To format an SD memory card using this utility: 1 Click Start, All Programs, Toshiba, Utilities, and then SD Memory Card Format, or click the SD Memory Card icon in the window. 5 When formatting is used is ...displayed in the horizontal bar in the Optimize tab of TOSHIBA Assist. The formatting progress is drag-and-drop. The TOSHIBA SD Memory Card Format screen appears. (Sample Image) TOSHIBA SD Memory Card Format screen 2 Select the drive corresponding to the SD memory card. 3 Select the formatting option: ❖ Quick...
...to format SD™ cards used with the Bridge Media Adapter slot. To format an SD memory card using this utility: 1 Click Start, All Programs, Toshiba, Utilities, and then SD Memory Card Format, or click the SD Memory Card icon in the window. 5 When formatting is used is ...displayed in the horizontal bar in the Optimize tab of TOSHIBA Assist. The formatting progress is drag-and-drop. The TOSHIBA SD Memory Card Format screen appears. (Sample Image) TOSHIBA SD Memory Card Format screen 2 Select the drive corresponding to the SD memory card. 3 Select the formatting option: ❖ Quick...
User Guide
Page 153
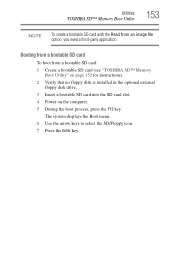
... Utility 153 NOTE To create a bootable SD card with the Read from a bootable SD card: 1 Create a bootable SD card (see "TOSHIBA SD™ Memory Boot Utility" on page 152 for instructions). 2 Verify that no floppy disk is installed in the optional external floppy disk drive. 3 Insert a bootable ...SD card into the SD card slot. 4 Power on the computer. 5 During the boot process, press the F12 key. Booting from a bootable SD card ...
... Utility 153 NOTE To create a bootable SD card with the Read from a bootable SD card: 1 Create a bootable SD card (see "TOSHIBA SD™ Memory Boot Utility" on page 152 for instructions). 2 Verify that no floppy disk is installed in the optional external floppy disk drive. 3 Insert a bootable ...SD card into the SD card slot. 4 Power on the computer. 5 During the boot process, press the F12 key. Booting from a bootable SD card ...
User Guide
Page 169
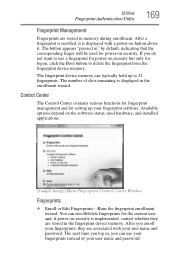
...contains various functions for fingerprint management and for logon, click the Boot button to delete the fingerprint from the fingerprint device memory. Utilities Fingerprint Authentication Utility 169 Fingerprint Management Fingerprints are stored in " by default, indicating that the corresponding finger will ... your fingerprints, they are associated with a power-on security but only for setting up to use your fingerprints instead of slots remaining is implemented, control whether they are stored in the enrollment wizard. After you do not want to 21 fingerprints. ...
...contains various functions for fingerprint management and for logon, click the Boot button to delete the fingerprint from the fingerprint device memory. Utilities Fingerprint Authentication Utility 169 Fingerprint Management Fingerprints are stored in " by default, indicating that the corresponding finger will ... your fingerprints, they are associated with a power-on security but only for setting up to use your fingerprints instead of slots remaining is implemented, control whether they are stored in the enrollment wizard. After you do not want to 21 fingerprints. ...
User Guide
Page 255
Index 255 Ethernet LAN port 123 expansion capability 135 expansion memory slot 51 exploring the desktop 117 external monitor not working 190 mouse 68 external diskette drive connecting 70 external display, adjusting 68 F FAT (File Allocation Table) ... 125 I icon 118 desktop 118 Internet Explorer 118 moving to desktop 118 recycle bin 118 safety 37 Windows Media® Player 118 installation memory module 50 installing memory modules 49 mouse 68 instant passwords, using 144 Internet bookmarked site not found 182 connecting to 125 features 126 slow connection 181 surfing 126...
Index 255 Ethernet LAN port 123 expansion capability 135 expansion memory slot 51 exploring the desktop 117 external monitor not working 190 mouse 68 external diskette drive connecting 70 external display, adjusting 68 F FAT (File Allocation Table) ... 125 I icon 118 desktop 118 Internet Explorer 118 moving to desktop 118 recycle bin 118 safety 37 Windows Media® Player 118 installation memory module 50 installing memory modules 49 mouse 68 instant passwords, using 144 Internet bookmarked site not found 182 connecting to 125 features 126 slow connection 181 surfing 126...
User Guide
Page 256
... Windows® special keys 85 keyboard, external 68 keyboard, full-size 84 L lock computer, using 80 M main battery removing 111 memory adding 49 problem solving 185 removing expansion slot cover 51 memory module inserting 52 installation 50 removing 55 microphone 127 modem connecting to telephone line 121 determining COM port 120 problem solving...
... Windows® special keys 85 keyboard, external 68 keyboard, full-size 84 L lock computer, using 80 M main battery removing 111 memory adding 49 problem solving 185 removing expansion slot cover 51 memory module inserting 52 installation 50 removing 55 microphone 127 modem connecting to telephone line 121 determining COM port 120 problem solving...
User Guide
Page 257
... properties 185 computer hangs when PC Card inserted 195 computer will not power up 178 contacting Toshiba 208 Index 257 corrupted/damaged data files 191 Device Manager 184 disabling a device 184 disk ...is slow 191 display is blank 188 external display not working 190 external monitor 189 faulty memory 185 hardware conflict 182, 183 high-pitched noise 193 illegal operation 177 Internet bookmarked site not... PC Card 193 checklist 194 error occurs 196 hot swapping fails 195 not recognized 195 slot appears dead 194 power and batteries 186 printer 196 program not responding 176 program not working...
... properties 185 computer hangs when PC Card inserted 195 computer will not power up 178 contacting Toshiba 208 Index 257 corrupted/damaged data files 191 Device Manager 184 disabling a device 184 disk ...is slow 191 display is blank 188 external display not working 190 external monitor 189 faulty memory 185 hardware conflict 182, 183 high-pitched noise 193 illegal operation 177 Internet bookmarked site not... PC Card 193 checklist 194 error occurs 196 hot swapping fails 195 not recognized 195 slot appears dead 194 power and batteries 186 printer 196 program not responding 176 program not working...


