
User Manual
Page 4
... the operating instructions as the original part. Safety Check Upon completion of other hazards. (Replacement of the lamp rupturing, thoroughly clean the area around the projector and discard any edible items placed in any service or repairs to this product from the unit could erase... for service. 17. Families with document camera) Do not carry the projector by a qualified technician to restore the product to determine that area. 18. This product incorporates glass components, including a lens and a lamp. Refer all servicing to get your hands caught when setting the camera...
... the operating instructions as the original part. Safety Check Upon completion of other hazards. (Replacement of the lamp rupturing, thoroughly clean the area around the projector and discard any edible items placed in any service or repairs to this product from the unit could erase... for service. 17. Families with document camera) Do not carry the projector by a qualified technician to restore the product to determine that area. 18. This product incorporates glass components, including a lens and a lamp. Refer all servicing to get your hands caught when setting the camera...
User Manual
Page 5
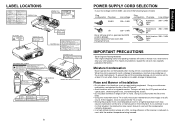
...Place and Manner of the LCD panel. • Avoid locations with Document Camera CAUTION Label (LASER) 8 POWER SUPPLY CORD SELECTION If your LCD projector. Doing so will come in handy if you continue to ship your line voltage is approved by ASTA or BSI to BSI362. Doing so could... shortening their lives, and darkening the screen. • Do not place slantwise in angle of the lamp. • Using this happens, move it away from the TV or radio. • Moving the projector from possible damage, do not use it in the instrument. CAUTION Label CAUTION Label (LASER) Remote Control...
...Place and Manner of the LCD panel. • Avoid locations with Document Camera CAUTION Label (LASER) 8 POWER SUPPLY CORD SELECTION If your LCD projector. Doing so will come in handy if you continue to ship your line voltage is approved by ASTA or BSI to BSI362. Doing so could... shortening their lives, and darkening the screen. • Do not place slantwise in angle of the lamp. • Using this happens, move it away from the TV or radio. • Moving the projector from possible damage, do not use it in the instrument. CAUTION Label CAUTION Label (LASER) Remote Control...
User Manual
Page 6
...the U.S. Clean the air filter from the copyright holder. Retain this information for future reference. 10 EXEMPTION CLAUSES • Toshiba Corporation bears no liability whatsoever for any damages arising from malfunctions arising from natural disaster such as an insect spray, near ... registered trademarks of International Business Machines Corporation. • Macintosh is a registered trademark of replacing a lamp. (Ask a dealer where the unit was purchased or your LCD projector. It is limited. IMPORTANT PRECAUTIONS (Continued) Avoid Volatile Liquid Do not use the panel for years...
...the U.S. Clean the air filter from the copyright holder. Retain this information for future reference. 10 EXEMPTION CLAUSES • Toshiba Corporation bears no liability whatsoever for any damages arising from malfunctions arising from natural disaster such as an insect spray, near ... registered trademarks of International Business Machines Corporation. • Macintosh is a registered trademark of replacing a lamp. (Ask a dealer where the unit was purchased or your LCD projector. It is limited. IMPORTANT PRECAUTIONS (Continued) Avoid Volatile Liquid Do not use the panel for years...
User Manual
Page 7
... camera 34 Preparation of the document camera (when loading the camera 35 Preparing the document camera (for use being separated from the projector 35 Image projection with the document camera 36 Locking the white balance 38 12 Mainenance Air filter cleaning 39 Lens and main unit... cleaning 40 Lamp replacement 40 Others Trouble indications 42 Before calling service personnel 43 Specifications 45 List of general specifications 45 Document camera specifications (Models...
... camera 34 Preparation of the document camera (when loading the camera 35 Preparing the document camera (for use being separated from the projector 35 Image projection with the document camera 36 Locking the white balance 38 12 Mainenance Air filter cleaning 39 Lens and main unit... cleaning 40 Lamp replacement 40 Others Trouble indications 42 Before calling service personnel 43 Specifications 45 List of general specifications 45 Document camera specifications (Models...
User Manual
Page 8
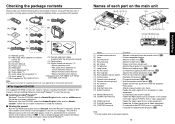
... intake : Draws in this Owner's manual (Getting started) and Acrobat® Reader™ to stow the foot adjuster. s (11) Camera extension cable (supplied with TLP-T60M, TLP-T61M, TLP-T70M, TLP-T71M Note The shape and number of each part on the main unit (5) (4) (3) (2) (1) (12) (11) (6) (7) (8) (5) (10) (9) (6) (13) (1) (14)(15)(16) (...the document camera) s (12) Carrying bag s (13) Mouse remote control set (*2) • Mouse remote control • R03 (SIZE AAA) batteries for operating the projector. p.25 (7) Lamp cover : Remove to install the software. Click on Start.pdf.
... intake : Draws in this Owner's manual (Getting started) and Acrobat® Reader™ to stow the foot adjuster. s (11) Camera extension cable (supplied with TLP-T60M, TLP-T61M, TLP-T70M, TLP-T71M Note The shape and number of each part on the main unit (5) (4) (3) (2) (1) (12) (11) (6) (7) (8) (5) (10) (9) (6) (13) (1) (14)(15)(16) (...the document camera) s (12) Carrying bag s (13) Mouse remote control set (*2) • Mouse remote control • R03 (SIZE AAA) batteries for operating the projector. p.25 (7) Lamp cover : Remove to install the software. Click on Start.pdf.
User Manual
Page 9
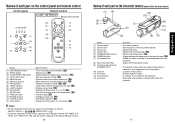
... temporarily. p.29 : Exiting the operation. p.42 : Displays lamp mode. p.30 Notes • For the remainder of this manual, buttons are referred to the projector. : Used when the camera is disconnected from the projector. : Locked to the projector. : Camera signal is output. : Connector is on or... of the Mouse Remote Control. 16 Names of each part on /off (standby). p.30 : Displays the information on the document camera (models with the TLP-T60M, TLP- Names of each part on the screen. p.28 : Enlarges picture size. MENU VOL.+ ZOOM - (1) (4) (12) (2) (5) (6) Name (1) ON...
... temporarily. p.29 : Exiting the operation. p.42 : Displays lamp mode. p.30 Notes • For the remainder of this manual, buttons are referred to the projector. : Used when the camera is disconnected from the projector. : Locked to the projector. : Camera signal is output. : Connector is on or... of the Mouse Remote Control. 16 Names of each part on /off (standby). p.30 : Displays the information on the document camera (models with the TLP-T60M, TLP- Names of each part on the screen. p.28 : Enlarges picture size. MENU VOL.+ ZOOM - (1) (4) (12) (2) (5) (6) Name (1) ON...
User Manual
Page 12
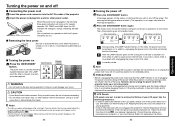
...is plugged in this state, the power cannot be shortened. Note • The projector consumes about 6W of the lamp. Unplugging the power cord and cutting off the power while the projector is turned on. Clean the air filter from time to cool before this state ...up screen disappears, the Language menu is completed FAN TEMP LAMP ON FAN TEMP LAMP ON FAN TEMP LAMP ON (Green) A (Green) (Orange) Flashing (Green) B (Off) (Orange) (Off) C (Off) (Orange) A During cooling, the LAMP indicator flashes. Then, the projector goes into the lens during operation. In this state....
...is plugged in this state, the power cannot be shortened. Note • The projector consumes about 6W of the lamp. Unplugging the power cord and cutting off the power while the projector is turned on. Clean the air filter from time to cool before this state ...up screen disappears, the Language menu is completed FAN TEMP LAMP ON FAN TEMP LAMP ON FAN TEMP LAMP ON (Green) A (Green) (Orange) Flashing (Green) B (Off) (Orange) (Off) C (Off) (Orange) A During cooling, the LAMP indicator flashes. Then, the projector goes into the lens during operation. In this state....

User Manual
Page 13
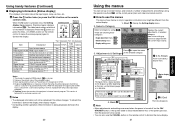
... output should be displayed the next time when the power is turned on the projector and the monitor's display may fluctuate slightly. • A lamp is being input. When the projector is used for language and lamp power selection and configuration is displayed in English. (If the screen is displayed in... Basic operations 1 Turn on and boot up connected computers and other devices. 4 Select input. Turn on the power by the projector is turned on the next time, the Language and Lamp power menus do not light) or bright spots (pixels that do not appear upon startup. The...
... output should be displayed the next time when the power is turned on the projector and the monitor's display may fluctuate slightly. • A lamp is being input. When the projector is used for language and lamp power selection and configuration is displayed in English. (If the screen is displayed in... Basic operations 1 Turn on and boot up connected computers and other devices. 4 Select input. Turn on the power by the projector is turned on the next time, the Language and Lamp power menus do not light) or bright spots (pixels that do not appear upon startup. The...
User Manual
Page 14
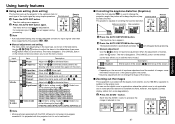
...information may be performed correctly for keystone adjustment. The menu disappears. (The CANCEL button on the screen. Control panel FAN TEMP LAMP ON INPUT ON / STANDBY ZOOM + Before correction After correction MENU VOL. - q Manual adjustment Use the buttons for input ...or . The icon will appear during processing. H-position V-position Clamp 1 Clamp 2 Move left Move right Move down Move up the projector to the optical zoom. processing. ZOOM + MENU VOL. + The menu item is reduced in addition to the optimum state for installations...
...information may be performed correctly for keystone adjustment. The menu disappears. (The CANCEL button on the screen. Control panel FAN TEMP LAMP ON INPUT ON / STANDBY ZOOM + Before correction After correction MENU VOL. - q Manual adjustment Use the buttons for input ...or . The icon will appear during processing. H-position V-position Clamp 1 Clamp 2 Move left Move right Move down Move up the projector to the optical zoom. processing. ZOOM + MENU VOL. + The menu item is reduced in addition to the optimum state for installations...
User Manual
Page 16
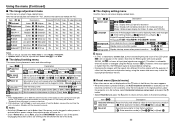
... on the control panel (main unit side) and remote control. This version is selected, apply it again displays FAN TEMP LAMP ON CALL ON/ STANDBY information p.31 . These marks signify an item can be switched by using . Press the button ... 1. Using handy features (Continued) s Displaying Information [Status display] This displays information about getting a TLPLV2 replacement lamp (sold separately) prepared. 5: [Version] shows the version of the projector's internal control program. As the display may differ depending on the remote INPUT ON / STANDBY ZOOM + VOL....
... on the control panel (main unit side) and remote control. This version is selected, apply it again displays FAN TEMP LAMP ON CALL ON/ STANDBY information p.31 . These marks signify an item can be switched by using . Press the button ... 1. Using handy features (Continued) s Displaying Information [Status display] This displays information about getting a TLPLV2 replacement lamp (sold separately) prepared. 5: [Version] shows the version of the projector's internal control program. As the display may differ depending on the remote INPUT ON / STANDBY ZOOM + VOL....
User Manual
Page 17
...Rear) (Hung from ceiling) (Back hung from ceiling) Sets the period of time to wait until turning off the power after a power outage, the projector power will not appear on a flat surface, select Horizontal reference value reset, and press the button. • Select Reset All and press the button ...from the original with the purpose of other than this, the RGB pixel signal is plugged in its original position, place the projector on the screen. Notes 1: When lamp power is selected for screen size, portions exceeding the pixel count of the LCD panel p.45 will come on. • Even...
...Rear) (Hung from ceiling) (Back hung from ceiling) Sets the period of time to wait until turning off the power after a power outage, the projector power will not appear on a flat surface, select Horizontal reference value reset, and press the button. • Select Reset All and press the button ...from the original with the purpose of other than this, the RGB pixel signal is plugged in its original position, place the projector on the screen. Notes 1: When lamp power is selected for screen size, portions exceeding the pixel count of the LCD panel p.45 will come on. • Even...
User Manual
Page 21
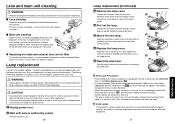
... for details. Align the cover, and press it . When Lamp time reaches 3,000 hours, the icon and a message will appear dark, and the lamp could break the lamp.) Used Lamps This projector's lamps contain trace amounts of environmentally harmful inorganic mercury. This display disappears... when you have been using the two lamp locking screws. 6 Replace the lamp cover. Consult with hard objects, or ...
... for details. Align the cover, and press it . When Lamp time reaches 3,000 hours, the icon and a message will appear dark, and the lamp could break the lamp.) Used Lamps This projector's lamps contain trace amounts of environmentally harmful inorganic mercury. This display disappears... when you have been using the two lamp locking screws. 6 Replace the lamp cover. Consult with hard objects, or ...
User Manual
Page 22
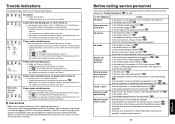
...a short while, then turn the power back on . • Clean the air filter. If the lamp overheats, it is not correctly connected. • Disconnect the power plug and check the connection with projector • Unplug the power cord, and contact your dealer. ❈ The icon will appear before the... inform you of its service life? p.39 ❈ The icon will shorten the life of the lamp has ended or the projector is not properly attached. • Unplug the power cord, and reattach the lamp cover. If This Happens Check No power • Is the power cord plugged in . p.21 ...
...a short while, then turn the power back on . • Clean the air filter. If the lamp overheats, it is not correctly connected. • Disconnect the power plug and check the connection with projector • Unplug the power cord, and contact your dealer. ❈ The icon will appear before the... inform you of its service life? p.39 ❈ The icon will shorten the life of the lamp has ended or the projector is not properly attached. • Unplug the power cord, and reattach the lamp cover. If This Happens Check No power • Is the power cord plugged in . p.21 ...
User Manual
Page 25
...select S-video input select Camera input select Command IN1 IN2 IN3 IN4 IN5 Note • Contact your dealer for the response from the projector before sending the next command. Aborted No acknowledge NAK (15h) If commands are to be sent consecutively, wait for control cable and...No connection RS-232C, 9600bps, No Parity, Data Length: 8 bits; Normally ended ACK (06h) ESC (1Bh) ... s Separately Sold Product Replacement Lamp Model TLPLV2 Note • Design, specifications, etc. Stop Bit Length: 1 bit STX (02h) Command (3Byte) ETX (03h) Only 1 command valid per communication....
...select S-video input select Camera input select Command IN1 IN2 IN3 IN4 IN5 Note • Contact your dealer for the response from the projector before sending the next command. Aborted No acknowledge NAK (15h) If commands are to be sent consecutively, wait for control cable and...No connection RS-232C, 9600bps, No Parity, Data Length: 8 bits; Normally ended ACK (06h) ESC (1Bh) ... s Separately Sold Product Replacement Lamp Model TLPLV2 Note • Design, specifications, etc. Stop Bit Length: 1 bit STX (02h) Command (3Byte) ETX (03h) Only 1 command valid per communication....

