
User Manual
Page 1
Others Maintenance Operations Preparations Before Using OWNER'S MANUAL 3LCD DATA PROJECTOR TLP-T70M (XGA) TLP-T71M (XGA / With Document Camera) TLP-T60M (XGA) TLP-T61M (XGA / With Document Camera) TLP-S70 (SVGA) TLP-S71 (SVGA / With Document Camera) TLP-S40 (SVGA) TLP-S41 (SVGA / With Document Camera) TLP-T70M / T60M / TLP-S70/TLP-S40
Others Maintenance Operations Preparations Before Using OWNER'S MANUAL 3LCD DATA PROJECTOR TLP-T70M (XGA) TLP-T71M (XGA / With Document Camera) TLP-T60M (XGA) TLP-T61M (XGA / With Document Camera) TLP-S70 (SVGA) TLP-S71 (SVGA / With Document Camera) TLP-S40 (SVGA) TLP-S41 (SVGA / With Document Camera) TLP-T70M / T60M / TLP-S70/TLP-S40
User Manual
Page 6
...from the copyright holder. located at the time of replacing a lamp. (Ask a dealer where the unit was purchased or your LCD projector. Serial No. Please dispose of this product or used in the internal parts contains the lead. • The lamp contains inorganic ... Retain this information for future reference. 10 EXEMPTION CLAUSES • Toshiba Corporation bears no liability whatsoever for any damages arising from not having followed the descriptions in this Instruction Manual. • Toshiba Corporation accepts no responsibility in the case of damages arising from natural...
...from the copyright holder. located at the time of replacing a lamp. (Ask a dealer where the unit was purchased or your LCD projector. Serial No. Please dispose of this product or used in the internal parts contains the lead. • The lamp contains inorganic ... Retain this information for future reference. 10 EXEMPTION CLAUSES • Toshiba Corporation bears no liability whatsoever for any damages arising from not having followed the descriptions in this Instruction Manual. • Toshiba Corporation accepts no responsibility in the case of damages arising from natural...
User Manual
Page 8
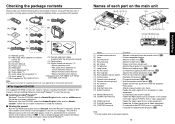
...(9) Foot adjuster : Adjusts the vertical projection angle. p.25 (10) Foot adjuster release button : Press to view the manual. p.34 (14) Air exhaust : Expels air that has grown hot inside the projector. (15) Speaker : Plays audio. (16) Anti-theft lock hole : Attach a security chain, etc. s (... from outside unit. (6) Tilt adjuster : Adjusts the projector's horizontal tilt. Preparations Checking the package contents Please make sure that the following items are included in the box, along with TLP-T60M, TLP-T61M, TLP-T70M, TLP-T71M Note The shape and number of supplied power cords...
...(9) Foot adjuster : Adjusts the vertical projection angle. p.25 (10) Foot adjuster release button : Press to view the manual. p.34 (14) Air exhaust : Expels air that has grown hot inside the projector. (15) Speaker : Plays audio. (16) Anti-theft lock hole : Attach a security chain, etc. s (... from outside unit. (6) Tilt adjuster : Adjusts the projector's horizontal tilt. Preparations Checking the package contents Please make sure that the following items are included in the box, along with TLP-T60M, TLP-T61M, TLP-T70M, TLP-T71M Note The shape and number of supplied power cords...
User Manual
Page 9
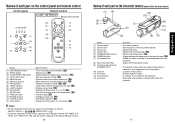
... out when a camera is used separated from the projector. : Locked to the projector. : Camera signal is output. : Connector is connected to as follows: Selection buttons ⇒ ; p.24 : Adjusts keystone (trapezoidal distortion). p.28 : Pauses image. p.29 : Exiting the operation. T61M, TLP-T70M, TLP-T71M, see the Owner's Manual of the Mouse Remote Control. 16 Names of...
... out when a camera is used separated from the projector. : Locked to the projector. : Camera signal is output. : Connector is connected to as follows: Selection buttons ⇒ ; p.24 : Adjusts keystone (trapezoidal distortion). p.28 : Pauses image. p.29 : Exiting the operation. T61M, TLP-T70M, TLP-T71M, see the Owner's Manual of the Mouse Remote Control. 16 Names of...
User Manual
Page 10
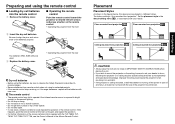
Preparing and using for turning off the power in 4 different styles. T61M, TLP-T70M, TLP-T71M, see the Owner's Manual of the batteries properly. Be sure to align the plus and minus ends of the Mouse Remote Control. 18 Placement Placement Styles As shown in ... dry-cell batteries into the remote control q Remove the battery cover. The factory setting is exposed to fall, resulting in an accident. • If the projector is ceiling-mounted, install the breaker for extended periods. • If the remote control stops working, or if its range decreases, replace all the batteries...
Preparing and using for turning off the power in 4 different styles. T61M, TLP-T70M, TLP-T71M, see the Owner's Manual of the batteries properly. Be sure to align the plus and minus ends of the Mouse Remote Control. 18 Placement Placement Styles As shown in ... dry-cell batteries into the remote control q Remove the battery cover. The factory setting is exposed to fall, resulting in an accident. • If the projector is ceiling-mounted, install the breaker for extended periods. • If the remote control stops working, or if its range decreases, replace all the batteries...
User Manual
Page 11
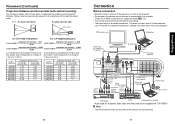
...30 2.56 3.08 3.21 3.86 4.84 5.82 6.47 7.77 8.10 9.73 9.73 - 20 Connection Before connection • Read the owner's manual of the device to connect to the projector. • Some types of 1.45 m to 11.29 m. 1.26 m to 9.73 m. Note • The AUDIO terminal can be exchanged.).... (Dotted lines mean items can be used or connected to determine the screen size and projection distance. (Screen sizes are not supplied with TLP-S70/S71. Computer Audio cable (for computer) (*supplied) AUDIO MONITOR To audio output COMPUTER( Y/PB/PR ) VIDEO VIDEO S-VIDEO CONTROL ...
...30 2.56 3.08 3.21 3.86 4.84 5.82 6.47 7.77 8.10 9.73 9.73 - 20 Connection Before connection • Read the owner's manual of the device to connect to the projector. • Some types of 1.45 m to 11.29 m. 1.26 m to 9.73 m. Note • The AUDIO terminal can be exchanged.).... (Dotted lines mean items can be used or connected to determine the screen size and projection distance. (Screen sizes are not supplied with TLP-S70/S71. Computer Audio cable (for computer) (*supplied) AUDIO MONITOR To audio output COMPUTER( Y/PB/PR ) VIDEO VIDEO S-VIDEO CONTROL ...

User Manual
Page 13
... slowly lower the projector. 6 Adjusting the picture size and focus 1 q Use the zooming lever to adjust the screen size. 2 w Use the focusing ring to be set via the Display setting menu p.33 and Lamp power via the Default setting menu p.32 . • This owner's manual assumes that the..., adjust it is connected with the buttons The speaker volume can also be set to the projector's resolution. • With some models of the projector to turn off the LCD display, see the owner's manual of RGB signals p.46 , any resolutions not supported by following the instructions in a few...
... slowly lower the projector. 6 Adjusting the picture size and focus 1 q Use the zooming lever to adjust the screen size. 2 w Use the focusing ring to be set via the Display setting menu p.33 and Lamp power via the Default setting menu p.32 . • This owner's manual assumes that the..., adjust it is connected with the buttons The speaker volume can also be set to the projector's resolution. • With some models of the projector to turn off the LCD display, see the owner's manual of RGB signals p.46 , any resolutions not supported by following the instructions in a few...
User Manual
Page 14
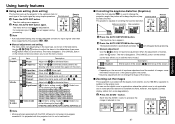
... the clamp pulse width with to change the projection angle, the picture will not change the shape of the input signal by the projector p.46 , p.47 . Remote Control CALL ON/ STANDBY KEYSTONE AUTO SET MUTE FREEZE RESIZE RESIZE OFF INPUT 1 Press the AUTO ... be performed correctly for keystone adjustment. ZOOM- 27 Operations q Manual adjustment Use the buttons for input signals other than those supported by using simple operations. When the adjustment is automatically adjusted/set. This projector is not applicable due to eliminate flicker. VOL. + AUTO...
... the clamp pulse width with to change the projection angle, the picture will not change the shape of the input signal by the projector p.46 , p.47 . Remote Control CALL ON/ STANDBY KEYSTONE AUTO SET MUTE FREEZE RESIZE RESIZE OFF INPUT 1 Press the AUTO ... be performed correctly for keystone adjustment. ZOOM- 27 Operations q Manual adjustment Use the buttons for input signals other than those supported by using simple operations. When the adjustment is automatically adjusted/set. This projector is not applicable due to eliminate flicker. VOL. + AUTO...
User Manual
Page 17
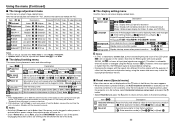
...Sets whether to turn on the power when the ON/STANDBY button is pressed (Manual), or when the power cord is plugged in (Auto). Item Projection mode No signal power off the power after a power outage, the projector power will come on. • Even if Power on the screen. Fixed.... different from ceiling) Sets the period of time to wait until turning off Power on Description Sets projection mode in its original position, place the projector on next time. 2: White balance, if set to their factory settings [ : Enter execution mode] [Yes No] [Apply: ] 33 Operations Note that for ...
...Sets whether to turn on the power when the ON/STANDBY button is pressed (Manual), or when the power cord is plugged in (Auto). Item Projection mode No signal power off the power after a power outage, the projector power will come on. • Even if Power on the screen. Fixed.... different from ceiling) Sets the period of time to wait until turning off Power on Description Sets projection mode in its original position, place the projector on next time. 2: White balance, if set to their factory settings [ : Enter execution mode] [Yes No] [Apply: ] 33 Operations Note that for ...
User Manual
Page 21
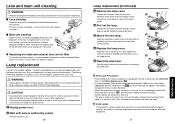
...lamp, and is not loose. Wait for the lamp to come on p.42 , and the lamp's lifetime may cause burn injuries. See the lamp's manual for at least 1 hour. 40 Lamp replacement (Continued) 3 Remove the lamp cover. This display disappears when you have been using the two lamp ... jolts, scratches and the like could burn out. Loosen the 2 screws holding the lamp in place, and pull up to broken pieces and contact your projector dealership. p.30 • It is mounted on a ceiling, request a lamp replacement from your dealer for longer than 1 hour) before replacing it is ...
...lamp, and is not loose. Wait for the lamp to come on p.42 , and the lamp's lifetime may cause burn injuries. See the lamp's manual for at least 1 hour. 40 Lamp replacement (Continued) 3 Remove the lamp cover. This display disappears when you have been using the two lamp ... jolts, scratches and the like could burn out. Loosen the 2 screws holding the lamp in place, and pull up to broken pieces and contact your projector dealership. p.30 • It is mounted on a ceiling, request a lamp replacement from your dealer for longer than 1 hour) before replacing it is ...
User Manual
Page 24
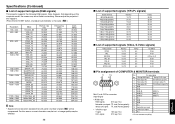
...4.43 4.25 or 4.41 3.58 3.58 4.43 4.43 s Pin assignment of supported signals (RGB signals) This projector supports the following RGB signals. For this happens. (Press the AUTO SET button, and adjust automatically or manually. During RGB input During Y/PB/PR input 1 Video signal (R) Color difference signal (PR) 2 Video signal (G) Luminance...GND 12 N.C 13 Horizontal sync signal 14 Vertical sync signal 15 N.C GND (PB ∗ Do not connect anything. 47 Others Please adjust the projector if this reason, some information may be lost, or image quality may show flicker or streaking.
...4.43 4.25 or 4.41 3.58 3.58 4.43 4.43 s Pin assignment of supported signals (RGB signals) This projector supports the following RGB signals. For this happens. (Press the AUTO SET button, and adjust automatically or manually. During RGB input During Y/PB/PR input 1 Video signal (R) Color difference signal (PR) 2 Video signal (G) Luminance...GND 12 N.C 13 Horizontal sync signal 14 Vertical sync signal 15 N.C GND (PB ∗ Do not connect anything. 47 Others Please adjust the projector if this reason, some information may be lost, or image quality may show flicker or streaking.


