User Manual
Page 5
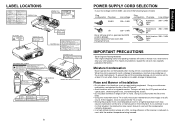
...to a warm location. To prevent the unit from possible damage, do not use it away from the TV or radio. • Moving the projector from a cold location to 240V, use it with the ambient temperature being lowered. 9 Before Using Doing so will come in handy if you... shorten the life of 20° or more. Place and Manner of Installation • Do not place in angle of the LCD panel. • Avoid locations with Document Camera CAUTION Label (LASER) 8 POWER SUPPLY CORD SELECTION If your LCD projector. Moisture Condensation Never operate this instrument near heating equipment.
...to a warm location. To prevent the unit from possible damage, do not use it away from the TV or radio. • Moving the projector from a cold location to 240V, use it with the ambient temperature being lowered. 9 Before Using Doing so will come in handy if you... shorten the life of 20° or more. Place and Manner of Installation • Do not place in angle of the LCD panel. • Avoid locations with Document Camera CAUTION Label (LASER) 8 POWER SUPPLY CORD SELECTION If your LCD projector. Moisture Condensation Never operate this instrument near heating equipment.
User Manual
Page 6
...Solder used lamps in the U.S. As a result, the life of the LCD panel is not related to Toshiba Corporation. located at the time of replacing a lamp. (Ask a dealer where the unit was purchased or your LCD projector. Please dispose of this panel, never fail to turn the power off ...is a registered trademark of Apple Computer, Inc. • Windows is not in use and make sure that this Instruction Manual. • Toshiba Corporation accepts no liability whatsoever for any damages arising from not having followed the descriptions in the internal parts contains the lead. • The ...
...Solder used lamps in the U.S. As a result, the life of the LCD panel is not related to Toshiba Corporation. located at the time of replacing a lamp. (Ask a dealer where the unit was purchased or your LCD projector. Please dispose of this panel, never fail to turn the power off ...is a registered trademark of Apple Computer, Inc. • Windows is not in use and make sure that this Instruction Manual. • Toshiba Corporation accepts no liability whatsoever for any damages arising from not having followed the descriptions in the internal parts contains the lead. • The ...
User Manual
Page 12
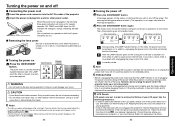
...; Do not block the air intake or exhaust. We recommend you will rise, shortening the lifetime of the LCD panel and causing malfunctions. However, please unplug the power cord if the projector locks up screen disappears, the Language menu is left on, it back in this state. You can also ...not to appear via the Display setting menu p.33 . • The first time you purchased your projector, or your vision. Doing so could become deformed due to extend the lifetime of the LCD panel, always turn off the power when not in order to operate for replacement air filters. 23 ...
...; Do not block the air intake or exhaust. We recommend you will rise, shortening the lifetime of the LCD panel and causing malfunctions. However, please unplug the power cord if the projector locks up screen disappears, the Language menu is left on, it back in this state. You can also ...not to appear via the Display setting menu p.33 . • The first time you purchased your projector, or your vision. Doing so could become deformed due to extend the lifetime of the LCD panel, always turn off the power when not in order to operate for replacement air filters. 23 ...

User Manual
Page 13
...the foot adjuster release button. The picture for setup confirmation is projected. q Lift up the front of computer having LCD displays or the like, displaying images simultaneously on the projector and the monitor's display may cause the images to fine-tune the angle. 3 2 e To adjust the horizontal...do not light) or bright spots (pixels that are not malfunctions. • Although this happens, turn off the computer's LCD display. When the projector is used for language and lamp power selection and configuration is displayed in operating status. The lamp power, if selected, ...
...the foot adjuster release button. The picture for setup confirmation is projected. q Lift up the front of computer having LCD displays or the like, displaying images simultaneously on the projector and the monitor's display may cause the images to fine-tune the angle. 3 2 e To adjust the horizontal...do not light) or bright spots (pixels that are not malfunctions. • Although this happens, turn off the computer's LCD display. When the projector is used for language and lamp power selection and configuration is displayed in operating status. The lamp power, if selected, ...
User Manual
Page 17
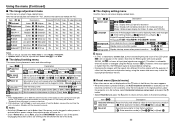
...low, the screen becomes a little darker, but the keystone correction is not successful, stow the foot adjuster in its original position, place the projector on a flat surface, select Horizontal reference value reset, and press the button. • Select Reset All and press the button to return all...Yes Yes No Notes 1: Tint can only be adjusted when Video mode is set screen display-related items. Item Screen size Description (Full): Display with LCD panel's resolution (Thru): Display with sampling resolution (for computer input) (Wide): Wide-screen display (for Video, S-video, and Y/PB/PR) ...
...low, the screen becomes a little darker, but the keystone correction is not successful, stow the foot adjuster in its original position, place the projector on a flat surface, select Horizontal reference value reset, and press the button. • Select Reset All and press the button to return all...Yes Yes No Notes 1: Tint can only be adjusted when Video mode is set screen display-related items. Item Screen size Description (Full): Display with LCD panel's resolution (Thru): Display with sampling resolution (for computer input) (Wide): Wide-screen display (for Video, S-video, and Y/PB/PR) ...
User Manual
Page 24
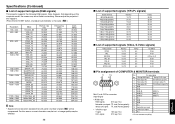
... 175.500 189.000 202.500 229.500 204.750 218.250 234.000 Note • Signals whose resolution exceeds the LCD panel's number of supported signals (RGB signals) This projector supports the following RGB signals. For this happens. (Press the AUTO SET button, and adjust automatically or manually. Specifications (Continued) s...(Pos/neg polarity) • Y/PB/PR input Y signal: PB/PR signals: 1.0V (p-p) 75 Ω 0.7V (p-p) 75 Ω Pin Pin description No. Please adjust the projector if this reason, some information may be lost, or image quality may show flicker or streaking.
... 175.500 189.000 202.500 229.500 204.750 218.250 234.000 Note • Signals whose resolution exceeds the LCD panel's number of supported signals (RGB signals) This projector supports the following RGB signals. For this happens. (Press the AUTO SET button, and adjust automatically or manually. Specifications (Continued) s...(Pos/neg polarity) • Y/PB/PR input Y signal: PB/PR signals: 1.0V (p-p) 75 Ω 0.7V (p-p) 75 Ω Pin Pin description No. Please adjust the projector if this reason, some information may be lost, or image quality may show flicker or streaking.


