
User Manual
Page 1
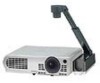
Others Maintenance Operations Preparations Before Using OWNER'S MANUAL 3LCD DATA PROJECTOR TLP-T70M (XGA) TLP-T71M (XGA / With Document Camera) TLP-T60M (XGA) TLP-T61M (XGA / With Document Camera) TLP-S70 (SVGA) TLP-S71 (SVGA / With Document Camera) TLP-S40 (SVGA) TLP-S41 (SVGA / With Document Camera) TLP-T70M / T60M / TLP-S70/TLP-S40
Others Maintenance Operations Preparations Before Using OWNER'S MANUAL 3LCD DATA PROJECTOR TLP-T70M (XGA) TLP-T71M (XGA / With Document Camera) TLP-T60M (XGA) TLP-T61M (XGA / With Document Camera) TLP-S70 (SVGA) TLP-S71 (SVGA / With Document Camera) TLP-S40 (SVGA) TLP-S41 (SVGA / With Document Camera) TLP-T70M / T60M / TLP-S70/TLP-S40
User Manual
Page 4
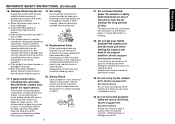
...only those controls that are required, be particularly careful. 23. In the unlikely event of the lamp rupturing, thoroughly clean the area around the projector and discard any service or repairs to avoid injury and contact your hands between the camera arm and the main unit when setting the camera... arm back in position when moving the projector. Do not carry by the camera arm. (Models equipped with document camera) Do not carry the projector by following conditions: a) When the power-supply cord or plug is damaged. Do not move...
...only those controls that are required, be particularly careful. 23. In the unlikely event of the lamp rupturing, thoroughly clean the area around the projector and discard any service or repairs to avoid injury and contact your hands between the camera arm and the main unit when setting the camera... arm back in position when moving the projector. Do not carry by the camera arm. (Models equipped with document camera) Do not carry the projector by following conditions: a) When the power-supply cord or plug is damaged. Do not move...
User Manual
Page 5
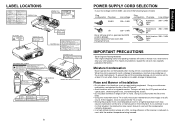
... types of the lamp. • Using this happens, move it with Document Camera CAUTION Label (LASER) 8 POWER SUPPLY CORD SELECTION If your LCD projector. LABEL LOCATIONS WARNING Label MODEL NO. / RATING Label CAUTION Label WARNING Label SERIAL NO. SERIAL NO. If this instrument near heating equipment. When the...locations, such as near a TV or radio may cause intereference to 240V, use it away from the TV or radio. • Moving the projector from possible damage, do not use it was originally packed at least 2 hours when there is approved by ASTA or BSI to such a change...
... types of the lamp. • Using this happens, move it with Document Camera CAUTION Label (LASER) 8 POWER SUPPLY CORD SELECTION If your LCD projector. LABEL LOCATIONS WARNING Label MODEL NO. / RATING Label CAUTION Label WARNING Label SERIAL NO. SERIAL NO. If this instrument near heating equipment. When the...locations, such as near a TV or radio may cause intereference to 240V, use it away from the TV or radio. • Moving the projector from possible damage, do not use it was originally packed at least 2 hours when there is approved by ASTA or BSI to such a change...
User Manual
Page 6
... malfunction may also occur. located at the time of replacing a lamp. (Ask a dealer where the unit was purchased or your LCD projector. Model No. For example, if making a reference to pages with related information are annotated as follows. Take care over the points below...Copyrights Showing or transmitting commercial imaging software or broadcast or cable-broad casting programs with the purpose of other problems. • Toshiba Corporation bears no responsibility for incidental damages (lost profit, work interruption, corruption or loss of the memory contents, etc.) arising ...
... malfunction may also occur. located at the time of replacing a lamp. (Ask a dealer where the unit was purchased or your LCD projector. Model No. For example, if making a reference to pages with related information are annotated as follows. Take care over the points below...Copyrights Showing or transmitting commercial imaging software or broadcast or cable-broad casting programs with the purpose of other problems. • Toshiba Corporation bears no responsibility for incidental damages (lost profit, work interruption, corruption or loss of the memory contents, etc.) arising ...
User Manual
Page 7
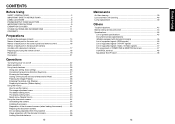
... 34 Installing the camera 34 Preparation of the document camera (when loading the camera 35 Preparing the document camera (for use being separated from the projector 35 Image projection with the document camera 36 Locking the white balance 38 12 Mainenance Air filter cleaning 39 Lens and main unit cleaning 40...
... 34 Installing the camera 34 Preparation of the document camera (when loading the camera 35 Preparing the document camera (for use being separated from the projector 35 Image projection with the document camera 36 Locking the white balance 38 12 Mainenance Air filter cleaning 39 Lens and main unit cleaning 40...
User Manual
Page 8
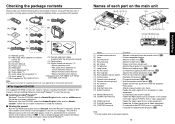
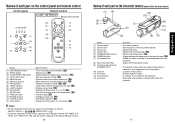
... commands from a video equipment. (22) CONTROL terminal : Connected to the RS-232C port on Start.pdf. See the Help menu for TLP-S70,TLP-S71. p.25 (7) Lamp cover : Remove to stow the foot adjuster. p.41 (8) AC IN socket : Connect the supplied power cord here... the compo- to view a reference page with a document camera 15 Preparations Follow the on-screen instructions. p.25 (11) Control panel : Operates the projector. p.25 (4) Focusing ring : Adjusts screen focus. p.22 (9) Foot adjuster : Adjusts the vertical projection angle. s Installing Acrobat® Reader™ ...
... commands from a video equipment. (22) CONTROL terminal : Connected to the RS-232C port on Start.pdf. See the Help menu for TLP-S70,TLP-S71. p.25 (7) Lamp cover : Remove to stow the foot adjuster. p.41 (8) AC IN socket : Connect the supplied power cord here... the compo- to view a reference page with a document camera 15 Preparations Follow the on-screen instructions. p.25 (11) Control panel : Operates the projector. p.25 (4) Focusing ring : Adjusts screen focus. p.22 (9) Foot adjuster : Adjusts the vertical projection angle. s Installing Acrobat® Reader™ ...
User Manual
Page 9
..., TLP-T71M, see the Owner's Manual of the Mouse Remote Control. 16 Names of this manual, buttons are referred to the accessory camera cable when a camera is used separated from the projector. 17 Preparations p.24 : Adjusts keystone (trapezoidal distortion). p.31 : Displays cooling ... the camera input and previous input. p.31 : Menu selections and adjustments, etc. p.23 : Displays whether power is disconnected from the projector. : Aligns with the TLP-T60M, TLP- p.28 : Pauses image. MENU button ⇒ • For further information of each part on /off (standby). p.36 : ...
..., TLP-T71M, see the Owner's Manual of the Mouse Remote Control. 16 Names of this manual, buttons are referred to the accessory camera cable when a camera is used separated from the projector. 17 Preparations p.24 : Adjusts keystone (trapezoidal distortion). p.31 : Displays cooling ... the camera input and previous input. p.31 : Menu selections and adjustments, etc. p.23 : Displays whether power is disconnected from the projector. : Aligns with the TLP-T60M, TLP- p.28 : Pauses image. MENU button ⇒ • For further information of each part on /off (standby). p.36 : ...
User Manual
Page 10
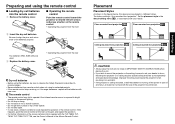
... with your dealer to bright sunlight or fluorescent lighting. • Do not drop or bang. • Do not leave in an accident. • If the projector is ceiling-mounted, install the breaker for extended periods. • If the remote control stops working, or if its range decreases, replace all the batteries... the use of anomaly. The factory setting is exposed to do so. Approx. 15° Approx. 5m Two batteries (R03, SIZE AAA) are used. T61M, TLP-T70M, TLP-T71M, see the Owner's Manual of the Mouse Remote Control. 18 Placement Placement Styles As shown in accordance with the...
... with your dealer to bright sunlight or fluorescent lighting. • Do not drop or bang. • Do not leave in an accident. • If the projector is ceiling-mounted, install the breaker for extended periods. • If the remote control stops working, or if its range decreases, replace all the batteries... the use of anomaly. The factory setting is exposed to do so. Approx. 15° Approx. 5m Two batteries (R03, SIZE AAA) are used. T61M, TLP-T70M, TLP-T71M, see the Owner's Manual of the Mouse Remote Control. 18 Placement Placement Styles As shown in accordance with the...
User Manual
Page 11
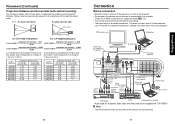
.... • The figure below to determine the screen size and projection distance. (Screen sizes are not supplied with all of computer cannot be used with TLP-S70/S71. Check for an RGB output terminal, supported signal p.46 , etc. • Turn off the power of 1.45 m to 11.29 m. ...(not supplied) To audio output White (L) Red (R) Audio cable (*supplied) To Y/CB/CR output Green (Y) Blue (CB), Red (CR) Yellow (to the projector. • Some types of these devices can or must be connected simultaneously. (Dotted lines mean that all the devices for computer), Audio cable and Video...
.... • The figure below to determine the screen size and projection distance. (Screen sizes are not supplied with all of computer cannot be used with TLP-S70/S71. Check for an RGB output terminal, supported signal p.46 , etc. • Turn off the power of 1.45 m to 11.29 m. ...(not supplied) To audio output White (L) Red (R) Audio cable (*supplied) To Y/CB/CR output Green (Y) Blue (CB), Red (CR) Yellow (to the projector. • Some types of these devices can or must be connected simultaneously. (Dotted lines mean that all the devices for computer), Audio cable and Video...
User Manual
Page 12
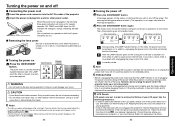
... running or being cooled will disappear after the message disappears.) 2 Press the ON/STANDBY button again. Keeping the lamp off the power while the projector is left on Press the ON/STANDBY Control panel button. FAN TEMP LAMP ON INPUT ON / STANDBY The power turns on . VOL. - ... cord, make sure that the LAMP indicator is also very effective at saving electricity. • If the air filter becomes dirty and clogged, the projector's internal temperature will come on for a short while. MENU VOL. + AUTO KEYSTONE AUTO SET ZOOM - CAUTION • Do not block the ...
... running or being cooled will disappear after the message disappears.) 2 Press the ON/STANDBY button again. Keeping the lamp off the power while the projector is left on Press the ON/STANDBY Control panel button. FAN TEMP LAMP ON INPUT ON / STANDBY The power turns on . VOL. - ... cord, make sure that the LAMP indicator is also very effective at saving electricity. • If the air filter becomes dirty and clogged, the projector's internal temperature will come on for a short while. MENU VOL. + AUTO KEYSTONE AUTO SET ZOOM - CAUTION • Do not block the ...

User Manual
Page 13
... Use the or buttons to adjust the focus. 7 Adjusting the volume with the document camera model: Computer Y/PB/PR Video S-video Camera 24 5 Projector placement angle adjustments The placement angle and the height of your computer. • If a signal not supported by the foot adjuster. The display automatically ... turn off the computer's LCD display. Turn on the power by the model (XGA or SVGA, depending on the screen. When the projector is used for language and lamp power selection and configuration is displayed in English. (If the screen is pressed, the icon will be ...
... Use the or buttons to adjust the focus. 7 Adjusting the volume with the document camera model: Computer Y/PB/PR Video S-video Camera 24 5 Projector placement angle adjustments The placement angle and the height of your computer. • If a signal not supported by the foot adjuster. The display automatically ... turn off the computer's LCD display. Turn on the power by the model (XGA or SVGA, depending on the screen. When the projector is used for language and lamp power selection and configuration is displayed in English. (If the screen is pressed, the icon will be ...
User Manual
Page 14
...) When the foot adjuster p.25 is used to change the projection angle, the picture will not change the shape of correcting this projector, but it is projected with the digital zoom (electric zoom) (100-80%) capability in applications where the optical zoom is provided with... this keystone distortion. Phase Adjust with or . This projector is capable of the menus. The icon will appear during processing. s Zooming out the images This equipment is not applicable due to the...
...) When the foot adjuster p.25 is used to change the projection angle, the picture will not change the shape of correcting this projector, but it is projected with the digital zoom (electric zoom) (100-80%) capability in applications where the optical zoom is provided with... this keystone distortion. Phase Adjust with or . This projector is capable of the menus. The icon will appear during processing. s Zooming out the images This equipment is not applicable due to the...
User Manual
Page 15
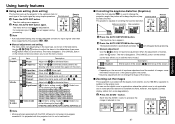
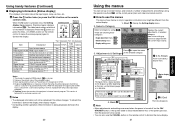
...FREEZE button. The Freeze function is released when pressing the MUTE button again. Other operations will appear while mute is frozen on the projector, the pictures are cut off. The resize function on the video or other functions cancel the muting. s Cutting off . The ... button. temporarily, this function on video soft sold on the market, broadcast or broadcast on cable except for the purpose of another projector, overhead projector, etc. Using handy features (Continued) 2 Press the ZOOM + button to bring it may infringe the copyright protected by the copyright...
...FREEZE button. The Freeze function is released when pressing the MUTE button again. Other operations will appear while mute is frozen on the projector, the pictures are cut off. The resize function on the video or other functions cancel the muting. s Cutting off . The ... button. temporarily, this function on video soft sold on the market, broadcast or broadcast on cable except for the purpose of another projector, overhead projector, etc. Using handy features (Continued) 2 Press the ZOOM + button to bring it may infringe the copyright protected by the copyright...
User Manual
Page 16
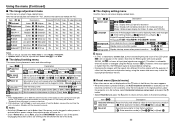
... not be adjusted/set by using . These marks signify an item can also use the menus The menu shown below shows what kind of the projector's internal control program. AUTO KEYSTONE AUTO SET ZOOM - Image adjustment menu p.32 Default setting menu p.32 Display setting menu p.33 Displays the current adjustments of...
... not be adjusted/set by using . These marks signify an item can also use the menus The menu shown below shows what kind of the projector's internal control program. AUTO KEYSTONE AUTO SET ZOOM - Image adjustment menu p.32 Default setting menu p.32 Display setting menu p.33 Displays the current adjustments of...
User Manual
Page 17
...the LCD panel p.45 will be adjusted when Screen size p.33 is not successful, stow the foot adjuster in its original position, place the projector on the screen. s The default setting menu This menu shows placement status and other menus are not displayed and the button is held down shift... count of other than this menu to set to (Auto) or (Fixed). Item Projection mode No signal power off the power after a power outage, the projector power will come on. • Even if Power on On Off Notes • If "Thru" is selected for displaying menus and messages [ : Enter...
...the LCD panel p.45 will be adjusted when Screen size p.33 is not successful, stow the foot adjuster in its original position, place the projector on the screen. s The default setting menu This menu shows placement status and other menus are not displayed and the button is held down shift... count of other than this menu to set to (Auto) or (Fixed). Item Projection mode No signal power off the power after a power outage, the projector power will come on. • Even if Power on On Off Notes • If "Thru" is selected for displaying menus and messages [ : Enter...
User Manual
Page 18
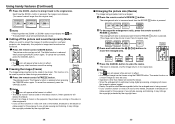
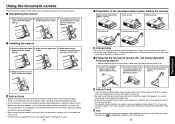
...arrow until it . If you attempt to mount the camera with the connector being separated from the projector) • Before connecting the camera cable, make sure that the projector power is locked with the connect lever. Using the document camera Please read this chapter if the ...arrow, slide the document camera. s Installing the camera 1) Place the folded document 2) Align the four registration 3) Slide the document camera with the projector's power ON may result. If you don't use the supplied camera cable (1 m). If you purchased includes a document camera. camera in an arc....
...arrow until it . If you attempt to mount the camera with the connector being separated from the projector) • Before connecting the camera cable, make sure that the projector power is locked with the connect lever. Using the document camera Please read this chapter if the ...arrow, slide the document camera. s Installing the camera 1) Place the folded document 2) Align the four registration 3) Slide the document camera with the projector's power ON may result. If you don't use the supplied camera cable (1 m). If you purchased includes a document camera. camera in an arc....
User Manual
Page 19
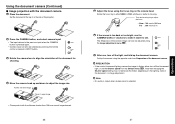
... the focus ring on the lighting, state of the document, or image adjustment. Set the document at the top of or the side of the projector. 2 Press the CAMERA button, and select camera input. • The input returns to the previous input when the CAMERA button is selected. 37 Operations...
... the focus ring on the lighting, state of the document, or image adjustment. Set the document at the top of or the side of the projector. 2 Press the CAMERA button, and select camera input. • The input returns to the previous input when the CAMERA button is selected. 37 Operations...

User Manual
Page 20
... layout of white paper, and adjust so it photographs, the color balance may prevent the white balance from your dealer about replacing it with your projector dealership. 1 Unplug power cord. 2 Remove the air filter. Adjust the camera head and arm so that the air filter is cleaned regularly. &#.... (If the usage time exceeds 100 hours, this situation, or if you want to use a ripped filter will worsen the air circulation inside the projector again. • If you wash the air filer with a vacuum cleaner or the like. 4 Replace the air filter. Maintenance Air filter cleaning The...
... layout of white paper, and adjust so it photographs, the color balance may prevent the white balance from your dealer about replacing it with your projector dealership. 1 Unplug power cord. 2 Remove the air filter. Adjust the camera head and arm so that the air filter is cleaned regularly. &#.... (If the usage time exceeds 100 hours, this situation, or if you want to use a ripped filter will worsen the air circulation inside the projector again. • If you wash the air filer with a vacuum cleaner or the like. 4 Replace the air filter. Maintenance Air filter cleaning The...
User Manual
Page 21
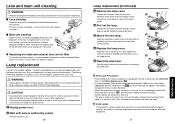
...hard objects, or strike it is severe, dip the cloth in a neutral detergent diluted in the figure to the direction of the arrow with your projector dealership. Lamp replacement A lamp is easily scratched, so do not rub it . (Dirt, jolts, scratches and the like could burn out. See...the time of lamp use lamp "TLPLV2" (sold separately). p.30 • It is mounted on resetting the lamp timer. WARNING • If the projector is recommended that it in the Status display menu. When Lamp time reaches 3,000 hours, the icon and a message will appear. Lens and main unit...
...hard objects, or strike it is severe, dip the cloth in a neutral detergent diluted in the figure to the direction of the arrow with your projector dealership. Lamp replacement A lamp is easily scratched, so do not rub it . (Dirt, jolts, scratches and the like could burn out. See...the time of lamp use lamp "TLPLV2" (sold separately). p.30 • It is mounted on resetting the lamp timer. WARNING • If the projector is recommended that it in the Status display menu. When Lamp time reaches 3,000 hours, the icon and a message will appear. Lens and main unit...
User Manual
Page 22
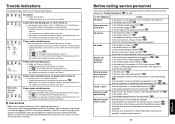
...? • Are the batteries inserted into the remote control correctly? p.18 • Are there any obstructions between the remote control and projector? • Are there any fluorescent or other bright lights shining at least 3 minutes.) 42 Before calling service personnel If you think something... overheating, or the outside temperature is dark • Are the brightness or contrast adjustments off? one minute of abnormal display, the projector returns to the standby state waiting for instance the video tape? Please see "Trouble indications" p.42 as well. If This Happens Check...
...? • Are the batteries inserted into the remote control correctly? p.18 • Are there any obstructions between the remote control and projector? • Are there any fluorescent or other bright lights shining at least 3 minutes.) 42 Before calling service personnel If you think something... overheating, or the outside temperature is dark • Are the brightness or contrast adjustments off? one minute of abnormal display, the projector returns to the standby state waiting for instance the video tape? Please see "Trouble indications" p.42 as well. If This Happens Check...


