
User Manual
Page 1
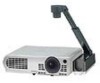
Others Maintenance Operations Preparations Before Using OWNER'S MANUAL 3LCD DATA PROJECTOR TLP-T70M (XGA) TLP-T71M (XGA / With Document Camera) TLP-T60M (XGA) TLP-T61M (XGA / With Document Camera) TLP-S70 (SVGA) TLP-S71 (SVGA / With Document Camera) TLP-S40 (SVGA) TLP-S41 (SVGA / With Document Camera) TLP-T70M / T60M / TLP-S70/TLP-S40
Others Maintenance Operations Preparations Before Using OWNER'S MANUAL 3LCD DATA PROJECTOR TLP-T70M (XGA) TLP-T71M (XGA / With Document Camera) TLP-T60M (XGA) TLP-T61M (XGA / With Document Camera) TLP-S70 (SVGA) TLP-S71 (SVGA / With Document Camera) TLP-S40 (SVGA) TLP-S41 (SVGA / With Document Camera) TLP-T70M / T60M / TLP-S70/TLP-S40
User Manual
Page 2
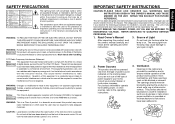
...operated in the cabinet are not sure of the type of Light After unpacking this equipment, not expressly approved by USA only Toshiba, or parties authorized by Toshiba, could void the user's authority to a mirror. 2 IMPORTANT SAFETY INSTRUCTIONS CAUTION: PLEASE READ AND OBSERVE ALL WARNINGS AND... INSTRUCTIONS GIVEN IN THIS OWNER'S MANUAL AND THOSE MARKED ON THE UNIT. WARNING: TO REDUCE THE RISK OF FIRE OR ELECTRIC SHOCK, DO ...
...operated in the cabinet are not sure of the type of Light After unpacking this equipment, not expressly approved by USA only Toshiba, or parties authorized by Toshiba, could void the user's authority to a mirror. 2 IMPORTANT SAFETY INSTRUCTIONS CAUTION: PLEASE READ AND OBSERVE ALL WARNINGS AND... INSTRUCTIONS GIVEN IN THIS OWNER'S MANUAL AND THOSE MARKED ON THE UNIT. WARNING: TO REDUCE THE RISK OF FIRE OR ELECTRIC SHOCK, DO ...
User Manual
Page 6
... the life of the actions listed above, including obtaining a license from time to Toshiba Corporation. Please dispose of this reason, please take appropriate measures before performing one of this Instruction Manual. • Toshiba Corporation accepts no liability whatsoever for a long time. If cleaning with the copyright ...of energy saving. • If the air filter is stained and is not in the U.S. Notational Conventions Used in This Manual References to humans and the environment. • Solder used lamps in the internal parts contains the lead. • The lamp contains inorganic...
... the life of the actions listed above, including obtaining a license from time to Toshiba Corporation. Please dispose of this reason, please take appropriate measures before performing one of this Instruction Manual. • Toshiba Corporation accepts no liability whatsoever for a long time. If cleaning with the copyright ...of energy saving. • If the air filter is stained and is not in the U.S. Notational Conventions Used in This Manual References to humans and the environment. • Solder used lamps in the internal parts contains the lead. • The lamp contains inorganic...
User Manual
Page 8
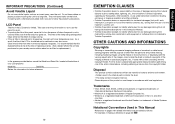
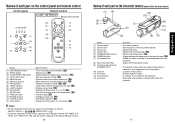
...pdf. p.22 (9) Foot adjuster : Adjusts the vertical projection angle. p.48 Note *: For the models with TLP-T60M, TLP-T61M, TLP-T70M, TLP-T71M Note The shape and number of each part on the product destination. p.25 (4) Focusing ring : Adjusts... (10) LASER PLAY MER-NUC/LIECNKTER INPUT STOP VOL.PJ MODE s (1) Remote control s (2) R03 (SIZE AAA) batteries for remote control (2) s (3) CD-ROM s (4) Owner's Manual s (5) Power cord (See note) s (6) RGB cable s (7) Quick Reference(*1) s (8) Video cable(*1) s (9) Audio cable (for computer)(*1) s (10) Audio cable(*1) (*1) Not supplied...
...pdf. p.22 (9) Foot adjuster : Adjusts the vertical projection angle. p.48 Note *: For the models with TLP-T60M, TLP-T61M, TLP-T70M, TLP-T71M Note The shape and number of each part on the product destination. p.25 (4) Focusing ring : Adjusts... (10) LASER PLAY MER-NUC/LIECNKTER INPUT STOP VOL.PJ MODE s (1) Remote control s (2) R03 (SIZE AAA) batteries for remote control (2) s (3) CD-ROM s (4) Owner's Manual s (5) Power cord (See note) s (6) RGB cable s (7) Quick Reference(*1) s (8) Video cable(*1) s (9) Audio cable (for computer)(*1) s (10) Audio cable(*1) (*1) Not supplied...
User Manual
Page 9
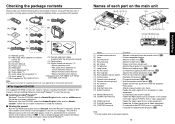
...26 : Displays menus and makes selections. p.31 : Menu selections and adjustments, etc. p.42 : Displays lamp mode. T61M, TLP-T70M, TLP-T71M, see the Owner's Manual of the Mouse Remote Control. 16 Names of each part on the control panel and remote control Control panel Remote Control CLASS 1 ..., TLP- p.31 : Displays cooling fan mode. p.36 : Adjusts the camera gain. p.28 : Enlarges picture size. p.30 Notes • For the remainder of this manual, buttons are referred to the projector. : Used when the camera is used separated from the projector. : Locked to the projector...
...26 : Displays menus and makes selections. p.31 : Menu selections and adjustments, etc. p.42 : Displays lamp mode. T61M, TLP-T70M, TLP-T71M, see the Owner's Manual of the Mouse Remote Control. 16 Names of each part on the control panel and remote control Control panel Remote Control CLASS 1 ..., TLP- p.31 : Displays cooling fan mode. p.36 : Adjusts the camera gain. p.28 : Enlarges picture size. p.30 Notes • For the remainder of this manual, buttons are referred to the projector. : Used when the camera is used separated from the projector. : Locked to the projector...
User Manual
Page 10
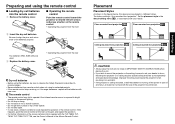
... unit again, and repeat the operation. • For further information of the batteries properly. Let everyone involved with the TLP-T60M, TLP- The factory setting is exposed to align the plus and minus ends of the mouse remote control supplied with the use of...remote sensor, and press a button on a ceiling requires special ceiling brackets (sold separately) and specialized knowledge. T61M, TLP-T70M, TLP-T71M, see the Owner's Manual of the remote control. Floor-mounted front projection Floor-mounted rear projection AC IN Ceiling-mounted front projection Ceiling-mounted rear...
... unit again, and repeat the operation. • For further information of the batteries properly. Let everyone involved with the TLP-T60M, TLP- The factory setting is exposed to align the plus and minus ends of the mouse remote control supplied with the use of...remote sensor, and press a button on a ceiling requires special ceiling brackets (sold separately) and specialized knowledge. T61M, TLP-T70M, TLP-T71M, see the Owner's Manual of the remote control. Floor-mounted front projection Floor-mounted rear projection AC IN Ceiling-mounted front projection Ceiling-mounted rear...
User Manual
Page 11
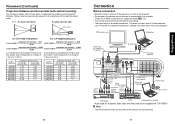
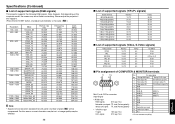
... the distance (m) between the lens and the screen, and corresponds to a range of the screen, and corresponds to a range of computer cannot be used with TLP-S70/S71. screen size (cm) 40 (102) 60 (152) 80 (203) 100 (254) 150 (381) 200 (508) 250 (635) 300 (762) projection distance...min) 1.26 1.52 1.91 2.30 2.56 3.08 3.21 3.86 4.84 5.82 6.47 7.77 8.10 9.73 9.73 - 20 Connection Before connection • Read the owner's manual of the device to connect to the projector. • Some types of 1.45 m to 11.29 m. 1.26 m to this projector. Note • The AUDIO terminal...
... the distance (m) between the lens and the screen, and corresponds to a range of the screen, and corresponds to a range of computer cannot be used with TLP-S70/S71. screen size (cm) 40 (102) 60 (152) 80 (203) 100 (254) 150 (381) 200 (508) 250 (635) 300 (762) projection distance...min) 1.26 1.52 1.91 2.30 2.56 3.08 3.21 3.86 4.84 5.82 6.47 7.77 8.10 9.73 9.73 - 20 Connection Before connection • Read the owner's manual of the device to connect to the projector. • Some types of 1.45 m to 11.29 m. 1.26 m to this projector. Note • The AUDIO terminal...

User Manual
Page 13
... .) • The LCD panel is not malfunction. (The lifetime of the lamp depends on how to turn off the LCD display, see the owner's manual of a lamp, and is made using the first time). This is characteristic of your computer. • If a signal not supported by the projector is... the projector to be set via the Display setting menu p.33 and Lamp power via the Default setting menu p.32 . • This owner's manual assumes that the computer's external output should be shown improperly. Message for language and lamp power selection and configuration is displayed in "Turning on the...
... .) • The LCD panel is not malfunction. (The lifetime of the lamp depends on how to turn off the LCD display, see the owner's manual of a lamp, and is made using the first time). This is characteristic of your computer. • If a signal not supported by the projector is... the projector to be set via the Display setting menu p.33 and Lamp power via the Default setting menu p.32 . • This owner's manual assumes that the computer's external output should be shown improperly. Message for language and lamp power selection and configuration is displayed in "Turning on the...
User Manual
Page 14
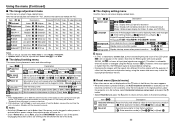
...in the table below . The Keystone menu appears. 2 Press the AUTO KEYSTONE button again. The keystone distortion is automatically adjusted/set. q Manual adjustment Use the buttons for each type of the menus. You can use the digital zoom in addition to eliminate flicker. ZOOM- 27 Operations... 2 Press the AUTO SET button again. The menu disappears. (The CANCEL button on the input type, as shown in size. q Manual adjustment and setting The menu items vary depending on the remote control also allows you are finished. Phase Adjust with to the optimum state ...
...in the table below . The Keystone menu appears. 2 Press the AUTO KEYSTONE button again. The keystone distortion is automatically adjusted/set. q Manual adjustment Use the buttons for each type of the menus. You can use the digital zoom in addition to eliminate flicker. ZOOM- 27 Operations... 2 Press the AUTO SET button again. The menu disappears. (The CANCEL button on the input type, as shown in size. q Manual adjustment and setting The menu items vary depending on the remote control also allows you are finished. Phase Adjust with to the optimum state ...
User Manual
Page 17
...Reset All and press the button to return all menu items to their factory settings [ : Enter execution mode] [Yes No] [Apply: ] 33 Operations Manual Auto Lamp power [Note 1] Sets the lamp power Standard Shutter speed Sets the camera's shutter speed to either (50Hz) or (60Hz). 50Hz White balance [...with "Yes", and those that cannot are marked with Placement Style p.19 (Placed on the power when the ON/STANDBY button is pressed (Manual), or when the power cord is plugged in its original position, place the projector on the screen. Item Description Computer Y/PB/PR Video ...
...Reset All and press the button to return all menu items to their factory settings [ : Enter execution mode] [Yes No] [Apply: ] 33 Operations Manual Auto Lamp power [Note 1] Sets the lamp power Standard Shutter speed Sets the camera's shutter speed to either (50Hz) or (60Hz). 50Hz White balance [...with "Yes", and those that cannot are marked with Placement Style p.19 (Placed on the power when the ON/STANDBY button is pressed (Manual), or when the power cord is plugged in its original position, place the projector on the screen. Item Description Computer Y/PB/PR Video ...
User Manual
Page 21
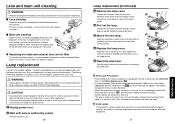
.... 5 1 7 Reset the lamp timer. WARNING • If the projector is recommended that these should break, please handle with local regulations. 41 Maintenance See the lamp's manual for at least 1 hour. 40 Lamp replacement (Continued) 3 Remove the lamp cover. s Main unit cleaning • Clean the main unit after 3,000 hours of glass...
.... 5 1 7 Reset the lamp timer. WARNING • If the projector is recommended that these should break, please handle with local regulations. 41 Maintenance See the lamp's manual for at least 1 hour. 40 Lamp replacement (Continued) 3 Remove the lamp cover. s Main unit cleaning • Clean the main unit after 3,000 hours of glass...
User Manual
Page 24
...: PB/PR signals: 1.0V (p-p) 75 Ω 0.7V (p-p) 75 Ω Pin Pin description No. For this happens. (Press the AUTO SET button, and adjust automatically or manually. During RGB input During Y/PB/PR input 1 Video signal (R) Color difference signal (PR) 2 Video signal (G) Luminance signal (Y) 3 Video signal (B) 4 GND 5 GND 6 GND (R) 7 GND (G) Color difference...
...: PB/PR signals: 1.0V (p-p) 75 Ω 0.7V (p-p) 75 Ω Pin Pin description No. For this happens. (Press the AUTO SET button, and adjust automatically or manually. During RGB input During Y/PB/PR input 1 Video signal (R) Color difference signal (PR) 2 Video signal (G) Luminance signal (Y) 3 Video signal (B) 4 GND 5 GND 6 GND (R) 7 GND (G) Color difference...


