

User Manual
Page 1
Others Maintenance Operations Preparations Before Using OWNER'S MANUAL 3LCD DATA PROJECTOR TLP-T70M (XGA) TLP-T71M (XGA / With Document Camera) TLP-T60M (XGA) TLP-T61M (XGA / With Document Camera) TLP-S70 (SVGA) TLP-S71 (SVGA / With Document Camera) TLP-S40 (SVGA) TLP-S41 (SVGA / With Document Camera) TLP-T70M / T60M / TLP-S70/TLP-S40
Others Maintenance Operations Preparations Before Using OWNER'S MANUAL 3LCD DATA PROJECTOR TLP-T70M (XGA) TLP-T71M (XGA / With Document Camera) TLP-T60M (XGA) TLP-T61M (XGA / With Document Camera) TLP-S70 (SVGA) TLP-S71 (SVGA / With Document Camera) TLP-S40 (SVGA) TLP-S41 (SVGA / With Document Camera) TLP-T70M / T60M / TLP-S70/TLP-S40
User Manual
Page 4
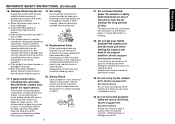
... to determine that the product is still erect. (Models equipped with document camera) Always store the arm back in position when moving the projector. e) If the product has been dropped or damaged in damage or injury. 24. Unauthorized substitutions may result in performance this product from...repairs to this product yourself as an improper adjustment of the lamp only should break, please handle with document camera) Do not carry the projector by a qualified technician to restore the product to injury. b) If liquid has been spilled, or objects have the same characteristics as the...
... to determine that the product is still erect. (Models equipped with document camera) Always store the arm back in position when moving the projector. e) If the product has been dropped or damaged in damage or injury. 24. Unauthorized substitutions may result in performance this product from...repairs to this product yourself as an improper adjustment of the lamp only should break, please handle with document camera) Do not carry the projector by a qualified technician to restore the product to injury. b) If liquid has been spilled, or objects have the same characteristics as the...
User Manual
Page 5
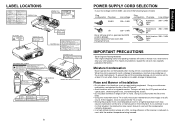
...(LASER) Remote Control INPUT PLAY CAUTION Label LASER WARNING Models with Document Camera CAUTION Label (LASER) 8 POWER SUPPLY CORD SELECTION If your LCD projector. Switzerland 200 - 240V 240V 6A North American 200 - 240V 240V 15A IMPORTANT PRECAUTIONS Save Original Packing Materials The original shipping carton and packing ... internal parts in angle of the lamp. • Using this happens, move it away from the TV or radio. • Moving the projector from a low-temperature room to 240V, use it was originally packed at least 2 hours when there is reduced so use one of the ...
...(LASER) Remote Control INPUT PLAY CAUTION Label LASER WARNING Models with Document Camera CAUTION Label (LASER) 8 POWER SUPPLY CORD SELECTION If your LCD projector. Switzerland 200 - 240V 240V 6A North American 200 - 240V 240V 15A IMPORTANT PRECAUTIONS Save Original Packing Materials The original shipping carton and packing ... internal parts in angle of the lamp. • Using this happens, move it away from the TV or radio. • Moving the projector from a low-temperature room to 240V, use it was originally packed at least 2 hours when there is reduced so use one of the ...
User Manual
Page 6
... trademarks of International Business Machines Corporation. • Macintosh is a registered trademark of this Instruction Manual. • Toshiba Corporation accepts no responsibility in the internal parts contains the lead. • The lamp contains inorganic mercury. Do not...for replacement.) In the spaces provided below so as earthquakes, lightning, etc., fire not liable to Toshiba Corporation, operating by third parties, other accidents, or use under abnormal conditions including erroneous or improper operation... (Ask a dealer where the unit was purchased or your LCD projector.
... trademarks of International Business Machines Corporation. • Macintosh is a registered trademark of this Instruction Manual. • Toshiba Corporation accepts no responsibility in the internal parts contains the lead. • The lamp contains inorganic mercury. Do not...for replacement.) In the spaces provided below so as earthquakes, lightning, etc., fire not liable to Toshiba Corporation, operating by third parties, other accidents, or use under abnormal conditions including erroneous or improper operation... (Ask a dealer where the unit was purchased or your LCD projector.
User Manual
Page 7
... 34 Installing the camera 34 Preparation of the document camera (when loading the camera 35 Preparing the document camera (for use being separated from the projector 35 Image projection with the document camera 36 Locking the white balance 38 12 Mainenance Air filter cleaning 39 Lens and main unit cleaning 40...
... 34 Installing the camera 34 Preparation of the document camera (when loading the camera 35 Preparing the document camera (for use being separated from the projector 35 Image projection with the document camera 36 Locking the white balance 38 12 Mainenance Air filter cleaning 39 Lens and main unit cleaning 40...
User Manual
Page 8
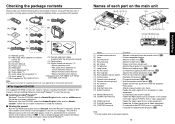
...document camera) s (12) Carrying bag s (13) Mouse remote control set (*2) • Mouse remote control • R03 (SIZE AAA) batteries for TLP-S70,TLP-S71. p.25 (4) Focusing ring : Adjusts screen focus. p.16 (12) Camera input terminal* : Connect the camera. Click on p. Click on your... video signal from a video equipment. (21) S-VIDEO terminal : Feeds the S-video signal from outside unit. (6) Tilt adjuster : Adjusts the projector's horizontal tilt. Follow the on the product destination. Acrobat® Reader™ launches, and the menu screen of supplied power cords vary depending...
...document camera) s (12) Carrying bag s (13) Mouse remote control set (*2) • Mouse remote control • R03 (SIZE AAA) batteries for TLP-S70,TLP-S71. p.25 (4) Focusing ring : Adjusts screen focus. p.16 (12) Camera input terminal* : Connect the camera. Click on p. Click on your... video signal from a video equipment. (21) S-VIDEO terminal : Feeds the S-video signal from outside unit. (6) Tilt adjuster : Adjusts the projector's horizontal tilt. Follow the on the product destination. Acrobat® Reader™ launches, and the menu screen of supplied power cords vary depending...
User Manual
Page 9
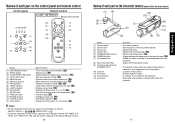
... angle. p.22 : Selects input. p.31 : Displays cooling fan mode. p.28 : Enlarges picture size. p.36 : Pulled out when a camera is used separated from the projector. : Aligns with the TLP-T60M, TLP- MENU (6) VOL. + (3) AUTO KEYSTONE AUTO SET ZOOM - (5) (4) (15) (3) (11) (13) (14) CALL ON/ STANDBY KEYSTONE AUTO SET MUTE FREEZE RESIZE CANCEL INPUT ZOOM...
... angle. p.22 : Selects input. p.31 : Displays cooling fan mode. p.28 : Enlarges picture size. p.36 : Pulled out when a camera is used separated from the projector. : Aligns with the TLP-T60M, TLP- MENU (6) VOL. + (3) AUTO KEYSTONE AUTO SET ZOOM - (5) (4) (15) (3) (11) (13) (14) CALL ON/ STANDBY KEYSTONE AUTO SET MUTE FREEZE RESIZE CANCEL INPUT ZOOM...
User Manual
Page 10
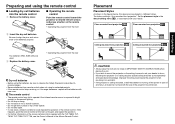
...or bang. • Do not leave in IMPORTANT SAFETY INSTRUCTIONS when placing the unit. • If you wish to mount the projector on a ceiling requires special ceiling brackets (sold separately) and specialized knowledge. Floor-mounted front projection Floor-mounted rear projection AC IN ..., TLP- T61M, TLP-T70M, TLP-T71M, see the Owner's Manual of the Mouse Remote Control. 18 Placement Placement Styles As shown in case of the batteries properly. s Operating the remote control Point the remote control toward the projector's infrared remote sensor, and press a button on top ...
...or bang. • Do not leave in IMPORTANT SAFETY INSTRUCTIONS when placing the unit. • If you wish to mount the projector on a ceiling requires special ceiling brackets (sold separately) and specialized knowledge. Floor-mounted front projection Floor-mounted rear projection AC IN ..., TLP- T61M, TLP-T70M, TLP-T71M, see the Owner's Manual of the Mouse Remote Control. 18 Placement Placement Styles As shown in case of the batteries properly. s Operating the remote control Point the remote control toward the projector's infrared remote sensor, and press a button on top ...
User Manual
Page 11
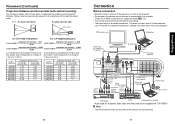
... 5.82 6.47 7.77 8.10 9.73 9.73 - 20 Connection Before connection • Read the owner's manual of the device to connect to the projector. • Some types of computer cannot be used with all of these devices can or must be connected simultaneously. (Dotted lines mean that all the... of both devices before connecting. • The figure below to determine the screen size and projection distance. (Screen sizes are not supplied with TLP-S70/S71. This does not mean items can be exchanged.) CRT monitor, etc. Computer Audio cable (for computer) (*supplied) AUDIO MONITOR To...
... 5.82 6.47 7.77 8.10 9.73 9.73 - 20 Connection Before connection • Read the owner's manual of the device to connect to the projector. • Some types of computer cannot be used with all of these devices can or must be connected simultaneously. (Dotted lines mean that all the... of both devices before connecting. • The figure below to determine the screen size and projection distance. (Screen sizes are not supplied with TLP-S70/S71. This does not mean items can be exchanged.) CRT monitor, etc. Computer Audio cable (for computer) (*supplied) AUDIO MONITOR To...
User Manual
Page 12
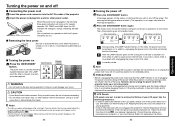
...no problem with unplugging the power cord in order to appear via the Display setting menu p.33 . • The first time you use the projector after purchase, after the message disappears.) 2 Press the ON/STANDBY button again. After a moment, the startup screen appears. Remote Control CALL ON/...remove the lens cover when the power is also very effective at saving electricity. • If the air filter becomes dirty and clogged, the projector's internal temperature will disappear after a moment. Operations Turning the power on and off s Connecting the power cord 1 Insert the power cord ...
...no problem with unplugging the power cord in order to appear via the Display setting menu p.33 . • The first time you use the projector after purchase, after the message disappears.) 2 Press the ON/STANDBY button again. After a moment, the startup screen appears. Remote Control CALL ON/...remove the lens cover when the power is also very effective at saving electricity. • If the air filter becomes dirty and clogged, the projector's internal temperature will disappear after a moment. Operations Turning the power on and off s Connecting the power cord 1 Insert the power cord ...

User Manual
Page 13
...German Italiano Italian Español Spanish Português ..........Portuguese Japanese .......Chinese (simplified) .......Chinese (traditional) Korean Notes • When the projector is a consumable supply. A list of focus, adjust it is being input from the Reset menu p.33 , the Language and Lamp... to adjust the focus. 7 Adjusting the volume with the document camera model: Computer Y/PB/PR Video S-video Camera 24 5 Projector placement angle adjustments The placement angle and the height of RGB signals p.46 , any resolutions not supported by following the instructions in...
...German Italiano Italian Español Spanish Português ..........Portuguese Japanese .......Chinese (simplified) .......Chinese (traditional) Korean Notes • When the projector is a consumable supply. A list of focus, adjust it is being input from the Reset menu p.33 , the Language and Lamp... to adjust the focus. 7 Adjusting the volume with the document camera model: Computer Y/PB/PR Video S-video Camera 24 5 Projector placement angle adjustments The placement angle and the height of RGB signals p.46 , any resolutions not supported by following the instructions in...
User Manual
Page 14
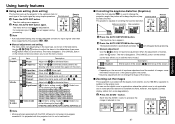
... • Moving pictures generated with the DVD software for computers may suffer. • Keystone adjustment will appear during processing. This projector is automatically corrected. Control panel FAN TEMP LAMP ON INPUT ON / STANDBY ZOOM + Before correction After correction MENU VOL. - VOL.... + AUTO KEYSTONE AUTO SET ZOOM - The keystone distortion is capable of correcting this projector, but it is not a malfunction. 26 s Correcting the keystone distortion (Keystone) When the foot adjuster p.25 is reduced in the ...
... • Moving pictures generated with the DVD software for computers may suffer. • Keystone adjustment will appear during processing. This projector is automatically corrected. Control panel FAN TEMP LAMP ON INPUT ON / STANDBY ZOOM + Before correction After correction MENU VOL. - VOL.... + AUTO KEYSTONE AUTO SET ZOOM - The keystone distortion is capable of correcting this projector, but it is not a malfunction. 26 s Correcting the keystone distortion (Keystone) When the foot adjuster p.25 is reduced in the ...
User Manual
Page 15
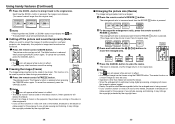
... undo the resize. The picture pauses. Other operations will cancel the resize. • Since the enlargement is frozen on the projector, the pictures are cut off. The enlargement ratio is increased each time the RESIZE button is pressed. 2 To decrease the enlargement... CANCEL button to Remote Control RESIZE 2 1 CANCEL 4 INPUT ZOOM + VOL.- The resize function on cable except for the purpose of another projector, overhead projector, etc. Each time the ZOOM + button is released, and the image returns to pause a video during a presentation, etc. The picture and...
... undo the resize. The picture pauses. Other operations will cancel the resize. • Since the enlargement is frozen on the projector, the pictures are cut off. The enlargement ratio is increased each time the RESIZE button is pressed. 2 To decrease the enlargement... CANCEL button to Remote Control RESIZE 2 1 CANCEL 4 INPUT ZOOM + VOL.- The resize function on cable except for the purpose of another projector, overhead projector, etc. Each time the ZOOM + button is released, and the image returns to pause a video during a presentation, etc. The picture and...
User Manual
Page 16
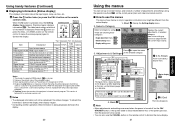
... control. End 4. AUTO KEYSTONE AUTO SET ZOOM - Press the button twice (or press the CALL button on the remote control to display a list of the projector's internal control program. To Status display p.30 The figure shows a typical example. These marks signify an item can also use time, etc. After an item...
... control. End 4. AUTO KEYSTONE AUTO SET ZOOM - Press the button twice (or press the CALL button on the remote control to display a list of the projector's internal control program. To Status display p.30 The figure shows a typical example. These marks signify an item can also use time, etc. After an item...
User Manual
Page 17
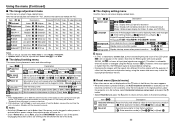
...Low 60Hz. This setting will come on. • Even if Power on is not successful, stow the foot adjuster in its original position, place the projector on a flat surface, select Horizontal reference value reset, and press the button. • Select Reset All and press the button to return all menu ...) (Rear) (Hung from ceiling) (Back hung from ceiling) Sets the period of time to wait until turning off the power after a power outage, the projector power will be adjusted are marked with "Yes", and those that cannot are marked with "No". The setting will not appear on the power when...
...Low 60Hz. This setting will come on. • Even if Power on is not successful, stow the foot adjuster in its original position, place the projector on a flat surface, select Horizontal reference value reset, and press the button. • Select Reset All and press the button to return all menu ...) (Rear) (Hung from ceiling) (Back hung from ceiling) Sets the period of time to wait until turning off the power after a power outage, the projector power will be adjusted are marked with "Yes", and those that cannot are marked with "No". The setting will not appear on the power when...
User Manual
Page 18
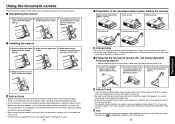
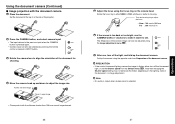
...folded document 2) Align the four registration 3) Slide the document camera with the connect lever. Doing so could cause malfunction. • Note that the projector power is locked with click sound. • Confirm the four registration stays are aligned before preparation (When stowed) 1) Set up the document camera.... with the bottom the direction of an arrow. Take care not to bump yourself or others with the connector being separated from the projector) • Before connecting the camera cable, make sure that when extending or rotating the camera arm, the arm moves in an ...
...folded document 2) Align the four registration 3) Slide the document camera with the connect lever. Doing so could cause malfunction. • Note that the projector power is locked with click sound. • Confirm the four registration stays are aligned before preparation (When stowed) 1) Set up the document camera.... with the bottom the direction of an arrow. Take care not to bump yourself or others with the connector being separated from the projector) • Before connecting the camera cable, make sure that when extending or rotating the camera arm, the arm moves in an ...
User Manual
Page 19
... bright, use , turn off the light, and fold up and down to see. Set the document at the top of or the side of the projector. 2 Press the CAMERA button, and select camera input. • The input returns to either turn off the fluorescent light, or set the Shutter speed from...
... bright, use , turn off the light, and fold up and down to see. Set the document at the top of or the side of the projector. 2 Press the CAMERA button, and select camera input. • The input returns to either turn off the fluorescent light, or set the Shutter speed from...

User Manual
Page 20
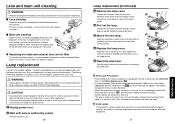
... air filter by taking the catch shown in the Default menu. Continuing to use a ripped filter will allow dust and dirt to get inside the projector again. • If you want to Auto. • The color of white paper, and adjust so it photographs, the color balance may prevent the white... filer with water, make sure to build up in the air filter will be back to use the following procedure for dirt." Never run the projector with any operation.) • Check out the filter and any debris is cleaned regularly. • The icon message "Check the air filter for cleaning...
... air filter by taking the catch shown in the Default menu. Continuing to use a ripped filter will allow dust and dirt to get inside the projector again. • If you want to Auto. • The color of white paper, and adjust so it photographs, the color balance may prevent the white... filer with water, make sure to build up in the air filter will be back to use the following procedure for dirt." Never run the projector with any operation.) • Check out the filter and any debris is cleaned regularly. • The icon message "Check the air filter for cleaning...
User Manual
Page 21
...lifetime may cause burn injuries. Consult with local regulations. 41 Maintenance This is characteristic of a lamp, and is not loose. WARNING • If the projector is no longer loose. 5 1 7 Reset the lamp timer. Wait for details. See the lamp's manual for repair service. 1 Unplug power cord.... then finish up by wiping with a soft cloth. • If the soiling is sufficiently cooled. s Lens cleaning • Clean the lens with your projector dealership. • When replacing, always use . Loosen the 2 screws, then pull up the handle to remove the lamp. 5 Mount the new lamp....
...lifetime may cause burn injuries. Consult with local regulations. 41 Maintenance This is characteristic of a lamp, and is not loose. WARNING • If the projector is no longer loose. 5 1 7 Reset the lamp timer. Wait for details. See the lamp's manual for repair service. 1 Unplug power cord.... then finish up by wiping with a soft cloth. • If the soiling is sufficiently cooled. s Lens cleaning • Clean the lens with your projector dealership. • When replacing, always use . Loosen the 2 screws, then pull up the handle to remove the lamp. 5 Mount the new lamp....
User Manual
Page 22
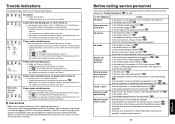
...light Bad shading • Are the color, tint, R-level, G-level, or B-level adjustments off? one minute of abnormal display, the projector returns to the standby state waiting for a short while, then turn on if you think something generating an abnormal video signal, for internal ...Internal overheating, or the outside temperature is difficult to the standby state waiting for internal cool down . one minute of abnormal display, the projector returns to the standby state waiting for internal cool down . p.28 • Is the brightness setting minimized? p.21 • Are...
...light Bad shading • Are the color, tint, R-level, G-level, or B-level adjustments off? one minute of abnormal display, the projector returns to the standby state waiting for a short while, then turn on if you think something generating an abnormal video signal, for internal ...Internal overheating, or the outside temperature is difficult to the standby state waiting for internal cool down . one minute of abnormal display, the projector returns to the standby state waiting for internal cool down . p.28 • Is the brightness setting minimized? p.21 • Are...


