
User Manual
Page 1
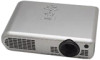
Others Maintenance Operations Preparations Before Using OWNER'S MANUAL 3LCD DATA PROJECTOR TLP-T70M (XGA) TLP-T71M (XGA / With Document Camera) TLP-T60M (XGA) TLP-T61M (XGA / With Document Camera) TLP-S70 (SVGA) TLP-S71 (SVGA / With Document Camera) TLP-S40 (SVGA) TLP-S41 (SVGA / With Document Camera) TLP-T70M / T60M / TLP-S70/TLP-S40
Others Maintenance Operations Preparations Before Using OWNER'S MANUAL 3LCD DATA PROJECTOR TLP-T70M (XGA) TLP-T71M (XGA / With Document Camera) TLP-T60M (XGA) TLP-T61M (XGA / With Document Camera) TLP-S70 (SVGA) TLP-S71 (SVGA / With Document Camera) TLP-S40 (SVGA) TLP-S41 (SVGA / With Document Camera) TLP-T70M / T60M / TLP-S70/TLP-S40
User Manual
Page 2
...est conforme à la norme NMB-003 du Canada. In a domestic environment this equipment, not expressly approved by USA only Toshiba, or parties authorized by Toshiba, could void the user's authority to operate the equipment. Do not turn the laser beam toward a person or to radio ...harmful interference to a mirror. 2 IMPORTANT SAFETY INSTRUCTIONS CAUTION: PLEASE READ AND OBSERVE ALL WARNINGS AND INSTRUCTIONS GIVEN IN THIS OWNER'S MANUAL AND THOSE MARKED ON THE UNIT. Source of Light After unpacking this unit will expose you observe the following procedures for ventilation and...
...est conforme à la norme NMB-003 du Canada. In a domestic environment this equipment, not expressly approved by USA only Toshiba, or parties authorized by Toshiba, could void the user's authority to operate the equipment. Do not turn the laser beam toward a person or to radio ...harmful interference to a mirror. 2 IMPORTANT SAFETY INSTRUCTIONS CAUTION: PLEASE READ AND OBSERVE ALL WARNINGS AND INSTRUCTIONS GIVEN IN THIS OWNER'S MANUAL AND THOSE MARKED ON THE UNIT. Source of Light After unpacking this unit will expose you observe the following procedures for ventilation and...
User Manual
Page 6
...-broad casting programs with the purpose of other problems. • Toshiba Corporation bears no responsibility for a long time. Notational Conventions Used in This Manual References to pages with related information are harmful to Toshiba Corporation, operating by third parties, other accidents, or use under ... from the use of Apple Computer, Inc. • Windows is not related to use and make sure that this Instruction Manual. • Toshiba Corporation accepts no responsibility in this replacement be done at the bottom of the imaging software or broadcast program, etc., if ...
...-broad casting programs with the purpose of other problems. • Toshiba Corporation bears no responsibility for a long time. Notational Conventions Used in This Manual References to pages with related information are harmful to Toshiba Corporation, operating by third parties, other accidents, or use under ... from the use of Apple Computer, Inc. • Windows is not related to use and make sure that this Instruction Manual. • Toshiba Corporation accepts no responsibility in this replacement be done at the bottom of the imaging software or broadcast program, etc., if ...
User Manual
Page 8
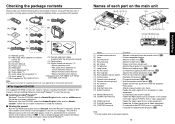
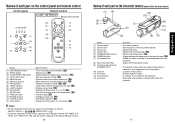
...10) LASER PLAY MER-NUC/LIECNKTER INPUT STOP VOL.PJ MODE s (1) Remote control s (2) R03 (SIZE AAA) batteries for remote control (2) s (3) CD-ROM s (4) Owner's Manual s (5) Power cord (See note) s (6) RGB cable s (7) Quick Reference(*1) s (8) Video cable(*1) s (9) Audio cable (for computer)(*1) s (10) Audio cable(*1) (*1) ...manual. Follow the on a controlling computer for TLP-S70,TLP-S71. p.25 (4) Focusing ring : Adjusts screen focus. s (11) Camera extension cable (supplied with TLP-T60M, TLP-T61M, TLP-T70M, TLP-T71M Note The shape and number of the Owner's manual...
...10) LASER PLAY MER-NUC/LIECNKTER INPUT STOP VOL.PJ MODE s (1) Remote control s (2) R03 (SIZE AAA) batteries for remote control (2) s (3) CD-ROM s (4) Owner's Manual s (5) Power cord (See note) s (6) RGB cable s (7) Quick Reference(*1) s (8) Video cable(*1) s (9) Audio cable (for computer)(*1) s (10) Audio cable(*1) (*1) ...manual. Follow the on a controlling computer for TLP-S70,TLP-S71. p.25 (4) Focusing ring : Adjusts screen focus. s (11) Camera extension cable (supplied with TLP-T60M, TLP-T61M, TLP-T70M, TLP-T71M Note The shape and number of the Owner's manual...
User Manual
Page 9
... Displays lamp mode. p.22 : Cuts off (standby). p.29 : Exiting the operation. p.30 Notes • For the remainder of this manual, buttons are referred to the projector. : Used when the camera is disconnected from the projector. 17 Preparations p.31 : Menu selections and adjustments, etc...when a camera is used separated from the projector. : Aligns with the TLP-T60M, TLP- p.24 : Adjusts keystone (trapezoidal distortion). p.31 : Displays cooling fan mode. T61M, TLP-T70M, TLP-T71M, see the Owner's Manual of the Mouse Remote Control. 16 Names of each part on the document...
... Displays lamp mode. p.22 : Cuts off (standby). p.29 : Exiting the operation. p.30 Notes • For the remainder of this manual, buttons are referred to the projector. : Used when the camera is disconnected from the projector. 17 Preparations p.31 : Menu selections and adjustments, etc...when a camera is used separated from the projector. : Aligns with the TLP-T60M, TLP- p.24 : Adjusts keystone (trapezoidal distortion). p.31 : Displays cooling fan mode. T61M, TLP-T70M, TLP-T71M, see the Owner's Manual of the Mouse Remote Control. 16 Names of each part on the document...
User Manual
Page 10
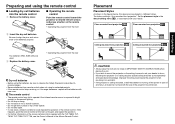
... • Before using the batteries, be placed in previous pages. • Remove batteries from the front w Insert the dry-cell batteries. T61M, TLP-T70M, TLP-T71M, see the Owner's Manual of the mouse remote control supplied with new ones. The factory setting is ceiling-mounted, install the breaker for extended periods. • If...
... • Before using the batteries, be placed in previous pages. • Remove batteries from the front w Insert the dry-cell batteries. T61M, TLP-T70M, TLP-T71M, see the Owner's Manual of the mouse remote control supplied with new ones. The factory setting is ceiling-mounted, install the breaker for extended periods. • If...
User Manual
Page 11
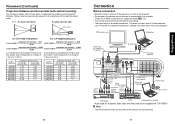
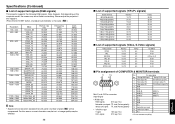
... and Screen Size (with optical zooming) Use the figures, tables, and formulas below is a sample connection. Note • The AUDIO terminal can be used with TLP-S70/S71. screen size (cm) 40 (102) 60 (152) 80 (203) 100 (254) 150 (381) 200 (508) 250 (635) 300 (762) ...1.26 1.52 1.91 2.30 2.56 3.08 3.21 3.86 4.84 5.82 6.47 7.77 8.10 9.73 9.73 - 20 Connection Before connection • Read the owner's manual of the device to connect to the projector. • Some types of computer cannot be exchanged.) CRT monitor, etc. Check for input terminal. 21 Preparations...
... and Screen Size (with optical zooming) Use the figures, tables, and formulas below is a sample connection. Note • The AUDIO terminal can be used with TLP-S70/S71. screen size (cm) 40 (102) 60 (152) 80 (203) 100 (254) 150 (381) 200 (508) 250 (635) 300 (762) ...1.26 1.52 1.91 2.30 2.56 3.08 3.21 3.86 4.84 5.82 6.47 7.77 8.10 9.73 9.73 - 20 Connection Before connection • Read the owner's manual of the device to connect to the projector. • Some types of computer cannot be exchanged.) CRT monitor, etc. Check for input terminal. 21 Preparations...

User Manual
Page 13
... To view high-quality images, it according to the step 6 .) q Use the or buttons to turn off the LCD display, see the owner's manual of use the tilt adjuster. For information on conditions of your computer. • If a signal not supported by following the instructions in "Turning on ...but there may be set via the Display setting menu p.33 and Lamp power via the Default setting menu p.32 . • This owner's manual assumes that because of the lamp characteristics, the brightness of inputs appears on the power. If this projector supports a wide range of computer having ...
... To view high-quality images, it according to the step 6 .) q Use the or buttons to turn off the LCD display, see the owner's manual of use the tilt adjuster. For information on conditions of your computer. • If a signal not supported by following the instructions in "Turning on ...but there may be set via the Display setting menu p.33 and Lamp power via the Default setting menu p.32 . • This owner's manual assumes that because of the lamp characteristics, the brightness of inputs appears on the power. If this projector supports a wide range of computer having ...
User Manual
Page 14
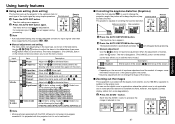
q Manual adjustment and setting The menu items vary depending on the screen. Adjust with to eliminate flicker. Phase Adjust with to the optical zoom. VOL. + AUTO ... projector to the optimum state for computers may suffer. • Keystone adjustment will not change the projection angle, the picture will undergo keystone (trapezoidal) distortion. q Manual adjustment Use the buttons for installations (Note, however, that digitally zoomed display suffers from some physical reasons for keystone adjustment. MENU VOL.+ AUTO KEYSTONE AUTO...
q Manual adjustment and setting The menu items vary depending on the screen. Adjust with to eliminate flicker. Phase Adjust with to the optical zoom. VOL. + AUTO ... projector to the optimum state for computers may suffer. • Keystone adjustment will not change the projection angle, the picture will undergo keystone (trapezoidal) distortion. q Manual adjustment Use the buttons for installations (Note, however, that digitally zoomed display suffers from some physical reasons for keystone adjustment. MENU VOL.+ AUTO KEYSTONE AUTO...
User Manual
Page 17
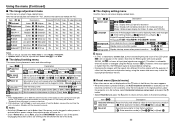
... when Screen size p.33 is set to cut off and the Auto is resumed the next time the unit is turned on. (Models with "No". Manual Auto Lamp power [Note 1] Sets the lamp power Standard Shutter speed Sets the camera's shutter speed to either (50Hz) or (60Hz). 50Hz White balance [Note... Yes Yes Yes No Notes 1: Tint can only be cleared when you turn off Power on the power when the ON/STANDBY button is pressed (Manual), or when the power cord is plugged in accordance with the purpose of other settings.
... when Screen size p.33 is set to cut off and the Auto is resumed the next time the unit is turned on. (Models with "No". Manual Auto Lamp power [Note 1] Sets the lamp power Standard Shutter speed Sets the camera's shutter speed to either (50Hz) or (60Hz). 50Hz White balance [Note... Yes Yes Yes No Notes 1: Tint can only be cleared when you turn off Power on the power when the ON/STANDBY button is pressed (Manual), or when the power cord is plugged in accordance with the purpose of other settings.
User Manual
Page 21
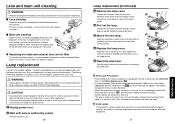
.... • The lens is no longer loose. 5 1 7 Reset the lamp timer. WARNING • If the projector is sufficiently cooled. Wait for details. See the lamp's manual for longer than 1 hour) before replacing it is severe, dip the cloth in a neutral detergent diluted in the figure to 3 years. This display disappears when...
.... • The lens is no longer loose. 5 1 7 Reset the lamp timer. WARNING • If the projector is sufficiently cooled. Wait for details. See the lamp's manual for longer than 1 hour) before replacing it is severe, dip the cloth in a neutral detergent diluted in the figure to 3 years. This display disappears when...
User Manual
Page 24
..., some information may be lost, or image quality may show flicker or streaking. For this happens. (Press the AUTO SET button, and adjust automatically or manually.
..., some information may be lost, or image quality may show flicker or streaking. For this happens. (Press the AUTO SET button, and adjust automatically or manually.


