
Owners Manual
Page 4
... if you are provided for installation, use and servicing. The strong light from the type of Light Do not look into the lens while the lamp is provided or the manufacturer's instructions have been adhered to protect it from battery power, or other instructions. 3. Improper use IMPORTANT SAFETY INSTRUCTIONS CONTENTS 4 CAUTION... not be blocked by the user. For products intended to your home, consult your eyes or sight. The openings should be operated only from the lamp may cause damage to assure personal safety.
... if you are provided for installation, use and servicing. The strong light from the type of Light Do not look into the lens while the lamp is provided or the manufacturer's instructions have been adhered to protect it from battery power, or other instructions. 3. Improper use IMPORTANT SAFETY INSTRUCTIONS CONTENTS 4 CAUTION... not be blocked by the user. For products intended to your home, consult your eyes or sight. The openings should be operated only from the lamp may cause damage to assure personal safety.
Owners Manual
Page 7
If glass components, including lens and lamp, should break, please handle with care to avoid injury and contact your dealer for a long period of glass may cause poisoning. Be careful not to ..., remove the battery to injury. 17. b) Do not load a battery into a fire. Keeping of children's reach. Continued This product incorporates glass components, including a lens and a lamp. If such parts should break, contact your dealer for old batteries in poly bags, etc. Do not throw the batteries into the remote control the...
If glass components, including lens and lamp, should break, please handle with care to avoid injury and contact your dealer for a long period of glass may cause poisoning. Be careful not to ..., remove the battery to injury. 17. b) Do not load a battery into a fire. Keeping of children's reach. Continued This product incorporates glass components, including a lens and a lamp. If such parts should break, contact your dealer for old batteries in poly bags, etc. Do not throw the batteries into the remote control the...

Owners Manual
Page 8
... you to determine that are required, be made by a qualified technician to restore the product to rain or water. Safety Check Upon completion of the lamp only should be sure the service technician has used replacement parts specified by following conditions: a) When the power-supply cord or plug is in performance...
... you to determine that are required, be made by a qualified technician to restore the product to rain or water. Safety Check Upon completion of the lamp only should be sure the service technician has used replacement parts specified by following conditions: a) When the power-supply cord or plug is in performance...

Owners Manual
Page 10
... setting 47 Default setting 49 Reset, Status display (Data setting 52 Maintenance Trouble indications 54 Air filter cleaning 55 Lens and main unit cleaning 56 Lamp replacement 57 Others Before calling service personal 59 Signal assignment for RGB input 60 Applicable RGB signal 61 Controlling the projector by using RS-232C...
... setting 47 Default setting 49 Reset, Status display (Data setting 52 Maintenance Trouble indications 54 Air filter cleaning 55 Lens and main unit cleaning 56 Lamp replacement 57 Others Before calling service personal 59 Signal assignment for RGB input 60 Applicable RGB signal 61 Controlling the projector by using RS-232C...

Owners Manual
Page 11
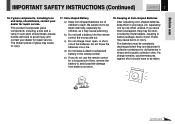
TEMP indicator 54 LAMP indicator 25 54 Infrared remote sensor 15 Foot adjuster release button 19 Lens cover 18 Intake holes Anti-theft lock Air filter 55 Zooming ring 27 Focusing ring 27 Foot adjuster 19 Continued MENU button 33 ON/STANDBY button 25 ON indicator 25 54 CONTENTS 11 SELECT/ADJUST button 34 ( / / / ) ENTER button 34 INPUT button 26 VOL (+) Increase the volume. Before use Names of each part on the main unit VOL (-) Decrease the volume.
TEMP indicator 54 LAMP indicator 25 54 Infrared remote sensor 15 Foot adjuster release button 19 Lens cover 18 Intake holes Anti-theft lock Air filter 55 Zooming ring 27 Focusing ring 27 Foot adjuster 19 Continued MENU button 33 ON/STANDBY button 25 ON indicator 25 54 CONTENTS 11 SELECT/ADJUST button 34 ( / / / ) ENTER button 34 INPUT button 26 VOL (+) Increase the volume. Before use Names of each part on the main unit VOL (-) Decrease the volume.
Owners Manual
Page 15
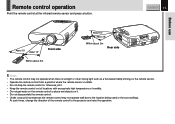
... / DBY Within about 5m Rear side Notes • The remote control may not operate when there is sunlight or other strong light such as a fluorescent lamp shining on the remote sensor. • Operate the remote control from a position where the remote sensor is visible. • Do not drop the remote control...
... / DBY Within about 5m Rear side Notes • The remote control may not operate when there is sunlight or other strong light such as a fluorescent lamp shining on the remote sensor. • Operate the remote control from a position where the remote sensor is visible. • Do not drop the remote control...

Owners Manual
Page 25
All of the buttons on the screen CONTENTS 25 CAUTION - Do not look into the projection lens while operating the projector. Preparation 1 Install and connect the projector properly. 2 Take off the lens cover. 1 Press ON/STANDBY. Projection on the main unit will also light. The projector turns on the connected equipment and put it in green. Continued Operations 2 Indicators Turn on and both the ON and LAMP indicators light up display appears. ON LAMP (Green) Flashing (Green) ON LAMP (Green) (Green) The lamp lights and the start up in playback mode.
All of the buttons on the screen CONTENTS 25 CAUTION - Do not look into the projection lens while operating the projector. Preparation 1 Install and connect the projector properly. 2 Take off the lens cover. 1 Press ON/STANDBY. Projection on the main unit will also light. The projector turns on the connected equipment and put it in green. Continued Operations 2 Indicators Turn on and both the ON and LAMP indicators light up display appears. ON LAMP (Green) Flashing (Green) ON LAMP (Green) (Green) The lamp lights and the start up in playback mode.
Owners Manual
Page 27
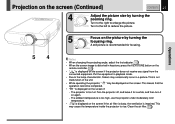
... on the screen (Continued) CONTENTS 27 4 Adjust the picture size by turning the focusing ring. This may cause the temperature inside the projector to the lamp characteristic, flickers may be completed. • " " is impaired. A still picture is displayed on the screen if the projector does not receive any signal from the...
... on the screen (Continued) CONTENTS 27 4 Adjust the picture size by turning the focusing ring. This may cause the temperature inside the projector to the lamp characteristic, flickers may be completed. • " " is impaired. A still picture is displayed on the screen if the projector does not receive any signal from the...

Owners Manual
Page 28
... turns off , unplug the power cord. Notes • Immediately after the power off, the projector may not be turned on while the LAMP indicator is turned off 1 CONTENTS 28 Press ON/STANDBY after turning the power off, the intake and exhaust fans continue to work for a... while to standby mode. (The ON indicator lights in orange.) ON LAMP (Orange) Flashing (Green) ON LAMP (Orange) Flashing (Orange) ON LAMP (Orange) (Off) 3 After confirming the LAMP indicator turns off . An instruction message appears. Turning the power off .
... turns off , unplug the power cord. Notes • Immediately after the power off, the projector may not be turned on while the LAMP indicator is turned off 1 CONTENTS 28 Press ON/STANDBY after turning the power off, the intake and exhaust fans continue to work for a... while to standby mode. (The ON indicator lights in orange.) ON LAMP (Orange) Flashing (Green) ON LAMP (Orange) Flashing (Orange) ON LAMP (Orange) (Off) 3 After confirming the LAMP indicator turns off . An instruction message appears. Turning the power off .

Owners Manual
Page 50
... display which appears when the power turns on by pressing ON/STANDBY with the power cord plugged. Off: Not to the chart on and the lamp lights. Power on: Manual: Auto: The power turns on . When the power cord is plugged, the power turns on page 16 20 . Default setting (Continued...
... display which appears when the power turns on by pressing ON/STANDBY with the power cord plugged. Off: Not to the chart on and the lamp lights. Power on: Manual: Auto: The power turns on . When the power cord is plugged, the power turns on page 16 20 . Default setting (Continued...

Owners Manual
Page 54
... maintenance, unplug the power cord. The power turns off or does not come on . → Malfunction of the unit. • Lamp's life length is over, replace the lamp with new one. • Unplug the power cord and call the dealer. The power turns off or does not come on again.... • Clean the air filter. ON LAMP TEMP Lit Flashing (red) (orange) → Trouble with the intake fan. • Unplug the power cord and call the dealer. Trouble indications If there...
... maintenance, unplug the power cord. The power turns off or does not come on . → Malfunction of the unit. • Lamp's life length is over, replace the lamp with new one. • Unplug the power cord and call the dealer. The power turns off or does not come on again.... • Clean the air filter. ON LAMP TEMP Lit Flashing (red) (orange) → Trouble with the intake fan. • Unplug the power cord and call the dealer. Trouble indications If there...

Owners Manual
Page 57
... on the ceiling, ask the dealer to carry out the maintenance such as cleaning or replacement of the lamp. • When replacing, always use condition.) In such a case, replace the lamp with care to avoid injury due to broken pieces and contact your dealer for repair service. 1 Unplug ...the power cord. Loosen the two fixing screws, and lift up . (Lamp's life length depends on the 1 bottom panel. Lamp replacement The lamp will eventually begin to project dark or dull pictures and finally will be very hot, and may cause burn injuries. ...
... on the ceiling, ask the dealer to carry out the maintenance such as cleaning or replacement of the lamp. • When replacing, always use condition.) In such a case, replace the lamp with care to avoid injury due to broken pieces and contact your dealer for repair service. 1 Unplug ...the power cord. Loosen the two fixing screws, and lift up . (Lamp's life length depends on the 1 bottom panel. Lamp replacement The lamp will eventually begin to project dark or dull pictures and finally will be very hot, and may cause burn injuries. ...

Owners Manual
Page 58
... the total working time at every 1,000 hours (only when plugged in place and tighten two screws. 7 Reset the lamp timer. Slide until it . Do not touch the lamp with your bare hands and do not jolt or damage it hits the bottom and tighten the two fixed screws.... Lamp replacement (Continued) Notes • The projector displays the total working time exceeds about 2,000 hours. • Attach the lamp cover firmly after replacing the lamp. If it is very fragile. Refer to the lamp instructions for resetting. Do not use an exhausted...
... the total working time at every 1,000 hours (only when plugged in place and tighten two screws. 7 Reset the lamp timer. Slide until it . Do not touch the lamp with your bare hands and do not jolt or damage it hits the bottom and tighten the two fixed screws.... Lamp replacement (Continued) Notes • The projector displays the total working time exceeds about 2,000 hours. • Attach the lamp cover firmly after replacing the lamp. If it is very fragile. Refer to the lamp instructions for resetting. Do not use an exhausted...

Owners Manual
Page 59
... No image appears. The colors are dim. The remote control does not work. Cause • The power cord is disconnected. • The lamp cover is not attached correctly. • The ambient temperature of the projection room is too high. • The lens cover is on. &#...Clean the lens. The pictures are strange. Connect the source correctly to the projector. Connect the source correctly to the projector. Replace the lamp. Take off while using the projector. Attach the cover correctly. Press MUTE to clean the lens. Focus the picture. Face the remote...
... No image appears. The colors are dim. The remote control does not work. Cause • The power cord is disconnected. • The lamp cover is not attached correctly. • The ambient temperature of the projection room is too high. • The lens cover is on. &#...Clean the lens. The pictures are strange. Connect the source correctly to the projector. Connect the source correctly to the projector. Replace the lamp. Take off while using the projector. Attach the cover correctly. Press MUTE to clean the lens. Focus the picture. Face the remote...

Owners Manual
Page 64
... 100 - 240V 50/60Hz 180W 2.6Kg 232 x 71 x 276 (mm) (W/H/D) (Except the protrusion parts) Temperature : 0°C to 35°C Humidity : 30% to 70% RH UHP lamp 120W 1W (monaural) Mini D-sub 15-pin Mini DIN 4-pin 1V(p-p), 75Ω, pin jack 1V(p-p), more than 22kΩ, ø3.5mm stereo mini jack...
... 100 - 240V 50/60Hz 180W 2.6Kg 232 x 71 x 276 (mm) (W/H/D) (Except the protrusion parts) Temperature : 0°C to 35°C Humidity : 30% to 70% RH UHP lamp 120W 1W (monaural) Mini D-sub 15-pin Mini DIN 4-pin 1V(p-p), 75Ω, pin jack 1V(p-p), more than 22kΩ, ø3.5mm stereo mini jack...

Owners Manual
Page 66
This warranty also covers accessories of the lamp is purchased and operated in the USA. 5. Labor service charges for installation and adjustment of investigation at prevailing rate. Warranties extend only to ...) days after investigation that the claimed problem was not covered with an equivalent protection. This warranty period of 3LCD Data Projector. LIMITED WARRANTY TOSHIBA TLP-B2 Series 3LCD Data Projector Toshiba America Consumer Products, Inc. (TACP) makes the following conditions. 1. Please contact your dealer for a delivery of a defective product or part. 3. ...
This warranty also covers accessories of the lamp is purchased and operated in the USA. 5. Labor service charges for installation and adjustment of investigation at prevailing rate. Warranties extend only to ...) days after investigation that the claimed problem was not covered with an equivalent protection. This warranty period of 3LCD Data Projector. LIMITED WARRANTY TOSHIBA TLP-B2 Series 3LCD Data Projector Toshiba America Consumer Products, Inc. (TACP) makes the following conditions. 1. Please contact your dealer for a delivery of a defective product or part. 3. ...

