Owners Manual
Page 4
... or sight. If you observe the following procedures for ventilation and to ensure reliable operation of Light Do not look into the lens while the lamp is on the marking label. RETAIN THIS BOOKLET FOR FUTURE REFERENCE. 1. Ventilation Openings in the cabinet are not sure of the type of power source...
... or sight. If you observe the following procedures for ventilation and to ensure reliable operation of Light Do not look into the lens while the lamp is on the marking label. RETAIN THIS BOOKLET FOR FUTURE REFERENCE. 1. Ventilation Openings in the cabinet are not sure of the type of power source...

Owners Manual
Page 7
...product has been exposed to qualified service personnel. 19. Adjust only those controls that area. 18. If glass components, including lens and lamp, should break, please handle with care to injury. Unauthorized substitutions may cause to avoid injury and contact your dealer for service. 17.... this product yourself as the original part. This product incorporates glass components, including a lens and a lamp. Servicing Do not attempt to dangerous voltage or other controls may expose you to service this indicates a need for repair service. ...
...product has been exposed to qualified service personnel. 19. Adjust only those controls that area. 18. If glass components, including lens and lamp, should break, please handle with care to injury. Unauthorized substitutions may cause to avoid injury and contact your dealer for service. 17.... this product yourself as the original part. This product incorporates glass components, including a lens and a lamp. Servicing Do not attempt to dangerous voltage or other controls may expose you to service this indicates a need for repair service. ...

Owners Manual
Page 10
... camera .. 56 Locking the white balance 59 Correcting illuminated defects 60 Maintenance Trouble indications 61 Air filter cleaning 62 Lens and main unit cleaning 64 Lamp replacement 65 Others Before calling service personal 67 Pin assignment of each part on the screen 28 Turning the power off 33 Adjusting the picture...
... camera .. 56 Locking the white balance 59 Correcting illuminated defects 60 Maintenance Trouble indications 61 Air filter cleaning 62 Lens and main unit cleaning 64 Lamp replacement 65 Others Before calling service personal 67 Pin assignment of each part on the screen 28 Turning the power off 33 Adjusting the picture...

Owners Manual
Page 12
... screen. 43 44 Use the selection buttons and the EXIT button to enlarge the image. 38 EXIT button Selection buttons ENTER button MENU button ON LAMP ON / STANDBY ON/STANDBY button 28 33 To turn the projector on the menu. ON indicator 28 33 61...
... screen. 43 44 Use the selection buttons and the EXIT button to enlarge the image. 38 EXIT button Selection buttons ENTER button MENU button ON LAMP ON / STANDBY ON/STANDBY button 28 33 To turn the projector on the menu. ON indicator 28 33 61...

Owners Manual
Page 16
...; About 15° About 15° Notes • The remote control may not operate when there is sunlight or other strong light such as a fluorescent lamp shining on the projector's remote sensor. • Operate the remote control from a position where the remote sensor is visible. • Do not drop the remote...
...; About 15° About 15° Notes • The remote control may not operate when there is sunlight or other strong light such as a fluorescent lamp shining on the projector's remote sensor. • Operate the remote control from a position where the remote sensor is visible. • Do not drop the remote...

Owners Manual
Page 18
... can adjust the vertical projection position with the lens shift dial. 20 Continued Top view Side view Screen Screen 90° KEYSTONE ON / STANDBY ON LAMP TEMP FAN ENTER EXIT AUTO SET VOL / ADJ 90° CONTENTS 18 Installation and connections MENU INPUT Point the lens straight at the center of...
... can adjust the vertical projection position with the lens shift dial. 20 Continued Top view Side view Screen Screen 90° KEYSTONE ON / STANDBY ON LAMP TEMP FAN ENTER EXIT AUTO SET VOL / ADJ 90° CONTENTS 18 Installation and connections MENU INPUT Point the lens straight at the center of...

Owners Manual
Page 19
... out the light with curtains or by other end into the AC IN socket on the lens or the internal optical section to see. ON LAMP ON / STANDBY TEMP FAN Light (Orange) CONTENTS 19 Power cord (Supplied) 4 Take off the lens cover. Do not perform any operations while the three indicators... lit green. Installation and connections Floor-mounted projector placement (continued) 3 Connect the power cord. • Insert one end into a wall outlet. The three indicators, TEMP, LAMP, and ON, light in orange and the projector turns to the standby mode.
... out the light with curtains or by other end into the AC IN socket on the lens or the internal optical section to see. ON LAMP ON / STANDBY TEMP FAN Light (Orange) CONTENTS 19 Power cord (Supplied) 4 Take off the lens cover. Do not perform any operations while the three indicators... lit green. Installation and connections Floor-mounted projector placement (continued) 3 Connect the power cord. • Insert one end into a wall outlet. The three indicators, TEMP, LAMP, and ON, light in orange and the projector turns to the standby mode.

Owners Manual
Page 21
... the projector until the desired tilt angle is insufficient. Adjust this when the highest position by the foot adjusters, since the life duration of the lamp may be adjusted using the foot adjuster. Foot adjuster release button Foot adjuster 2 Lift up . Installation and connections Projector placement angle adjustment (Foot adjuster) CONTENTS...
... the projector until the desired tilt angle is insufficient. Adjust this when the highest position by the foot adjusters, since the life duration of the lamp may be adjusted using the foot adjuster. Foot adjuster release button Foot adjuster 2 Lift up . Installation and connections Projector placement angle adjustment (Foot adjuster) CONTENTS...

Owners Manual
Page 28
.... TEMP FAN (Green) MENU VOL / ADJ ENTER CT-90106 EXIT / P.MODE Operations KEYSTONE Control panel (Main unit side) 1 ON LAMP ON / STANDBY TEMP FAN MENU ENTER EXIT 1 Indicators AUTO SET INPUT VOL / ADJ Notes • The startup screen disappears when you ... screen CONTENTS 28 CAUTION - Preparation 1 Install and connect the projector properly. 2 Take off the lens cover. ON/STANDBY (The LAMP indicator blinks while the lamp is displayed after the startup screen disappears. Continued The projector turns on the menu screen. 51 • When a projector is used...
.... TEMP FAN (Green) MENU VOL / ADJ ENTER CT-90106 EXIT / P.MODE Operations KEYSTONE Control panel (Main unit side) 1 ON LAMP ON / STANDBY TEMP FAN MENU ENTER EXIT 1 Indicators AUTO SET INPUT VOL / ADJ Notes • The startup screen disappears when you ... screen CONTENTS 28 CAUTION - Preparation 1 Install and connect the projector properly. 2 Take off the lens cover. ON/STANDBY (The LAMP indicator blinks while the lamp is displayed after the startup screen disappears. Continued The projector turns on the menu screen. 51 • When a projector is used...
Owners Manual
Page 29
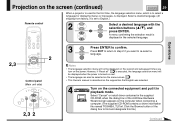
Press EXIT to return to step 2 if you want to re-select a ENTER language. 2,3 ENTER CT-90106 EXIT / P.MODE Control panel (Main unit side) ON LAMP ON / STANDBY TEMP FAN MENU ENTER VOL / ADJ EXIT AUTO SET 2,3 2 INPUT Notes • The language selection menu will be displayed when the power is ...
Press EXIT to return to step 2 if you want to re-select a ENTER language. 2,3 ENTER CT-90106 EXIT / P.MODE Control panel (Main unit side) ON LAMP ON / STANDBY TEMP FAN MENU ENTER VOL / ADJ EXIT AUTO SET 2,3 2 INPUT Notes • The language selection menu will be displayed when the power is ...

Owners Manual
Page 30
... input source is emitted from the menu screen. 45 5-b INPUT Press INPUT and hold for selection. INPUT Operations KEYSTONE Control panel (Main unit side) ON LAMP ON / STANDBY TEMP FAN MENU ENTER VOL / ADJ EXIT AUTO SET INPUT 5-a,5-b 5-b Select the input source to project. Regardless of the contents of input source...
... input source is emitted from the menu screen. 45 5-b INPUT Press INPUT and hold for selection. INPUT Operations KEYSTONE Control panel (Main unit side) ON LAMP ON / STANDBY TEMP FAN MENU ENTER VOL / ADJ EXIT AUTO SET INPUT 5-a,5-b 5-b Select the input source to project. Regardless of the contents of input source...
Owners Manual
Page 32
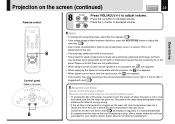
...occur. It is made using extremely advanced technology, but there may occasionally occur in use the panel for replacement.) INPUT The state of the lamp being extinguished helps enhance the effect of the LCD panel is clogged up, the main unit inner temperature rises. VOL/ADJ Press the (-) ... ON / STANDBY AUTO SET FREEZE MUTE PIP CALL RESIZE MENU VOL / ADJ 8 ENTER CT-90106 EXIT / P.MODE Control panel (Main unit side) ON LAMP ON / STANDBY TEMP FAN MENU ENTER VOL / ADJ EXIT AUTO SET 8 Notes • To change the projecting angle, adjust the foot adjuster. 21 •...
...occur. It is made using extremely advanced technology, but there may occasionally occur in use the panel for replacement.) INPUT The state of the lamp being extinguished helps enhance the effect of the LCD panel is clogged up, the main unit inner temperature rises. VOL/ADJ Press the (-) ... ON / STANDBY AUTO SET FREEZE MUTE PIP CALL RESIZE MENU VOL / ADJ 8 ENTER CT-90106 EXIT / P.MODE Control panel (Main unit side) ON LAMP ON / STANDBY TEMP FAN MENU ENTER VOL / ADJ EXIT AUTO SET 8 Notes • To change the projecting angle, adjust the foot adjuster. 21 •...

Owners Manual
Page 33
... STANDBY AUTO SET FREEZE MUTE PIP CALL RESIZE 1,2 MENU VOL / ADJ ENTER CT-90106 EXIT / P.MODE 1,2 INPUT Control panel (Main unit side) ON LAMP ON / STANDBY TEMP FAN 2 Indicators MENU ENTER VOL / ADJ EXIT AUTO SET 2 ON/STANDBY ON/STANDBY Press ON/STANDBY again. The power cannot be ...shortened. Cutting the power by unplugging the power cord while the projector is operating or the light source lamp is necessary. We recommend you may unplug the power cord at a high temperature, it may not light and it's life duration will be...
... STANDBY AUTO SET FREEZE MUTE PIP CALL RESIZE 1,2 MENU VOL / ADJ ENTER CT-90106 EXIT / P.MODE 1,2 INPUT Control panel (Main unit side) ON LAMP ON / STANDBY TEMP FAN 2 Indicators MENU ENTER VOL / ADJ EXIT AUTO SET 2 ON/STANDBY ON/STANDBY Press ON/STANDBY again. The power cannot be ...shortened. Cutting the power by unplugging the power cord while the projector is operating or the light source lamp is necessary. We recommend you may unplug the power cord at a high temperature, it may not light and it's life duration will be...

Owners Manual
Page 34
... analog signals are sampled. AUTO SET The icon appears during signal processing. Operations KEYSTONE ENTER CT-90106 EXIT / P.MODE Control panel (Main unit side) ON LAMP ON / STANDBY TEMP FAN MENU ENTER VOL / ADJ EXIT AUTO SET 2 Notes • Automatic adjustment may not be performed properly for images that are adjusted...
... analog signals are sampled. AUTO SET The icon appears during signal processing. Operations KEYSTONE ENTER CT-90106 EXIT / P.MODE Control panel (Main unit side) ON LAMP ON / STANDBY TEMP FAN MENU ENTER VOL / ADJ EXIT AUTO SET 2 Notes • Automatic adjustment may not be performed properly for images that are adjusted...

Owners Manual
Page 35
... 1 INPUT KEYSTONE ON / STANDBY AUTO SET FREEZE MUTE PIP CALL RESIZE MENU VOL / ADJ ENTER CT-90106 EXIT / P.MODE 2 3 Control panel (Main unit side) ON LAMP ON / STANDBY TEMP FAN MENU ENTER VOL / ADJ EXIT AUTO SET 2 31 1 KEYSTONE Press KEYSTONE. The projector can correct this keystone distortion.
... 1 INPUT KEYSTONE ON / STANDBY AUTO SET FREEZE MUTE PIP CALL RESIZE MENU VOL / ADJ ENTER CT-90106 EXIT / P.MODE 2 3 Control panel (Main unit side) ON LAMP ON / STANDBY TEMP FAN MENU ENTER VOL / ADJ EXIT AUTO SET 2 31 1 KEYSTONE Press KEYSTONE. The projector can correct this keystone distortion.

Owners Manual
Page 40
... is displayed. current input source H-resolution - the vertical resolution of the input signal (at RGB input) H-frequency - the polarity of the lamp Version - the elapsed usage time of the sync signal (at Video, S-Video input) Signal format- the color mode of the firmware Shutter ...video signal (at RGB input) Video mode - To refresh the information, turn off if any other operation is performed. • The "Lamp time" shows an approximate time for servicing, etc. CONTENTS 40 Operations Remote control CALL INPUT KEYSTONE ON / STANDBY AUTO SET FREEZE MUTE PIP...
... is displayed. current input source H-resolution - the vertical resolution of the input signal (at RGB input) H-frequency - the polarity of the lamp Version - the elapsed usage time of the sync signal (at Video, S-Video input) Signal format- the color mode of the firmware Shutter ...video signal (at RGB input) Video mode - To refresh the information, turn off if any other operation is performed. • The "Lamp time" shows an approximate time for servicing, etc. CONTENTS 40 Operations Remote control CALL INPUT KEYSTONE ON / STANDBY AUTO SET FREEZE MUTE PIP...

Owners Manual
Page 42
... KEYSTONE ON / STANDBY AUTO SET FREEZE MUTE PIP CALL RESIZE MENU VOL / ADJ ENTER CT-90106 EXIT / P.MODE 6 5,7 P.MODE Control panel (Main unit side) ON LAMP ON / STANDBY TEMP FAN MENU ENTER VOL / ADJ EXIT AUTO SET 3 4 Adjust the projector before presentation if necessary.
... KEYSTONE ON / STANDBY AUTO SET FREEZE MUTE PIP CALL RESIZE MENU VOL / ADJ ENTER CT-90106 EXIT / P.MODE 6 5,7 P.MODE Control panel (Main unit side) ON LAMP ON / STANDBY TEMP FAN MENU ENTER VOL / ADJ EXIT AUTO SET 3 4 Adjust the projector before presentation if necessary.

Owners Manual
Page 43
... select other items, press EXIT repeatedly until GUIDE MENU disappears. [Reset] [Default setting] [Display] [Audio] End Control panel (Main unit side) ENTER MENU Selection ON LAMP ON / STANDBY TEMP FAN EXIT MENU ENTER VOL / ADJ EXIT AUTO SET INPUT Remote control MENU MENU VOL / ADJ ENTER ENTER CT-90106 EXIT / P.MODE...
... select other items, press EXIT repeatedly until GUIDE MENU disappears. [Reset] [Default setting] [Display] [Audio] End Control panel (Main unit side) ENTER MENU Selection ON LAMP ON / STANDBY TEMP FAN EXIT MENU ENTER VOL / ADJ EXIT AUTO SET INPUT Remote control MENU MENU VOL / ADJ ENTER ENTER CT-90106 EXIT / P.MODE...

Owners Manual
Page 44
... whose the choices are displayed; The Item selected is displayed; This state does not in fact. Control panel (Main unit side) ENTER MENU Selection ON LAMP ON / STANDBY TEMP FAN EXIT MENU ENTER VOL / ADJ EXIT AUTO SET INPUT Remote control MENU MENU VOL / ADJ ENTER ENTER CT-90106 EXIT / P.MODE...
... whose the choices are displayed; The Item selected is displayed; This state does not in fact. Control panel (Main unit side) ENTER MENU Selection ON LAMP ON / STANDBY TEMP FAN EXIT MENU ENTER VOL / ADJ EXIT AUTO SET INPUT Remote control MENU MENU VOL / ADJ ENTER ENTER CT-90106 EXIT / P.MODE...

Owners Manual
Page 57
... camera input mode. • Pressing CAMERA again will return the input selection to the document imaging camera's picture. INPUT Control panel (Main unit side) ON LAMP ON / STANDBY TEMP FAN MENU ENTER VOL / ADJ EXIT AUTO SET 3 Camera control panel LOCK W.BALANCE ARM LIGHT CAMERA GAIN CAMERA 3 Down: To enlarge. 123...
... camera input mode. • Pressing CAMERA again will return the input selection to the document imaging camera's picture. INPUT Control panel (Main unit side) ON LAMP ON / STANDBY TEMP FAN MENU ENTER VOL / ADJ EXIT AUTO SET 3 Camera control panel LOCK W.BALANCE ARM LIGHT CAMERA GAIN CAMERA 3 Down: To enlarge. 123...


